Installing SSL certificate on Zimbra
Let us explain how to install SSL certificates in Zimbra. After activating the SSL code with the CSR code and fulfilling all verification requirements, an SSL certificate will be issued and sent to your email address. When the certificate is received, you can start the installation process.
Zimbra's mail server supports two possible ways to set up SSL:

')
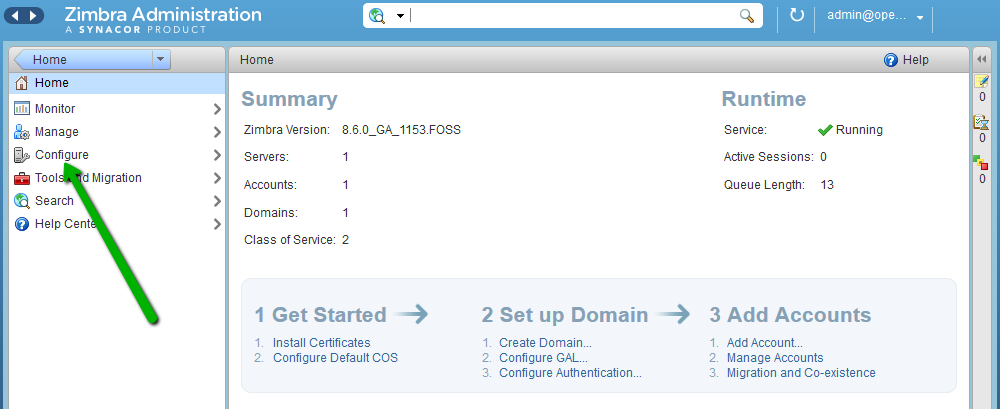
1. Click "Customize" in the left list of the main menu:
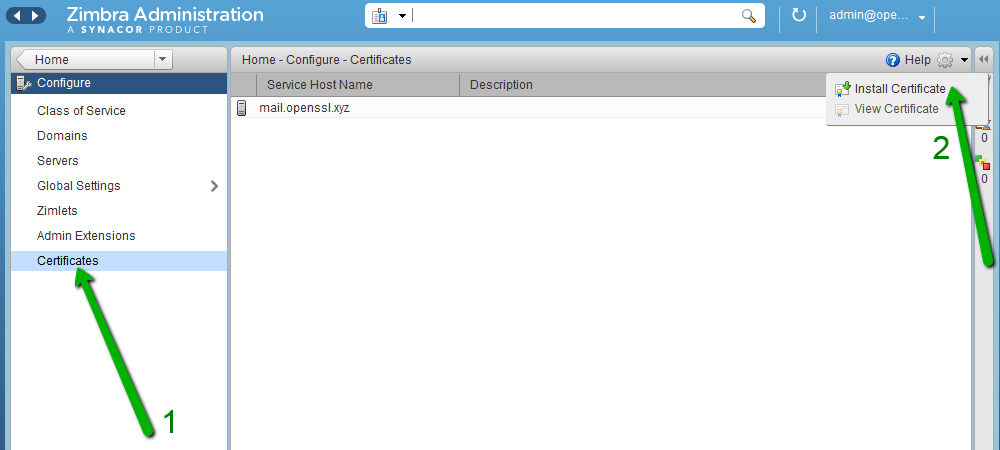
2. In the next window, click "Certificates" and select the "Install Certificate" option:
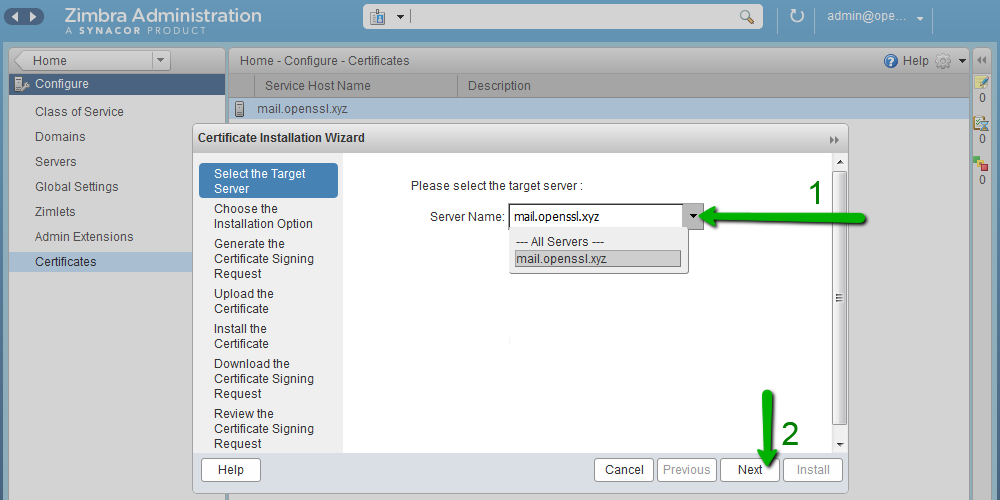
3. You will see a separate window in which you need to select the desired mail server. Then click "Next":
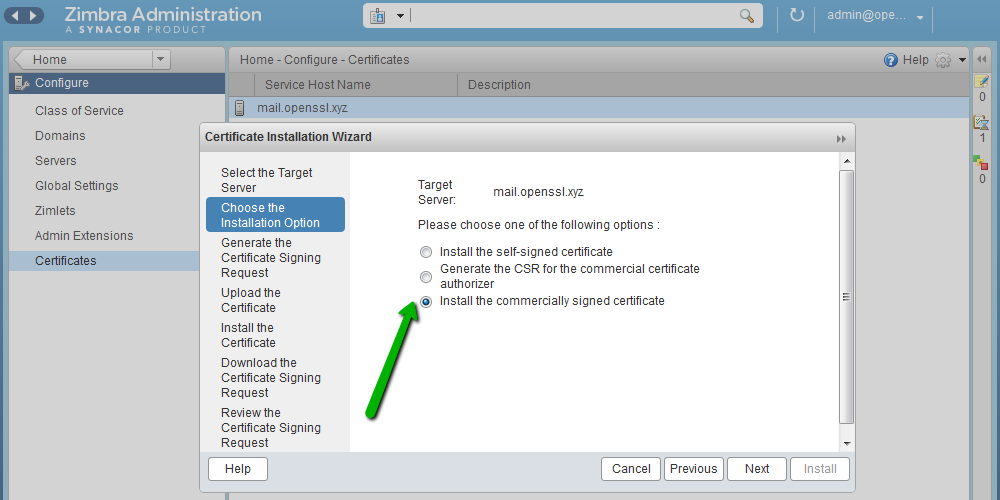
4. Select “Install a commercially signed certificate” to begin the installation process:
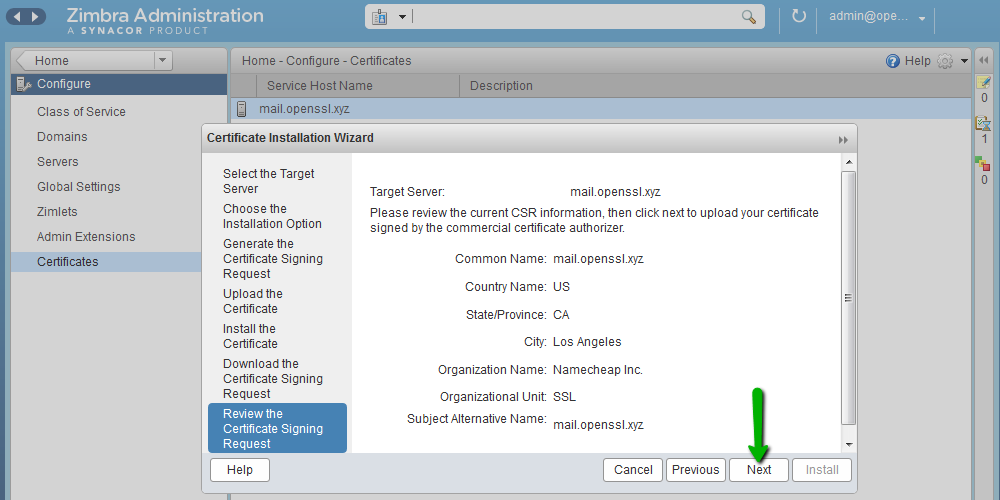
5. Review all the information that was used to generate the CSR. If the information is correct, click the Next button:
6. Download the SSL certificate file, root certificate, and intermediate certificates from the Certificate Authority.

7. In the next step, click "Install" to install the selected SSL certificate. The installation process may take several minutes:

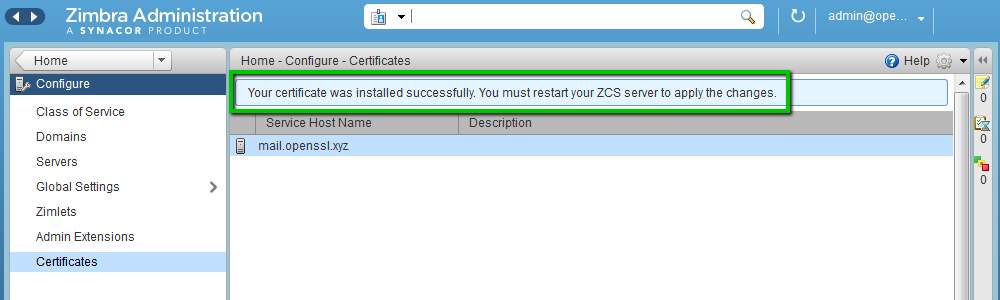
8. When the SSL installation process is complete, you will see the notification:
9. To apply the changes, you need to restart Zimbra services, such as the zimbra user, in a CLI session:
After the default user switches to the zimbra user, run this command to restart the services:
10. When all services are restarted, you can check the new SSL certificate details here:

An SSL certificate was successfully installed for the following services:
LDAP service: port 389
Mailbox service: ports 8443, 7071
MTA service: ports 25 (SMTP TLS), 465 (SMTP SSL), 7110 (POP3 TLS), 7143 (IMAP TLS), 7993 (IMAP SSL), 7995 (POP3 SSL)
Proxy service: 443, 110 (POP3 TLS), 143 (IMAP TLS), 993 (IMAP SSL), 995 (POP3 SSL).

With this online tool you can verify the SSL installation.
The Zimbra package has a “zmcertmgr” tool for managing SSL certificates.
For version 8.6 or lower, this tool should run as root. Run this command in the terminal to switch from the default user to the root:
Starting with version 8.7, this tool should run as a zimbra user. Run these commands to switch from the default user to the zimbra user:
1. To start the installation process, you need to temporarily upload the SSL certificate file (server_domain_com.crt) and the CA package file (server_domain_com.ca-bundle) to any folder on your hosting server. In this example, the SSL files are uploaded to the / opt / directory.
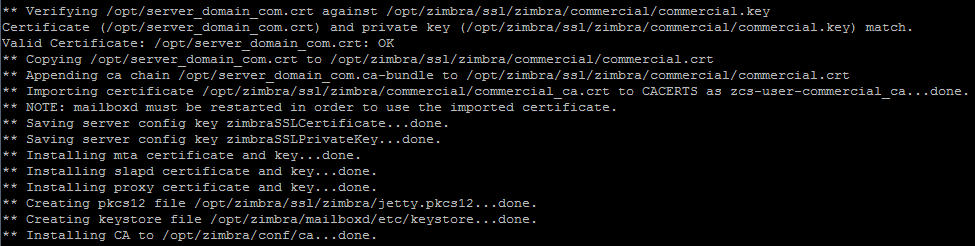
2. Ensure that your certificate from the certification authority corresponds to the private key created with the CSR:
/ opt / zimbra / bin / zmcertmgr verifycrt comm
/opt/zimbra/ssl/zimbra/commercial/commercial.key /opt/server_domain_com.crt /opt/server_domain_com.ca-bundle
The result should look like this:

3. Deploy your commercial certificate.
/ opt / zimbra / bin / zmcertmgr deploycrt comm /opt/server_domain_com.crt /opt/server_domain_com.ca-bundle
Successful output should look like this:
4. Verify that the correct certificate has been deployed.
/ opt / zimbra / bin / zmcertmgr viewdeployedcrt
For example, information about the PositiveSSL certificate will look like this:

5. To apply the changes, you need to restart Zimbra services, such as the zimbra user:
When the default user switches to the zimbra user, run this command to restart the services:
When all services have rebooted, the new SSL certificate data can be verified with this online tool .
Zimbra's mail server supports two possible ways to set up SSL:
- zimbra administration console (web interface)
- zimbra certificate manager (command line interface)
Installing SSL certificate through Zimbra Administration Console
')
1. Click "Customize" in the left list of the main menu:
2. In the next window, click "Certificates" and select the "Install Certificate" option:
3. You will see a separate window in which you need to select the desired mail server. Then click "Next":
4. Select “Install a commercially signed certificate” to begin the installation process:
5. Review all the information that was used to generate the CSR. If the information is correct, click the Next button:
6. Download the SSL certificate file, root certificate, and intermediate certificates from the Certificate Authority.
7. In the next step, click "Install" to install the selected SSL certificate. The installation process may take several minutes:
8. When the SSL installation process is complete, you will see the notification:
9. To apply the changes, you need to restart Zimbra services, such as the zimbra user, in a CLI session:
sudo su
su zimbra
After the default user switches to the zimbra user, run this command to restart the services:
zmcontrol restart10. When all services are restarted, you can check the new SSL certificate details here:
An SSL certificate was successfully installed for the following services:
LDAP service: port 389
Mailbox service: ports 8443, 7071
MTA service: ports 25 (SMTP TLS), 465 (SMTP SSL), 7110 (POP3 TLS), 7143 (IMAP TLS), 7993 (IMAP SSL), 7995 (POP3 SSL)
Proxy service: 443, 110 (POP3 TLS), 143 (IMAP TLS), 993 (IMAP SSL), 995 (POP3 SSL).
With this online tool you can verify the SSL installation.
Installing SSL certificate through Zimbra Certificate Manager (command line interface)
The Zimbra package has a “zmcertmgr” tool for managing SSL certificates.
For version 8.6 or lower, this tool should run as root. Run this command in the terminal to switch from the default user to the root:
sudo suStarting with version 8.7, this tool should run as a zimbra user. Run these commands to switch from the default user to the zimbra user:
sudo su
su zimbra
1. To start the installation process, you need to temporarily upload the SSL certificate file (server_domain_com.crt) and the CA package file (server_domain_com.ca-bundle) to any folder on your hosting server. In this example, the SSL files are uploaded to the / opt / directory.
2. Ensure that your certificate from the certification authority corresponds to the private key created with the CSR:
/ opt / zimbra / bin / zmcertmgr verifycrt comm
/opt/zimbra/ssl/zimbra/commercial/commercial.key /opt/server_domain_com.crt /opt/server_domain_com.ca-bundle
The result should look like this:
3. Deploy your commercial certificate.
/ opt / zimbra / bin / zmcertmgr deploycrt comm /opt/server_domain_com.crt /opt/server_domain_com.ca-bundle
Successful output should look like this:
4. Verify that the correct certificate has been deployed.
/ opt / zimbra / bin / zmcertmgr viewdeployedcrt
For example, information about the PositiveSSL certificate will look like this:
5. To apply the changes, you need to restart Zimbra services, such as the zimbra user:
sudo su
su zimbra
When the default user switches to the zimbra user, run this command to restart the services:
zmcontrol restartWhen all services have rebooted, the new SSL certificate data can be verified with this online tool .
Source: https://habr.com/ru/post/341996/
All Articles