Web application on Node and Vue, part 3: client and server development
Today we are publishing the third part of a series of materials devoted to the development of the Budget Manager application using Node.js, Vue.js and MongoDB. In the first and second parts, we created a server, set up authentication mechanisms and were engaged in arranging the frontend. In this material we will continue to work on the client and server parts of the system. What has already been created, while almost does not concern the logic of the application itself, which is designed to work with financial documents. Therefore, among other things, we will deal with this aspect of the project.

To begin, I would like to thank the user @OmgImAlexis for pointing out the problem with the background image, that I do not have rights to use it, and for recommending this resource with freely available images.
Therefore, today we will start by replacing the background image used in the project to this (do not forget to reduce the image if you are going to deploy the application). If you want to use a thumbnail right away, you can take it from my repository .
')
After downloading the image, go to the file component
Here we added the
This is due to the fact that Vuetify uses a white background for the application pages. Now, while still in the
Here we changed the
Now open the
Here we have redefined several styles of Vuetify, the reason for this is in the features of the

Now go to the file
Here we have changed the promise so that, having parsed the
Next, edit the
We replaced the first promis with the switch function, since we do not receive a response from the POST request. In addition, here we no longer set the token. Instead, call the
We made these corrections to the project, because, otherwise, after registering in the system, the user will be redirected as if he is authenticated, but we do not authenticate him, as a result, the system will not work as expected.
Now, right below the
Then, immediately after the
Here you can leave everything as it is, or, to convert the
A common flaw in JS code is to use logical expressions to cast certain values to a logical type instead of applying a construct with an exclamation mark. Usually this option looks like this:
Before tackling the homepage component, create a header for it. To do this, go to the
Now we have a fairly simple component preparation. There is only a field to enter a search query, linked to data from
Open a partial
Now we define the components in the router. To do this, open the
Here, we first import the
In terms of tag names, I would like to quote from the documentation for Vue.js:
Please note that Vue does not require compliance with W3C rules for user tag names (such as requirements for using only lower case and hyphens), although following these conventions is considered good practice.
Now it’s the turn of the router:
Here we point out that the default component for the home page is
We will deal with the
As usual - open the component file, which we are going to do. To do this, go to the
Here we display the header, represented by the
Here we apply the
In addition, we, as properties, transfer to
Go to the
This is just a header for the document list page.
Now, in the same folder, create another component file and give it the name
Here we describe the body of the page, and how it will look in different environments, and, we are guided by mobile devices.
Now, finally, create the
Notice the
Now you need to add the
As before, we import components here, register them, and enable the
Let's return to the server part of the project, work on the API. For a start, let's clean it up a bit. To do this, open the file
Here we have deleted the
Now let's work on the
Here we removed the routes that were needed for the old methods.
Let's go to the
In addition, create a few more models. Let's start with the model that will be in the
Now let's work on the model, which will be in the
Now we do not need to use mutable arrays, which increase as we work with them. Instead, we use links to specify exactly which users and clients we need, using
Open the
Now we need to add methods for new models to the API, so go to the
There is a method for creating new customers and for getting their full list. These methods are protected by the use of JWT authentication.
Now create another file, let's call it
Its methods, as in the previous case, are protected by JWT authentication. One of these three methods is used to create new documents, the second to get a list of all documents related to a user account, and another one to get all documents for a specific client.
Go to the
Then create the
Both of these files are similar. In them, we first call the
Now, if we use Postman to register clients and documents associated with them, this is what happens:
In this material, we corrected some of the shortcomings, worked on the client and server parts of the application, starting the implementation of its main logic. Next time we will continue to develop the project, in particular, we will develop mechanisms for registering new clients and creating related financial documents.
Now, while the next article in this series has not yet come out, we suggest that everyone, as an exercise, make a fork of the repository of the author of this material and try to independently realize the means for registering clients and documents.
Dear readers! If you decide to do your homework, please tell us what happened.
Several fixes
To begin, I would like to thank the user @OmgImAlexis for pointing out the problem with the background image, that I do not have rights to use it, and for recommending this resource with freely available images.
Therefore, today we will start by replacing the background image used in the project to this (do not forget to reduce the image if you are going to deploy the application). If you want to use a thumbnail right away, you can take it from my repository .
')
After downloading the image, go to the file component
App.vue and replace the image that was before. In addition, edit the styles: <style lang="scss"> @import "./assets/styles"; body { background: url('./assets/images/background.jpg') no-repeat center center fixed; background-size: cover; &:after { content: ''; position: fixed; width: 100%; height: 100%; top: 0; left: 0; background-color: $background-tint; opacity: .3; z-index: -1; } .application { background: none; } } </style> Here we added the
background-size: cover property and the following construction: .application { background: none; } This is due to the fact that Vuetify uses a white background for the application pages. Now, while still in the
App.vue file, App.vue 's make some changes to the template: <template> <v-app> <v-container> <router-view/> </v-container> </v-app> </template> Here we changed the
div id="app" to a v-app , this is the main component from Vuetify.Now open the
Authentication.vue component file and make some changes to the styles: <style lang="scss"> @import "./../../../assets/styles"; .l-auth { background-color: $background-color; padding: 15px; margin: 45px auto; min-width: 272px; max-width: 320px; animation: bounceIn 1s forwards ease; label, input, .icon { color: #29b6f6!important; } .input-group__details { &:before { background-color: $border-color-input !important; } } } .l-signup { @extend .l-auth; animation: slideInFromLeft 1s forwards ease; } </style> Here we have redefined several styles of Vuetify, the reason for this is in the features of the
v-app . In addition, we expanded the l-auth class, since our l-signup class is exactly the same, the differences are only in the animation. As a result, the application will look like this:Now go to the file
index.js , which is located in the Authentication folder. First, we will make changes to the authenticate method: authenticate (context, credentials, redirect) { Axios.post(`${BudgetManagerAPI}/api/v1/auth`, credentials) .then(({data}) => { context.$cookie.set('token', data.token, '1D') context.$cookie.set('user_id', data.user._id, '1D') context.validLogin = true this.user.authenticated = true if (redirect) router.push(redirect) }).catch(({response: {data}}) => { context.snackbar = true context.message = data.message }) }, Here we have changed the promise so that, having parsed the
data object, we extract the user ID from it, since we intend to store this id .Next, edit the
signup method: signup (context, credentials, redirect) { Axios.post(`${BudgetManagerAPI}/api/v1/signup`, credentials) .then(() => { context.validSignUp = true this.authenticate(context, credentials, redirect) }).catch(({response: {data}}) => { context.snackbar = true context.message = data.message }) }, We replaced the first promis with the switch function, since we do not receive a response from the POST request. In addition, here we no longer set the token. Instead, call the
authenticate method.We made these corrections to the project, because, otherwise, after registering in the system, the user will be redirected as if he is authenticated, but we do not authenticate him, as a result, the system will not work as expected.
Now, right below the
signup method, add the signout method: signout (context, redirect) { context.$cookie.delete('token') context.$cookie.delete('user_id') this.user.authenticated = false if (redirect) router.push(redirect) }, Then, immediately after the
signout method, signout make small changes to the checkAuthentication method: checkAuthentication () { const token = document.cookie this.user.authenticated = !!token }, Here you can leave everything as it is, or, to convert the
token constant to a boolean value, use the ternary comparison operator.A common flaw in JS code is to use logical expressions to cast certain values to a logical type instead of applying a construct with an exclamation mark. Usually this option looks like this:
this.user.authenticated = token ? true : false Development of the Header component
Before tackling the homepage component, create a header for it. To do this, go to the
components folder and create a file Header.vue : <template> <header class="l-header-container"> <v-layout row wrap> <v-flex xs12 md5> <v-text-field v-model="search" label="Search" append-icon="search" color="light-blue lighten-1"> </v-text-field> </v-flex> <v-flex xs12 offset-md1 md1> <v-btn block color="light-blue lighten-1">Clients</v-btn> </v-flex> <v-flex xs12 offset-md1 md2> <v-select label="Status" color="light-blue lighten-1" v-model="status" :items="statusItems" single-line> </v-select> </v-flex> <v-flex xs12 offset-md1 md1> <v-btn block color="red lighten-1 white--text" @click.native="submitSignout()">Sign out</v-btn> </v-flex> </v-layout> </header> </template> <script> import Authentication from '@/components/pages/Authentication' export default { data () { return { search: '', status: '', statusItems: [ 'All', 'Approved', 'Denied', 'Waiting', 'Writing', 'Editing' ] } }, methods: { submitSignout () { Authentication.signout(this, '/login') } } } </script> <style lang="scss"> @import "./../assets/styles"; .l-header-container { background-color: $background-color; margin: 0 auto; padding: 0 15px; min-width: 272px; label, input, .icon, .input-group__selections__comma { color: #29b6f6!important; } .input-group__details { &:before { background-color: $border-color-input !important; } } .btn { margin-top: 15px; } } </style> Now we have a fairly simple component preparation. There is only a field to enter a search query, linked to data from
search , a button to go to the clients page, which we will deal with later, a switch to filter documents and a button to exit the system.Open a partial
_variables template, add color information there, and set the background-color transparency to 0.7 : // Colors $background-tint: #1734C1; $background-color: rgba(0, 0, 0, .7); $border-color-input: rgba(255, 255, 255, 0.42); Now we define the components in the router. To do this, open the
index.js file in the router folder and bring it to this form: // Pages import Home from '@/components/pages/Home' import Authentication from '@/components/pages/Authentication/Authentication' // Global components import Header from '@/components/Header' // Register components Vue.component('app-header', Header) Vue.use(Router) Here, we first import the
Home component, then the Header component, and then register it, keeping in mind that the @ sign when using the webpack is a pseudonym for the src folder. App-header is the tag name that we will use to output the Header component.In terms of tag names, I would like to quote from the documentation for Vue.js:
Please note that Vue does not require compliance with W3C rules for user tag names (such as requirements for using only lower case and hyphens), although following these conventions is considered good practice.
Now it’s the turn of the router:
const router = new Router({ routes: [ { path: '/', name: 'Home', components: { default: Home, header: Header }, meta: { requiredAuth: true } }, { path: '/login', name: 'Authentication', component: Authentication } ] }) Here we point out that the default component for the home page is
Home , and also include the Header component on this page. Please note that here we do not make any changes to the route to enter the system. The Header component representing the page Header is not needed there.We will deal with the
Header component later, but at this stage of work we are satisfied with its current state.Development of the Home component
As usual - open the component file, which we are going to do. To do this, go to the
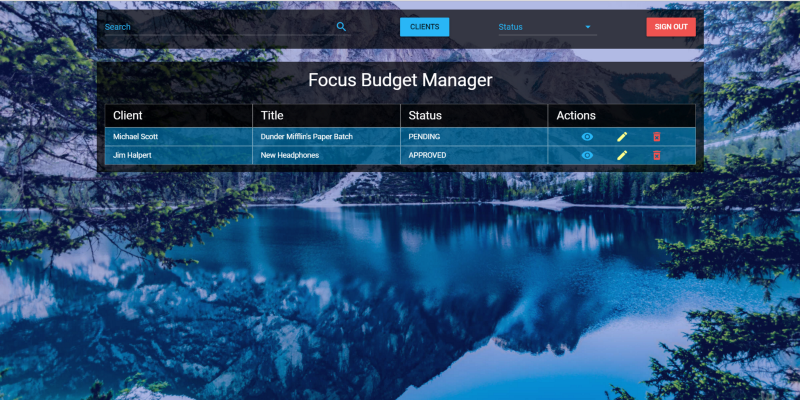
pages folder and open the Home.vue file: <template> <main class="l-home-page"> <app-header></app-header> <div class="l-home"> <h4 class="white--text text-xs-center my-0"> Focus Budget Manager </h4> <budget-list> <budget-list-header slot="budget-list-header"></budget-list-header> <budget-list-body slot="budget-list-body" :budgets="budgets"></budget-list-body> </budget-list> </div> </main> </template> <script> import Axios from 'axios' import Authentication from '@/components/pages/Authentication' import BudgetListHeader from './../Budget/BudgetListHeader' import BudgetListBody from './../Budget/BudgetListBody' const BudgetManagerAPI = `http://${window.location.hostname}:3001` export default { components: { 'budget-list-header': BudgetListHeader, 'budget-list-body': BudgetListBody }, data () { return { budgets: [] } }, mounted () { this.getAllBudgets() }, methods: { getAllBudgets () { Axios.get(`${BudgetManagerAPI}/api/v1/budget`, { headers: { 'Authorization': Authentication.getAuthenticationHeader(this) }, params: { user_id: this.$cookie.get('user_id') } }).then(({data}) => (this.budgets = data)) } } } </script> <style lang="scss" scoped> @import "./../../assets/styles"; .l-home { background-color: $background-color; margin: 25px auto; padding: 15px; min-width: 272px; } </style> Here we display the header, represented by the
h4 tag, containing the name of the application. The following classes are assigned to it:white--text: used to color the text in white.text-xs-center: used to center the text along thexaxis.my-0: used to set theyaxis fields to0.
Here we apply the
budget-list component, which we will create below. It includes the budget-list-header and budget-list-body components, which play the role of data slots.In addition, we, as properties, transfer to
budget-list-body array of financial budgets documents, the data from which are extracted when the component is mounted. We pass the Authorization header, which gives us the opportunity to work with the API. It is also transmitted here as a parameter, user_id , which makes it possible to indicate which user is requesting data.Development of components for working with the list of documents
Go to the
components folder and create a new folder called Budget in it. Inside this folder, create a component file BudgetListHeader.vue : <template> <header class="l-budget-header"> <div class="md-budget-header white--text">Client</div> <div class="md-budget-header white--text">Title</div> <div class="md-budget-header white--text">Status</div> <div class="md-budget-header white--text">Actions</div> </header> </template> <script> export default {} </script> <style lang="scss"> @import "./../../assets/styles"; .l-budget-header { display: none; width: 100%; @media (min-width: 601px) { margin: 25px 0 0; display: flex; } .md-budget-header { width: 100%; background-color: $background-color; border: 1px solid $border-color-input; padding: 0 15px; display: flex; height: 45px; align-items: center; justify-content: center; font-size: 22px; @media (min-width: 601px) { justify-content: flex-start; } } } </style> This is just a header for the document list page.
Now, in the same folder, create another component file and give it the name
BudgetListBody.vue : <template> <section class="l-budget-body"> <div class="md-budget" v-if="budgets != null" v-for="budget in budgets"> <div class="md-budget-info white--text">{{ budget.client }}</div> <div class="md-budget-info white--text">{{ budget.title }}</div> <div class="md-budget-info white--text">{{ budget.state }}</div> <div class="l-budget-actions"> <v-btn small flat color="light-blue lighten-1"> <v-icon small>visibility</v-icon> </v-btn> <v-btn small flat color="yellow accent-1"> <v-icon>mode_edit</v-icon> </v-btn> <v-btn small flat color="red lighten-1"> <v-icon>delete_forever</v-icon> </v-btn> </div> </div> </section> </template> <script> export default { props: ['budgets'] } </script> <style lang="scss"> @import "./../../assets/styles"; .l-budget-body { display: flex; flex-direction: column; .md-budget { width: 100%; display: flex; flex-direction: column; margin: 15px 0; @media (min-width: 960px) { flex-direction: row; margin: 0; } .md-budget-info { flex-basis: 25%; width: 100%; background-color: rgba(0, 175, 255, 0.45); border: 1px solid $border-color-input; padding: 0 15px; display: flex; height: 35px; align-items: center; justify-content: center; &:first-of-type, &:nth-of-type(2) { text-transform: capitalize; } &:nth-of-type(3) { text-transform: uppercase; } @media (min-width: 601px) { justify-content: flex-start; } } .l-budget-actions { flex-basis: 25%; display: flex; background-color: rgba(0, 175, 255, 0.45); border: 1px solid $border-color-input; align-items: center; justify-content: center; .btn { min-width: 45px !important; margin: 0 5px !important; } } } } </style> Here we describe the body of the page, and how it will look in different environments, and, we are guided by mobile devices.
Now, finally, create the
BudgetList.vue file in the same folder and add the code of the corresponding component to it: <template> <section class="l-budget-list-container"> <slot name="budget-list-header"></slot> <slot name="budget-list-body"></slot> </section> </template> <script> export default {} </script> Notice the
slot tags. In them we deduce components. These tags are called named slots.Now you need to add the
BudgetList component to the router: // ... // Global components import Header from '@/components/Header' import BudgetList from '@/components/Budget/BudgetList' // Register components Vue.component('app-header', Header) Vue.component('budget-list', BudgetList) // ... const router = new Router({ routes: [ { path: '/', name: 'Home', components: { default: Home, header: Header, budgetList: BudgetList }, meta: { requiredAuth: true } }, { path: '/login', name: 'Authentication', component: Authentication } ] }) // ... export default router As before, we import components here, register them, and enable the
Home component to use them.RESTful API Refinement
Let's return to the server part of the project, work on the API. For a start, let's clean it up a bit. To do this, open the file
user.js from the services/BudgetManagerAPI/app/api folder and bring it to this form: const mongoose = require('mongoose'); const api = {}; api.signup = (User) => (req, res) => { if (!req.body.username || !req.body.password) res.json({ success: false, message: 'Please, pass an username and password.' }); else { const user = new User({ username: req.body.username, password: req.body.password }); user.save(error => { if (error) return res.status(400).json({ success: false, message: 'Username already exists.' }); res.json({ success: true, message: 'Account created successfully' }); }); } } module.exports = api; Here we have deleted the
setup and index methods. The setup method is no longer needed, since we already have the means to create accounts. The index method is not required due to the fact that we are not going to display a list of all registered users. In addition, we got rid of console.log in the signup method, and from the empty array of clients in the method of creating a new user.Now let's work on the
user.js file, which is stored in the services/BudgetManagerAPI/app/routes folder: const models = require('@BudgetManager/app/setup'); module.exports = (app) => { const api = app.BudgetManagerAPI.app.api.user; app.route('/api/v1/signup') .post(api.signup(models.User)); } Here we removed the routes that were needed for the old methods.
Improved models
Let's go to the
models folder, which is located at BudgetManagerAPI/app/ and make some improvements in the model. Open the file user.js Here we are going to modify the user data scheme: const Schema = mongoose.Schema({ username: { type: String, unique: true, required: true }, password: { type: String, required: true } }); In addition, create a few more models. Let's start with the model that will be in the
client.js file: const mongoose = require('mongoose'); const Schema = mongoose.Schema({ name: { type: String, required: true }, email: { type: String, required: true }, phone: { type: String, required: true }, user_id: { type: mongoose.Schema.Types.ObjectId, ref: 'User' } }); mongoose.model('Client', Schema); Now let's work on the model, which will be in the
budget.js file: const mongoose = require('mongoose'); const Schema = mongoose.Schema({ client: { type: String, required: true }, state: { type: String, required: true }, title: { type: String, required: true }, total_price: { type: Number, required: true }, client_id: { type: mongoose.Schema.Types.ObjectId, ref: 'Client' }, items: [{}] }); mongoose.model('Budget', Schema); Now we do not need to use mutable arrays, which increase as we work with them. Instead, we use links to specify exactly which users and clients we need, using
ref and ObjectID .Open the
index.js file from the setup folder and bring it to this form: const mongoose = require('mongoose'), UserModel = require('@BudgetManagerModels/user'), BudgetModel = require('@BudgetManagerModels/budget'), ClientModel = require('@BudgetManagerModels/client'); const models = { User: mongoose.model('User'), Budget: mongoose.model('Budget'), Client: mongoose.model('Client') } module.exports = models; API extension
Now we need to add methods for new models to the API, so go to the
api folder and create a new client.js file client.js : const mongoose = require('mongoose'); const api = {}; api.store = (User, Client, Token) => (req, res) => { if (Token) { const client = new Client({ user_id: req.body.user_id, name: req.body.name, email: req.body.email, phone: req.body.phone, }); client.save(error => { if (error) return res.status(400).json(error); res.status(200).json({ success: true, message: "Client registration successfull" }); }) } else return res.status(403).send({ success: false, message: 'Unauthorized' }); } api.getAll = (User, Client, Token) => (req, res) => { if (Token) { Client.find({ user_id: req.query.user_id }, (error, client) => { if (error) return res.status(400).json(error); res.status(200).json(client); return true; }) } else return res.status(403).send({ success: false, message: 'Unauthorized' }); } module.exports = api; There is a method for creating new customers and for getting their full list. These methods are protected by the use of JWT authentication.
Now create another file, let's call it
budget.js : const mongoose = require('mongoose'); const api = {}; api.store = (User, Budget, Client, Token) => (req, res) => { if (Token) { Client.findOne({ _id: req.body.client_id }, (error, client) => { if (error) res.status(400).json(error); if (client) { const budget = new Budget({ client_id: req.body.client_id, user_id: req.body.user_id, client: client.name, state: req.body.state, title: req.body.title, total_price: req.body.total_price, items: req.body.items }); budget.save(error => { if (error) res.status(400).json(error) res.status(200).json({ success: true, message: "Budget registered successfully" }) }) } else { res.status(400).json({ success: false, message: "Invalid client" }) } }) } else return res.status(403).send({ success: false, message: 'Unauthorized' }); } api.getAll = (User, Budget, Token) => (req, res) => { if (Token) { Budget.find({ user_id: req.query.user_id }, (error, budget) => { if (error) return res.status(400).json(error); res.status(200).json(budget); return true; }) } else return res.status(403).send({ success: false, message: 'Unauthorized' }); } api.getAllFromClient = (User, Budget, Token) => (req, res) => { if (Token) { Budget.find({ client_id: req.query.client_id }, (error, budget) => { if (error) return res.status(400).json(error); res.status(200).json(budget); return true; }) } else return res.status(403).send({ success: false, message: 'Unauthorized' }); } module.exports = api; Its methods, as in the previous case, are protected by JWT authentication. One of these three methods is used to create new documents, the second to get a list of all documents related to a user account, and another one to get all documents for a specific client.
Creating and securing routes for documents and clients
Go to the
routes folder and create a budget.js file budget.js : module.exports = (app) => { const api = app.BudgetManagerAPI.app.api.budget; app.route('/api/v1/budget') .post(passport.authenticate('jwt', config.session), api.store(models.User, models.Budget, models.Client, app.get('budgetsecret'))) .get(passport.authenticate('jwt', config.session), api.getAll(models.User, models.Budget, app.get('budgetsecret'))) .get(passport.authenticate('jwt', config.session), api.getAllFromClient(models.User, models.Budget, app.get('budgetsecret'))) } Then create the
client.js file: const passport = require('passport'), config = require('@config'), models = require('@BudgetManager/app/setup'); module.exports = (app) => { const api = app.BudgetManagerAPI.app.api.client; app.route('/api/v1/client') .post(passport.authenticate('jwt', config.session), api.store(models.User, models.Client, app.get('budgetsecret'))) .get(passport.authenticate('jwt', config.session), api.getAll(models.User, models.Client, app.get('budgetsecret'))); } Both of these files are similar. In them, we first call the
passport.authenticate method, and then the API methods with passing the models and the secret key to them.results
Now, if we use Postman to register clients and documents associated with them, this is what happens:
Results and homework
In this material, we corrected some of the shortcomings, worked on the client and server parts of the application, starting the implementation of its main logic. Next time we will continue to develop the project, in particular, we will develop mechanisms for registering new clients and creating related financial documents.
Now, while the next article in this series has not yet come out, we suggest that everyone, as an exercise, make a fork of the repository of the author of this material and try to independently realize the means for registering clients and documents.
Dear readers! If you decide to do your homework, please tell us what happened.
Source: https://habr.com/ru/post/341874/
All Articles