Using Singleton in Unity3D
Introduction
The organization of any, albeit a small, serious project requires a good organization of the code. Projects developed in the Unity3D environment are no exception and, as the project grows, its organization can play a significant role in the quality of the source product.
In this article, we tried not only to describe such an approach to code organization as Singleton (popularly called the design pattern), but also to consider the most comfortable and correct approaches to event processing and talk about the convenience of the code as a whole.
So, in this article we will address the following points:
- Introduction
- How does singleton work
- Singleton implementation in Unity3D
- Interaction with Singleton
- On the pros and cons of Singleton
- Some practical examples.
- Conclusion
How does singleton work
Before you begin to understand how the Singleton pattern works, you need to understand what it is. Singleton (Singleton) - a certain manager, through which the game scripts are managed. As a rule, singletons are saved from scene to scene without being reinitialized (like a global object).
')
In the simplest example, the work of a singleton can be explained as follows:
There are global objects (managers) in the game that will always be in the game and can be accessed from any script, which can be useful for creating classes for controlling music, network functions, localization, and all that is used in a single copy. In addition to the managers in the game, multiple objects will be used: interfaces, game characters and objects of the game world. All these objects will interact closely with our managers to achieve the ultimate goal.
Consider for example the organization of work in a mobile game:
In our case, Singleton is an object moving from scene to scene, serving to control all objects of a certain type within the game scene (the game as a whole).
In the diagram below, we depicted the scheme of operation using the example of a mobile turn-based online game:
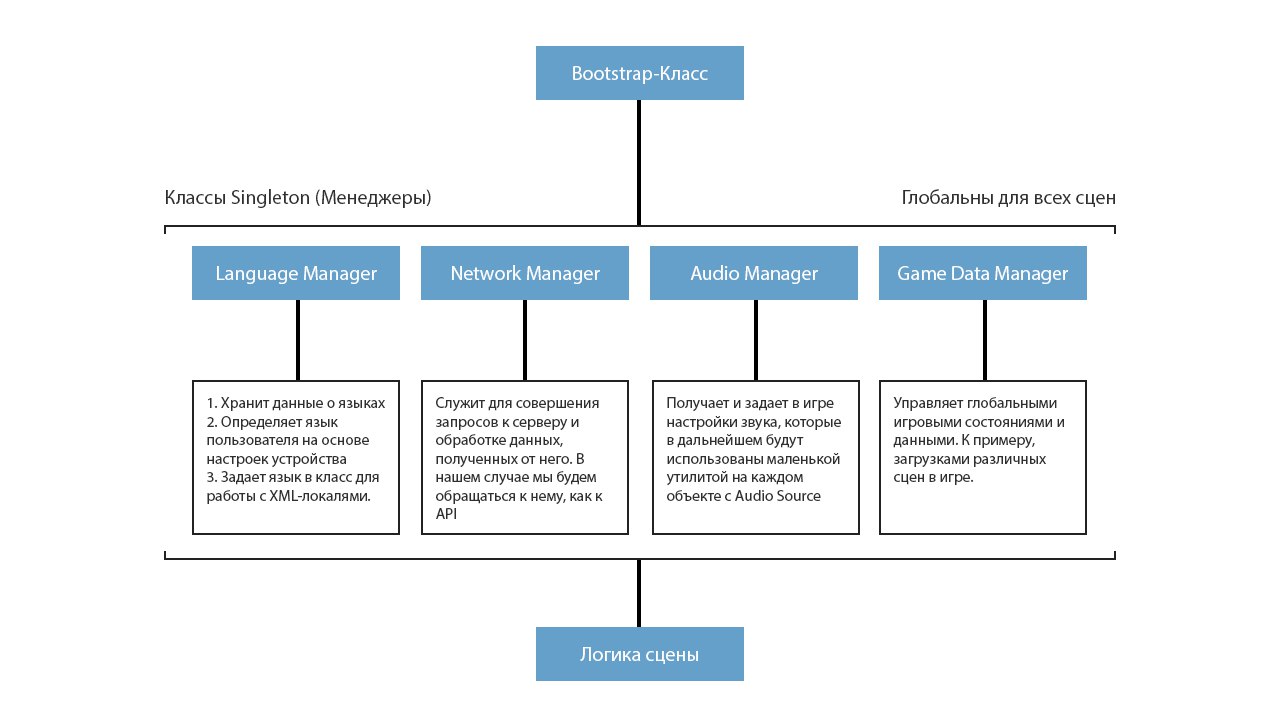
To have a complete picture, consider the architecture of this game. In this case, in addition to Singleton objects, we will have the following elements:
- Objects for loading Singleton (the so-called Bootstrap class)
- Game Logic Objects (Script Management Objects)
- Controllers (For example: player controller)
- Data models (objects for serializing data received from the server)
- Interface Objects
- Other static game objects
Thus, we will be able to create a convenient and clean project architecture with which in the future there will be no difficulty in scaling.
Singleton implementation in Unity3D
For easier perception, we will continue to consider the architecture of mobile online games and see how everything that we described above looks like in practice.
Manager Classes
The basis of the entire design method is the classes themselves managers, who are in the game in a single copy and can be called at any time. To create such a manager class, we can describe the following code:
using System.Collections; using System.Collections.Generic; using UnityEngine; //============================================= // Audio Manager //============================================= public class AudioManager: MonoBehaviour { public static AudioManager instance = null; // // , void Start () { // , if (instance == null) { // instance = this; // } else if(instance == this){ // Destroy(gameObject); // } // , // DontDestroyOnLoad(gameObject); // InitializeManager(); } // private void InitializeManager(){ /* TODO: */ } } In the example above, we created the basis for one of the game managers (in our case, this is the Audio manager). It is not necessary to perform initialization through the Start () method. You can also use the Awake () method to do this so that your object is ready even before the scene starts.
Now we will add our class so that it can load and save sound and music parameters in the game:
using System.Collections; using System.Collections.Generic; using UnityEngine; //============================================= // Audio Manager //============================================= public class AudioManager: MonoBehaviour { public static AudioManager instance = null; // public static bool music = true; // public static bool sounds = true; // // , void Start () { // , if (instance == null) { // instance = this; // } else if(instance == this){ // Destroy(gameObject); // } // , // DontDestroyOnLoad(gameObject); // InitializeManager(); } // private void InitializeManager(){ // PlayerPrefs music = System.Convert.ToBoolean (PlayerPrefs.GetString ("music", "true")); sounds = System.Convert.ToBoolean (PlayerPrefs.GetString ("sounds", "true")); } // public static void saveSettings(){ PlayerPrefs.SetString ("music", music.ToString ()); // PlayerPrefs.SetString ("sounds", sounds.ToString ()); // PlayerPrefs.Save(); // } } So, done. Now our audio manager can load and save sound and music settings. Now the next question arises about how we can use it. In the example below, we have demonstrated a simple example of interaction with the manager:
using System.Collections; using System.Collections.Generic; using UnityEngine; //============================================= // Audio Muter Class //============================================= public class AudioMuter : MonoBehaviour { // public bool is_music = false; // ? // private AudioSource _as; // Audio Source private float base_volume = 1F; // // void Start () { _as = this.gameObject.GetComponent<AudioSource> (); // AS base_volume = _as.volume; // AS } // void Update () { // , if (is_music) { _as.volume = (AudioManager.music)?base_volume:0F; } else { _as.volume = (AudioManager.sounds)?base_volume:0F; } } } In the example above, we created a component that allows us to automatically enable / disable AudioSource on the object based on the static music and sounds fields in our manager.
Note
Using Singleton in conjunction with delegates and Coroutine functions will help create ideal managers, for example, to implement error handling or network requests.
Bootstrap class
Suppose that you already have several managers. In order not to unload them into each scene as an object separately, you can create a so-called Bootstrap-class, which will cling objects from pre-created prefabs. There is no obligation in the Boostrap object, but we recommend using it just for your convenience.
Consider our Boostrap class:
using System.Collections; using System.Collections.Generic; using UnityEngine; //============================================= // Game Classes Loader //============================================= public class GameLoader : MonoBehaviour { // public GameObject game_manager; // Game Base Manager public GameObject audio_manager; // Audio Manager public GameObject lang_manager; // Language Manager public GameObject net_manager; // Network Manager // ( ) void Awake () { // if (GameBase.instance == null) { Instantiate (game_manager); } // if (AudioManager.instance == null) { Instantiate (audio_manager); } // if (LangManager.instance == null) { Instantiate (lang_manager); } // if (NetworkManager.instance == null) { Instantiate (net_manager); } } } Now we can use the Boostrap and add new manager prefabs to it without having to place them on each game scene.
Data models
Using data models is optional, but you can create them to quickly process data from the server and store data in the client without the need for repeated requests. (for example for caching user data in the game).
In our case, after a request to the server, we will upload the data to the model and process their data. Consider the simplest data model:
using System.Collections; using System.Collections.Generic; using UnityEngine; [System.Serializable] public class responceModel{ public bool complete = false; // public string message = ""; // ( complete = false) } In the example above, we have a data model that will be used to process basic statuses received from the server in JSON format. Thus, when we access our game server we get 2 types of response:
If successful, we get the following answer:
{ complete: true, // data: {} // } And if we get an error, we get a response like
{ complete: false, // message: "" // } Thus, we can parse the server response using JSON deserialization and our data model:
responceModel responce = JsonUtility.FromJson<responceModel>(request.text); // JSON if(responce.complete){ /* TODO: - */ Debug.Log(responce.data); }else{ /* TODO: */ Debug.Log(responce.message); } Controllers
The controllers will serve us for the operation of multiple objects in the game (for example, opponents in the game, or a player controller). Controllers are created in the most usual way and cling to objects in the game as components.
An example of a simple player controller:
using System.Collections; using System.Collections.Generic; using UnityEngine; //============================================= // PLAYER CONTROLLER //============================================= public class PlayerController : MonoBehaviour { // [Header ("Player Body Parts")] public GameObject[] hairs; public GameObject[] faces; public GameObject[] special; // void Start () { } // void Update () { } // public void updateParts (){ // for (int i = 0; i < hairs.Length; i++) { if (i == NetworkManager.instance.auth.player_data.profile_data.body.hairs) { hairs [i].SetActive (true); } else { hairs [i].SetActive (false); } } /* TODO: */ } } In the example above, in the part of the code where we update parts of the player’s body, we use a data model with information about the player’s profile that was directly connected to the network manager.
Consider this line:
if (i == NetworkManager.instance.auth.player_data.profile_data.body.hairs){ Here we see that the index is being compared in a loop with the hair identifier in the player’s data model. This model is presented in an instance of the Network Manager object ( NetworkManager ), where the object was initialized for work with authorization ( auth ), inside which the data models are located ( player_data => profile_data => body ).
Interaction with Singleton
To interact with managers, we will use either an instance of an object (instance) or a direct call for static parameters.
Example of working with instance:
public bool _hair = NetworkManager.instance.auth.player_data.profile_data.body.hairs; In the example above, we used the instance property to get data about the player’s hair in the NetworkManager manager.
An example of direct interaction with static parameters:
public bool _sounds = AudioManager.sounds; In the example above, we turned directly to the static property of sounds in the AudioManager manager.
On the pros and cons of Singleton
Pros:
+ There is no need for constant customization and descriptions of script fields in the inspector
+ Managers can be accessed through the instance property.
+ Convenient code refactoring
+ Compact code
Minuses:
- Strong code dependency
- Access only to script managers in a single copy.
Some practical examples.
Delegate Usage
We can make our code more responsive by adding delegates to managers. In this way, a callback method can be created for each function.
Consider this example:
// - public delegate void OnComplete(); public delegate void OnError(string message); // , public void checkNumber(int number, OnComplete success, OnError fail){ if(number<10){ success(); // OnComplete }else{ fail(" 10!"); // } } In the simple example above, we created a method that calls the success function if the number parameter was less than 10 and the error function when the parameter was greater than or equal to 10, respectively.
This method can be used as follows:
public void testMethod(){ int _number = Random.Range(0,50); // // checkNumber(_number, (()=>{ // Success /* TODO: - */ Debug.Log(" !"); }), ((string text)=>{ // Fail Debug.Log(text); // , Callback testMethod(); // , <10 })); } In this way, we can create code with a manageable result. Now we smoothly move on to the example of use with Singleton.
Delegates with Coroutine at Singleton
For the most convenient and correct interaction with the server, we can use a bunch of Coroutine-functions and delegates, thereby being able to send asynchronous requests and process the server's response. Below, we have prepared an example of NetworkManager using Coroutine functions and delegates.
Consider this NetworkManager example:
using System.Collections; using System.Collections.Generic; using UnityEngine; //============================================= // Network Manager //============================================= public class NetworkManager : MonoBehaviour { // public static NetworkManager instance = null; // public static string server = "https://mysite.com/api"; // URL // public APIAuth auth; // public APIUtils utils; // // void Awake () { // if (instance == null) { instance = this; } else if(instance == this){ Destroy(gameObject); } // , DontDestroyOnLoad(gameObject); // InitializeManager(); } // public void InitializeManager(){ auth = new APIAuth (server + "/auth/"); // utils = new APIUtils (server + "/utils/"); // } } //============================================= // API Auth Manager //============================================= public class APIAuth{ // private string controllerURL = ""; // Controller URL //============================================= // //============================================= public APIAuth(string controller){ controllerURL = controller; } //============================================= // //============================================= public delegate void OnLoginComplete(); public delegate void OnLoginError(string message); public IEnumerator SingIn(string login, string password, OnLoginComplete complete, OnLoginError error){ // WWWForm data = new WWWForm(); data.AddField("login", login); data.AddField("password", password); data.AddField("lang", LangManager.language); // WWW request = new WWW(controllerURL + "/login/", data); yield return request; // if (request.error != null) { // error (" "); } else { // try{ responceModel responce = JsonUtility.FromJson<responceModel>(request.text); if(responce.complete){ complete(); // Success Callback }else{ error (responce.message); // Do error Debug.Log("API Error: " + responce.message); } }catch{ error (" "); Debug.Log(" . : " + request.text); } } } /* TODO: */ } //============================================= // //============================================= public class APIUtils{ private string controllerURL = ""; // public APIUtils(string controller){ controllerURL = controller; } //============================================= // //============================================= public delegate void OnClientVersionChecked(); public delegate void OnClientVersionError(string message); public IEnumerator CheckClientVersion(string version, OnClientVersionChecked complete, OnClientVersionError error){ // WWWForm data = new WWWForm(); data.AddField("version", version); data.AddField("lang", LangManager.language); // WWW request = new WWW(controllerURL + "/checkVersion/", data); yield return request; // if (request.error != null) { error (" "); } else { try{ responceModel responce = JsonUtility.FromJson<responceModel>(request.text); if(responce.complete){ complete(); }else{ error (responce.message); Debug.Log("API Error: " + responce.message); } }catch{ error (" "); Debug.Log(" . : " + request.text); } } } } Now we can use it for its intended purpose:
// public void checkMyGame(){ StartCoroutine(NetworkManager.instance.utils.CheckClientVersion(Application.version, (()=>{ // /* TODO: */ }), ((string msg) => { // /* TODO: */ Debug.Log(msg); }))); } Thus, you can execute the NetworkManager code and control its methods using Callback functions from any scene of the game.
Conclusion
In general, the theme of Singleton and patterns as a whole in the framework of projects on Unity3D deserves a separate book and it’s impossible to tell everything in one article. Below we have attached some useful materials where you can read more about this.
List of useful materials:
Source: https://habr.com/ru/post/341830/
All Articles