Vue.js tutorial: from jQuery to Vue.js
Hi, Habr! I present to you the translation of the article Vue.js Tutorial: From jQuery to Vue.js by Paul Redmond .
As for the JavaScript libraries, there has never been a more popular library than jQuery. It was created to bypass DOM elements using CSS selectors at a time when browser compatibility was an important issue for developers.
In fact, jQuery is so versatile that I thought it would perfectly convey why I like to write UI with Vue using component JavaScript. In this tutorial, we will first look at creating a user interface with jQuery, and then rewrite it using Vue.
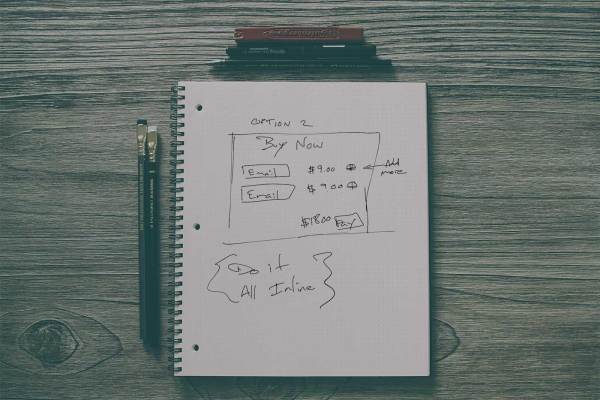
Project
It is quite typical when there is a form for which you need to dynamically add several fields using JavaScript. Imagine that we have an online registration form that allows a user to purchase several tickets that require a name and an email address for each ticket:
Implementing it first in jQuery is a good step before we do the same with Vue. Many developers are familiar with jQuery and it provides excellent contrast with a very different approach that you should use to create dynamic interfaces.
I created code samples using jQuery and using Vue on Code Pen.
JQuery version
There are a dozen ways we could build this interface with jQuery. For example, we could create a form with one set of fields in the HTML markup, and then allow jQuery to dynamically add additional fields to the DOM when the user adds more.
We could also use the <script type = "text/template"> as a template string and add one by default to DOMContentLoaded, this is the approach that we will use.
jQuery HTML Template
Using a template is more like how we could create a component in Vue. This is what the HTML markup looks like:
<!DOCTYPE html> <html lang="en"> <head> <meta charset="UTF-8"> <meta name="viewport" content="width=device-width, initial-scale=1.0"> <meta http-equiv="X-UA-Compatible" content="ie=edge"> <title>jQuery Checkout UI</title> <link rel="stylesheet" href="https://maxcdn.bootstrapcdn.com/bootstrap/4.0.0-beta/css/bootstrap.min.css"> <style type="text/css"> body { margin: 3em } button { cursor: pointer; } .unit-price { margin-right: 2rem; color: #999; } </style> </head> <body> <div class="container" id="app"> <form> <!-- A placeholder for the list of attendee inputs --> <div class="attendee-list"></div> <div class="row justify-content-center"> <div class="col-sm-6"></div> <div class="col-sm-2"> <button type="button" class="btn btn-secondary add-attendee">Add Attendee</button> </div> </div> <hr> <div class="row justify-content-center"> <div class="col-sm-6"> <!-- A placeholder for the unit price --> <span id="unit-price" class="unit-price"></span> </div> <div class="col-sm-2 text-left"> <button type="submit" id="checkout-button" class="btn btn-primary"> Pay <!-- A placeholder for the checkout total --> <span class="amount"></span></button> </div> </div> </form> </div> <script type="text/template" data-template="attendee"> <div class="attendee row justify-content-center"> <div class="col-sm-3"> <div class="form-group"> <label class="sr-only">Name</label> <input class="form-control" placeholder="Enter name" name="attendees[][name]" required> </div> </div> <div class="col-sm-3"> <div class="form-group"> <label class="sr-only">Email address</label> <input type="email" class="form-control" placeholder="Enter email" name="attendees[][email]" required> </div> </div> <div class="col-sm-2 text-left"> <button type="button" class="btn btn-light remove-attendee"> <span aria-hidden="true">×</span> Remove </button> </div> </div> </script> <script src="https://code.jquery.com/jquery-3.2.1.slim.min.js"></script> <script src="app.js"></script> </body> </html> We use the beta version of Bootstrap 4 for the layout. We have defined several jQuery placeholders that will be filled with data in $ (document) .ready (), but it’s hard to tell from the markup what will happen. You will need to look at HTML and JavaScript at the same time to understand the meaning of the intended functionality. Returning to this project in a few months will require a decent amount of mental effort to figure out what is going on.
In our app.js file, we will fill in the price for one ticket and the total price, which will be displayed using JavaScript on the check button. Each time a user clicks the “Add Attendee” button, we will add a new line to the <div class="attendee-list"></div> container from the template.
To fill the list of participants with recurring form fields, we use the <script> as a client template. Browsers will ignore the script because of type = "text / template", which means that it will not be executed.
Next to the closing tag we use the latest version of jQuery and app.js, in which we will start working with dynamic updates of the user interface.
JQuery initialization
To start creating our version with jQuery, let's initialize the form, calculate the total amount, add a default string and set the price from data:
// app.js $(document).ready(function () { var data = { cost: 9.99 }; /** * Get the attendee count */ function getAttendeeCount() { return $('.attendee-list .row.attendee').length; } function addAttendee() { $('.attendee-list').append( $('script[data-template="attendee"]').text() ); } function syncPurchaseButton() { // Total up the count for the checkout button total $('#checkout-button span.amount').html( '$' + data.cost * getAttendeeCount() ); } // // Initialize the form // // Set up the unit cost of one ticket $('#unit-price').html('$' + data.cost + ' ea.'); // Add one attendee by default on init addAttendee(); syncPurchaseButton(); }); The first part of the code sets the data object literal containing one price property. Price is the price of a single ticket. You may want to set the price of a single ticket dynamically, but for our purposes it is simply hardcoded.
We have several helper functions, including getting the number of members using a DOM query. Using DOM is the only accurate way to determine this value using jQuery.
The second helper function adds a new member to the list using the template in our markup.
The syncPurchaseButton () function uses getAttendeeCount () to calculate and populate the buy button with a finite amount.
If you want to get the same amount of purchase anywhere in the template, you will need to synchronize all the instances in the DOM using the class selector, but in this case we are aiming at only one.
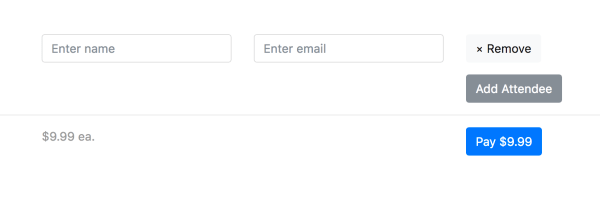
If you load the page at this moment, the form will be initialized by one visitor, the price of one ticket and the total amount in the check button:
Add members using jQuery
Then let's consider adding and removing members. jQuery has excellent event handling, including running custom events. Let's start with the code needed to add new members:
function addAttendee() { $('.attendee-list').append( $('script[data-template="attendee"]').text() ); // Sync remove button UI syncRemoveButtons(); } function syncRemoveButtons() { // If only one attendee, hide the first remove button // otherwise, show all remove buttons if (getAttendeeCount() === 1) { $('.attendee-list .attendee .remove-attendee').first().hide(); } else { $('.attendee-list .attendee .remove-attendee').show(); } } function syncPurchaseButton() { // Total up the count for the checkout button total $('#checkout-button span.amount').html( '$' + data.cost * getAttendeeCount() ); } // Events $('.add-attendee').on('click', function (event) { event.preventDefault(); addAttendee(); $(this).trigger('attendee:add'); }).on('attendee:add', function () { syncPurchaseButton(); syncRemoveButtons(); }); The syncRemoveButtons () function ensures that the user cannot delete a field when it remains only one, but the user can delete any line if there are several of them.
Now we call syncRemoveButtons () in the addAttendee () function, which means that if you refresh the page, the delete button is hidden because the number of participants is only one.
The event handler for adding a participant calls the function addAttendee (), and then fires the custom event attendee: add.
In the custom event handler, we synchronize the total price so that it is correct in the button, and then we call syncRemoveButtons () to update the status of the delete button, as described above.
The synchronization state can get out of control as your jQuery user interface grows. We must explicitly manage the state and synchronize it when it changes in response to events, and we need to understand the features of state synchronization in each application.
State management in jQuery requires additional mental effort, because it can be processed and linked to the DOM in various ways. When a state is dependent on a DOM, and not vice versa, DOM requests for state tracking become more complex.
Removing members using jQuery
At this stage, if you refresh the page, you can add new lines to the form. When you add the first additional member, the delete button will be shown for each row, which will remove the row.
Then let's enable the delete event and make sure that the state of the user interface is displayed after the deletion:
// Attach an event handler to the dynamic row remove button $('#app').on('click', '.attendee .remove-attendee', function (event) { event.preventDefault(); var $row = $(event.target).closest('.attendee.row'); $row.remove(); $('#app').trigger('attendee:remove'); }); $('#app').on('attendee:remove', function () { syncPurchaseButton(); syncRemoveButtons(); }); We added a click event listener to the DOM identifier #app, which allows us to dynamically respond to the click event for new lines. Inside this handler, we prevent the default button event, and then find the nearest ancestor .row in the DOM tree.
Once the $ row parent is found, we remove it from the DOM and fire a custom event, attendee: remove.
In the attendee: remove event handler, we synchronize our buy button and the state of the remove button.
Ready jQuery version
At the moment we have a working jQuery prototype UI of our form, which we can use to compare with the Vue version.
Here is the complete app.js file:
$(document).ready(function () { var data = { cost: 9.99 }; /** * Get the attendee count */ function getAttendeeCount() { return $('.attendee-list .row.attendee').length; } function addAttendee() { $('.attendee-list').append( $('script[data-template="attendee"]').text() ); syncRemoveButtons(); } function syncRemoveButtons() { // If only one attendee, hide the first remove button // otherwise, show all remove buttons if (getAttendeeCount() === 1) { $('.attendee-list .attendee .remove-attendee').first().hide(); } else { $('.attendee-list .attendee .remove-attendee').show(); } } function syncPurchaseButton() { // Total up the count for the checkout button total $('#checkout-button span.amount').html( '$' + data.cost * getAttendeeCount() ); } // Events $('.add-attendee').on('click', function (event) { event.preventDefault(); addAttendee(); $(this).trigger('attendee:add'); }).on('attendee:add', function () { syncPurchaseButton(); syncRemoveButtons(); }); // Attach an event handler to the dynamic row remove button $('#app').on('click', '.attendee .remove-attendee', function (event) { event.preventDefault(); var $row = $(event.target).closest('.attendee.row'); $row.remove(); $('#app').trigger('attendee:remove'); }); $('#app').on('attendee:remove', function () { syncPurchaseButton(); syncRemoveButtons(); }); // // Initialize the form // // Set up the unit cost of one ticket $('#unit-price').html('$' + data.cost + ' ea.'); // Add one attendee by default on init addAttendee(); syncPurchaseButton(); }); The purpose of this example is to show the appearance of the user interface, which you probably wrote, and then show how it looks in comparison with Vue.js. The important conclusion here is the state associated directly with the DOM, and you must query the DOM to make a conclusion about the state.
JQuery still allows you to write a user interface, but let's see how you can write the same functionality using Vue.
Introduction to Vue
Most people have probably heard about Vue at the moment, but for those who are not familiar with Vue, the guide is a great place to meet.
Comparing with other frameworks is also useful for perceiving Vue in contrast with other frameworks that you may already be familiar with.
I suggest you install the Vue devtools extension , available in Chrome and Firefox . Developer tools will provide you with excellent debugging information when you study and develop applications with Vue.
Version using Vue
Our version of Vue will be written using plain javascript to avoid having to worry about the ES6 tools and focus on the component example instead.
You will see how Vue helps to separate data from the user interface display, with data displayed in a reactive approach. We also do not need to navigate through the DOM to calculate values that start to seem awkward when you compare how jQuery does this compared to React or Vue.
Beginning
Before writing our template and JavaScript, let's discuss our approach to building a form. Thinking about the data associated with the form, I represent the collection (array) of participants and the price of one item.
A literal object might look like this:
var data = { attendees: [ { name: 'Example', email: 'user@example.com' } ], cost: 9.99, }; If we update the data by adding another member, Vue will listen and be ready to respond to this data change:
data.attendees.push({ name: 'Example 2', email: 'user2@example.com' }); With this in mind, let's build an approximate HTML markup and JavaScript skeleton for our user interface.
Vue html template
We will gradually build JavaScript and HTML to pass you through each function that we have already reviewed in the jQuery version.
Here is the initial HTML markup for the Vue part of this tutorial:
<!DOCTYPE html> <html lang="en"> <head> <meta charset="UTF-8"> <meta name="viewport" content="width=device-width, initial-scale=1.0"> <meta http-equiv="X-UA-Compatible" content="ie=edge"> <title>Vue Checkout UI</title> <link rel="stylesheet" href="https://maxcdn.bootstrapcdn.com/bootstrap/4.0.0-beta/css/bootstrap.min.css"> <style type="text/css"> body { margin: 3em } button { cursor: pointer; } .unit-price { margin-right: 2rem; color: #999; } </style> </head> <body> <div class="container" id="app"> <form> <div class="row justify-content-center" v-for="(attendee, index) in attendees" :key="index" > <div class="col-sm-3"> <div class="form-group"> <label class="sr-only">Name</label> <input class="form-control" aria-describedby="emailHelp" placeholder="Enter name" v-model="attendee.name" name="attendees[][name]" required > </div> </div> <div class="col-sm-3"> <div class="form-group"> <label class="sr-only">Email address</label> <input type="email" class="form-control" placeholder="Enter email" v-model="attendee.email" name="attendees[][email]" required > </div> </div> <div class="col-sm-2 text-left"> <button type="button" class="btn btn-light"> <span aria-hidden="true">×</span> Remove</button> </div> </div> <div class="row justify-content-center"> <div class="col-sm-6"></div> <div class="col-sm-2"> <button type="button" class="btn btn-secondary">Add Attendee</button> </div> </div> <hr> <div class="row justify-content-center"> <div class="col-sm-6"> <span class="unit-price">${{ cost }} ea.</span> </div> <div class="col-sm-2 text-left"> <button type="submit" class="btn btn-primary">Pay</button> </div> </div> <form> </div> <script src="https://unpkg.com/vue@2.4.4/dist/vue.js"></script> <script src="app.js"></script> </body> </html> The markup is very similar to our jQuery version, but you may have noticed a variable for the price of one item:
<span class="unit-price">${{ cost }} ea.</span> Vue uses declarative rendering to render data to the DOM. {{cost}} - data binding using the mustache syntax and dollar symbol $.
Remember the data object with the cost property?
var data = { cost: 9.99 }; The whiskers tag is replaced by the data.cost value when the associated data changes.
Then pay attention to the v-for = "(attendee, index) in attendees" string, which is a loop that iterates the attendees dataset and displays the form input fields for each participant.
The v-for attribute is a directive that "reactively applies changes to the DOM when the value of this expression is updated." In our example, when the data.attendees array is updated, the DOM will be updated as a result of this directive.
You should start to see the pattern: we modify the data (state), and the user interface reacts to these changes. As a result, your code is more declarative and easier to write.
Vue Initialization
At the bottom of the HTML markup, we have a tag connecting the app.js script with our Vue code.
To initialize an instance of Vue on the page, we need to connect Vue to the DOM node. We have provided a container </ div>, which means that any markup inside this DOM element will be associated with Vue and will react to data changes:
(function () { var app = new Vue({ el: '#app', data: { attendees: [{ name: '', email: '' }], cost: 9.99, }, }); })(); We create a new Vue instance associated with the DOM element #app and define the main data object. The data object includes the cost of one item and an array of participants. We have added one empty member, so our default form will be displayed with one set of input fields.
If you delete all participants and make them an empty array, you will not see any names and emails.
All this is wrapped in an immediately invoked functional expression (IIFE - immediately-invoked function expression) to exclude our instance from the global scope.
Calculation of the total price
In the jQuery version, we calculated the total price by synchronizing the quantity with the DOM using the delete or add member event. In Vue, as you might have guessed, we use data, and then the view responds to these changes automatically.
We could do something like the following, and it would be much better than a DOM query:
<button type="submit" class="btn btn-primary" > Pay ${{ cost * attendees.length }} </button> However, too much logic in your templates makes them less expressive and difficult to maintain. Instead, we can use computed properties :
(function () { var app = new Vue({ el: '#app', data: { attendees: [{ name: '', email: '' }], cost: 9.99, }, computed: { quantity: function () { return this.attendees.length; }, checkoutTotal: function () { return this.cost * this.quantity; } } }); })(); We defined two calculated properties. The first property is the number of tickets, which is calculated by the length of the attendees array.
The second computed property is checkoutTotal, which uses the first computed property to multiply the number of elements by the cost.
Now we can update the validation button using a computed property. Notice how the result describes the name of the calculated property:
<button type="submit" class="btn btn-primary" > Pay ${{ checkoutTotal }} </button> If you update your browser, you should see the total amount automatically calculated on the button.
When you add a member, the calculated property is automatically updated and displayed in the DOM.
Add members with Vue
We are ready to see how we would add members using Vue events.
In jQuery, we used a DOM event handler:
$('.add-attendee').on('click', function () {}); In Vue, we enable the event in the template. In my opinion, this makes it easier to read HTML, because we have an expressive way to find out which events are associated with this element.
You can use v-on: click = "addAttendee":
<!-- Using v-on: --> <button type="button" class="btn btn-secondary" v-on:click="attendees.push({ name: '', email: ''})" > Add Attendee </button> Or abbreviated click = ”addAttendee”:
<!-- Using @click --> <button type="button" class="btn btn-secondary" @click="attendees.push({ name: '', email: ''})" > Add Attendee </button> It’s normal to use any style, but it’s good practice to stick with one method. I prefer the abbreviated style.
When the button is pressed, we place a new object in the attendees array in the template. I wanted to show you this style so you can understand that you can just run JavaScript in the attribute.
In most cases, it is better to use event handlers, because, as a rule, events have more complex logic associated with them:
<button type="button" class="btn btn-secondary" @click="addAttendee" > Add Attendee </button> Vue accepts the properties of the methods in the main Vue object (and in the components), which allows us to define an event handler method:
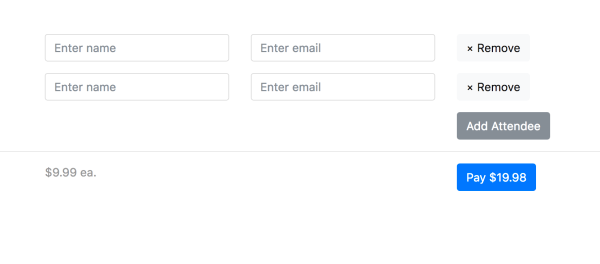
(function () { var app = new Vue({ el: '#app', data: { attendees: [{ name: '', email: '' }], cost: 9.99, }, computed: { quantity: function () { return this.attendees.length; }, checkoutTotal: function () { return this.cost * this.quantity; } }, methods: { addAttendee: function (event) { event.preventDefault(); this.attendees.push({ name: '', email: '', }); } } }); })(); We prevent the default action and put a new object on the attendees array. Now, if you add members, you will see the new input fields added, and checkoutTotal will correspond to the number of lines:
Notice that the handler receives an event object that we can use to prevent the default action. To prevent the default action of the event or the termination of distribution (event.stopPropagation ()), Vue provides event modifiers used with a dot (.) As part of the attribute:
<button type="button" class="btn btn-secondary" @click.prevent="addAttendee" > Add Attendee </button> Your methods are data oriented, and Vue automatically handles DOM events using event modifiers.
Remove members from Vue
Removing participants is similar to adding them, but instead of adding an object to an array, we need to remove it based on the array index in another event handler:
<button type="button" class="btn btn-light" @click.prevent="removeAttendee(index)" > <span aria-hidden="true">×</span> Remove </button> We use an array index to refer to the desired visitor we want to delete. If you recall in our v-for loop, we defined an index:
<div class="row justify-content-center" v-for="(attendee, index) in attendees" :key="index" > <!-- Attendee inputs --> </div> Inside the Vue instance, we define the removeAttendee method, which uses splice to remove one element from an array based on an index:
methods: { removeAttendee: function (index) { this.attendees.splice(index, 1); }, // ... } With the help of the removeAttendee handler, you can add and remove participants!
We also want to meet business requirements with the “Remove” button displayed only when adding several participants. We do not want to allow the user to delete all participants.
We can do this with the built-in v-show conditional directive :
<button type="button" class="btn btn-light" @click.prevent="removeAttendee(index)" v-show="quantity > 1" > <span aria-hidden="true">×</span> Remove </button> We used the calculated quantity property to show the delete button when the quantity is greater than one.
We could also hide the v-if button. I recommend reading the documentation to understand the nuances of how they work.
In our case, we use v-show to show and hide the button using CSS. If you change the code using v-if and take a look at the DOM, you will see that Vue removes the element from the DOM.
Finished Vue version
Here is the final Vue version:
(function () { var app = new Vue({ el: '#app', data: { attendees: [{ name: '', email: '' }], cost: 9.99, }, computed: { quantity: function () { return this.attendees.length; }, checkoutTotal: function () { return this.cost * this.quantity; } }, methods: { removeAttendee: function (index) { this.attendees.splice(index, 1); }, addAttendee: function (event) { event.preventDefault(); this.attendees.push({ name: '', email: '', }); } } }); })(); ! , DOM .
Vue , jQuery . , , jQuery . , , UI HTML.
What's next?
:
JQuery, React, Vue, . Vue , ( ).
, , .
— .
')
Source: https://habr.com/ru/post/341798/
All Articles