Angular 5

Introduction
On November 1, 2017, Google announced the major version of Angular 5.0.0, codenamed “pentagonal donut”. The new version includes new features and bug fixes, and at the same time, the main emphasis was again placed on reducing the size of Angular, making it quick and easy to use. A complete description of all changes, including critical ones, can be found in the changelog file of the official Angular repository.
From translators
Hello everyone, Maxim Ivanov and Dmitry Sergienkov are with you, and today we will talk about the released new version, briefly consider some of the most important changes and recall the history of Angular. Also for those who are just starting to learn this framework, we will look at examples of how to quickly deploy an application on Angular. I would like to note that you can join the Angular community in Telegram , as well as attend Angular Meetup in Moscow.
Angular history
1.1. AngularJS and the rest
1.2. Why do we still like Angular 1.x?
1.3. And yet Angular is not jQuery
1.4. All you need is ... the core of Angular
1.5. So why did we leave AngularJS?
1.6. What did AngularJS do for the Web?Angular quickstart
2.1. Why do we need TypeScript?
2.2. Step 1. Setting up the environment
2.3. Step 2. Creating a new project
2.4. Step 3: Run the web application in development mode
2.5. Step 4: Editing Your First Angular Component
2.6. What's next?
2.7. Project Directory
2.8. Angular CLI vs. Manual setupInnovation Angular 5
3.1. Improved compiler
3.2. Optimized build
3.3. Improved server-side rendering in Angular Universal
3.4. Improved forms performance
3.5. Rewritten to localize Pipes
3.6. ReflectiveInjector replacing with StaticInjector
3.7. Superior NgZone
3.8. Multi exportAs
3.9. Improved RxJS
3.10. Updated Router Life Cycle
3.11. Improved Mobile Experience
3.12. Breaking Changes and more
1. Angular history
Choosing the right framework for our JavaScript environment, application or simple website is a top priority for any business. The current landscape of JavaScript frameworks has led many developers to wonder which camp they should be in.
Angular is an open source JavaScript framework that provides everything you need to create the client logic of your application:
- The fact that Angular is supported by Google inspires confidence in itself;
- This framework is designed in such a way that you can easily switch to it from other programming languages without breaking your psyche;
- Many developers note that if your Angular code looks complicated, it means that you are doing something wrong;
- A large number of websites and applications written in AngularJS and Angular: YouTube (for PS3), GoodFilms, Freelancer, Upwork, and others .
1.1. AngularJS and the rest
Almost every developer knows that AngularJS was one of the first JavaScript frameworks needed to create single-page applications (SPA). Currently, we are not surprised by the appearance of the SPA, they are everywhere. But in 2012 ( AngularJS 1.0.0 ) it was something new. AngularJS was the brainchild of Google, it was first released in 2009 as an open source framework under the MIT license.
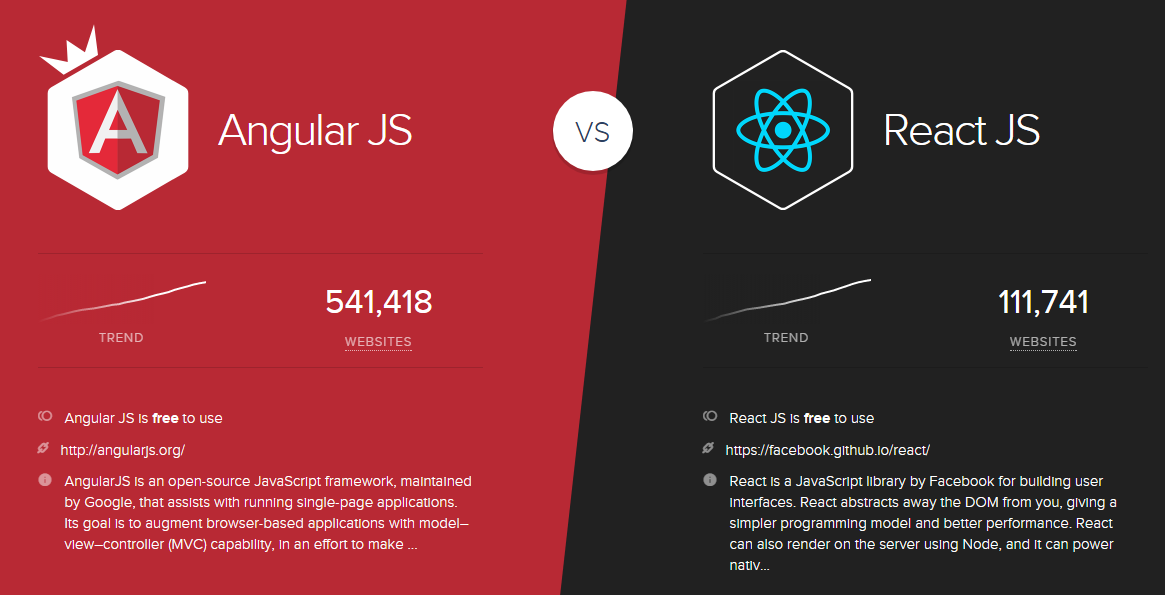
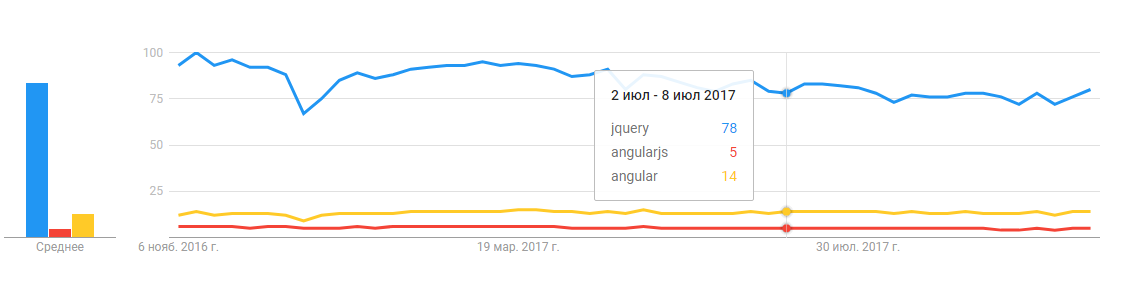
According to SimilarTech.com, which measures the use of web technologies, ReactJS is currently used on 112k websites (with a 3.20% increase in October 2017), and AngularJS (including Angular) is used by 542k sites (with a growth of 1.93% ).
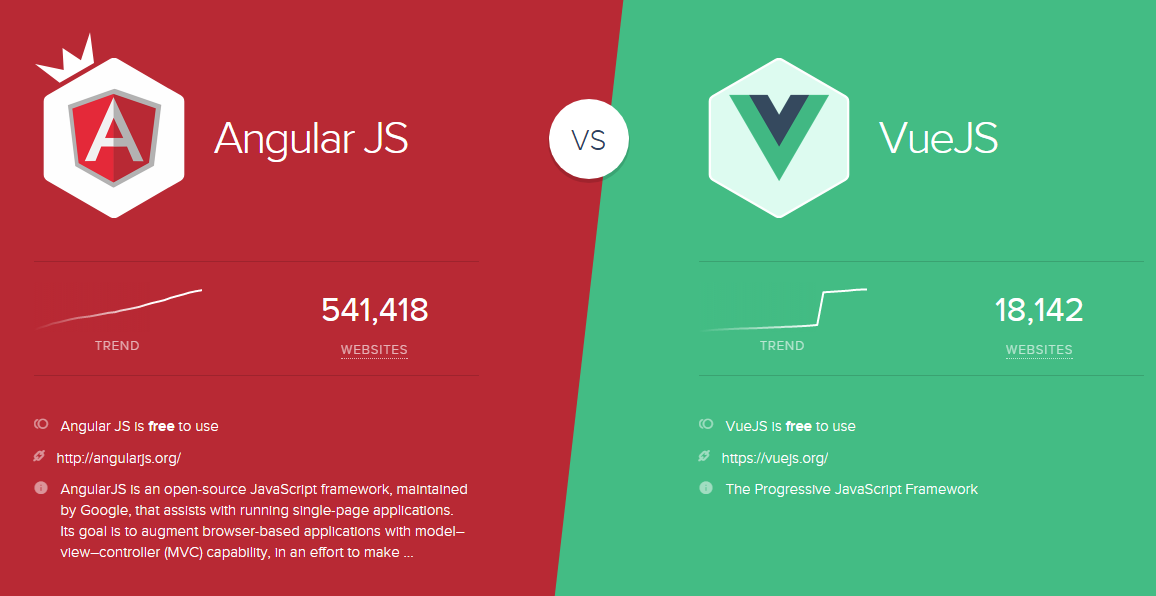
However, it is worth noting the growth of VueJS lately, which is currently used on 19k sites (with growth of 28.3%).
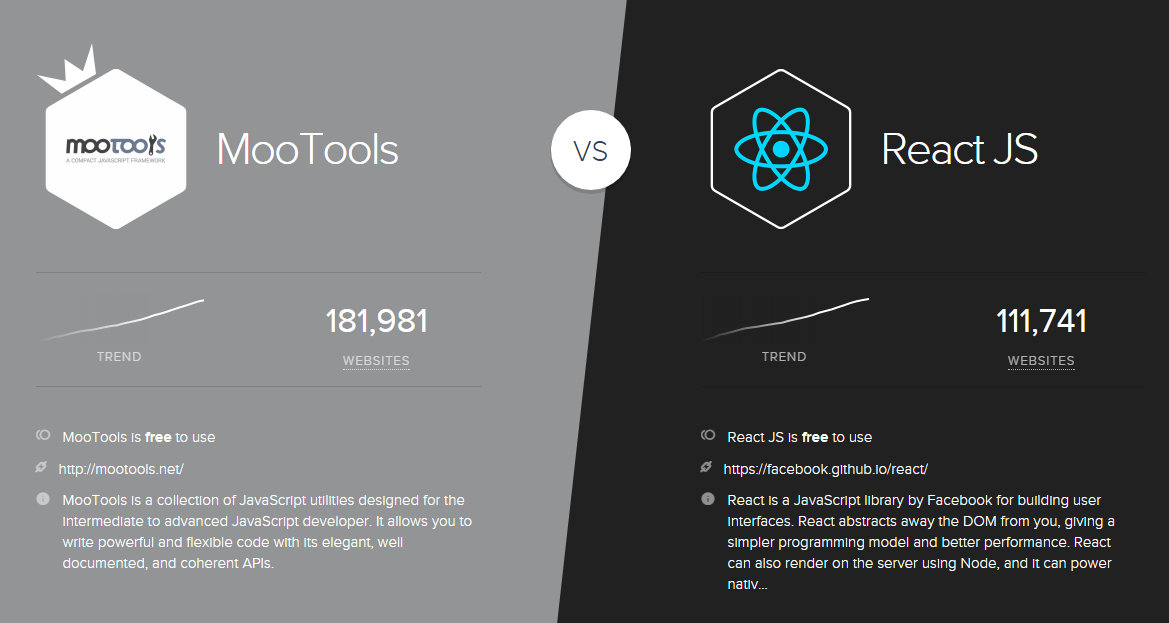
Many will say that it is wrong to compare the library and the framework (and partly you will be right, Angular vs React), but people have the right to do so. If we pay attention to jQuery, which is used on 70 million sites (with growth of 0.16%), and begin to compare it with everything, then of course, it will always be in the lead, however, for the same Enterprise it’s obvious that we will choose something more serious. It's funny that Mootools also began to gain popularity in the period under review (an increase of 18.5%).
1.2. Why do we still like Angular 1.x?
- On AngularJS it was easy to start writing applications.
Yes, it was very easy to create a new project. Just insert the link to the CDN, add the ng-app to the html tag, quickly learn some tutorial and the new application is ready. Official modules, such as ngAnimate and ngRouter, quickly solved all our problems.
- AngularJS Docs and Tutorial
AngularJS had very good documentation and a lot of amazing tutorials. After the same “Phonecat App” you perfectly understood what AngularJS is and how to use it. In fact, it was much clearer than Tour of Heroes (the current tutorial is written under Angular2, whose quick start uses SystemJS, and Angular CLI uses Webpack). Although for the new Angular this problem will be solved soon.
- AngularJS was modular from the start (1.x versions)
Do you remember the time when everyone used Browserify and Bower? At that time there were no such assembly systems as Webpack. Yes, at that time, of course, Grunt and Gulp existed, but they were intended for use, for example, gulp-browserify. So we formally used Browserify. And yet, the ng.module from AngularJS was a very important feature. You could simply insert links to your scripts, and they were interpreted as modules of a single application. It was a great modular system. Unlike jQuery ($ .fn.myNewAwesomePluginForJQueryThatNobodyDownloads), AngularJS gave you the opportunity to write your own modules and use them as plugins or parts of your application. In addition, it was very convenient in the form of lazy-loading.
1.3. And yet Angular is not jQuery
Many still remember the time when almost every article compared AngularJS with jQuery. Many developers started switching to AngularJS with jQuery. True, now I don’t want to think about jQuery at all, associating it with bad code.
- Bilateral binding of objects and models was a “killer feature” or just a “killer”?
ng-model - connected your object with the $ scope-object and the DOM-element - it was the “killer feature” and “killer” at the same time:
1) You could easily implement two-way data binding - the “killer feature”;
2) Inexperienced developers tied each variable to the $ scope object in the controller and then complained: “Why does my application run so slowly?” - “killer”.
One-way data binding was introduced in version 1.2, but not all developers were aware of this.
- jqLite is a miniature alternative to jQuery inside your framework
jqLite is a tiny, API-compatible jQuery subset that allowed AngularJS to cross-manipulate with the DOM. jqLite implemented only the most frequently used functions in order to cover small requirements. The main paradigm was directives and components.
So you were taken care of and you didn’t need to include the full version of jQuery. jqLite provides everything you need. But wait ... Do you really need this?
DOM manipulations were moved to a small library, access to which was possible only through angular.element. Was it a step towards a new level of abstraction? May be.
- Component model
The first attempt to implement the component model was in AngularJS. But unlike ReactJS, AngularJS was “JS in HTML”, and not “HTML in JS”. Even the motto of AngularJS spoke for itself: “AngularJS - improved HTML for web applications!”.
Why "js in html"? Quite simply, you used directives such as ng-click, ng-for and ng-class in your application's .html files.
The directives were the first attempt to separate frequently used components in small modules. However, this idea failed due to React-like components implemented in Angular 1.5. Perhaps React won in this fight, because once your file-name.html could have become so (bad code that shows the biggest problem when working with Angular):
1.4. All you need is ... the core of Angular
- Built-in directives
No need to reinvent the wheel when you already have all the necessary directives. From my own experience, some developers did not create directives at all. They simply used the built-in AngularJS directives, as mentioned above ng-click and ng-for.
- JavaScript dependency injection
One very interesting feature of AngularJS is dependency injection. By the way, have you ever seen it in other projects, with the exception of AngularJS?
- AngularJS is huge
And in fact there is no point here to consider the following questions:
1) "Services, factories, providers in AngularJS";
2) "How to reduce the Angular application?";
3) “How does $ scope. $ Watch work?”;
4) “How does AngularJS work?”;
5) "Built-in $ http, filtering and ng-for performance";
6) “What was the biggest problem with AngularJS?”;
… long list
Some questions are so large that it is possible to conduct an academic study on them.
1.5. So why did we leave AngularJS?
1) Not very good performance out of the box;
2) Most of the functionality of AngularJS was not used in practice;
3) AngularJS worked directly with the DOM, and not with VirtualDOM, for example;
4) Low level of abstraction, in AngularJS almost all the logic was tied to HTML;
5) It’s hard to be an expert in AngularJS if the framework itself is huge;
6) The modern Web required a new approach.
1.6. What did AngularJS do for the Web?
This is a simple and complex question at the same time.
- JS === Power
Perhaps AngularJS was the first tool to prove that JavaScript is a powerful language. You can usually hear that “JavaScript is a language for children” or “JS is a language for creating silly animations”; all these myths were destroyed by AngularJS.
- Community, experts, ecosystems
1) Good framework => many developers;
2) Many developers => Large community;
3) Large community => Additional components, tools, tutorials;
4) A large number of tools and practices => Many experts;
5) Many experts => New ideas, modules, libraries;
6) Pure progress ...
- Vue, Aurelia, Angular 2/4/5
All of these frameworks were inspired by AngularJS. Aurelia is a fork of AngularJS. Angular (Angular 2+) is a continuation of AngularJS. Some developers call VueJS a new AngularJS due to v-if, v-bind, v-on and other directives.
- Do you still remember AngularJS?
2. Angular QuickStart
Good development tools make your work more comfortable, even if you like to do everything manually. Angular CLI is a command line interface that allows you to quickly create projects, add files and perform many specific tasks, such as testing, building and deploying.
The main purpose of this section is to create and run a simple Angular TypeScript application using the Angular CLI and continue to follow the official Style Guide manuals that specifies and standardizes Angular projects. In the end, you will have a basic understanding of how to develop applications using the CLI. However, first we decide why we need TypeScript?
2.1. Why do we need TypeScript?
![]()
TypeScript is JavaScript (ES6 / ES7 / ES8 / ...) + type information. That is, if you know ES6 +, then you automatically know TypeScript (only information about types and some nuances will be added, but in general they strictly follow the standard). TypeScript is not Dart, which is another language. This is an add-on JavaScript that allows for very large projects (such as Angular itself, which is a very large project itself) to improve complexity management, get static analysis, we can use annotations, typing, inheritance, interfaces, and most importantly - modules. In large projects, this information really allows you to get rid of a huge set of errors. On the Internet, there are quite a large number of examples and guidelines for writing applications on TypeScript, but in our case we have prepared for you a basic starter kit , which runs under the control of the Webpack assembly system.
2.2. Step 1. Setting up the environment
Before you start developing, you need to set up an environment for yourself. Install Node.js and npm (if you haven't installed them) on your computer. Make sure that you use Node.js version not lower than 6.9.x and npm not lower than 3.xx (to do this, run node -v and npm -v in the terminal).
Then install the Angular CLI globally.
npm install -g @angular/cli As a rule, this step is done once, and in the future its implementation is no longer required.
2.3. Step 2. Creating a new project
Create a new application (unwrap the framework) by executing the following commands:
ng new my-app Be patient in this step. Angular will pull up all the necessary dependencies for your application, and most of the time will be spent on installing npm packages.
2.4. Step 3: Run the web application in development mode
Navigate to the project directory and start the web server.
cd my-app ng serve --open The ng serve command starts the web server, and also listens to the directory with the source code of your application, and when changes are made in these source files, the project reassembles the project on the fly. It is worth noting that in this mode the project is not stored on the disk, it is written directly to the RAM.
Using the --open key (or just -o) means that after building the project, your browser will automatically open (the default is selected in the operating system).
In the open tab http: // localhost: 4200 / by default you will see the standard layout of the Angular application.

2.5. Step 4: Editing Your First Angular Component
By default, Angular CLI creates a base component for you. This basic component is root, it is associated with the app-root selector. You can find it in the following path in the ./src/app/app.component.ts directory.
In this file you will see the following:
... @Component({ selector: 'app-root', templateUrl: './app.component.html', styleUrls: ['./app.component.css'] }) export class AppComponent { title = 'app'; } @Component is one of the basic decorators in Angular. Decorators are an alternative for annotations (an example from Java) proposed by Yehuda Katz in the ECMAScript 2016 standard. Decorators allow not only to annotate objects with metadata, but also to modify classes, methods and properties. Also decorating is a programming technique that allows
take an existing function and change / expand its behavior. In many cases, code using decorators will be cleaner, more beautiful and more efficient.

The decorator receives the function (in our case, the AppComponent class) and returns a wrapper that does something of its own “around” (magic) of the call to the main function. What exactly does the @Component decorator do you can see here .
So, the most obvious thing you can do now for your component is to change its title, for example:
... export class AppComponent { title = 'My First Angular App'; } As soon as you make changes to the file and save them, the browser will automatically reload the changes (hot reloading). Of course, you can easily make changes to the styles of your component.
Open the .src / app / app.component.css file and set some styles to the component:
h1 { color: #369; font-family: Arial, Helvetica, sans-serif; font-size: 250%; } 
True, here it is worth noting the following moment: if you try to do this:
body { background: red; } app-root { background: blue; } then nothing will change, the page background will not be red, and the background of the component itself will not be blue. And if we look at the page code, we will see the following:
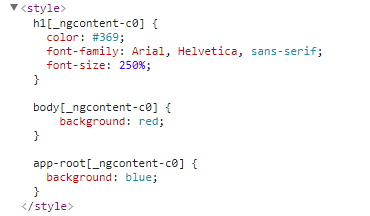
The fact is that Angular by default encapsulates CSS (cross-browser emulates a Shadow DOM) so that the styles of one component will not break or redefine the styles of another. Therefore, under no circumstances use the component selector name or external selector names to define its styles. Attributes for encapsulating CSS code are generated only for the children of this component.
Some argue that if the page uses a huge number of components, Angular does extra work and loads our processor, which affects the speed, and if you use some css-methodology (BEM, SMACSS), then most likely you will write good layout and css code that does not require Angular encapsulation. To do this, you can simply specify an additional parameter in the decorator:
@Component({ ... encapsulation: ViewEncapsulation.None ... }) In more detail you can read here .
2.6. What's next?
The steps described above are all that is needed for a simple “Hello, World”. Then you can try to explore the Tour of Heroes tutorial and create a small application that will help you develop more advanced applications using Angular in the future, but I would recommend watching the video course on Udemy (it doesn't matter that it is in English, you can understand that everything there is available is shown). To familiarize yourself with the commands of angular-cli, you can go to this Russian-language resource . Now you can see the project catalog.
2.7. Project Directory
Angular CLI is a convenient tool for developing and deploying enterprise solutions. First of all, the very first file you need to study is README.md.
It contains information about the basic commands you need to know when using the Angular CLI. Whenever you need to learn more than what is in the README and see some examples of using Angular CLI, you just need to go to the official repository and open the Wiki section.
Some of the generated files may be unfamiliar to you, so let's talk about them in more detail.
Src directory
The source code of your application being developed is usually located in the src directory. Here you will store Angular components, patterns, styles, images and everything else that your application will need. Any files outside this folder are designed to support the creation, assembly, and deployment of your application.
. |-- app | |-- app.component.css | |-- app.component.html | |-- app.component.spec.ts | |-- app.component.ts | `-- app.module.ts |-- assets |-- environments | |-- environment.prod.ts | `-- environment.ts |-- favicon.ico |-- index.html |-- main.ts |-- polyfills.ts |-- styles.css |-- test.ts |-- tsconfig.app.json |-- tsconfig.spec.json `-- typings.d.ts app / app.component. {ts, html, css, spec.ts} - AppComponent specifies the component of the html-template, styles and unit tests. This is the root component for which the tree of nested components will appear as the application evolves .
app / app.module.ts - specifies AppModule. The root module that tells Angular how the application will be built. Now only AppComponent is declared in it. Subsequently, you will declare in it other components.
assets / * is the directory where you place the images and everything else that needs to be copied to the final assembly directory when you create the application itself.
environments / * - this directory contains build target files (dev or prod modes), each of which exports simple env-configuration variables needed for use in your application. When you develop an application, files are collected on the fly. You can use a different set of APIs during development (dev), other than production (prod), in which you can connect all kinds of metrics or auth tokens. You can even use different services or stubs for different build purposes.
favicon.ico - you can add your own icon that will be displayed on the tab in the browser.
index.html is the main HTML page that is displayed when someone visits your site. In most cases, you will never need to edit it. Angular CLI automatically adds all generated js and css files when creating your application, so you do not need to add any tags (script, link) manually.
main.ts is the entry point of your application. Now, by default, your application is compiled in the delivery with the JIT compiler. This file loads the application root module (AppModule) and launches it in the browser. You can also use the AOT compiler by compiling your application beforehand, removing the JIT compiler from the assembly, for this you must use the —aot flag for the Angular CLI ng build and ng serve commands.
polyfills.ts - different browsers have different levels of support for various web standards. Polyfills help to normalize these differences. However, do not forget to check the current browser support .
styles.css - global styles are stored here. Most of the time, you’ll work with the local styles of your components, but styles that affect your entire application should be in this place.
test.ts is the entry point for all your unit tests. This file has a custom configuration, but as a rule, you will rarely edit it.
tsconfig. {app | spec} .json - the TypeScript compiler configuration is described in the tsconfig.app.json file, for the unit tests, the tsconfig.spec.json configuration is used.
Project Root Directory
src / is only one element of the project root directory. Other files help build, test, maintain, document, and deploy an application.
. |-- README.md |-- e2e |-- karma.conf.js |-- node_modules |-- package-lock.json |-- package.json |-- protractor.conf.js |-- src |-- tsconfig.json `-- tslint.json e2e / - e2e (end-to-end) tests are located inside the e2e / directory. They should not be inside the src / directory, since these tests are a separate application that tests your main application. Inside are the configuration files, for example, tsconfig.e2e.json.
node_modules / - Node.js creates this directory, in which it stores all third-party modules listed in package.json.
.angular-cli.json - Angular CLI configuration file. In this file you can set several default values, as well as configure which files will be included when building the project.
.editorconfig - A simple setting for your editor that specifies the same basic configuration for formatting text code. Most editors support the .editorconfig file. For more information, see http://editorconfig.org .
.gitignore - this file is required for the version control system, it is needed to exclude auto-generated files that do not need to be stored in a Git repository.
karma.conf.js is a configuration file for running unit tests using Karma, tests can be run using the ng test command.
package.json is the npm configuration file, which lists the third-party modules (packages) of developers that your project uses. Here you can also register your own scripts.
README.md - the main documentation for your project, pre-filled with information Angular CLI.
tsconfig.json - TypeScript compiler configuration for your IDE.
tslint.json - configuration for the TSLint static analyzer, used when running ng lint. What is the analyzer for, you can look at an example .
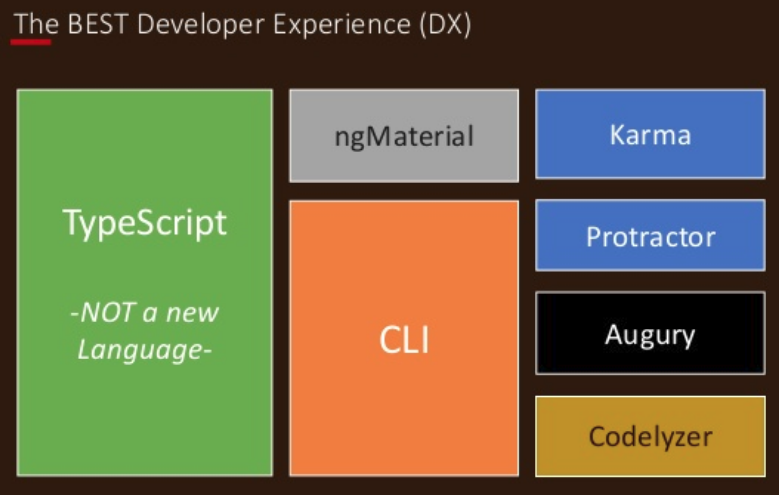
Developer Experience
2.8. Angular CLI vs. Manual setup
There are many ways you can try to create a new project on Angular. But in fact, there are two main approaches, the first one is to use Angular CLI, and the second is to manually configure the Webpack.
Angular cli
The easiest and fastest way to create a new project on Angular. Without resorting to manual configuration, you can deploy the project in a few minutes and start developing even large applications without problems.
Pros:
- Fast and easy to install, perfect for beginners
- Is an add-on Webpack
- Includes Protractor e2e, Karma, Jasmine testing tools.
- No need to follow dependencies
- Centralized configuration file
- Quick and simple CLI commands to run an application, create new components, and more.
Minuses:
- Less advanced configuration (it is not possible to change the built-in Webpack configuration)
- The rigid structure of configuration files (several tsconfig files that are more difficult to move from directory to directory)
- Weak support or the complete absence of plug-ins (it is impossible, for example, to add a Pug-template engine)
All the pros and cons really come down to the following: with the Angular CLI, it is much easier to manage a project, but it also makes the project less flexible. This is great for beginners or simple projects, but most likely in the future you will need a manual approach to customizing your project.
Webpack
In this case, manual configuration using the Webpack is actually the opposite of the pros and cons of the Angular CLI. However, one of the best alternatives to the Angular CLI, in terms of configuration flexibility, is the AngularClass Angular Webpack Starter project. However, by easily configuring the webpack, you can set up a simple environment for your project, leaving only what is needed .
Pros:
- Webpack Advanced Setup
- The ability to use any HTML-template engines
- Net configuration file and directory structure
- Greater flexibility (configuration files are javascript files for which you can write your logic)
Minuses:
- The difficulty of setting up effective e2e testing
- Extended configuration capability increases the likelihood of configuration errors
- Problems with dependencies and their upgrade-updates
Systemjs
SystemJS positions itself as a universal dynamic loader of modules - modules of ES6, AMD, CommonJS and global browser or Node.js packages. Since you use modules in TypeScript, just like in ES6, you need a module loader (in Webpack, loaders are responsible for this). In the case of SystemJS, you write the systemjs.config.js configuration, which allows you to customize how the module names are mapped to their corresponding files in the node_modules directory or elsewhere.
This configuration file is necessary for the case when you use SystemJS on the client, with the help of it you import the main module of your application:
<script> System.import('app').catch(function(err){ console.error(err); }); </script> And running ahead, for the TypeScript configuration you specified a specific parameter of the module type :
{ "compilerOptions": { "target": "es5", "module": "commonjs", // <------ ... Thus, after compiling from TypeScript in your javascript files, you would see inside special functions require (). If you specified "module": "es6", you would see import, export keywords in the compiled files. However, you still cannot use this syntax, because browsers do not yet have full support. If you specified the type "module": "amd", you would see a different syntax that the define () functions used. It is worth noting that SystemJS is still involved in the training tutorial on the official website of the Tour of Heroes; however, after the release of Angular 5, the developers will soon correct the documentation and replace it with examples from the Angular CLI.
SystemJS as one of the modular assembly systems was designed to emulate support for ES6 modules, and as soon as browsers start supporting them, it would be easy to get rid of it, however, in general, this idea failed due to the SystemJS minuses.
Webpack is a fairly flexible build system. It not only handles any types of modules (ES6, AMD, CommonJS), but also allows you to perform adjacent tasks, ensuring the implementation of compression, minification of any files, work with pictures, css-preprocessors and much more. It also provides a web server for development in incremental build mode. When you use Webpack, SystemJS becomes redundant. Webpack prepares for you at least one file with the possible name of bundle.js. This file can contains all the necessary HTML, CSS, JS components of your web components. Since all files are combined into one file, there is no need for a lazy loader, such as SystemJS. The main potential of SystemJS was in lazy loading your files. The application had to load faster, because you don’t download one big bundle, but in practice it was not a very profitable solution.
But even now, Webpack allows you to use code removal from the general bundle (code splitting) and load them with lazy load on demand, and also presents improved Tree Shaking for your modules. Therefore, starting from version 1.2, Angular CLI uses the Webpack implementation inside itself.
In fact, it is almost impossible to find any working Starter Kit using SystemJS, many have either rewritten to Webpack or abandoned. But even if you find it, it will most likely be with the Angular 2 version. Therefore, I highly recommend learning the first two ways to build your Angular applications.
Rollup
Here we will not talk much about this topic. Although there are examples (albeit in comparison with Webpack second version), which code generates a Webpack, and which generates a Rollup at the output, and then the latter is much better. It should be noted again that Webpack is not just a module builder, but much more. Therefore, Webpack is usually better suited for application development, and Rollup is generally better suited for library development.
3. Innovations Angular 5
Those who have already managed to upgrade from the second version to the fourth, could not help but notice how easy it was to do it. In the fifth version, they want to continue this pleasant tradition and do everything to make the transition from Angular 4 to Angular 5 happen as seamlessly as possible. In the future, the automatic update system built into the Angular CLI will be implemented. Now, either you need to use Angular CLI 1.5+, or independently update your packages in the project.
$ npm install @angular/{animations,common,compiler,compiler-cli,core,forms,http,platform-browser,platform-browser-dynamic,platform-server,router}@5.0.0 # Yarn: $ yarn add @angular/{animations,common,compiler,compiler-cli,core,forms,http,platform-browser,platform-browser-dynamic,platform-server,router}@5.0.0 # @5.0.0, @latest 3.1. Improved compiler
TypeScript Transforms
Angular 4:
In the incremental build, the Angular compiler (ngc) recompiled all files with each change, which slowed down the development process.
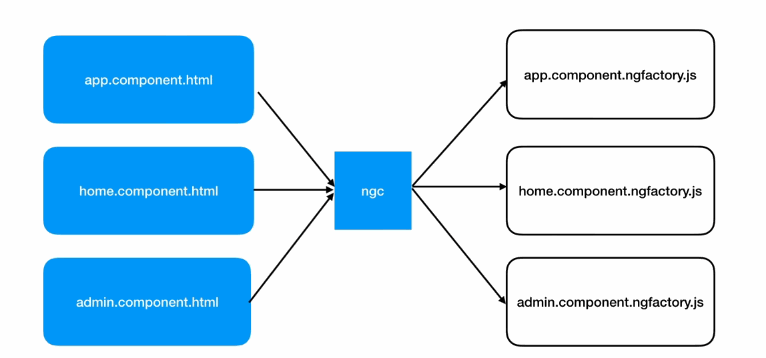
Angular 5:
Now presents an improved watch option that recompiles just what you need.

This means that for medium projects the compilation time was reduced from 12-14 seconds to 2-3 seconds.
Now you have the opportunity to use the incremental build mode in conjunction with the AOT compilation, thanks to which you can find problem areas of your application code even at the development stage. The most common mistakes that anyone had are working with Lazy Modules in different assembly modes. In AngularJS and Angular 2 (initially), only JIT compilation was available, a new type of compilation was added in the future, in older versions of Angular, the AOT mode will be enabled by default, now you need to either specify a special flag (Angular CLI), or use a special webpack loader.
ng serve --aot However, there is a possibility something might go wrong if you previously built your application only in JIT mode :
ng build --prod --aot=false --build-optimizer=false # : ng build --prod --aot=false , , Angular , :
- (Just in time, JIT)
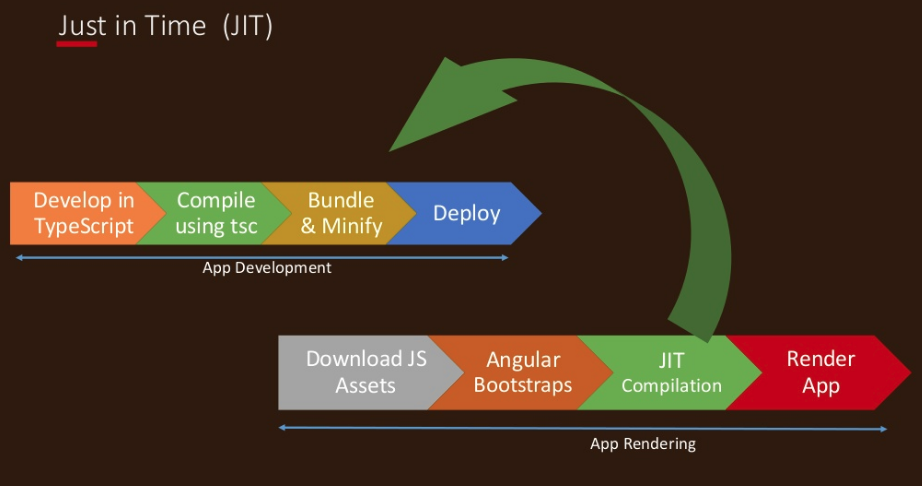
- (Ahead of time, AOT)
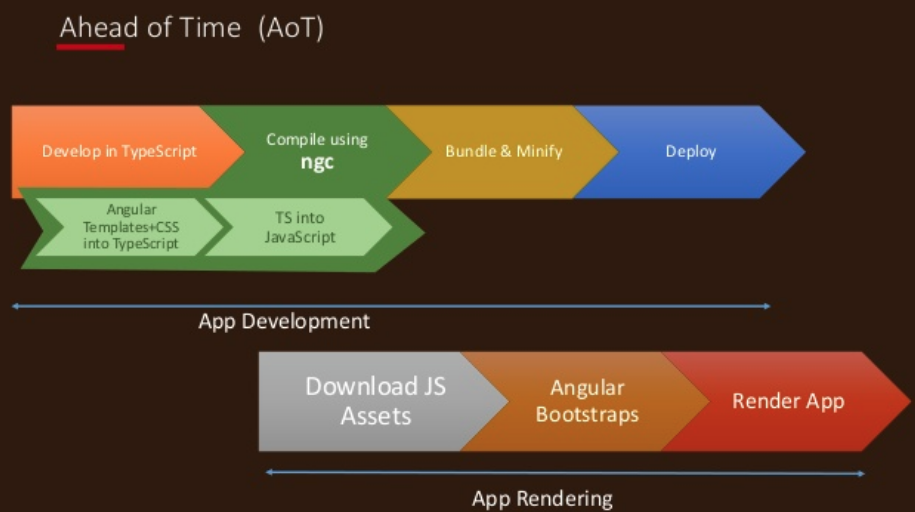
Angular CLI 1.5 , , , - , - . AOT.
Preserve Whitespace
@Component , .
, app.component.html:

, , . , .
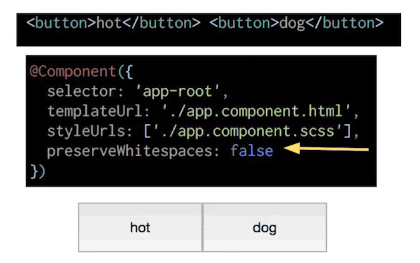
preserveWhitespaces, true. , .
tsconfig.json
{ "extends": "../tsconfig.json", "compilerOptions": { "outDir": "../out-tsc/app", "baseUrl": "./", "module": "es2015", "types": [] }, "angularCompilerOptions": { "preserveWhitespaces": false // <------ }, "exclude": [ "test.ts", "**/*.spec.ts" ] } main.ts
platformBrowserDynamic().bootstrapModule(AppModule, { preserveWhitespaces: false }); pre, , . Angular preserveWhitespaces true. — , - , .
ngPreserveWhitespaces, - , :
<div ngPreserveWhitespaces>hi !+! panda</div> Angular , , d.ts API. , runtime.
:
export function webSocketFactory() { return WebSocket; } @NgModule({ providers: [ { provide: WEBSOCKET, useFactory: webSocketFactory }, ] }) export class AppModule {} :
@NgModule({ providers: [ { provide: WEBSOCKET, useFactory: () => WebSocket }, ] }) export class AppModule {} , . .
fullTemplateTypeCheck, false, . , , :
<!-- lowercase expects a string --> <div>{{ 12.3 | lowercase }}</div> :
Argument of type '12.3' is not assignable to parameter of type 'string' , . , ngModel hasError(), :
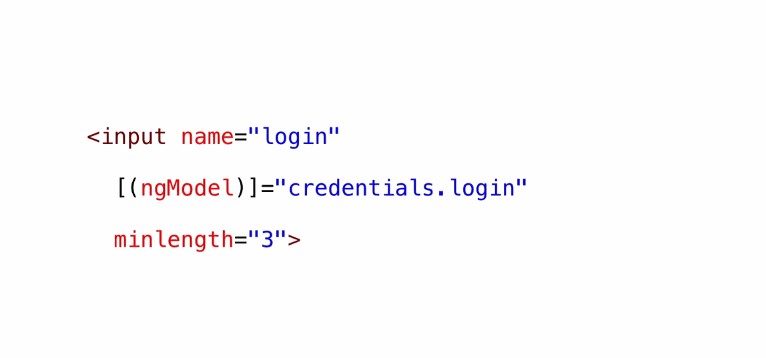
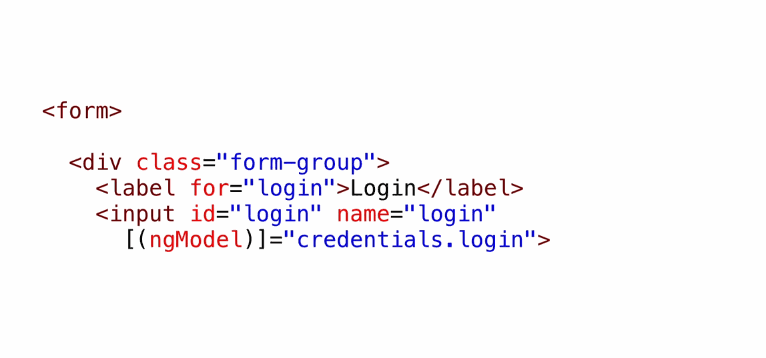
<input [(ngModel)]="user.password" required #loginCtrl="ngModel"> <!-- typo in `hasError()` method --> <div *ngIf="loginCtrl.hasEror('required')">Password required</div> :
Property 'hasEror' does not exist on type 'NgModel'. Did you mean 'hasError'? 3.2.
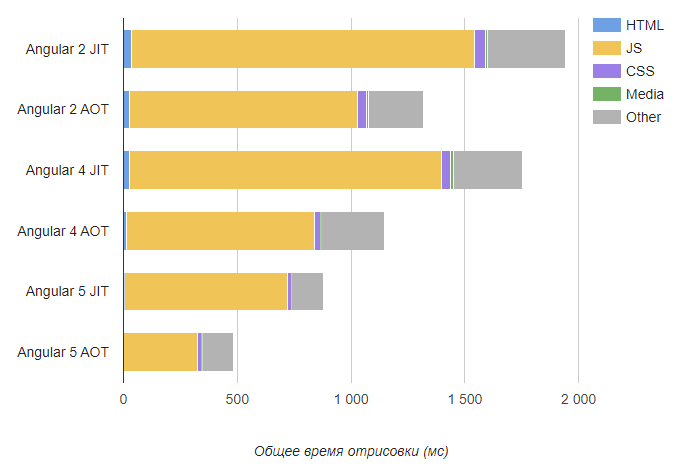
Angular 5.0.0, production builds, Angular CLI, .
Build optimizer — , Angular CLI, , .
AngularMoscow 2017 Google Angular 4 , , Angular 2 Angular 4. , , , Angular 5. , , , Angular 5 .
3.3. server-side rendering Angular Universal
Angular Universal — , (SSR) Angular-. HTML , .
SSR Enterprise-:
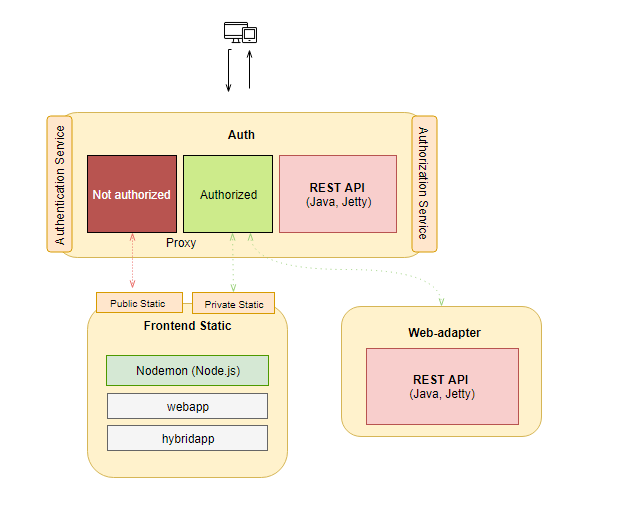
Nodemon ( Express Node.js), server-side-rendering ( headless , ), , . - Node.js - (Java, ASP.NET, ...) (Nginx, HAProxy). - , - Node.js. - , , , - , , .
, , , , , .
starter kit, . . Angular Universal Page Load Performance .
Angular Universal State Transfer API and DOM Support
. ServerTransferStateModule BrowserTransferStateModule. HTTP- . — Domino platform-server. DOM , -- JS- .
3.4.
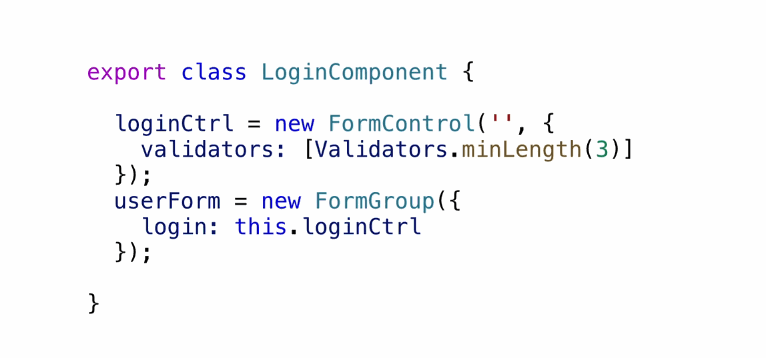
, Enterpise User Interface , , UI . blur submit, . , . asyncValidator options.
Angular 4:
:

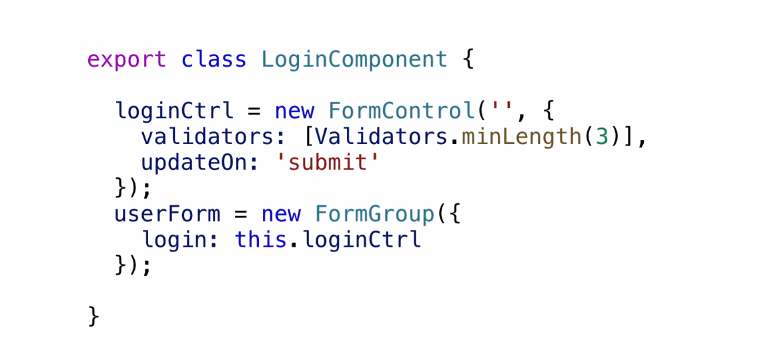
Anguar 5:
updateOn:
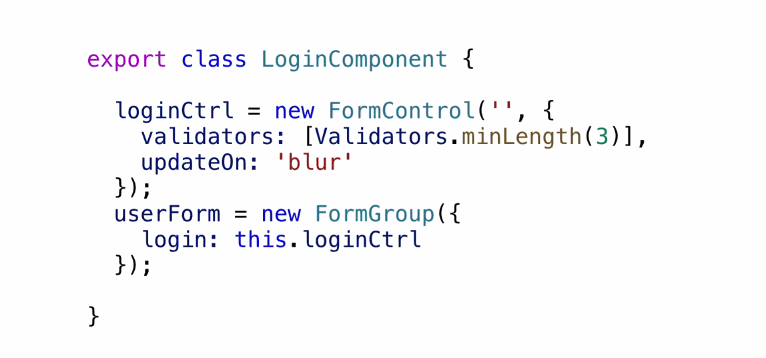
:
ngModel:
ngFormOptions:
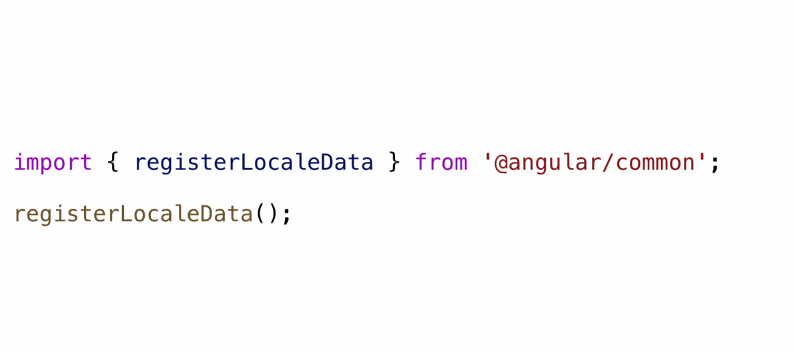
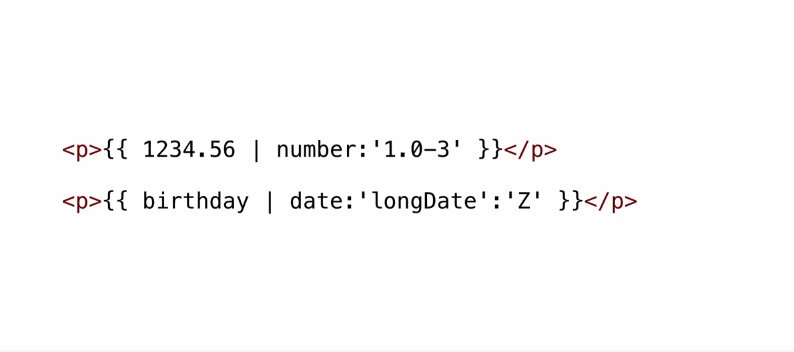
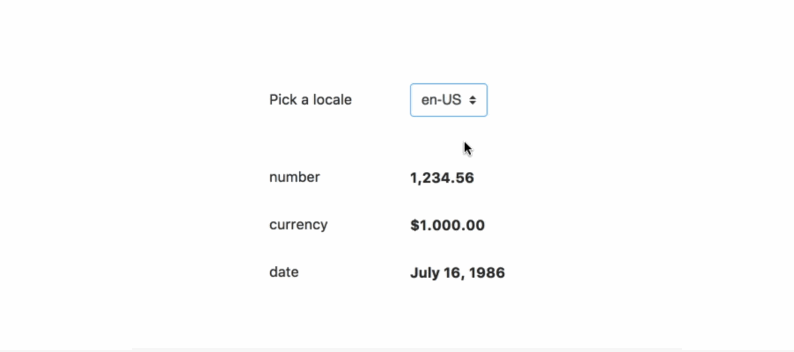
3.5. Pipes
Pipes () Date, Number, Percent Currency, i18n.
Pipes . . , .
:
3.6. ReflectiveInjector StaticInjector
ReflectiveInjector StaticInjector. injector' Reflect. , Reflect - , JIT.
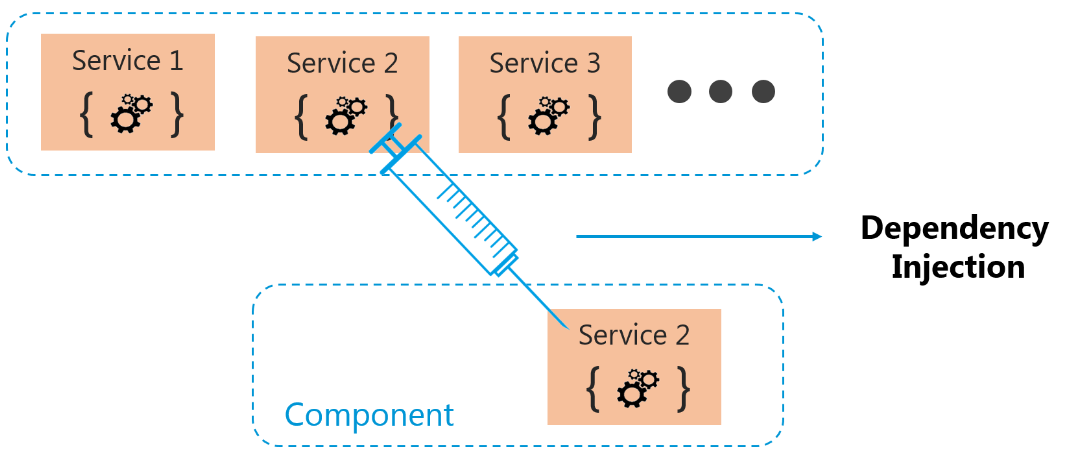
Dependency Injection Angular, . Dependency Injection (DI) — , . DI — , , (), (), . () .
ReflectiveInjector
ReflectiveInjector , Reflect, , Reflective.
class B {} class A { constructor(@Inject(B) b) { } <----- `B` } const i = ReflectiveInjector.resolveAndCreate([A, B]); @Inject , , ReflectiveInjector .
StaticInjector
, :
class B {} class A { constructor(b) {} } const i = Injector.create([{provide: A, useClass: A, deps: [B]]}; const a = i.get(A); , :
class B1 {} class A1 { constructor(@Inject(B1) b) {} } class B2 {} class A2 { constructor(@Inject(B2) b) {} } bootstrapModule(AppModule, {providers: [A1, B1]}).platformBrowserDynamic([A2, B2]) :
class B1 {} class A1 { constructor(b) {} } class B2 {} class A2 { constructor(b) {} } platformBrowserDynamic([{ provide: A1, useClass: A1, deps: [B1] }, B1]) .bootstrapModule(AppModule, { providers: [ {provide: A2, useClass: A2, deps: [B2]}, B2 ] }) ReflectiveInjector - , , , . , .
3.7. NgZone
Angular NgZone . , , , , , Mobx .
platformBrowserDynamic().bootstrapModule(AppModule, {ngZone: 'noop'}).then(ref => {}); 3.8. Multi exportAs
. - .

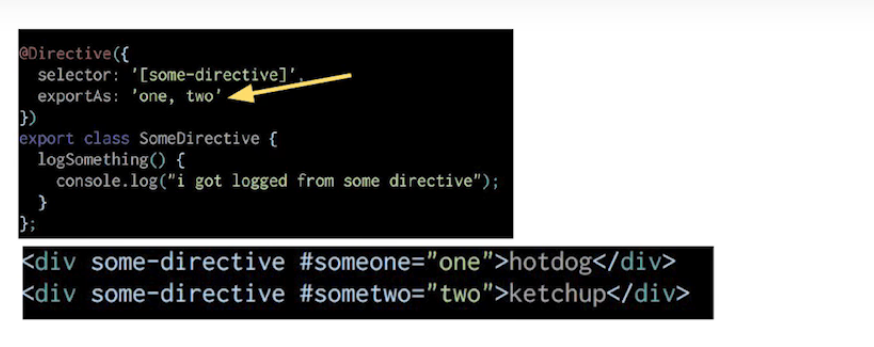
:
@Component({ moduleId: module.id, selector: 'a[mat-button], a[mat-raised-button], a[mat-icon-button]', exportAs: 'matButton, matAnchor', . . . } 3.9. RxJS
RxJS 5.5.2+. «lettable operators» , . patch, splitting / tree shaking.
import { Component, OnInit } from '@angular/core'; import { Observable } from 'rxjs/Observable'; import 'rxjs/add/observable/of'; import 'rxjs/add/operator/map'; import 'rxjs/add/operator/filter'; import 'rxjs/add/operator/do'; @Component({ ... }) export class AppComponent implements OnInit { myObs = Observable.of('Hello', 'Alligator', 'World!'); ngOnInit() { this.myObs .do(x => console.log('The do operator is the do operator!')) .filter(x => x.length > 8) .map(x => x.toUpperCase()) .subscribe(x => console.log(x)); } } :
import { Component, OnInit } from '@angular/core'; import { of } from 'rxjs/observable/of'; import { map, filter, tap } from 'rxjs/operators'; @Component({ ... }) export class AppComponent implements OnInit { myObs = of('Hello', 'Alligator', 'World!'); ngOnInit() { this.myObs .pipe( tap(x => console.log('The do operator is now tap!')), filter(x => x.length > 8), map(x => x.toUpperCase()) ) .subscribe(x => console.log(x)); } } , . lettable- pipe, .
:
do -> tap
catch -> catchError
switch -> switchAll
finally -> finalize
You can read more here .
3.10. Router
. guards / resolvers .
():
GuardsCheckStart,
ChildActivationStart,
ActivationStart,
GuardsCheckEnd,
ResolveStart,
ResolveEnd,
ActivationEnd,
ChildActivationEnd.
class MyComponent { constructor(public router: Router, spinner: Spinner) { router.events.subscribe(e => { if (e instanceof ChildActivationStart) { spinner.start(e.route); } else if (e instanceof ChildActivationEnd) { spinner.end(e.route); } }); } } 3.11. Mobile Experience
@angular/service-worker, Progressive Web Application (PWA). - Material Design 2017 . , .
3.12. Breaking Changes
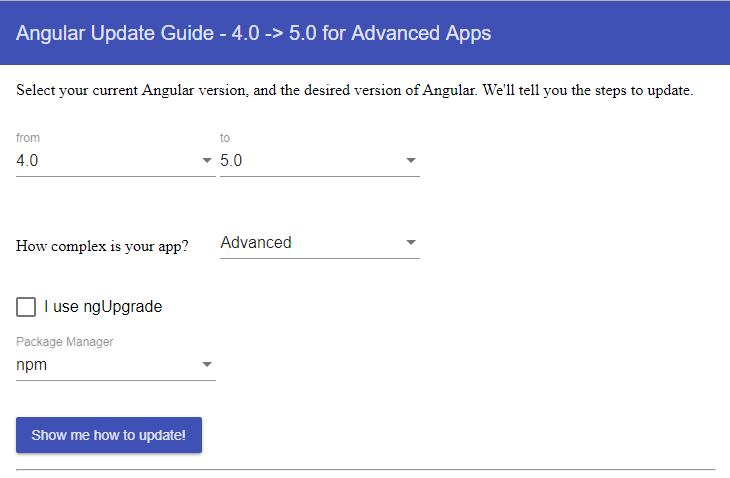
, . , Angular Angular Update Guide , , - .
Pipes
Pipes: Date, Number, Percent Currency, :
@NgModule({ imports: [CommonModule, DeprecatedI18NPipesModule], // ... }) export class AppModule { :
platformBrowserDynamic([ MyCustomProviderA, MyCustomProviderB // depends on MyCustomProviderA ]).bootstrapModule(AppModule); :
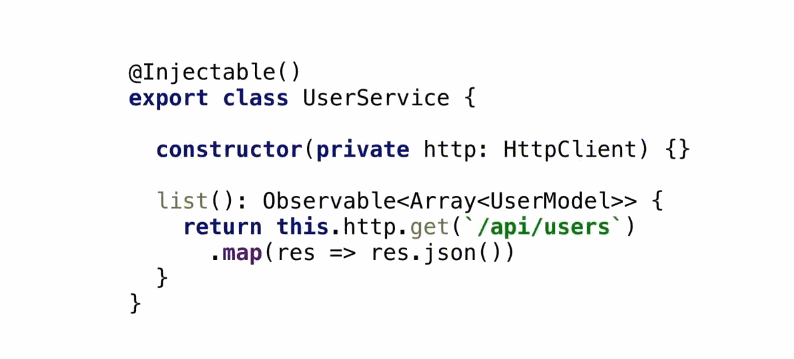
platformBrowserDynamic([ { provide: MyCustomProviderA, deps: [] }, { provide: MyCustomProviderB, deps: [MyCustomProviderA] } ]).bootstrapModule(AppModule); HttpClient
Angular 4.3, HttpClient. Angular 6, , Angular deprecated.
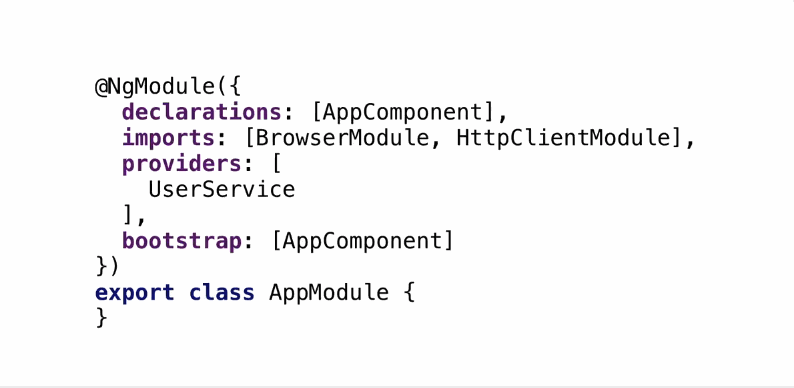
HttpClientModule:
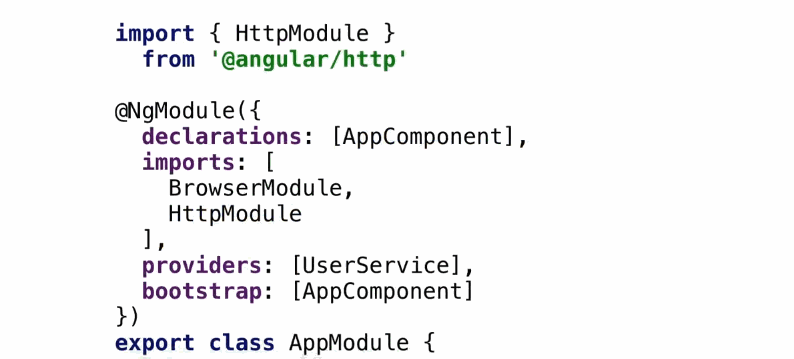
Inject HttpClient:
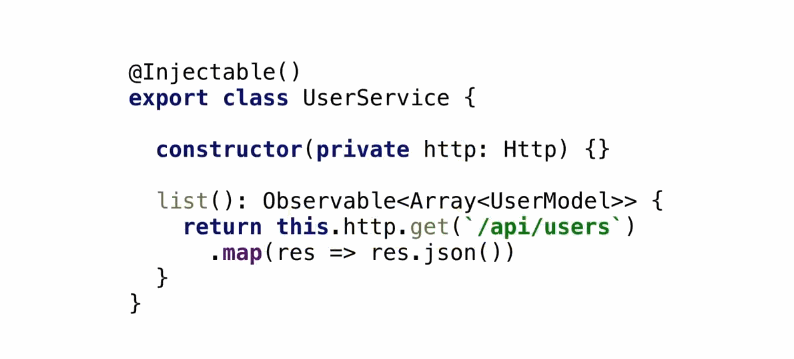
JSON:
(Interceptors):
:
Resource integrity
Angular CLI 1.5 script link integrity crossorigin. , , , «man in the middle». , .
TypeScript
Angular CLI 1.5 , TypeScript ( TypeScript ), Angular. , , - , TypeScript - , , . Angular CLI TypeScript 2.4. , ng set warnings.typescriptMismatch=false (, , ).
appRoot configurable
— src.
In custody
Angular , . , Angular. , Issues Tracker , , , Angular Team, Community. , , ! Until!

')
Source: https://habr.com/ru/post/341688/
All Articles