Configuring VM Instance Google Cloud for machine learning tasks
Solving heavy machine learning problems on stationary computers is a thankless and unpleasant task. Imagine that you are making an ensemble of N neural networks on a home laptop to study the Amazon forests on a laptop. Dubious pleasure, especially since now there is an excellent choice of cloud services for this purpose - Amazon Web Services, Google Cloud Platform, Microsoft Azure and others. Some are even relatively free and provide video cards.
We will configure the VM on the Google Cloud Platform from scratch. Bonus - starting $ 300 for a year on one gmail account. Go.
- Creating and configuring Virtual Machine Instances
- Configure network settings
- Installing Anaconda and Optional Packages
- Jupyter Notebook Setup
- Setting File Transfer
1. Creating and Configuring Virtual Machine Instances
Create an account
From the first steps, it may be misleading that Google categorically categorizes you as a legal entity without the right to change status. This is the norm for quite some time now and we will have to accept this. Next, we fearlessly indicate the payment details, money without warning will not be withdrawn, even when the free limit is reached.
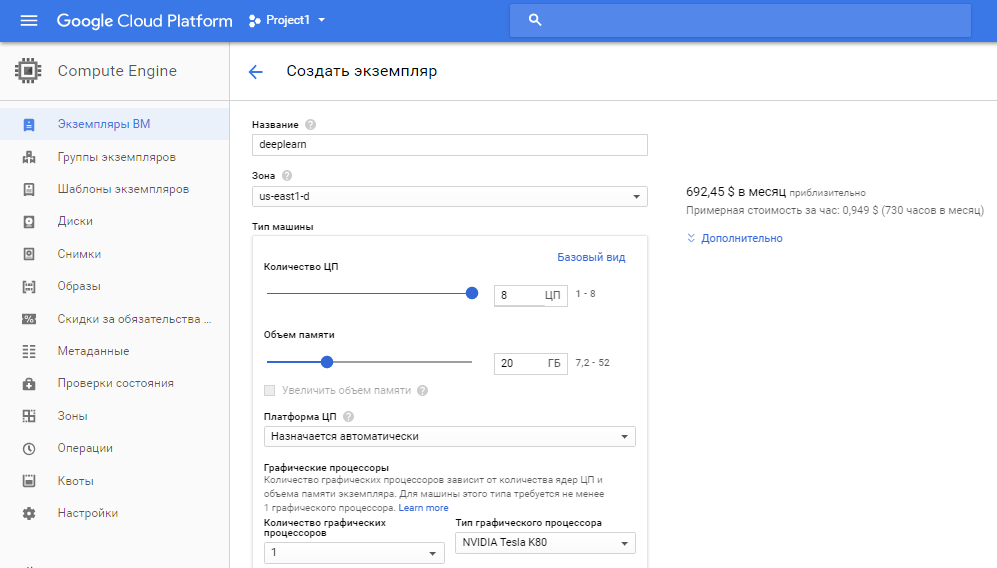
Create a Virtual Machine and select parameters
Here are some interesting points. Graphic processors are not in all zones. I did not find it in European and West Asian countries, I didn’t search in South American, so I chose the East American zone. There you can even set up eight with a subscription fee of $ 5,000 per hour. We average the data and set up eight processors, twenty gigabytes of RAM and one graphics processor. All this pleasure will cost $ 1 per hour.
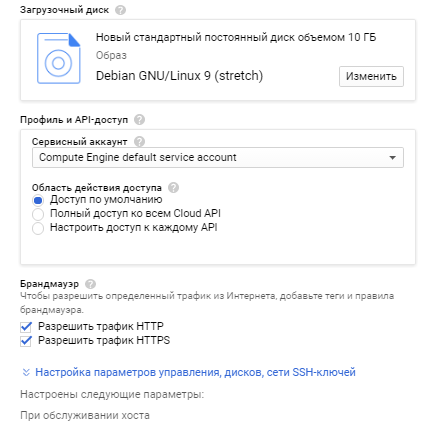
The operating system can be chosen for every taste. Take the Linux distribution you like and set the checkboxes "allow traffic". Network configuration and SSH skip. We will configure them further. And finally, one important point, uncheck the delete boot disk when instance is deleted . This will save your nerves when you start creating images for different tasks.
2. Configure network settings
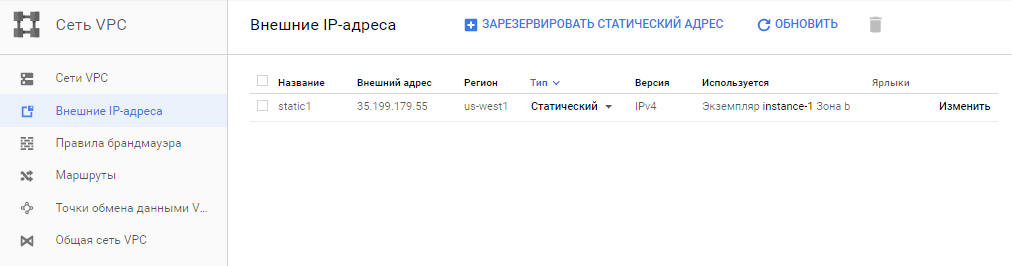
Static IP Configuration
The default external ip is dynamic. Let's make it static and live immediately becomes much easier. When linked to a project or a virtual machine (just our case), it's free.
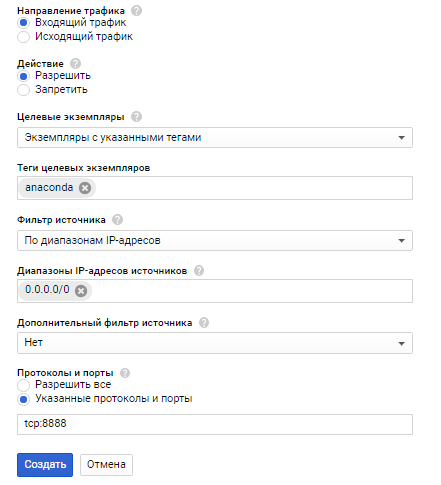
Firewall configuration.
Jupyter Notebook is our main tool and it will need access to the virtual machine. Create a rule with the following parameters:
- Allow incoming traffic
- We indicate any port within reasonable limits. For example, the 22nd will not work, SSH hangs on it.
- The address range is the default 0.0.0.0/0 (can be changed)
We have created a clean VM and you should end up with something like this:

And most importantly - do not forget to turn off the VM when finished work!
3. Installing Anaconda and Optional Packages
Run the created Instance, connect via SSH and to install the Anaconda distribution we enter on the command line:
wget http://repo.continuum.io/archive/Anaconda3-5.0.1-Linux-x86_64.sh bash Anaconda3-5.0.1-Linux-x86_64.sh At the end of the installation, do not forget to enter "yes" to set the PATH variable.
Put your favorite packages:
conda install seaborn conda install keras conda install tensorflow And move on to setting up Jupyter Notebook.
4. Configure Jupyter Notebook
Enter into the command line (port - which you specified in the firewall settings):
echo c.NotebookApp.ip = '*' > ~/.jupyter/jupyter_notebook_config.py echo c.NotebookApp.open_browser = False> ~/.jupyter/jupyter_notebook_config.py echo c.NotebookApp.port = 8888 > ~/.jupyter/jupyter_notebook_config.py Checking:
tail -n 10 ~/.jupyter/jupyter_notebook_config.py Run:
jupyter notebook --ip=0.0.0.0 --port=8888 --no-browser & And now one interesting point. If everything went well with you, after starting Jupiter Server in the bash you will see something like this:
Copy/paste this URL into your browser when you connect for the first time, to login with a token: http://localhost:8888/?token=[ id ] If you click on the link, the authorization error will fall out in the browser, which is quite obvious. To do this, you must explicitly specify the external static IP created above in the browser line:
http: // <your IP>: 8888 /? token = [here will be the token id]
Welcome aboard!
Now we just need to configure File Transfer between our local system and the remote one. Without this, the Amazon forest does not explore.
5. Setting File Transfer
We have a Linux boot disk and therefore four methods are available:
- Using the gcloud command line (private SSH keys required)
- Via SFTP in the browser. This is the easiest way, not requiring an SSH key and using a native browser. Prerequisite - the local system you have Linux or Mac.
- Using the SDC command line (private SSH keys required)
- WinSCP program for happy owners of Windows (private SSH keys required)
You can read in detail here and choose the way you like. I have Windows 10 on my laptop, so the choice is not rich. Let's go not the easiest way and consider in detail the fourth method.
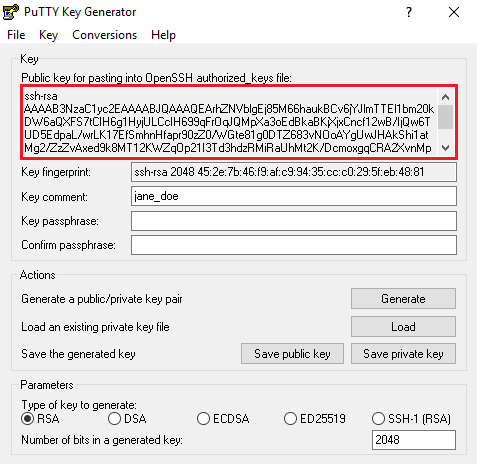
First you need to generate SSH keys. Download the distribution PuTTY and install. With it, we will generate keys.
- Open puttygen.exe. A window will appear where you can generate keys.
- We leave all the default parameters except the key comment field. Enter the username of the remote system into it. Most likely this is your gmail account. It is important - not all mail, but only the part that is up to the @ sign. I first read the instructions diagonally and eventually killed half an hour to understand why WinSCP returned an error.
- Save the private key - it is used locally in WinSCP.
- Copy the private key text field (make sure to copy all the text completely! In the screenshot, only a part of it)
- We go to the Google clouds and there in the "Metadata -> SSH-keys" add the copied key.
Details on Google Offsite
Very little is left; the most pleasant part is to configure the WinSCP file manager.
- Download it here.
- Configure the configuration. Remember that IP is our static IP of the remote system. Username - similar to PuTTY.
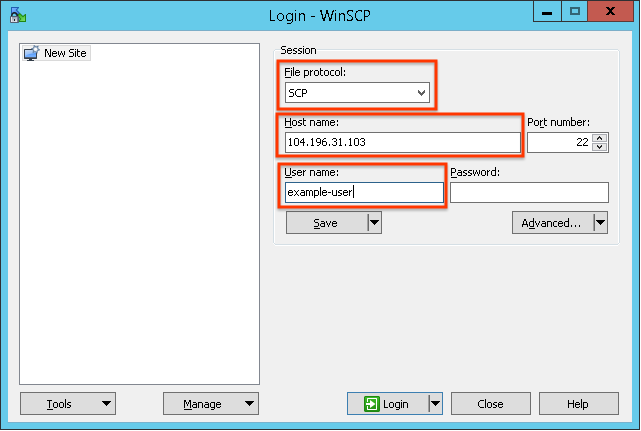
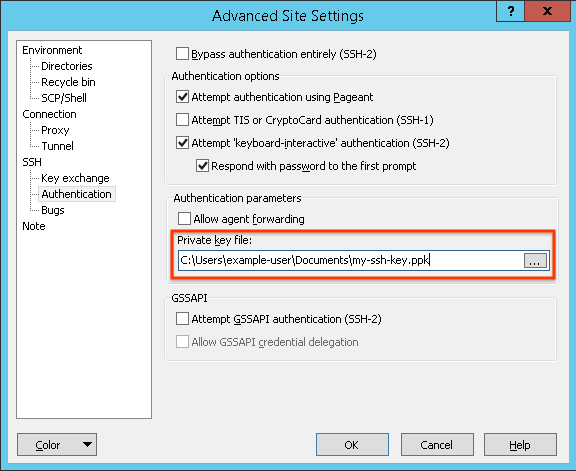
In the additional settings, we specify the private key and set the checkboxes as in the screenshot.
Everything! Our combat system is ready to digest heavy convolutional neural networks and bulk data.
Additionally, I want to note that the use of one Instance is not very reasonable economically. Different tasks require different resources. You can create twelve virtualok with different settings for processors, memory and graphics, or work with images. Experiment and love the data.
Useful links:
')
Source: https://habr.com/ru/post/341446/
All Articles