Reactive brain waves: a story about Muse, JS and browsers
A few months ago, I stumbled upon an intelligent Bluetooth EEG headset and immediately saw its potential in some very interesting areas. Namely, this headset and Web Bluetooth could easily allow to directly connect my brain with web pages.
EEG, or electroencephalography, is a way to monitor the electrical activity of the brain. Usually, during an EEG study, several electrodes are placed on the surface of the head, which then register electrical phenomena associated with the brain. Registration results are recorded in the form of electroencephalograms. The idea of experimenting with this data seemed to me very interesting. EEG is usually used for medical purposes, but recently there have begun to appear projects involving new ways of using data on the electrical activity of the brain.
')
One of these projects is Muse . Its creators sell, for about $ 250, a system that teaches meditation. It includes a well-made EEG headset that supports Bluetooth. Although Muse should teach how to calm my mind, my mind calmed down only after I understood how to work with headset data in a web browser.
(If you also burn with impatience to find out, you can go directly to the code).
The headset can work with applications for Android and iOS. In addition, there is a library, using which you can create your own application based on the data received from the headset. However, it is suitable only for the development of native applications, and its source code was closed (as a result, my dream of managing web pages with the power of thought seemed to seem impracticable at first glance).
When I arrived at the ng-cruise conference, I met Alex Castillo . He talked about how he connected the OpenBCI EEG headset to Angular and visualized the signals coming from it. This headset is created as part of a project with open hardware. Although it all looked very impressive, he had to use a rather complex system based on Node.js and the server on the web sockets to work with data from the headset. And this was not at all what I wanted. However, later, there was a night hackathon, where everyone tried to do something interesting with different pieces of hardware, including the EEG headset. As a result, which is quite natural, I decided to take advantage of the chance that I had.
I tried to reverse the Muse Bluetooth protocol, much like I did with the Magic Blue light bulb. Having spent about an hour, I realized that someone might have already done this. I searched one of the feature numbers I found and found this excellent article through which I went to the Python library that Alexander Barachant wrote. As a result, quite unexpectedly, I had everything I needed. This is how the muse-js library appeared.
Now I could connect to the Muse headset from web applications and work with EEG data coming from it (as well as read the battery charge level, accelerometer data, gyroscope data, and so on). Now I will talk about what I did on the basis of this library.
Before we dive into the code, first get a little better acquainted with the Muse headset. It is made in the form of a miniature headband with built-in batteries. Muse has four EEG electrodes. When putting on the headset, two of them are on the forehead, just above the eyes, two more - in the ear area. In addition, it has a gyroscope and an accelerometer, which makes it possible to determine the orientation of the head of the one who wears the headset. I really liked the fact that Muse has another EEG sensor that can be connected to its own electrode (via Micro USB). In the near future I plan to try it out.
Please note that there are two versions of this headset. One - in 2014, the second - in 2016. You will definitely like the version of 2016, which uses Bluetooth Low Energy. The 2014 headset uses Classic Bluetooth to communicate with the outside world, and thus, it cannot be used with Bluetooth Web.
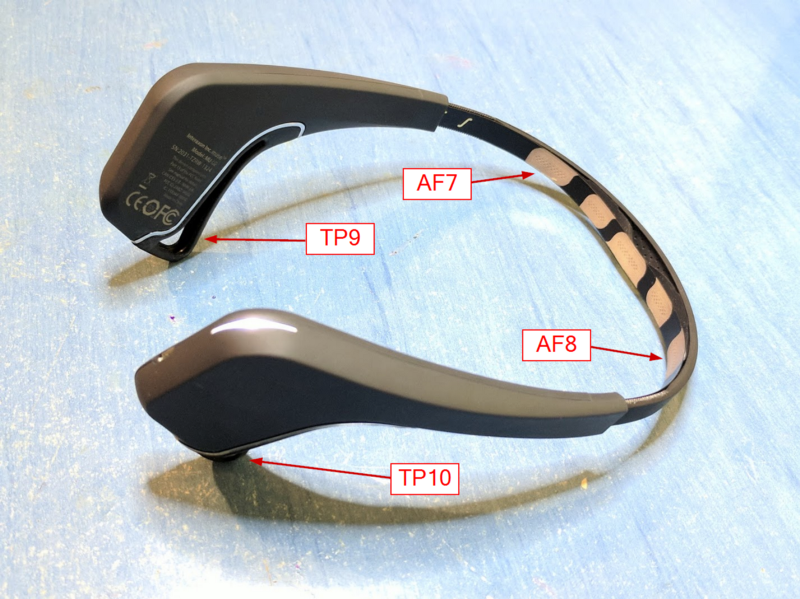
Headset Muse sample of 2016. Electrodes AF7 and AF8 are located on the forehead. TP9 and TP10 Electrodes - near the ears
When I created the library, I needed to choose a way to present incoming EEG data. When working with Bluetooth Web, an event is raised whenever a new packet is received. Each package contains 12 measurement samples from a single electrode. I could consider registering a JavaScript function that would be called each time a new data portion was received, but I decided to implement it using the RxJS (Reactive Extensions Library for JavaScript) library. It includes methods for working with data streams. They can be transformed, created, from them you can extract what you need.
The strength of RxJS is that the library offers a set of functions that allow you to manipulate the raw data streams received from the Muse headset and process them, converting them into something more convenient for further work (which we will soon do).
The first thing that comes to mind when you think about what can be done on the basis of the

My first prototype for visualizing Muse data
In fact, if you have Muse and a browser that supports Web Bluetooth , you can open this page and try everything yourself.

Visualizing the electrical activity of my brain using the Muse, Angular and Smoothie Charts
With this application you can see that the data from the headset does indeed go to the browser. However, to be honest, although observing graphs may be interesting, you will probably get bored pretty soon if you cannot do anything with the data (interestingly, however, how this loss of interest would appear on the graphs ...).
One of the operations performed during EEG diagnostics is the measurement of electric potential (voltage) in different areas of the head. The measured signal is a side effect of brain activity, it can be used to determine the general state of the brain (such as concentration level, detection of unexpected stimuli, and so on).
In addition to electroencephalography, which explores brain activity, there is such a thing as electrooculography (EOG). This is a study in which you can detect eye movements (fortunately, my girlfriend is a vision correction specialist, she explained to me what was happening). Muse has two electrodes located near the forehead, fairly close to the eyes. (They are called AF7 and AF8 - in accordance with the standard electrode positioning system with EEG “10-20%”) This enables us to track eye movements.

The human eye. The cornea, in front, is positively charged; retina, behind, negatively charged
We will use the signals from the electrodes in our electroencephalographic “Hello World” to detect blinks by tracking the activity of the eyes.
We will act like this: we take the stream of EEG data coming from the headset (
Although this may not be the most accurate method for determining the moment of blinking, in my case it went very well. In addition, the code was simple, so easy to understand (all of these are signs of any good “Hello World”).
Before you start working with EEG data, let's set
Then we import the library into the code. In this case, we are talking about the Angular-application - the usual empty project created with the help of Angular CLI. You, if you want, can reproduce all this with the use of React or Vue.js, since in this example there is very little code that is strictly tied to the framework.
Next, we import
The
In the component, create a new instance of
Now here's something more complicated: the code to connect to the headset.
Web Bluetooth requires user intervention to initiate a connection. Therefore, we need to add a button to the component. We will connect to the headset only after the user clicks the button. The logic of connecting to the headset is implemented in the
The

Connect to Muse Headset using Web Bluetooth
The next thing to do is to organize a subscription to the EEG data available in the observable object
This code accepts EEG readings obtained from the device and selects only those that are related to the AF7 electrode, which is located above the left eye. Each packet contains 12 samples; as a result, each element in the observed flow is an object with the following structure:
The
In the next step, we need to select the maximum value from each packet (that is, the measurement with the maximum output value). Here we will process the received stream using the RxJS
Now, since we have a stream of ordinary numbers, we can filter it and skip only values that are greater than 500. These values probably correspond to blinking, and this is what we need:
At this stage, we have a simple blink detection pipeline based on RxJS, but we still need to subscribe to it in order to start receiving data. Let's start with the usual
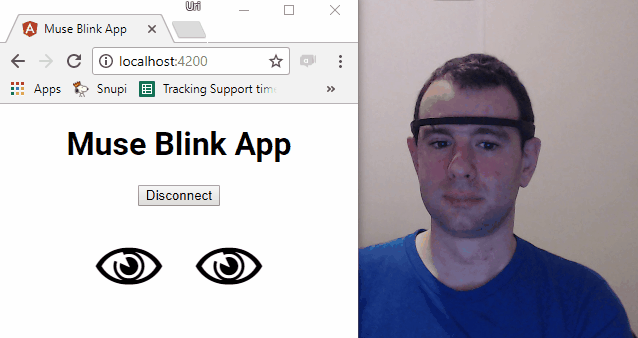
If you run this code, you will probably see a lot of “Blink!” Messages while you are wearing the headset, as there will be a lot of static noise at this time. As soon as the headset is reliably worn, messages should appear only when blinking:
The program responds to blinks
You may see several “Blink!” Messages with each blink. The reason for this is that each blink creates several changes in electrical potential. In order to get rid of unnecessary messages, you need to apply a debounce filter similar to that used when working with mechanical buttons on the Arduino .
Therefore, we will add one more improvement to our project: instead of outputting raw data to the console, we will issue a value of 1 when a blink is detected, then wait half a second after the last potential change, and issue 0. This will filter out the multiple “Blink!” Events that we have seen:
What is the secret of
Now we can use this observable object

This code hides the eye icon when blinking. Instead, you can switch the CSS class and use the color or animate the eye symbol when blinking:

In any case, I recommend, if you can, to blink with only one eye to check the code.
If you create, using the same approach, the React application, you can simply subscribe to this observed object and update the state of the component when you blink:
So we did it! Here it is, “Hello World” for the EEG headset!
Ready "Hello World"
Here you can find the code for this project. I want to express my deep gratitude to Ben Lesch for his help with the preparation of the RxJS code.
Several years ago, the word "electroencephalography" evoked thoughts about cumbersome, terribly expensive equipment, available only to hospitals and research institutions. Today, web developers, just like you and me, can work with data about the electrical activity of the brain, using the usual tools: browser, RxJS, Angular and quite accessible headset.
Probably, EEG is not your topic, but this cannot prevent you from seeing how new generations of “intelligent” devices create a lot of interesting possibilities for programmers. Oh, what a time has come!
Dear readers! What options to use EEG headsets in web development seem to you the most interesting and promising?
EEG, or electroencephalography, is a way to monitor the electrical activity of the brain. Usually, during an EEG study, several electrodes are placed on the surface of the head, which then register electrical phenomena associated with the brain. Registration results are recorded in the form of electroencephalograms. The idea of experimenting with this data seemed to me very interesting. EEG is usually used for medical purposes, but recently there have begun to appear projects involving new ways of using data on the electrical activity of the brain.
')
One of these projects is Muse . Its creators sell, for about $ 250, a system that teaches meditation. It includes a well-made EEG headset that supports Bluetooth. Although Muse should teach how to calm my mind, my mind calmed down only after I understood how to work with headset data in a web browser.
(If you also burn with impatience to find out, you can go directly to the code).
The headset can work with applications for Android and iOS. In addition, there is a library, using which you can create your own application based on the data received from the headset. However, it is suitable only for the development of native applications, and its source code was closed (as a result, my dream of managing web pages with the power of thought seemed to seem impracticable at first glance).
When I arrived at the ng-cruise conference, I met Alex Castillo . He talked about how he connected the OpenBCI EEG headset to Angular and visualized the signals coming from it. This headset is created as part of a project with open hardware. Although it all looked very impressive, he had to use a rather complex system based on Node.js and the server on the web sockets to work with data from the headset. And this was not at all what I wanted. However, later, there was a night hackathon, where everyone tried to do something interesting with different pieces of hardware, including the EEG headset. As a result, which is quite natural, I decided to take advantage of the chance that I had.
I tried to reverse the Muse Bluetooth protocol, much like I did with the Magic Blue light bulb. Having spent about an hour, I realized that someone might have already done this. I searched one of the feature numbers I found and found this excellent article through which I went to the Python library that Alexander Barachant wrote. As a result, quite unexpectedly, I had everything I needed. This is how the muse-js library appeared.
Now I could connect to the Muse headset from web applications and work with EEG data coming from it (as well as read the battery charge level, accelerometer data, gyroscope data, and so on). Now I will talk about what I did on the basis of this library.
Hardware
Before we dive into the code, first get a little better acquainted with the Muse headset. It is made in the form of a miniature headband with built-in batteries. Muse has four EEG electrodes. When putting on the headset, two of them are on the forehead, just above the eyes, two more - in the ear area. In addition, it has a gyroscope and an accelerometer, which makes it possible to determine the orientation of the head of the one who wears the headset. I really liked the fact that Muse has another EEG sensor that can be connected to its own electrode (via Micro USB). In the near future I plan to try it out.
Please note that there are two versions of this headset. One - in 2014, the second - in 2016. You will definitely like the version of 2016, which uses Bluetooth Low Energy. The 2014 headset uses Classic Bluetooth to communicate with the outside world, and thus, it cannot be used with Bluetooth Web.
Headset Muse sample of 2016. Electrodes AF7 and AF8 are located on the forehead. TP9 and TP10 Electrodes - near the ears
Reactive streams and RxJS
When I created the library, I needed to choose a way to present incoming EEG data. When working with Bluetooth Web, an event is raised whenever a new packet is received. Each package contains 12 measurement samples from a single electrode. I could consider registering a JavaScript function that would be called each time a new data portion was received, but I decided to implement it using the RxJS (Reactive Extensions Library for JavaScript) library. It includes methods for working with data streams. They can be transformed, created, from them you can extract what you need.
The strength of RxJS is that the library offers a set of functions that allow you to manipulate the raw data streams received from the Muse headset and process them, converting them into something more convenient for further work (which we will soon do).
Visualization
The first thing that comes to mind when you think about what can be done on the basis of the
muse-js — new library muse-js — data visualization. During the night hackathon, Alex and I started working on the angular-muse project. This is an angular application that visualizes EEG data and shows head position.My first prototype for visualizing Muse data
In fact, if you have Muse and a browser that supports Web Bluetooth , you can open this page and try everything yourself.
Visualizing the electrical activity of my brain using the Muse, Angular and Smoothie Charts
With this application you can see that the data from the headset does indeed go to the browser. However, to be honest, although observing graphs may be interesting, you will probably get bored pretty soon if you cannot do anything with the data (interestingly, however, how this loss of interest would appear on the graphs ...).
In the blink of an eye
One of the operations performed during EEG diagnostics is the measurement of electric potential (voltage) in different areas of the head. The measured signal is a side effect of brain activity, it can be used to determine the general state of the brain (such as concentration level, detection of unexpected stimuli, and so on).
In addition to electroencephalography, which explores brain activity, there is such a thing as electrooculography (EOG). This is a study in which you can detect eye movements (fortunately, my girlfriend is a vision correction specialist, she explained to me what was happening). Muse has two electrodes located near the forehead, fairly close to the eyes. (They are called AF7 and AF8 - in accordance with the standard electrode positioning system with EEG “10-20%”) This enables us to track eye movements.
The human eye. The cornea, in front, is positively charged; retina, behind, negatively charged
We will use the signals from the electrodes in our electroencephalographic “Hello World” to detect blinks by tracking the activity of the eyes.
Beginning of work
We will act like this: we take the stream of EEG data coming from the headset (
muse-js gives access to this data as an observed RxJS object). Then we select only the data from the electrode we need, AF7, which is above the left eye, and look for peaks in the signal, that is, samples, the absolute value of which exceeds 500 µV, which indicates a large change in potential at times of such peaks. Since the electrode is located near the eye, we expect the movement of the eyeball to generate a large potential difference.Although this may not be the most accurate method for determining the moment of blinking, in my case it went very well. In addition, the code was simple, so easy to understand (all of these are signs of any good “Hello World”).
Before you start working with EEG data, let's set
muse-js : npm install --save muse-js Then we import the library into the code. In this case, we are talking about the Angular-application - the usual empty project created with the help of Angular CLI. You, if you want, can reproduce all this with the use of React or Vue.js, since in this example there is very little code that is strictly tied to the framework.
Next, we import
muse-js into the main component of the application: import { MuseClient, channelNames } from `muse-js`; The
MuseClient class MuseClient responsible for interacting with the headset, and channelNames — simply an array used to bring channel names into a convenient form.In the component, create a new instance of
MuseClient : this.muse = new MuseClient(); Now here's something more complicated: the code to connect to the headset.
Web Bluetooth requires user intervention to initiate a connection. Therefore, we need to add a button to the component. We will connect to the headset only after the user clicks the button. The logic of connecting to the headset is implemented in the
onConnectButtonClick method: async onConnectButtonClick() { await this.muse.connect(); this.muse.start(); // TODO: } The
connect() method of the MuseClient initiates a connection to the headset. Then the start() method sends a command to the headset to start collecting EEG data and transfer them to the application.Connect to Muse Headset using Web Bluetooth
The next thing to do is to organize a subscription to the EEG data available in the observable object
muse.eegReadings (this is done where the TODO comment is located in the above code): const leftEyeChannel = channelNames.indexOf('AF7'); this.leftBlinks = this.muse.eegReadings .filter(r => r.electrode === leftEyeChannel) This code accepts EEG readings obtained from the device and selects only those that are related to the AF7 electrode, which is located above the left eye. Each packet contains 12 samples; as a result, each element in the observed flow is an object with the following structure:
interface EEGReading { electrode: number; timestamp: number; samples: number[]; } The
electrode variable will contain a numerical electrode index (use the channelNames array to bring this index to a more understandable electrode name), the timestamp contains the time relative to the start of the measurement when the measurement was made, and samples — an array containing 12 floating point numbers , each element of which contains one EEG-measurement, expressed in microvolts (µV).In the next step, we need to select the maximum value from each packet (that is, the measurement with the maximum output value). Here we will process the received stream using the RxJS
map operator in order to get the desired value: this.leftBlinks = this.muse.eegReadings .filter(r => r.electrode === leftEyeChannel) .map(r => Math.max(...r.samples.map(n => Math.abs(n)))) Now, since we have a stream of ordinary numbers, we can filter it and skip only values that are greater than 500. These values probably correspond to blinking, and this is what we need:
this.leftBlinks = this.muse.eegReadings .filter(r => r.electrode === leftEyeChannel) .map(r => Math.max(...r.samples.map(n => Math.abs(n)))) .filter(max => max > 500) At this stage, we have a simple blink detection pipeline based on RxJS, but we still need to subscribe to it in order to start receiving data. Let's start with the usual
console.log : this.leftBlinks.subscribe(value => { console.log('Blink!', value); }); If you run this code, you will probably see a lot of “Blink!” Messages while you are wearing the headset, as there will be a lot of static noise at this time. As soon as the headset is reliably worn, messages should appear only when blinking:
The program responds to blinks
You may see several “Blink!” Messages with each blink. The reason for this is that each blink creates several changes in electrical potential. In order to get rid of unnecessary messages, you need to apply a debounce filter similar to that used when working with mechanical buttons on the Arduino .
Therefore, we will add one more improvement to our project: instead of outputting raw data to the console, we will issue a value of 1 when a blink is detected, then wait half a second after the last potential change, and issue 0. This will filter out the multiple “Blink!” Events that we have seen:
this.leftBlinks = this.muse.eegReadings .filter(r => r.electrode === leftEyeChannel) .map(r => Math.max(...r.samples.map(n => Math.abs(n)))) .filter(max => max > 500) .switchMap(() => Observable.merge( Observable.of(1), Observable.timer(500).map(() => 0) ) ); What is the secret of
switchMap ? And the following happens: when a new element arrives, switchMap discards the previous stream and calls the specified function to create a new stream. This new stream includes two elements: a value of 1, which we issue immediately using Observable.of , and then a value of 0, which is issued after 500 milliseconds, unless, of course, a new element arrives from the filter string, which restarts switchMap and discards the expected value of 0.Now we can use this observable object
leftBlinks to visualize blinks. This data can be linked to the Angular template using the asynchronous pipeline:This code hides the eye icon when blinking. Instead, you can switch the CSS class and use the color or animate the eye symbol when blinking:
In any case, I recommend, if you can, to blink with only one eye to check the code.
If you create, using the same approach, the React application, you can simply subscribe to this observed object and update the state of the component when you blink:
this.leftBlinks.subscribe(value => { this.setState({blinking: value}); }); So we did it! Here it is, “Hello World” for the EEG headset!
Ready "Hello World"
Here you can find the code for this project. I want to express my deep gratitude to Ben Lesch for his help with the preparation of the RxJS code.
Results
Several years ago, the word "electroencephalography" evoked thoughts about cumbersome, terribly expensive equipment, available only to hospitals and research institutions. Today, web developers, just like you and me, can work with data about the electrical activity of the brain, using the usual tools: browser, RxJS, Angular and quite accessible headset.
Probably, EEG is not your topic, but this cannot prevent you from seeing how new generations of “intelligent” devices create a lot of interesting possibilities for programmers. Oh, what a time has come!
Dear readers! What options to use EEG headsets in web development seem to you the most interesting and promising?
Source: https://habr.com/ru/post/341426/
All Articles