JavaScript, Node, Puppeteer: Chrome Automation and Web Scraping
The puppeteer library for Node.js allows you to automate the work with the Google Chrome browser. In particular, with the help of
Today we will talk about creating a web scraper based on Node.js and
Before you start, you need Node 8+. You can find and download it here by selecting the current (Current) version. If you've never worked with Node before, take a look at these training courses or look for other materials, good enough, plenty of them on the Web.
After installing Node, create a folder for the project and install
')
After installing
First, create a file
Disassemble this code line by line. First we show the big picture.
In this line, we include the previously installed
Here is the main function,
In this line, we call the
It is important to note that the
Due to the use of the
Now let's
Here we run
Here we create a new page in the browser, controlled by the program code. Namely, we request this operation, we wait for its completion and we write down the link to the page in
Using the
Here we request
The
The above code, stored in the
Here's what happens after he successfully runs:
Wonderful! And now, so that it is more fun (and to make debugging easier), we can do the same thing by running Chrome in the normal way.
What would it mean? Try it and see for yourself. To do this, replace this line of code:
On this:
Save the file and run it again using Node:
Great, right? By
Before we go further, we'll do something else. Have you noticed that the screenshot that the program makes includes only part of the page? This is due to the fact that the browser window is slightly smaller than the size of the web page. You can fix this by using the following line, which changes the size of the window:
It must be added to the code immediately after the command to go to the URL. This will cause the program to make a screenshot that looks much better:
Here’s what the final version of the code will look like:
Now that you have mastered the basics of Chrome automation using
First you should look at the documentation for
We will collect data from the Books To Scrape website. This is an imitation of an electronic bookstore created for web scraping experiments.
In the same directory as the
Ideally, after parsing the first example, you should already understand how this code works. But if this is not the case - no big deal.
In this snippet we connect the previously installed
Check this code by adding a line to the
After this, run the program with the
First you need to create a browser instance, open a new page and go to the URL. Here's how we do it all:
Let's sort this code.
In this line, we create an instance of the browser and set the
Here we create a new page in the browser.
Go to
Here we add a delay of 1000 milliseconds in order to give the browser time to fully load the page, but usually this step can be omitted.
Here we close the browser and return the result.
Preliminary preparation is complete, now we will be engaged in scraping.
As you have probably understood, there is a large catalog of real books with conditional data on Books To Scrape. We are going to take the first book located on the page and return its name and price. Here is the home page of the site. Click on the first book (it is highlighted with a red frame).

In the
The construction of the
It’s very good that the Google Chrome developer’s tools allow you to define a specific element selector without much difficulty. In order to do this, simply click the right mouse button on the image and select the
This command will open the
Fine! Now we have a selector and everything is ready to form the
Now the program simulates a click on the first product image, which leads to the opening of the product page.
On this new page we are interested in the name of the book and its price. They are highlighted in the figure below.

To get to these values, we will use the
First,
In this function, we can select the necessary elements. In order to understand how to describe what we need, we’ll use the Chrome developer tools again. To do this, right-click on the book title and select the
In the
Since we need the text contained in this element, we will need to use the
The same approach will help us figure out how to get the price of the book from the page.
You may notice that the line with the price corresponds to the class
Now that we’ve pulled the book’s name and price out of the page, we can return all of this from the function as an object:
The result is the following code:
Here we read the name of the book and the price from the page, save them in the object and return this object, which results in its being written to
Now it remains only to return the
The full code for this example will look like this:
Now you can run the program using Node:
If everything is done correctly, the title of the book and its price will be displayed in the console:
As a matter of fact, all this is web scraping and you have just taken the first steps in this lesson.
Here you may have quite reasonable questions: “Why click on the link leading to the page of the book, if both its name and price are displayed on the home page? Why not take them straight from there? And if we were able to do this, why not read the titles and prices of all the books? ”
The answer to these questions is that there are many approaches to web scraping! In addition, if we limit ourselves to the data displayed on the home page, you may encounter the fact that book titles will be shortened. However, all these reflections give you a great opportunity to practice.
Your goal is to read all the titles of the books and their prices from the home page and return them as an array of objects. Here is what array I got:
You can proceed. Do not read further, try to do everything yourself. I must say that this task is very similar to the one we just solved.
Happened? If not, then here is a hint.
The main difference of this task from the previous example is that here we need to go through the list of data. Here's how to do it:
If you still fail to solve the problem, there is nothing to worry about. This is a matter of practice. Here is one of the possible options for its solution.
From this material, you learned how to use the Google Chrome browser and the Puppeteer library to create a web scraping system. Namely, we looked at the structure of the code, the methods of browser control, the method of creating screen copies, the methods of simulating the user's work with the page, and the approaches to reading and saving data placed on web pages. If this was your first encounter with web scraping, we hope you now have everything you need to get everything you need from the Internet.
Dear readers! Do you use the Puppeteer library and Google Chrome browser without a user interface?
puppeteer you can create programs for automatic data collection from web sites, so-called web scrapers, imitating the actions of a regular user. In such scenarios, a browser without a user interface, the so-called “Headless Chrome”, can be used. Using puppeteer , you can control the browser, which is running normally, which is especially useful when debugging programs.Today we will talk about creating a web scraper based on Node.js and
puppeteer . The author of the material sought to ensure that the article was interesting to the widest possible audience of programmers, therefore, those web developers who already have some experience with puppeteer and those who first encounter such a concept as “ Headless Chrome.Preliminary preparation
Before you start, you need Node 8+. You can find and download it here by selecting the current (Current) version. If you've never worked with Node before, take a look at these training courses or look for other materials, good enough, plenty of them on the Web.
After installing Node, create a folder for the project and install
puppeteer . Along with it, the current version of Chromium will be installed, which is guaranteed to work with the API of interest to us. You can do this with the following command:')
npm install --save puppeteer Example # 1: Making Screen Copies
After installing
puppeteer let's take a simple example. He, with minor changes, repeats the documentation for the library. The code that we are going to look at now makes a screenshot of the given web page.First, create a file
test.js and put the following into it: const puppeteer = require('puppeteer'); async function getPic() { const browser = await puppeteer.launch(); const page = await browser.newPage(); await page.goto('https://google.com'); await page.screenshot({path: 'google.png'}); await browser.close(); } getPic(); Disassemble this code line by line. First we show the big picture.
const puppeteer = require('puppeteer'); In this line, we include the previously installed
puppeteer library as a dependency. async function getPic() { ... } Here is the main function,
getPic() . This function contains code that automates the work with the browser. getPic(); In this line, we call the
getPic() function, that is, execute it.It is important to note that the
getPic() function is asynchronous, it is defined with the async . It uses the async / await construction from ES 2017. Since getPic() is an asynchronous function, it returns a Promise object when called. Such objects are usually called "promises". When a function defined with the async terminates and returns a value, the promise will either be allowed (if the operation completes successfully) or is rejected (if an error occurs).Due to the use of the
async keyword when defining a function, we can execute calls of other functions in it with the await keyword. It suspends the execution of the function and allows waiting for the permission of the corresponding promise, after which the function will continue. If this is all you do not understand yet - just read further and gradually everything will start to fall into place.Now let's
getPic() function code. const browser = await puppeteer.launch(); Here we run
puppeteer . In fact, this means that we launch an instance of the Chrome browser and write a link to it in the browser constant just created. Since the await keyword is used in this line, the execution of the main function will be suspended until the corresponding promise is enabled. In this case, this means waiting for either the successful launch of the Chrome instance or the occurrence of an error. const page = await browser.newPage(); Here we create a new page in the browser, controlled by the program code. Namely, we request this operation, we wait for its completion and we write down the link to the page in
page constant. await page.goto('https://google.com'); Using the
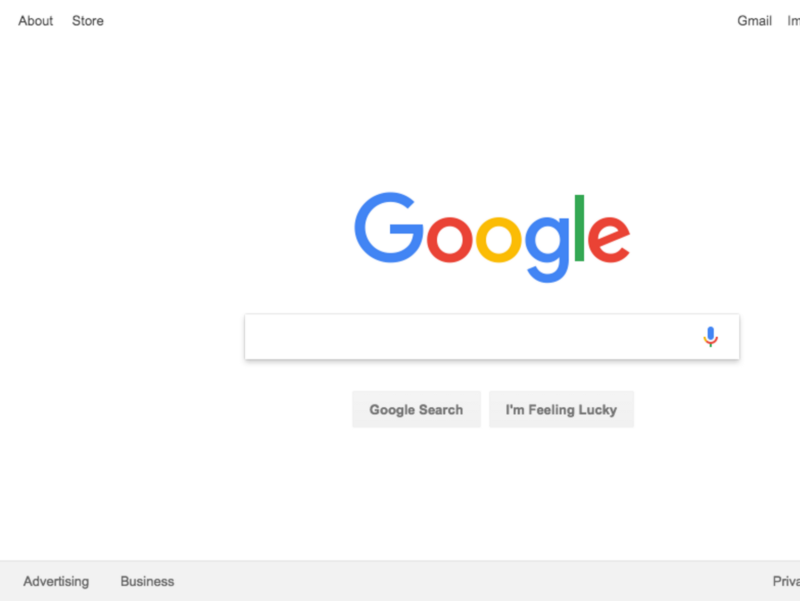
page variable created in the previous line, we can give the page a command to go to the specified URL. In this example, we are going to https://google.com . The execution of the code, as in the previous lines, will pause until the completion of the operation. await page.screenshot({path: 'google.png'}); Here we request
puppeteer create a screenshot of the current page represented by the page constant. The screenshot() method takes, as a parameter, an object. Here you can specify the path by which you want to save the screenshot in .png format. Again, the await keyword is used here, which causes the function to be suspended until the operation is completed. await browser.close(); The
getPic() function getPic() and we close the browser.Run example
The above code, stored in the
test.js file, can be run using Node as follows: node test.js Here's what happens after he successfully runs:
Wonderful! And now, so that it is more fun (and to make debugging easier), we can do the same thing by running Chrome in the normal way.
What would it mean? Try it and see for yourself. To do this, replace this line of code:
const browser = await puppeteer.launch(); On this:
const browser = await puppeteer.launch({headless: false}); Save the file and run it again using Node:
node test.js Great, right? By
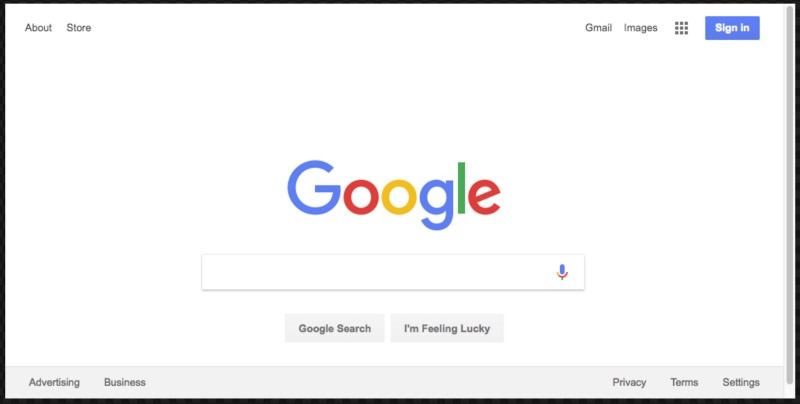
{headless: false} object as a parameter when launching the browser, we can observe how the code controls the operation of Google Chrome.Before we go further, we'll do something else. Have you noticed that the screenshot that the program makes includes only part of the page? This is due to the fact that the browser window is slightly smaller than the size of the web page. You can fix this by using the following line, which changes the size of the window:
await page.setViewport({width: 1000, height: 500}) It must be added to the code immediately after the command to go to the URL. This will cause the program to make a screenshot that looks much better:
Here’s what the final version of the code will look like:
const puppeteer = require('puppeteer'); async function getPic() { const browser = await puppeteer.launch({headless: false}); const page = await browser.newPage(); await page.goto('https://google.com'); await page.setViewport({width: 1000, height: 500}) await page.screenshot({path: 'google.png'}); await browser.close(); } getPic(); Example 2: web scraping
Now that you have mastered the basics of Chrome automation using
puppeteer , let's look at a more complex example in which we will collect data from web pages.First you should look at the documentation for
puppeteer . You can pay attention to the fact that there are a huge number of different methods that allow us not only to simulate mouse clicks on page elements, but also to fill out forms and read data from pages.We will collect data from the Books To Scrape website. This is an imitation of an electronic bookstore created for web scraping experiments.
In the same directory as the
test.js file, create a scrape.js file and paste the following blank there: const puppeteer = require('puppeteer'); let scrape = async () => { // ... // }; scrape().then((value) => { console.log(value); // ! }); Ideally, after parsing the first example, you should already understand how this code works. But if this is not the case - no big deal.
In this snippet we connect the previously installed
puppeteer . Next, we have the scrape() function, in which, below, we will add the code for scraping. This function will return some value. Finally, we call the scrape() function and work with what it returned. In this case, just output it to the console.Check this code by adding a line to the
scrape() function: let scrape = async () => { return 'test'; }; After this, run the program with the
node scrape.js . The word test should appear in the console. The efficiency of the code, we confirmed the desired value falls into the console. Now you can do web scraping.▍ Step 1: Setup
First you need to create a browser instance, open a new page and go to the URL. Here's how we do it all:
let scrape = async () => { const browser = await puppeteer.launch({headless: false}); const page = await browser.newPage(); await page.goto('http://books.toscrape.com/'); await page.waitFor(1000); // browser.close(); return result; }; Let's sort this code.
const browser = await puppeteer.launch({headless: false}); In this line, we create an instance of the browser and set the
headless parameter to false . This allows us to observe what is happening. const page = await browser.newPage(); Here we create a new page in the browser.
await page.goto('http://books.toscrape.com/'); Go to
http://books.toscrape.com/ . await page.waitFor(1000); Here we add a delay of 1000 milliseconds in order to give the browser time to fully load the page, but usually this step can be omitted.
browser.close(); return result; Here we close the browser and return the result.
Preliminary preparation is complete, now we will be engaged in scraping.
▍Step 2: scraping
As you have probably understood, there is a large catalog of real books with conditional data on Books To Scrape. We are going to take the first book located on the page and return its name and price. Here is the home page of the site. Click on the first book (it is highlighted with a red frame).
In the
puppeteer documentation, you can find a method that allows you to simulate mouse clicks on the page: page.click(selector[, options]) The construction of the
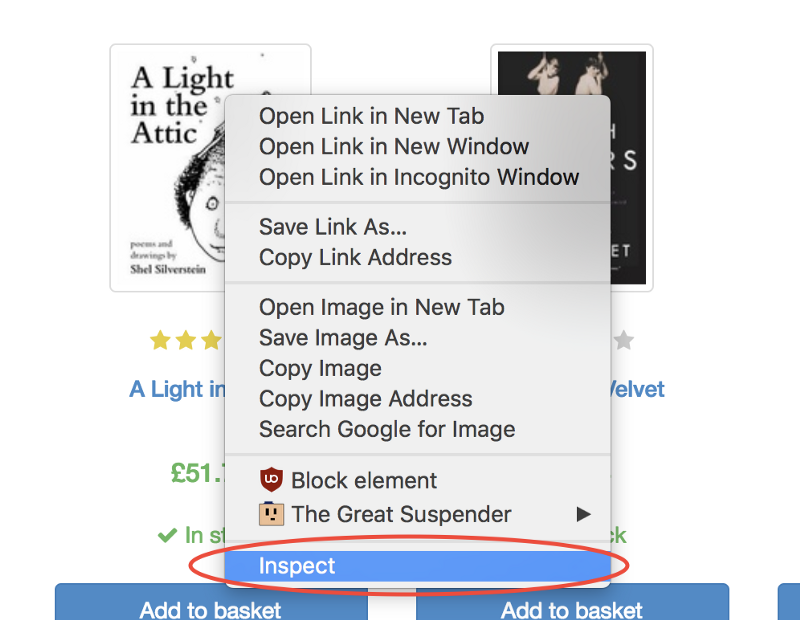
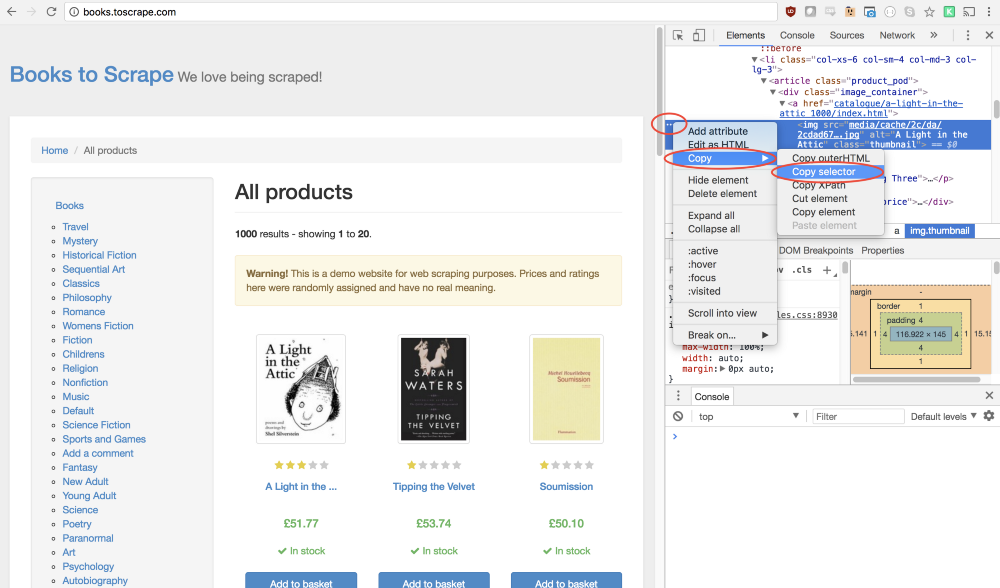
selector <string> is a selector for searching for an element that needs to be clicked. If several elements are found that satisfy the selector, then a click will be made on the first one.It’s very good that the Google Chrome developer’s tools allow you to define a specific element selector without much difficulty. In order to do this, simply click the right mouse button on the image and select the
Inspect command.This command will open the
Elements panel, in which the page code will be displayed, a fragment of which corresponding to the element of interest to us will be highlighted. After that you can click on the button with three dots on the left and in the appeared menu select the command Copy → Copy selector .Fine! Now we have a selector and everything is ready to form the
click method and insert it into the program. Here is what it will look like: await page.click('#default > div > div > div > div > section > div:nth-child(2) > ol > li:nth-child(1) > article > div.image_container > a > img'); Now the program simulates a click on the first product image, which leads to the opening of the product page.
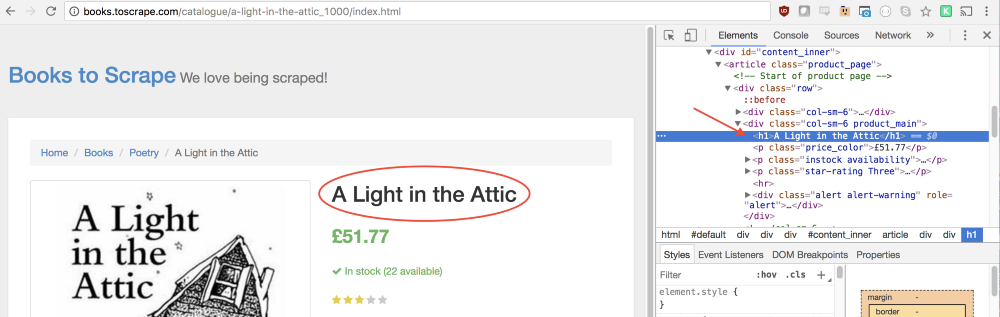
On this new page we are interested in the name of the book and its price. They are highlighted in the figure below.
To get to these values, we will use the
page.evaluate() method. This method allows you to use JavaScript methods to work with the DOM, like querySelector() .First,
page.evaluate() call the page.evaluate() method and set the value returned to it to the result constant: const result = await page.evaluate(() => { // - }); In this function, we can select the necessary elements. In order to understand how to describe what we need, we’ll use the Chrome developer tools again. To do this, right-click on the book title and select the
Inspect command.In the
Elements panel you can see that the title of the book is the usual first-level heading, h1 . This item can be selected using the following code: let title = document.querySelector('h1'); Since we need the text contained in this element, we will need to use the
.innerText property. As a result, we arrive at the following construction: let title = document.querySelector('h1').innerText; The same approach will help us figure out how to get the price of the book from the page.
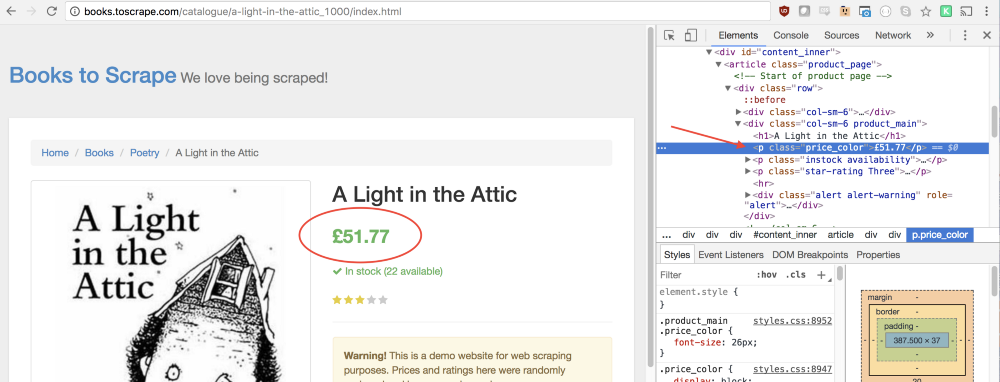
You may notice that the line with the price corresponds to the class
price_color . We can use this class to select an element and read the text contained in it: let price = document.querySelector('.price_color').innerText; Now that we’ve pulled the book’s name and price out of the page, we can return all of this from the function as an object:
return { title, price } The result is the following code:
const result = await page.evaluate(() => { let title = document.querySelector('h1').innerText; let price = document.querySelector('.price_color').innerText; return { title, price } }); Here we read the name of the book and the price from the page, save them in the object and return this object, which results in its being written to
result .Now it remains only to return the
result constant and output its contents to the console. return result; The full code for this example will look like this:
const puppeteer = require('puppeteer'); let scrape = async () => { const browser = await puppeteer.launch({headless: false}); const page = await browser.newPage(); await page.goto('http://books.toscrape.com/'); await page.click('#default > div > div > div > div > section > div:nth-child(2) > ol > li:nth-child(1) > article > div.image_container > a > img'); await page.waitFor(1000); const result = await page.evaluate(() => { let title = document.querySelector('h1').innerText; let price = document.querySelector('.price_color').innerText; return { title, price } }); browser.close(); return result; }; scrape().then((value) => { console.log(value); // ! }); Now you can run the program using Node:
node scrape.js If everything is done correctly, the title of the book and its price will be displayed in the console:
{ title: 'A Light in the Attic', price: '£51.77' } As a matter of fact, all this is web scraping and you have just taken the first steps in this lesson.
Example number 3: improving the program
Here you may have quite reasonable questions: “Why click on the link leading to the page of the book, if both its name and price are displayed on the home page? Why not take them straight from there? And if we were able to do this, why not read the titles and prices of all the books? ”
The answer to these questions is that there are many approaches to web scraping! In addition, if we limit ourselves to the data displayed on the home page, you may encounter the fact that book titles will be shortened. However, all these reflections give you a great opportunity to practice.
▍Task
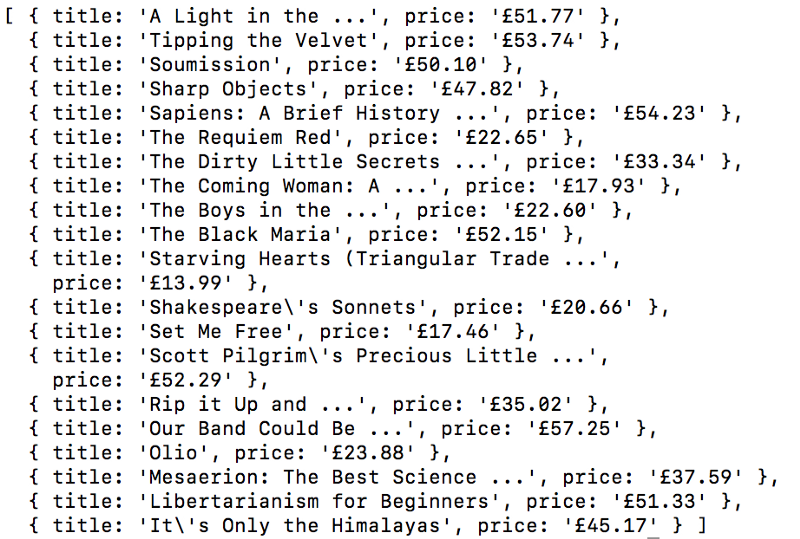
Your goal is to read all the titles of the books and their prices from the home page and return them as an array of objects. Here is what array I got:
You can proceed. Do not read further, try to do everything yourself. I must say that this task is very similar to the one we just solved.
Happened? If not, then here is a hint.
▍Tip
The main difference of this task from the previous example is that here we need to go through the list of data. Here's how to do it:
const result = await page.evaluate(() => { let data = []; // let elements = document.querySelectorAll('xxx'); // // // // data.push({title, price}); // return data; // }); If you still fail to solve the problem, there is nothing to worry about. This is a matter of practice. Here is one of the possible options for its solution.
▍ Solving the problem
const puppeteer = require('puppeteer'); let scrape = async () => { const browser = await puppeteer.launch({headless: false}); const page = await browser.newPage(); await page.goto('http://books.toscrape.com/'); const result = await page.evaluate(() => { let data = []; // let elements = document.querySelectorAll('.product_pod'); // for (var element of elements){ // let title = element.childNodes[5].innerText; // let price = element.childNodes[7].children[0].innerText; // data.push({title, price}); // } return data; // }); browser.close(); return result; // }; scrape().then((value) => { console.log(value); // ! }); Results
From this material, you learned how to use the Google Chrome browser and the Puppeteer library to create a web scraping system. Namely, we looked at the structure of the code, the methods of browser control, the method of creating screen copies, the methods of simulating the user's work with the page, and the approaches to reading and saving data placed on web pages. If this was your first encounter with web scraping, we hope you now have everything you need to get everything you need from the Internet.
Dear readers! Do you use the Puppeteer library and Google Chrome browser without a user interface?
Source: https://habr.com/ru/post/341348/
All Articles