Cloning a 50Gb database from Prod to Dev in 1 second without loss of integrity

Tool list
- Proxmox
- ZFS
- Lxc
- MongoDB as an experimental base
Foreword
My name is Evgeny Savyolov, I do networking, virtualization, Windows and Linux servers, coordinating the work of programmers and customers in a small company.
I see that many use virtualization systems such as Proxmox, but do not know how to take advantage of LXC and ZFS. Many simply use classic file systems, such as Ext4, and the classic methods of cloning and backing up containers. This leads to downtime during cloning of large containers and high server load.
I will try to share my experience.
')
I also prepared the material in the form of a 6-minute screencast. Voice support is not, so you can not look for headphones :). But there are annotations below.
View video
Initial settings
Proxmox
Installed immediately on ZFS
ZFS
Support is enabled by default for Proxmox. The default settings are good. Doubts are caused by: swap partition on ZFS and zvol block size for KVM virtual machines.
Lxc
Support is enabled by default for Proxmox. The default settings are excellent.
MongoDB
Test base for 50Gb inside LXC container created using Proxmox Web Console
Cloning and Testing
1. Let's get acquainted with the source container
Root container file system takes 56.5GiB on disk with snapshots and 30Gib on disk without snapshots.
zfs list rpool/data/containers/subvol-105-disk-1 NAME USED AVAIL REFER MOUNTPOINT rpool/data/containers/subvol-105-disk-1 56.5G 98.3G 30.0G /rpool/data/containers/subvol-105-disk-1 Below you can see that our container occupies 44.4GiB places logically (excluding snapshots and LZ4 compression).
zfs get logicalreferenced rpool/data/containers/subvol-105-disk-1 NAME PROPERTY VALUE SOURCE rpool/data/containers/subvol-105-disk-1 logicalreferenced 44.4G - Inside a Ubuntu 14.04 container with a MongoDB 3.4 database
2. Create a new container in Proxmox, we will clone the original container into it
When creating a new container, be careful, as a template, you must specify the template used in the main container.
That is, if the main container is Ubuntu 14.04, then the new container should also be Ubuntu 14.04.
If this is not done, then after cloning the file system from the source container, the new container will not start. The fact is that besides the file system, containers have certain launch attributes that depend on the OS inside the container.
3. Destroy the file system of the new container.
Replace the number inside the square brackets with the number of the new container. Warning : this operation is irreversible!
zfs destroy rpool/data/images/vm-[111]-disk-1 4. Take a snapshot of the source container
A snapshot is one atomic operation.
ZFS ensures that a snapshot is taken instantly, regardless of the size of the file system. We can also be sure that “inside” the operation of taking a snapshot, no data of the file system (consistency) will be changed.
zfs snapshot rpool/data/images/vm-[105]-disk-1@demo #demo - 5. Make a clone of the source container file system.
File system cloning is always performed with a snapshot of another file system. The name of the clone must be specified taking into account the name of the new container, then after creating the file system, you will not need to change the mount points to launch the container.
zfs clone rpool/data/images/vm-[105]-disk-1@demo rpool/data/images/vm-[111]-disk-1 6. Run the zfs list output and demonstrate that the clone does not consume additional space.
Below you can see that our container occupies 112KiB on disk and refers to 30.0Gib
zfs list rpool/data/containers/subvol-111-disk-1 NAME USED AVAIL REFER MOUNTPOINT rpool/data/containers/subvol-111-disk-1 112K 98.2G 30.0G /rpool/data/containers/subvol-111-disk-1 7. Run the clone container and demonstrate that everything works. Let's change part of the database.
The container can be launched from the Proxmox Web interface or using the following command:
pct start 111 To find out the IP address of the new container, you can go to it.
lxc-attach -n 111 ifconfig exit It remains for us to connect to the cloned database, for example using MongoBooster and change part of the data. I will impose a complex index.
Screenshot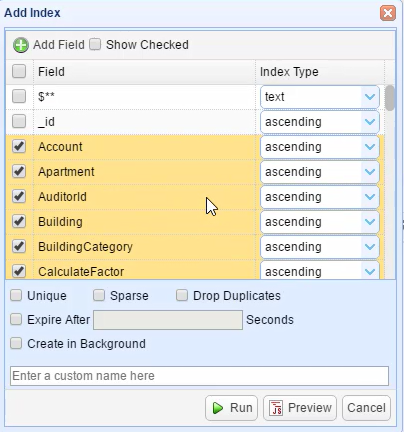
8. Run the zfs list output and demonstrate that the clone consumes the space that was required to change part of the database.
Space is spent only on modified blocks.
Usually, the larger the block size, the more space will be expended, but zfs uses transparent lz4 compression, which reduces the overhead of using efficient 128KiB blocks.
Below you can see that our container occupies 144MiB on disk and refers to 30.1Gib
zfs list rpool/data/containers/subvol-111-disk-1 NAME USED AVAIL REFER MOUNTPOINT rpool/data/containers/subvol-111-disk-1 144M 98.2G 30.1G /rpool/data/containers/subvol-111-disk-1 9. Results
In the future, we will not need to remove or create containers in Proxmox. We simply destroy the clone file system and again remove the clone from the Production base.
This is done instantly. The clone's network settings will not change, as it will not change the Mac address.
Instead of conclusion
Rely on your comments. I will try to answer all interesting questions and supplement the article with these questions and the answers to them, pleasant viewing.
Source: https://habr.com/ru/post/341170/
All Articles