Ember.js: a great framework for web applications
Ember.js is a JavaScript framework for developing client-side web applications, an ambitious project that has recently attracted a lot of attention. Today we want to talk about some of the key concepts that underlie Ember.js, demonstrating them during the creation of a simple application.

This will be the Dice Roller program, which allows you to “throw” the dice, pre-setting their parameters, and view the history of previous “throws”. Its code can be found on Github .
The Ember.js framework includes many modern concepts and technologies from the world of JavaScript. Among its possibilities, I would like to mention the following:
')
In order to get started with Ember.js, you need the latest versions of Node.js and npm. All this can be downloaded from the Node.js website.
In addition, it should be said that Ember.js is a framework focused exclusively on frontend. It supports many ways of interacting with various backends, but everything related to server code is not within Ember’s responsibility.
 The command line interface Ember.js,
Practically everything you do during the creation of an Ember application will, to a certain extent, include the use of
The first step of our work is to install
To check whether the installation was successful, and at the same time to find out which version of
After
Execution of the above command leads to the creation of a workable application layout. She even sets up a Git version control system. Please note that integration with Git can also be disabled, in addition,
Now let's look at what we did. The launch of the Ember application for development purposes, as already mentioned, is performed using
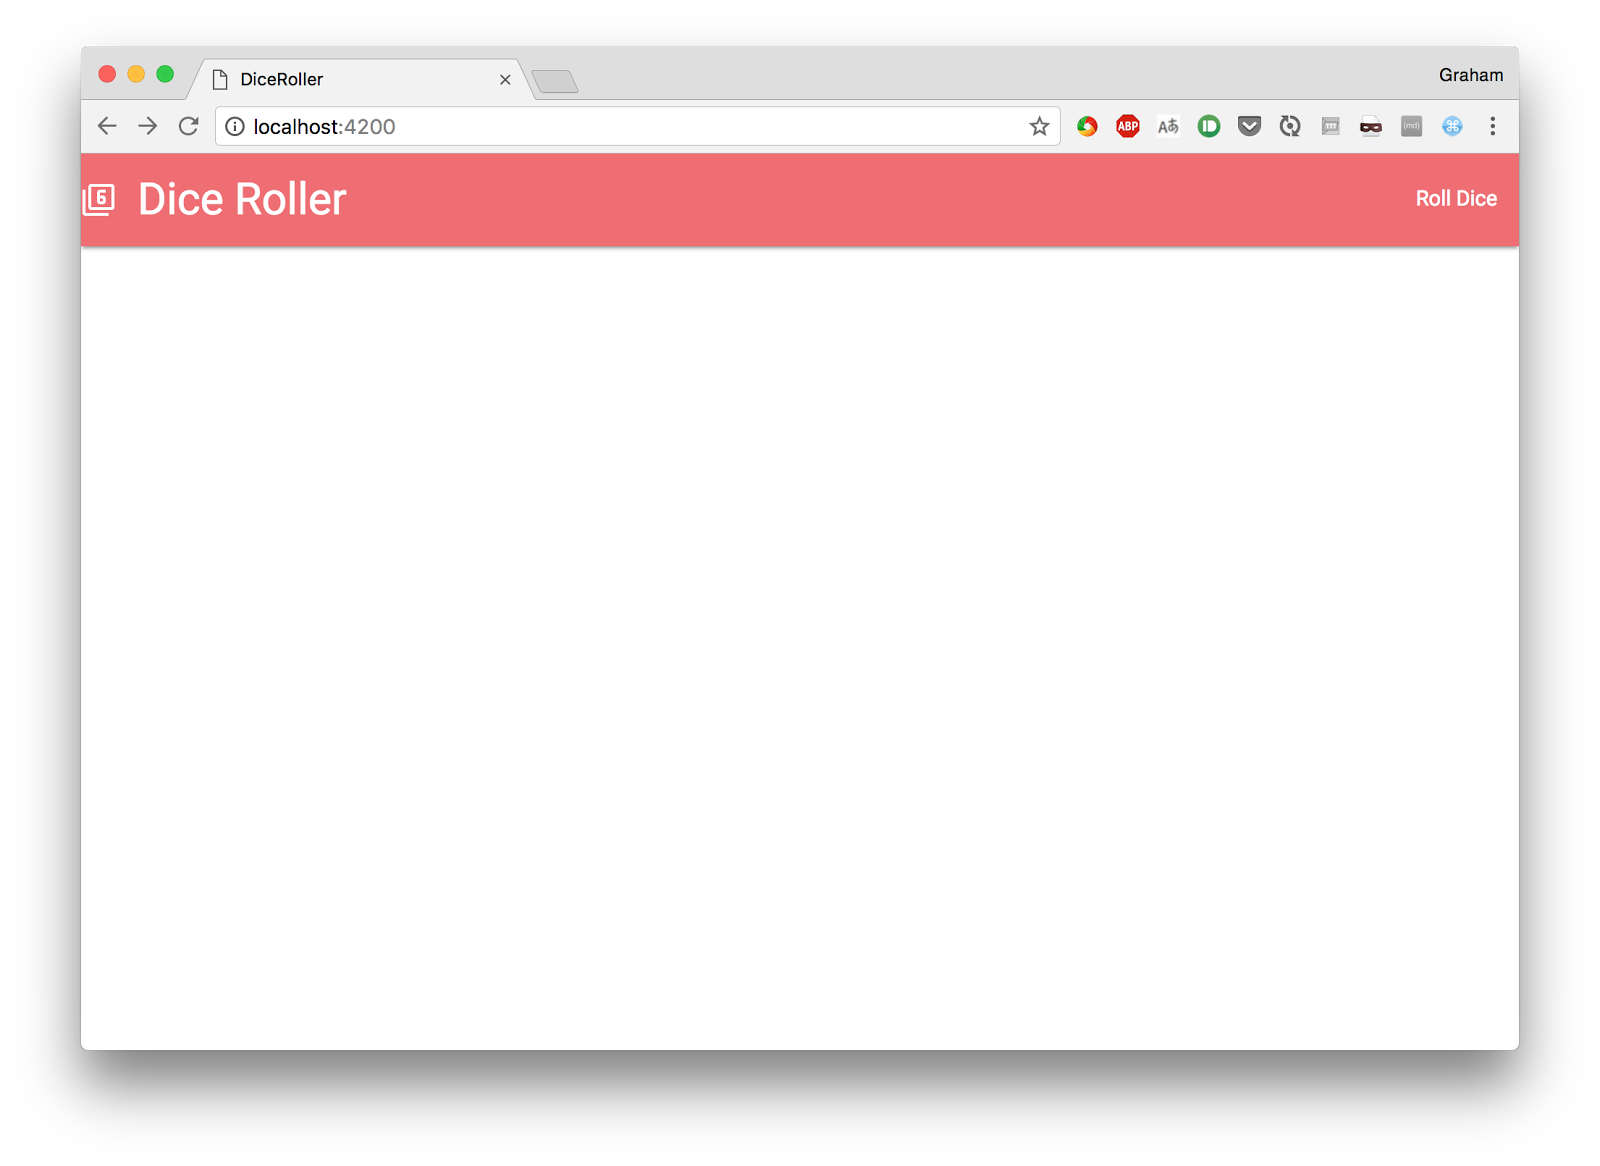
Now everything is ready, the application is available at http: // localhost: 4200 and it looks like this:
In addition to the application itself , LiveReload service is launched , which monitors changes in project files and automatically reloads the page in the browser. This means that during the modification of the site you will very quickly see the result of the changes.
The first page tells us what can be done next, listen to these messages, change the main page and see what happens. To do this, we will bring the file
Note that the
After changing the file, you should immediately look at what will be
Here we are informed that the system has detected a template change, rebuilt and restarted the project. This is a fully automatic process, we do not take part in it.
Now we will look at the browser. If you have
It cannot be said that the appearance of the page is amazing, but what we did with it required a minimum of effort on our part.
In addition, we have a fully ready to use testing subsystem. In order to run it, you need to use the corresponding Ember tool:
Note that the majority of the output data comes from Phantom.js . This is due to the fact that there is full support for integration testing, which, by default, is made in the browser PhantomJS without a graphical interface. There is also the ability to run testing in other browsers, if necessary. When setting up a continuous integration system (CI, Continuous Integration), you should use this opportunity to make sure that the application works correctly in all supported browsers.
Before we work on the application, let's look at the folder and file structure on which it is based. The above command
At the very top level of the application structure, you can pay attention to the following files and folders:
Before continuing, let's take a look at the structure of the page. In this case, we will use the Materialize CSS framework, which allows us to give the page a pleasant look and make it more convenient for the end user.
In order to add support for additional funds to the application, you can use one of the following approaches:
Unfortunately, the add-on for Materialize is not yet working with the latest version of Ember.js, so we will enable this framework on the main page of the application, using the link to the CDN resource. In order to do this, you need to edit the file
Now you can change the main page so that it displays the basic application template. This is done by bringing the
Thanks to this code at the top of the page will be a navigation bar, prepared by means of Materialize. The page also has a container in which the
Now, if you look at the browser, you can find that the page looks like the one shown in the figure below.
It's time to talk about the
The
Access to each application page on Ember.js is organized through a route (Route). There is a direct correspondence between the URL that opens the browser and the materials related to the route that the application displays.
The easiest way to get acquainted with this concept is by example. Add to the application a new route that allows the user to “throw” the dice. This step is again performed using
Here is what was created by calling this command:
Let's look at how this works. For now we will have a very simple page containing elements that describe the dice and a button that, a little later, will allow it to “quit”. In order to form this page, put the following code in the template file
After that, visit http: // localhost: 4200 / roll and see what happens.
Now we need a way to organize the transition to this page through the application interface. Ember makes it easy to solve this problem by using the
Include the following in the
This will cause the navigation bar at the top of the page to appear as shown in the figure below.
A new link,
If you try to work with the application, try it, you will notice a problem. The home page opens normally, the
Work with the components. Components are parts of the user interface that have a full life cycle and can interact with. In addition, using components, you can, if necessary, create user interface elements suitable for reuse. We will talk about it later.
Now we are going to create a single component that represents a
As a result, the system creates the following:
Now we are going to move all the markup to the component. This will not directly affect how the application works, but in the future will help us configure it the way we need it.
Let's give the
Now put the following code in the file
The same markup that used to be located in the route pattern file got into the component template. The route pattern file has become much easier. The
If you look now at how the application looks in the browser, we will not see any difference. However, the code device has changed, it has become modular. We are going to use the component we have just created in order to fix the wrong page layout and add some new features to our application.
Components in Ember differ in a particular life cycle, while provision is made for hooks that are called at various stages of their life cycle. We are going, in order to allow Materialize to correctly display the signatures, to use the
To do this, edit the component code, which can be found in the file
Now, every time we visit the
We would like to use the component to load data into the user interface and unload it from it. It's very easy to do this, but, interestingly, there's nothing about this in the Ember manual. As a result, the data binding procedure in Ember looks more complicated than it actually is.
Each piece of data with which we want to work exists in the form of a field of the
In this case, there are three fields, so you need to add three lines of code to
Then we set up a template for outputting this data using auxiliary mechanisms instead of the usual HTML markup. In order to do this, you need to replace the
Notice that the syntax of the
All this means that now we can work with the three fields of the component as if they are the values of the input fields, and the rest of the work is done by the internal Ember mechanisms.
. ,
, , ( ).
, ,
, , . DOM — , — JS-.
. ,
, , , , .
, - «» . . «» . :
, , Ember .
Ember (Store), (Models). — , (Model) , . , , .
. ( , ), . .
, , — . , , , , , . , DOM Ember , - .
, , , , . , , .
, , ,
,
, , , . —
,
, , , , , , .
, , .
, , :
, .
, «» . ,
, ,
Ember.js, . Ember.js , , , ember-localstorage-adapter , . . , .
, - , . ,
Ember ,
index
, . «»:
, , , , «» . , , , . .
Ember . , , React, Ember , - .
Ember . , Ember . , , « », Ember . Ember, , , ( ) , , .
Ember — , -. , , , , , .
Dear readers! Ember.js?
This will be the Dice Roller program, which allows you to “throw” the dice, pre-setting their parameters, and view the history of previous “throws”. Its code can be found on Github .
The Ember.js framework includes many modern concepts and technologies from the world of JavaScript. Among its possibilities, I would like to mention the following:
')
- Use the Babel transpiler to provide support for ES2016.
- Support for Testem and QTest testing tools , which opens up opportunities for modular, integration and acceptance testing.
- Broccoli.js collector support.
- Interactive reloading of web pages, which speeds up the development process.
- Handlebar template engine support.
- Using the development model, the implementation of which first creates URL routes. This provides full support for deep links.
- The presence of a layer for working with data, based on the JSON API, but supporting the connection to any API with which you need to work.
In order to get started with Ember.js, you need the latest versions of Node.js and npm. All this can be downloaded from the Node.js website.
In addition, it should be said that Ember.js is a framework focused exclusively on frontend. It supports many ways of interacting with various backends, but everything related to server code is not within Ember’s responsibility.
Discover ember-cli
The command line interface Ember.js, ember-cli , provides access to the many features of this framework. Ember-cli supports the programmer at all stages of work. It simplifies creating an application, extending its functionality, testing and launching a project in development mode.Practically everything you do during the creation of an Ember application will, to a certain extent, include the use of
ember-cli . Therefore it is important to study this tool. We, in the course of work on the educational project, will constantly use it.The first step of our work is to install
ember-cli , or, if it is already installed, to check the relevance of the existing version. You can install ember-cli from the npm registry with the following command: $ npm install -g ember-cli To check whether the installation was successful, and at the same time to find out which version of
ember-cli installed, you can use the following command: $ ember --version ember-cli: 2.15.0-beta.1 node: 8.2.1 os: darwin x64 Creating the first application on Ember.js
After
ember-cli installed, we are ready to start creating the application. This is the first situation in which we will use ember-cli . He creates the structure of the application, customizes it and gives us a working project. Create a dice-roller application with the following command: $ ember new dice-roller installing app create .editorconfig create .ember-cli create .eslintrc.js create .travis.yml create .watchmanconfig create README.md create app/app.js create app/components/.gitkeep create app/controllers/.gitkeep create app/helpers/.gitkeep create app/index.html create app/models/.gitkeep create app/resolver.js create app/router.js create app/routes/.gitkeep create app/styles/app.css create app/templates/application.hbs create app/templates/components/.gitkeep create config/environment.js create config/targets.js create ember-cli-build.js create .gitignore create package.json create public/crossdomain.xml create public/robots.txt create testem.js create tests/.eslintrc.js create tests/helpers/destroy-app.js create tests/helpers/module-for-acceptance.js create tests/helpers/resolver.js create tests/helpers/start-app.js create tests/index.html create tests/integration/.gitkeep create tests/test-helper.js create tests/unit/.gitkeep create vendor/.gitkeep NPM: Installed dependencies Successfully initialized git. $ Execution of the above command leads to the creation of a workable application layout. She even sets up a Git version control system. Please note that integration with Git can also be disabled, in addition,
yarn can be used instead of the package manager npm . Details on this can be found in the Ember documentation.Now let's look at what we did. The launch of the Ember application for development purposes, as already mentioned, is performed using
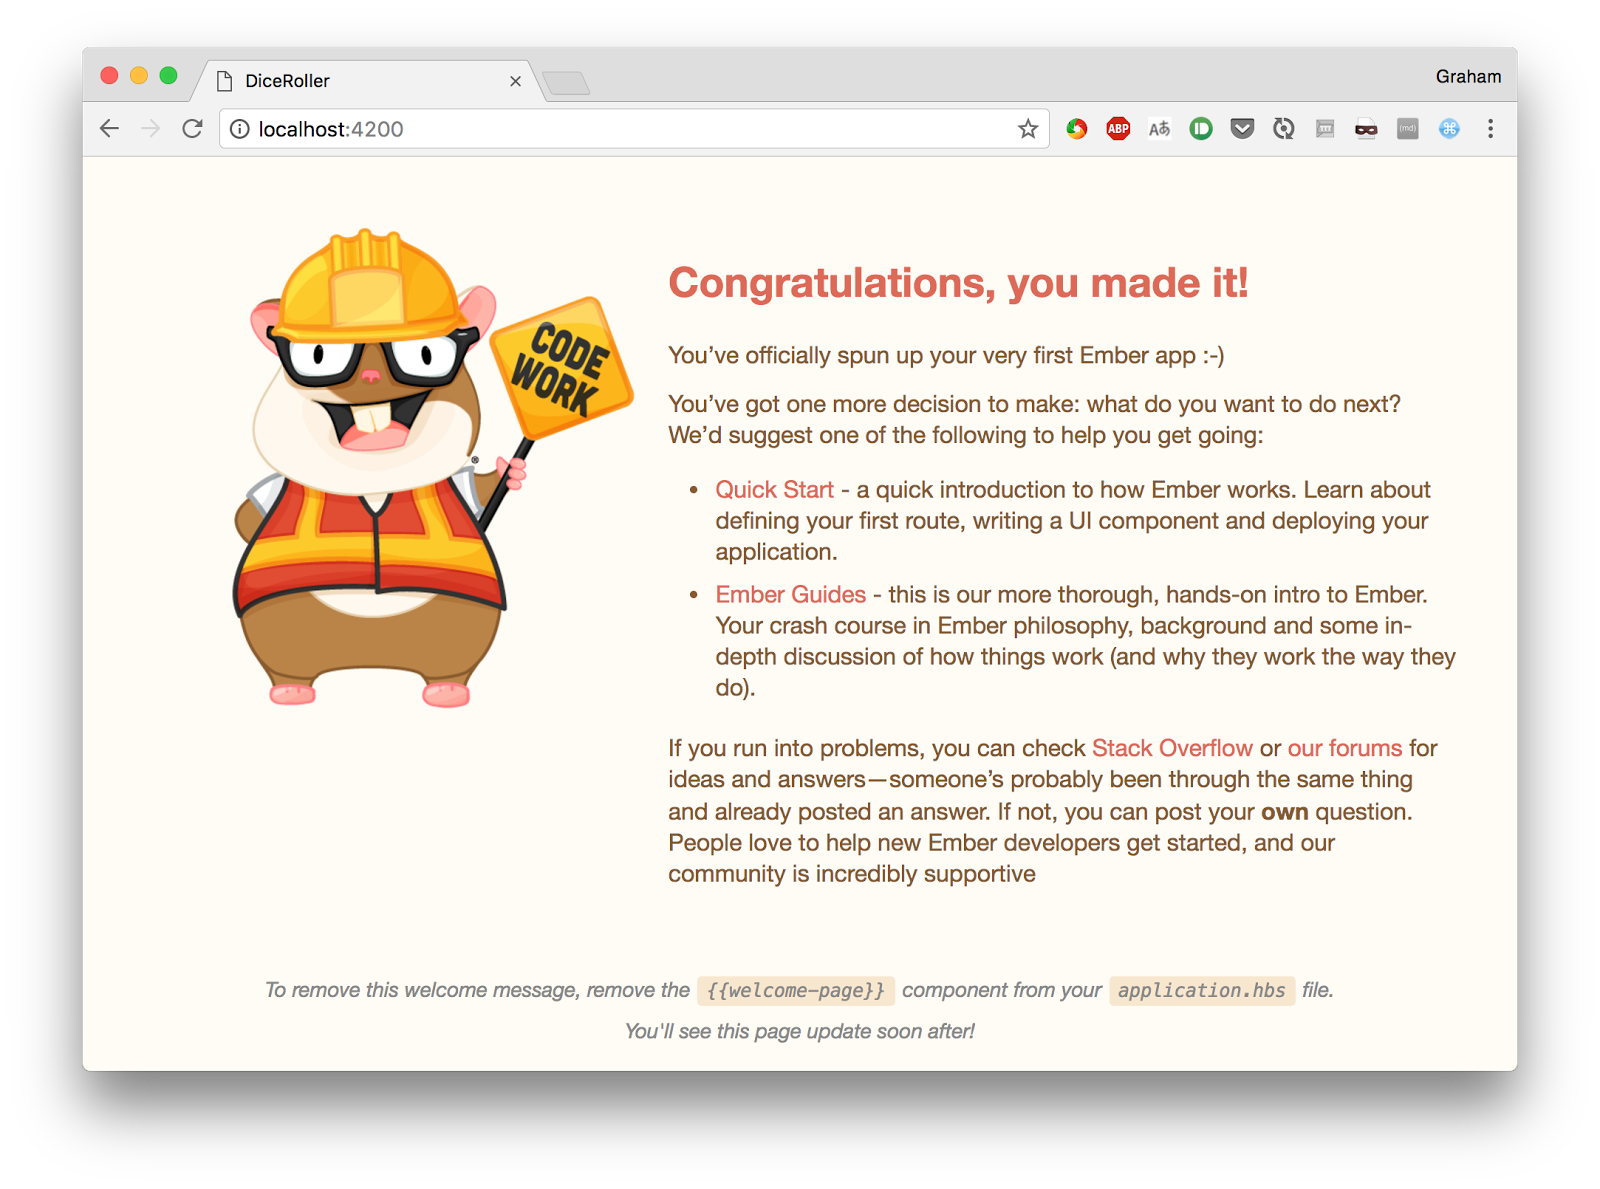
ember-cli . This is done like this: $ cd dice-roller $ ember serve Livereload server on http://localhost:49153 'instrument' is imported from external module 'ember-data/-debug' but never used Warning: ignoring input sourcemap for vendor/ember/ember.debug.js because ENOENT: no such file or directory, open '/Users/coxg/source/me/writing/repos/dice-roller/tmp/source_map_concat-input_base_path-2fXNPqjl.tmp/vendor/ember/ember.debug.map' Warning: ignoring input sourcemap for vendor/ember/ember-testing.js because ENOENT: no such file or directory, open '/Users/coxg/source/me/writing/repos/dice-roller/tmp/source_map_concat-input_base_path-Xwpjztar.tmp/vendor/ember/ember-testing.map' Build successful (5835ms) – Serving on http://localhost:4200/ Slowest Nodes (totalTime => 5% ) | Total (avg) ----------------------------------------------+--------------------- Babel (16) | 4625ms (289 ms) Rollup (1) | 445ms Now everything is ready, the application is available at http: // localhost: 4200 and it looks like this:
In addition to the application itself , LiveReload service is launched , which monitors changes in project files and automatically reloads the page in the browser. This means that during the modification of the site you will very quickly see the result of the changes.
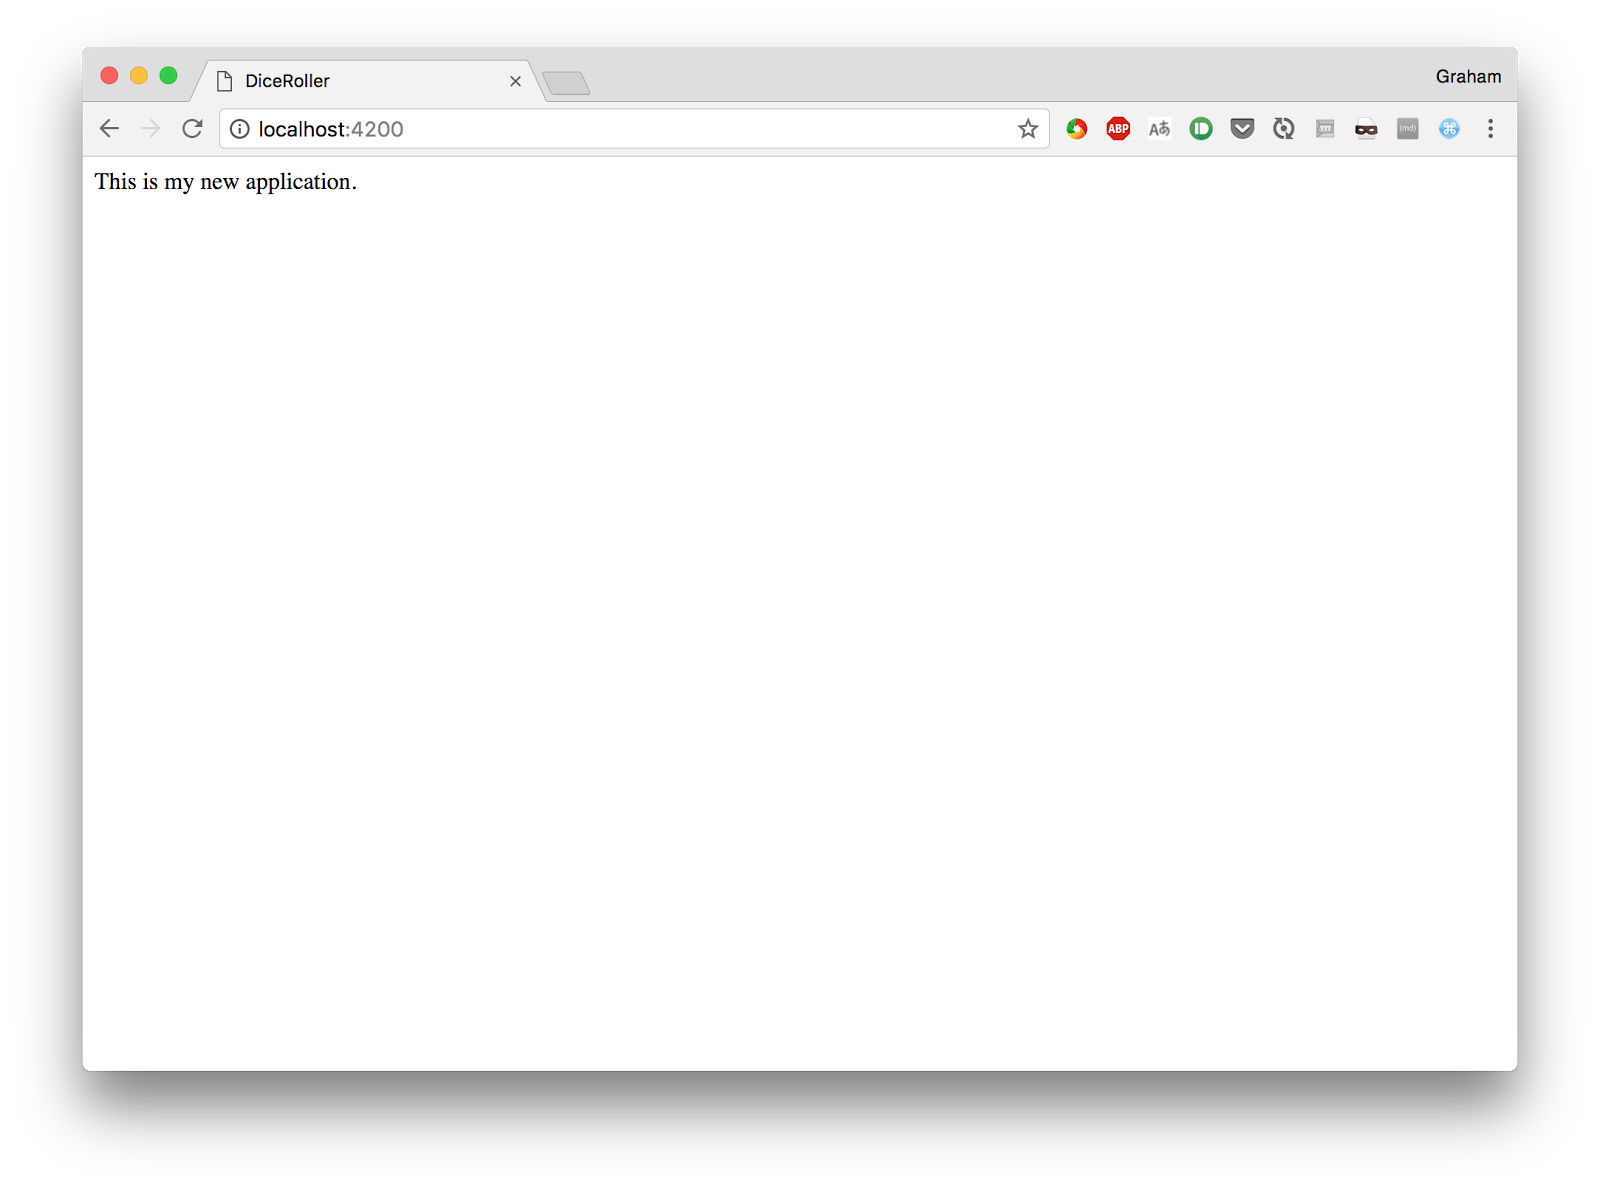
The first page tells us what can be done next, listen to these messages, change the main page and see what happens. To do this, we will bring the file
app/templates/application.hbs to the following form: This is my new application. {{outlet}} Note that the
{{outlet}} tag is part of how the routing process works in Ember. We'll talk more about this below.After changing the file, you should immediately look at what will be
ember-cli in the ember-cli . It should look something like this: file changed templates/application.hbs Build successful (67ms) – Serving on http://localhost:4200/ Slowest Nodes (totalTime => 5% ) | Total (avg) ----------------------------------------------+--------------------- SourceMapConcat: Concat: App (1) | 9ms SourceMapConcat: Concat: Vendor /asset... (1) | 8ms SimpleConcatConcat: Concat: Vendor Sty... (1) | 4ms Funnel (7) | 4ms (0 ms) Here we are informed that the system has detected a template change, rebuilt and restarted the project. This is a fully automatic process, we do not take part in it.
Now we will look at the browser. If you have
LiveReload installed and running, then you do not even need to manually reload the page in order to see the changes. Otherwise, the application page will have to reload on its own.It cannot be said that the appearance of the page is amazing, but what we did with it required a minimum of effort on our part.
In addition, we have a fully ready to use testing subsystem. In order to run it, you need to use the corresponding Ember tool:
$ ember test ⠸ Building'instrument' is imported from external module 'ember-data/-debug' but never used ⠴ BuildingWarning: ignoring input sourcemap for vendor/ember/ember.debug.js because ENOENT: no such file or directory, open '/Users/coxg/source/me/writing/repos/dice-roller/tmp/source_map_concat-input_base_path-S8aQFGaz.tmp/vendor/ember/ember.debug.map' ⠇ BuildingWarning: ignoring input sourcemap for vendor/ember/ember-testing.js because ENOENT: no such file or directory, open '/Users/coxg/source/me/writing/repos/dice-roller/tmp/source_map_concat-input_base_path-wO8OLEE2.tmp/vendor/ember/ember-testing.map' cleaning up... Built project successfully. Stored in "/Users/coxg/source/me/writing/repos/dice-roller/tmp/class-tests_dist-PUnMT5zL.tmp". ok 1 PhantomJS 2.1 - ESLint | app: app.js ok 2 PhantomJS 2.1 - ESLint | app: resolver.js ok 3 PhantomJS 2.1 - ESLint | app: router.js ok 4 PhantomJS 2.1 - ESLint | tests: helpers/destroy-app.js ok 5 PhantomJS 2.1 - ESLint | tests: helpers/module-for-acceptance.js ok 6 PhantomJS 2.1 - ESLint | tests: helpers/resolver.js ok 7 PhantomJS 2.1 - ESLint | tests: helpers/start-app.js ok 8 PhantomJS 2.1 - ESLint | tests: test-helper.js 1..8 # tests 8 # pass 8 # skip 0 # fail 0 # ok Note that the majority of the output data comes from Phantom.js . This is due to the fact that there is full support for integration testing, which, by default, is made in the browser PhantomJS without a graphical interface. There is also the ability to run testing in other browsers, if necessary. When setting up a continuous integration system (CI, Continuous Integration), you should use this opportunity to make sure that the application works correctly in all supported browsers.
Ember.js application structure
Before we work on the application, let's look at the folder and file structure on which it is based. The above command
ember new creates the necessary folders and files for the application, which are quite a few. Understanding how it all works is important for organizing effective work with Ember and for creating projects of any scale.At the very top level of the application structure, you can pay attention to the following files and folders:
- README.md - standard readme-file with a description of the application.
- package.json is the
npmconfiguration file that describes the application. It is mainly used to ensure correct installation of dependencies. - ember-cli-build.js is a configuration file for
ember-clithat is responsible for building the application. - testem.js - This is a configuration file for the testing subsystem. It allows, among other things, to set browsers that should be used to organize application tests in different environments.
- app / - the application logic is stored here. In this folder, a lot of interesting things happen, below we will talk about it.
- config / - here are the application settings.
- public / - there are stored static resources that need to be included in the application. For example, these are images and fonts.
- vendor / - frontend dependencies fall here that the build system does not control.
- tests / - here are the tests.
Page structure
Before continuing, let's take a look at the structure of the page. In this case, we will use the Materialize CSS framework, which allows us to give the page a pleasant look and make it more convenient for the end user.
In order to add support for additional funds to the application, you can use one of the following approaches:
- Connect what you need, directly, using an external service like some kind of CDN.
- Use a package manager like
npmorBowerto install the required package. - Include the necessary resources directly into the application.
- Use the appropriate addon for Ember.
Unfortunately, the add-on for Materialize is not yet working with the latest version of Ember.js, so we will enable this framework on the main page of the application, using the link to the CDN resource. In order to do this, you need to edit the file
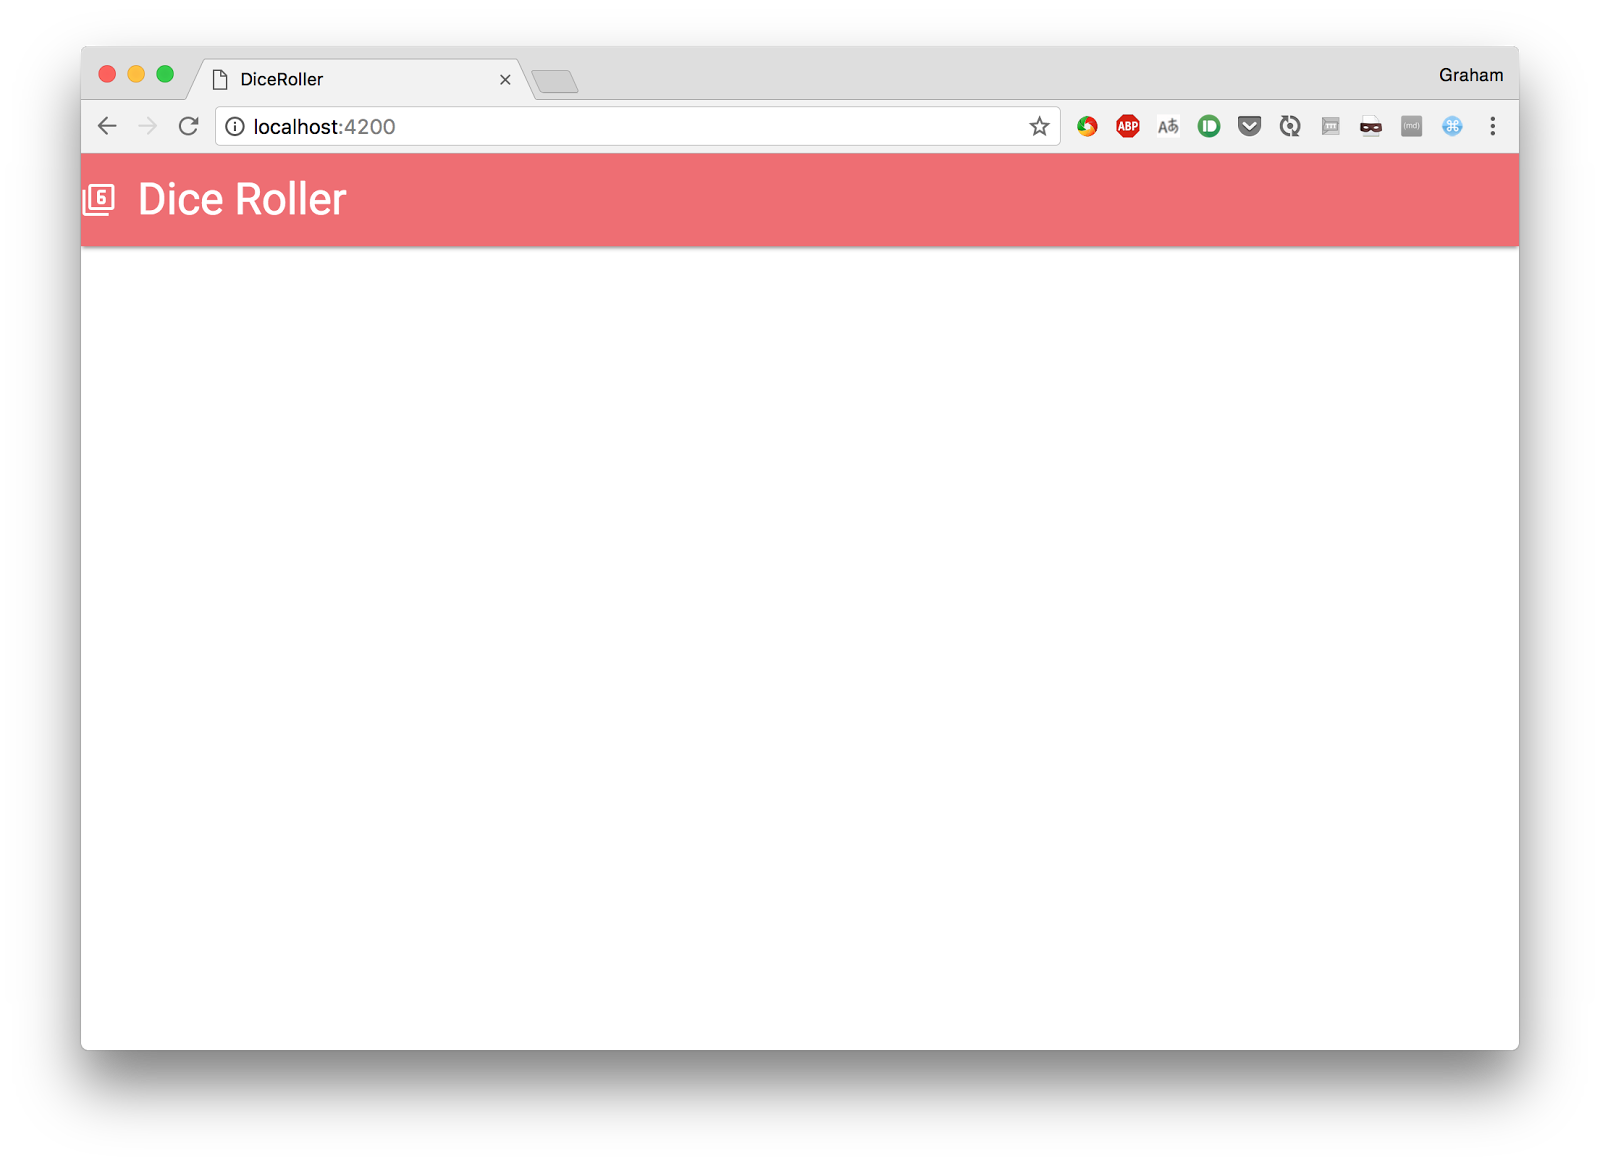
app/index.html , which describes the structure of the main page in which the application is displayed. We are going to add CDN links to jQuery, to the font with Google icons, and to Materialize. <!-- Inside the Head section --> <link href="https://fonts.googleapis.com/icon?family=Material+Icons" rel="stylesheet"> <link rel="stylesheet" href="https://cdnjs.cloudflare.com/ajax/libs/materialize/0.100.1/css/materialize.min.css"> <!-- Inside the Body section --> <script type="text/javascript" src="https://code.jquery.com/jquery-3.2.1.min.js"></script> <script src="https://cdnjs.cloudflare.com/ajax/libs/materialize/0.100.1/js/materialize.min.js"></script> Now you can change the main page so that it displays the basic application template. This is done by bringing the
app/templates/application.hbs file to this form: <nav> <div class="nav-wrapper"> <a href="#" class="brand-logo"> <i class="material-icons">filter_6</i> Dice Roller </a> <ul id="nav-mobile" class="right hide-on-med-and-down"> </ul> </div> </nav> <div class="container"> {{outlet}} </div> Thanks to this code at the top of the page will be a navigation bar, prepared by means of Materialize. The page also has a container in which the
{{outlet}} tag mentioned above is located.Now, if you look at the browser, you can find that the page looks like the one shown in the figure below.
It's time to talk about the
{{outlet}} tag. Ember's job is route based. Each route is considered a descendant of some other route. The root route is processed automatically, it displays the app/templates/application.hbs .The
{{outlet}} tag specifies the place where Ember will display the contents corresponding to the next route in the current hierarchy - as a result, the first level route is displayed in this tag in application.hbs , the second level route is displayed in the same tag in the first level template, and so Further.Creating a new route
Access to each application page on Ember.js is organized through a route (Route). There is a direct correspondence between the URL that opens the browser and the materials related to the route that the application displays.
The easiest way to get acquainted with this concept is by example. Add to the application a new route that allows the user to “throw” the dice. This step is again performed using
ember-cli : $ ember generate route roll installing route create app/routes/roll.js create app/templates/roll.hbs updating router add route roll installing route-test create tests/unit/routes/roll-test.js Here is what was created by calling this command:
- Route Handler -
app/routes/roll.js - The route
app/templates/roll.hbsisapp/templates/roll.hbs. - Test for route -
tests/unit/routes/roll-test.js - Updating the configuration of the router, giving it information about this new route -
app/router.js
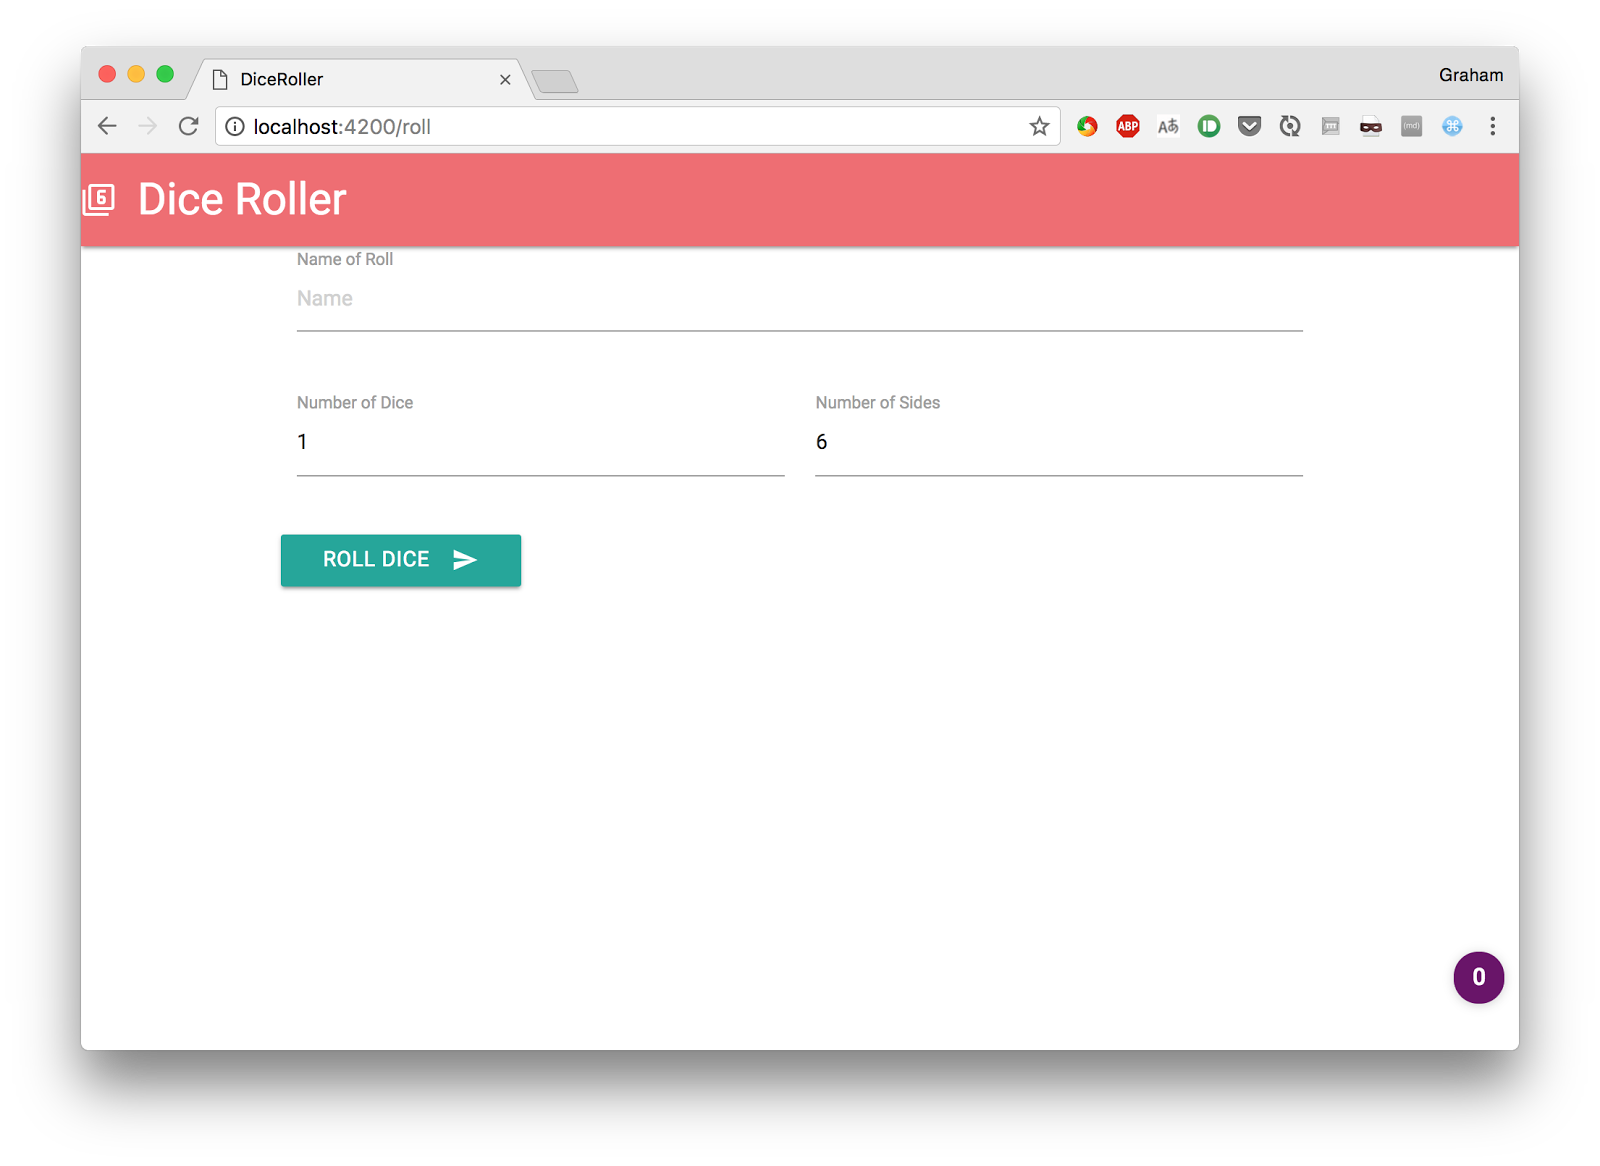
Let's look at how this works. For now we will have a very simple page containing elements that describe the dice and a button that, a little later, will allow it to “quit”. In order to form this page, put the following code in the template file
app/templates/roll.hbs : <div class="row"> <form class="col s12"> <div class="row"> <div class="input-field col s12"> <input placeholder="Name" id="roll_name" type="text" class="validate"> <label for="roll_name">Name of Roll</label> </div> </div> <div class="row"> <div class="input-field col s6"> <input placeholder="Number of dice" id="number_of_dice" type="number" class="validate" value="1"> <label for="number_of_dice">Number of Dice</label> </div> <div class="input-field col s6"> <input placeholder="Number of sides" id="number_of_sides" type="number" class="validate" value="6"> <label for="number_of_sides">Number of Sides</label> </div> </div> <div class="row"> <button class="btn waves-effect waves-light" type="submit" name="action"> Roll Dice <i class="material-icons right">send</i> </button> </div> </form> </div> {{outlet}} After that, visit http: // localhost: 4200 / roll and see what happens.
Now we need a way to organize the transition to this page through the application interface. Ember makes it easy to solve this problem by using the
link-to tag. It, among other things, accepts the name of the route that we are sending the user, and displays the elements that allow the user to go on this route.Include the following in the
app/templates/application.hbs file: <ul id="nav-mobile" class="right hide-on-med-and-down"> {{#link-to 'roll' tagName="li"}} <a href="roll">Roll Dice</a> {{/link-to}} </ul> This will cause the navigation bar at the top of the page to appear as shown in the figure below.
A new link,
Roll Dice , appeared on the right side of the panel, when the user clicks on the /roll route. That is what we tried to achieve.Development of modular components
If you try to work with the application, try it, you will notice a problem. The home page opens normally, the
/roll link works, but the field signatures on the form are incorrectly aligned. This is due to the fact that Materialize needs to call a certain JS-code in order to arrange the elements accordingly, but due to the nature of dynamic routing, the pages are not reloaded. Now we fix it.Work with the components. Components are parts of the user interface that have a full life cycle and can interact with. In addition, using components, you can, if necessary, create user interface elements suitable for reuse. We will talk about it later.
Now we are going to create a single component that represents a
Roll Dice form. As usual in such situations, to create a component, let's turn to ember-cli : $ ember generate component roll-dice installing component create app/components/roll-dice.js create app/templates/components/roll-dice.hbs installing component-test create tests/integration/components/roll-dice-test.js As a result, the system creates the following:
- The code that implements the component logic is
app/components/roll-dice.js - > Template that defines the appearance of the component -
app/templates/components/roll-dice.hbs - Test to verify that the component works correctly -
tests/integration/components/roll-dice-test.js
Now we are going to move all the markup to the component. This will not directly affect how the application works, but in the future will help us configure it the way we need it.
Let's give the
app/templates/components/roll-dice.hbs to this state: <form class="col s12"> <div class="row"> <div class="input-field col s12"> <input placeholder="Name" id="roll_name" type="text" class="validate"> <label for="roll_name">Name of Roll</label> </div> </div> <div class="row"> <div class="input-field col s6"> <input placeholder="Number of dice" id="number_of_dice" type="number" class="validate" value="1"> <label for="number_of_dice">Number of Dice</label> </div> <div class="input-field col s6"> <input placeholder="Number of sides" id="number_of_sides" type="number" class="validate" value="6"> <label for="number_of_sides">Number of Sides</label> </div> </div> <div class="row"> <button class="btn waves-effect waves-light" type="submit" name="action"> Roll Dice <i class="material-icons right">send</i> </button> </div> </form> Now put the following code in the file
app/templates/roll.hbs : <div class="row"> {{roll-dice}} </div> {{outlet}} The same markup that used to be located in the route pattern file got into the component template. The route pattern file has become much easier. The
roll-dice tag tells Ember where to put the component.If you look now at how the application looks in the browser, we will not see any difference. However, the code device has changed, it has become modular. We are going to use the component we have just created in order to fix the wrong page layout and add some new features to our application.
Component life cycle
Components in Ember differ in a particular life cycle, while provision is made for hooks that are called at various stages of their life cycle. We are going, in order to allow Materialize to correctly display the signatures, to use the
didRender hook, which is called after the component is displayed on the screen. Moreover, this is done both at the first show of the component, and at its subsequent shows.To do this, edit the component code, which can be found in the file
app/components/roll-dice.js : /* global Materialize:false */ import Ember from 'ember'; export default Ember.Component.extend({ didRender() { Materialize.updateTextFields(); } }); Now, every time we visit the
/roll route using a direct link or a link from the navigation bar, this code is executed, and Materialize correctly displays the text field labels.Data binding
We would like to use the component to load data into the user interface and unload it from it. It's very easy to do this, but, interestingly, there's nothing about this in the Ember manual. As a result, the data binding procedure in Ember looks more complicated than it actually is.
Each piece of data with which we want to work exists in the form of a field of the
Component class. Knowing this, we can use auxiliary tools that allow us to display the input fields for the component and bind these fields to the component variables. As a result, you can interact with the data directly, without thinking about working with the DOM.In this case, there are three fields, so you need to add three lines of code to
app/components/roll-dice.js , inside the component definition block: rollName: '', numberOfDice: 1, numberOfSides: 6, Then we set up a template for outputting this data using auxiliary mechanisms instead of the usual HTML markup. In order to do this, you need to replace the
<input> with the following code: <div class="row"> <div class="input-field col s12"> <!-- This replaces the <input> tag for "roll_name" --> {{input placeholder="Name" id="roll_name" class="validate" value=(mut rollName)}} <label for="roll_name">Name of Roll</label> </div> </div> <div class="row"> <div class="input-field col s6"> <!-- This replaces the <input> tag for "number_of_dice" --> {{input placeholder="Number of dice" id="number_of_dice" type="number" class="validate" value=(mut numberOfDice)}} <label for="number_of_dice">Number of Dice</label> </div> <div class="input-field col s6"> <!-- This replaces the <input> tag for "number_of_sides" --> {{input placeholder="Number of sides" id="number_of_sides" type="number" class="validate" value=(mut numberOfSides)}} <label for="number_of_sides">Number of Sides</label> </div> </div> Notice that the syntax of the
value attribute looks unusual. Similar constructions can be used for any attribute of the tag, and not just for value . Here are three ways to use them:- In the form of a string enclosed in quotes. With this approach, the value is displayed in the form in which it is presented in the code.
- In the form of a string without quotes. In this case, the value is taken from the corresponding data fragment of the component, but the element that outputs the data does not affect the component.
- As a construction
(mut <name>). Due to this, the corresponding value is taken from the component, and the component changes (mutate) as the value changes in the browser.
All this means that now we can work with the three fields of the component as if they are the values of the input fields, and the rest of the work is done by the internal Ember mechanisms.
Component actions
. ,
Roll Dice . Ember (Actions). — , . — , , , , actions ., , ( ).
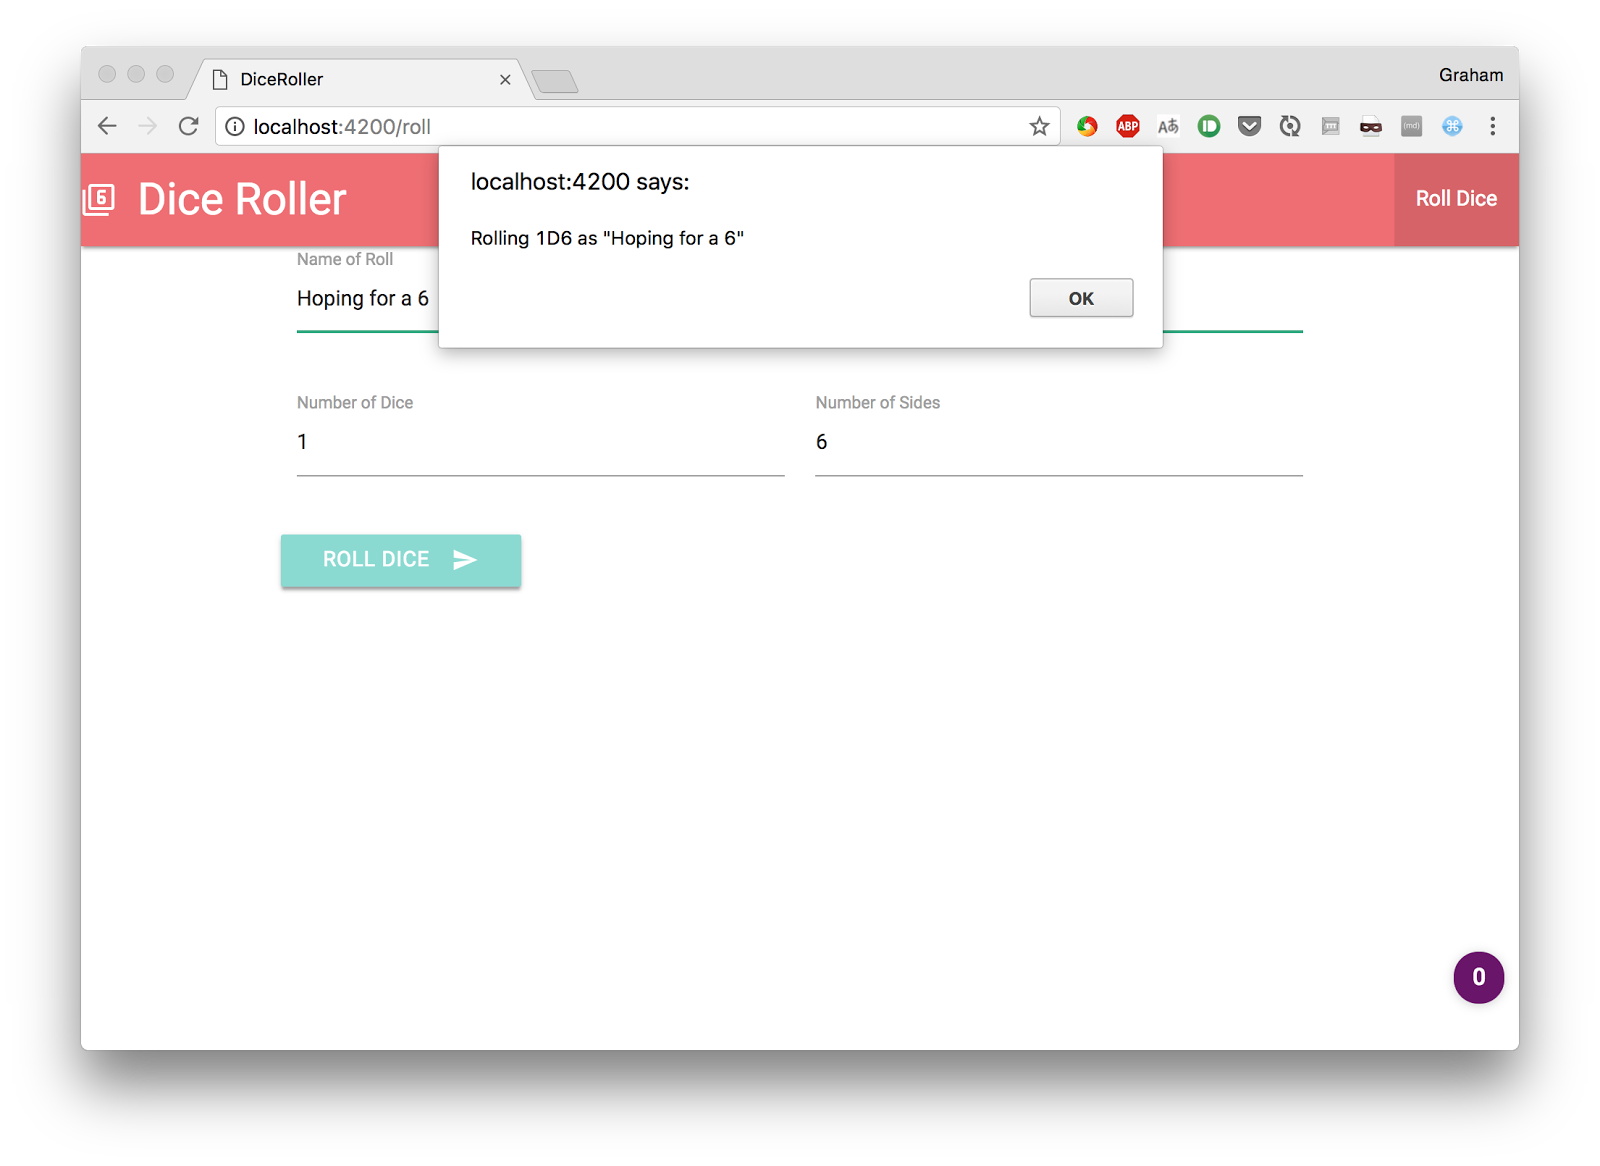
OnSubmit . , , Enter ., ,
app/components/roll-dice.hbs : actions: { triggerRoll() { alert(`Rolling ${this.numberOfDice}D${this.numberOfSides} as "${this.rollName}"`); return false; } } false . — , HTML-. ., , . DOM — , — JS-.
. ,
onsubmit . Ember . app/templates/components/roll-dice.hbs : <form class="col s12" onsubmit={{action 'triggerRoll'}}> , , , , .
, - «» . . «» . :
- , «».
- Roll Dice.
- , , .
- «» , .
- «».
, , Ember .
Ember (Store), (Models). — , (Model) , . , , .
. ( , ), . .
, , — . , , , , , . , DOM Ember , - .
, , , , . , , .
, , ,
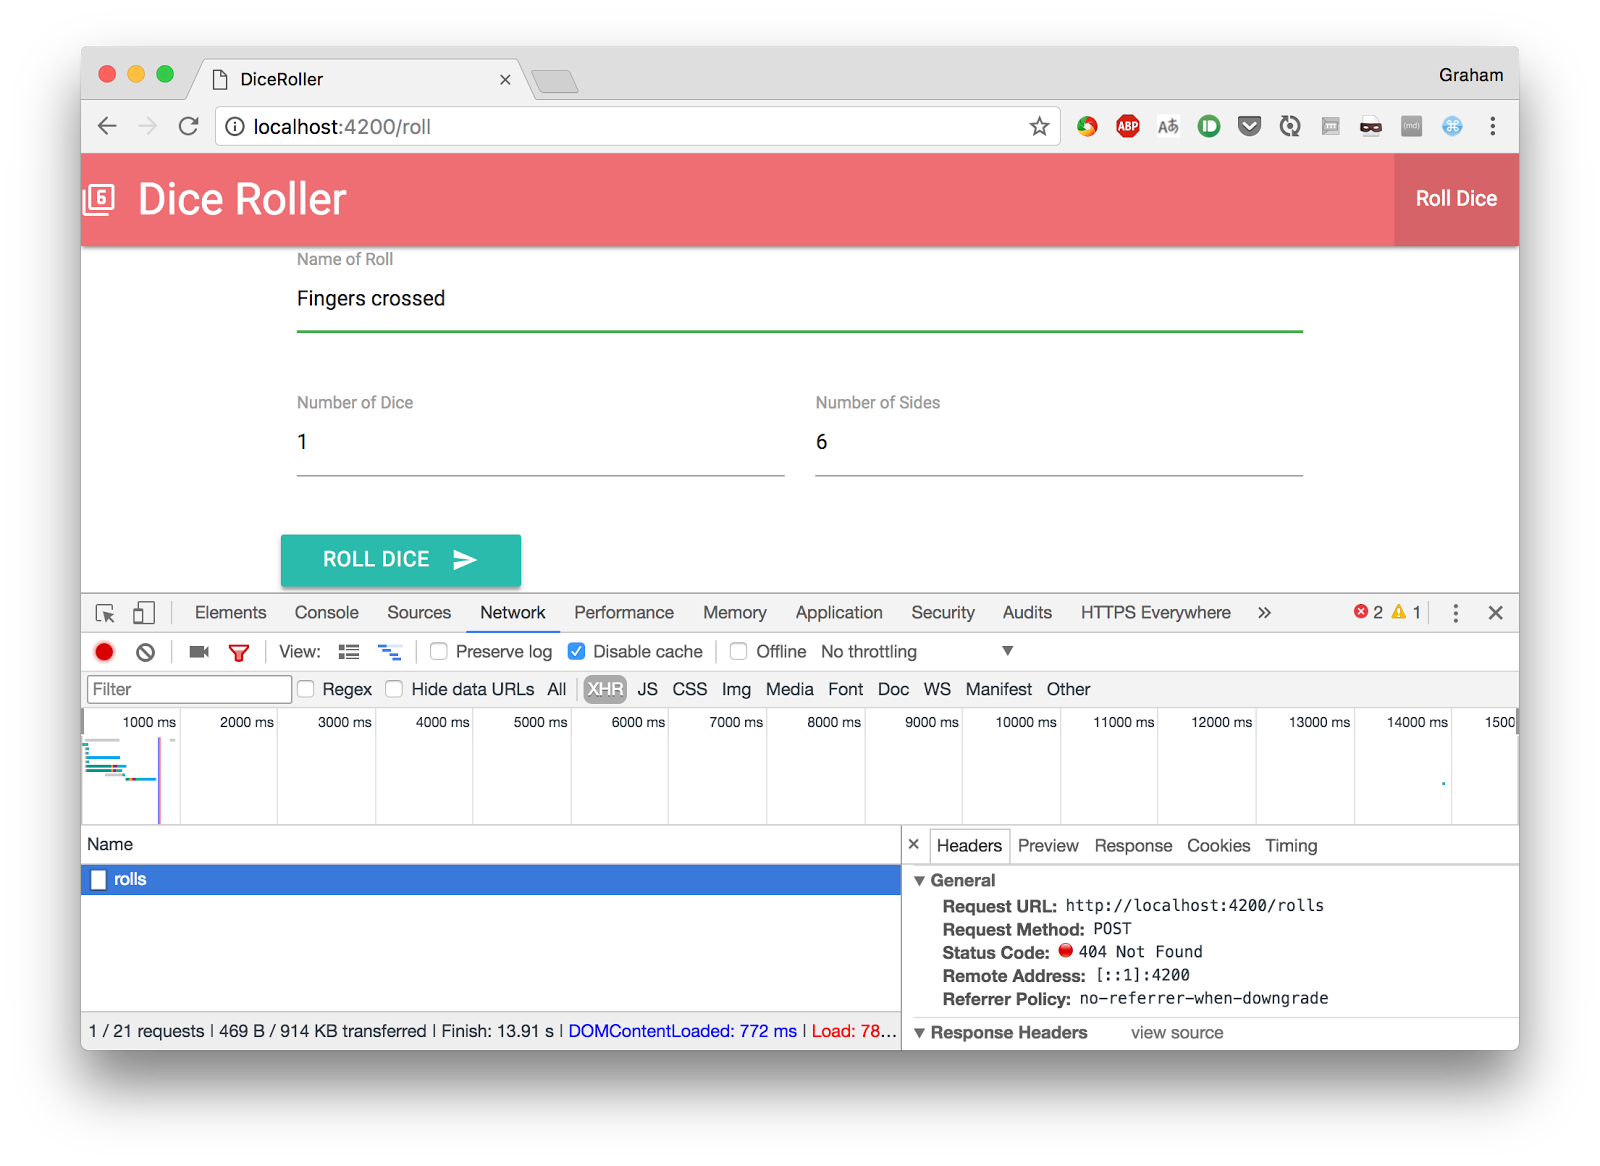
app/routes/roll.js , , , . actions: { saveRoll: function(rollName, numberOfDice, numberOfSides) { alert(`Rolling ${numberOfDice}D${numberOfSides} as "${rollName}"`); } } ,
app/components/roll-dice.js , . sendAction : triggerRoll() { this.sendAction('roll', this.rollName, this.numberOfDice, this.numberOfSides); return false; } , , , . —
app/templates/roll.hbs . , : {{roll-dice roll="saveRoll" }} ,
roll saveRoll . , roll , , , «» . , , «» , , ., , , , , , .
, , .
ember-cli ., , :
$ ember generate model roll installing model create app/models/roll.js installing model-test create tests/unit/models/roll-test.js , .
app/models/roll.js : import DS from 'ember-data'; export default DS.Model.extend({ rollName: DS.attr('string'), numberOfDice: DS.attr('number'), numberOfSides: DS.attr('number'), result: DS.attr('number') }); DS.attr . — string , number , date boolean , , ., «» . ,
app/routes/roll.js : saveRoll: function(rollName, numberOfDice, numberOfSides) { let result = 0; for (let i = 0; i < numberOfDice; ++i) { result += 1 + (parseInt(Math.random() * numberOfSides)); } const store = this.get('store'); // "roll" . const roll = store.createRecord('roll', { rollName, numberOfDice, numberOfSides, result }); // , . roll.save(); } , ,
Roll Dice . , , , , , — .Ember.js, . Ember.js , , , ember-localstorage-adapter , . . , .
, - , . ,
index — .Ember ,
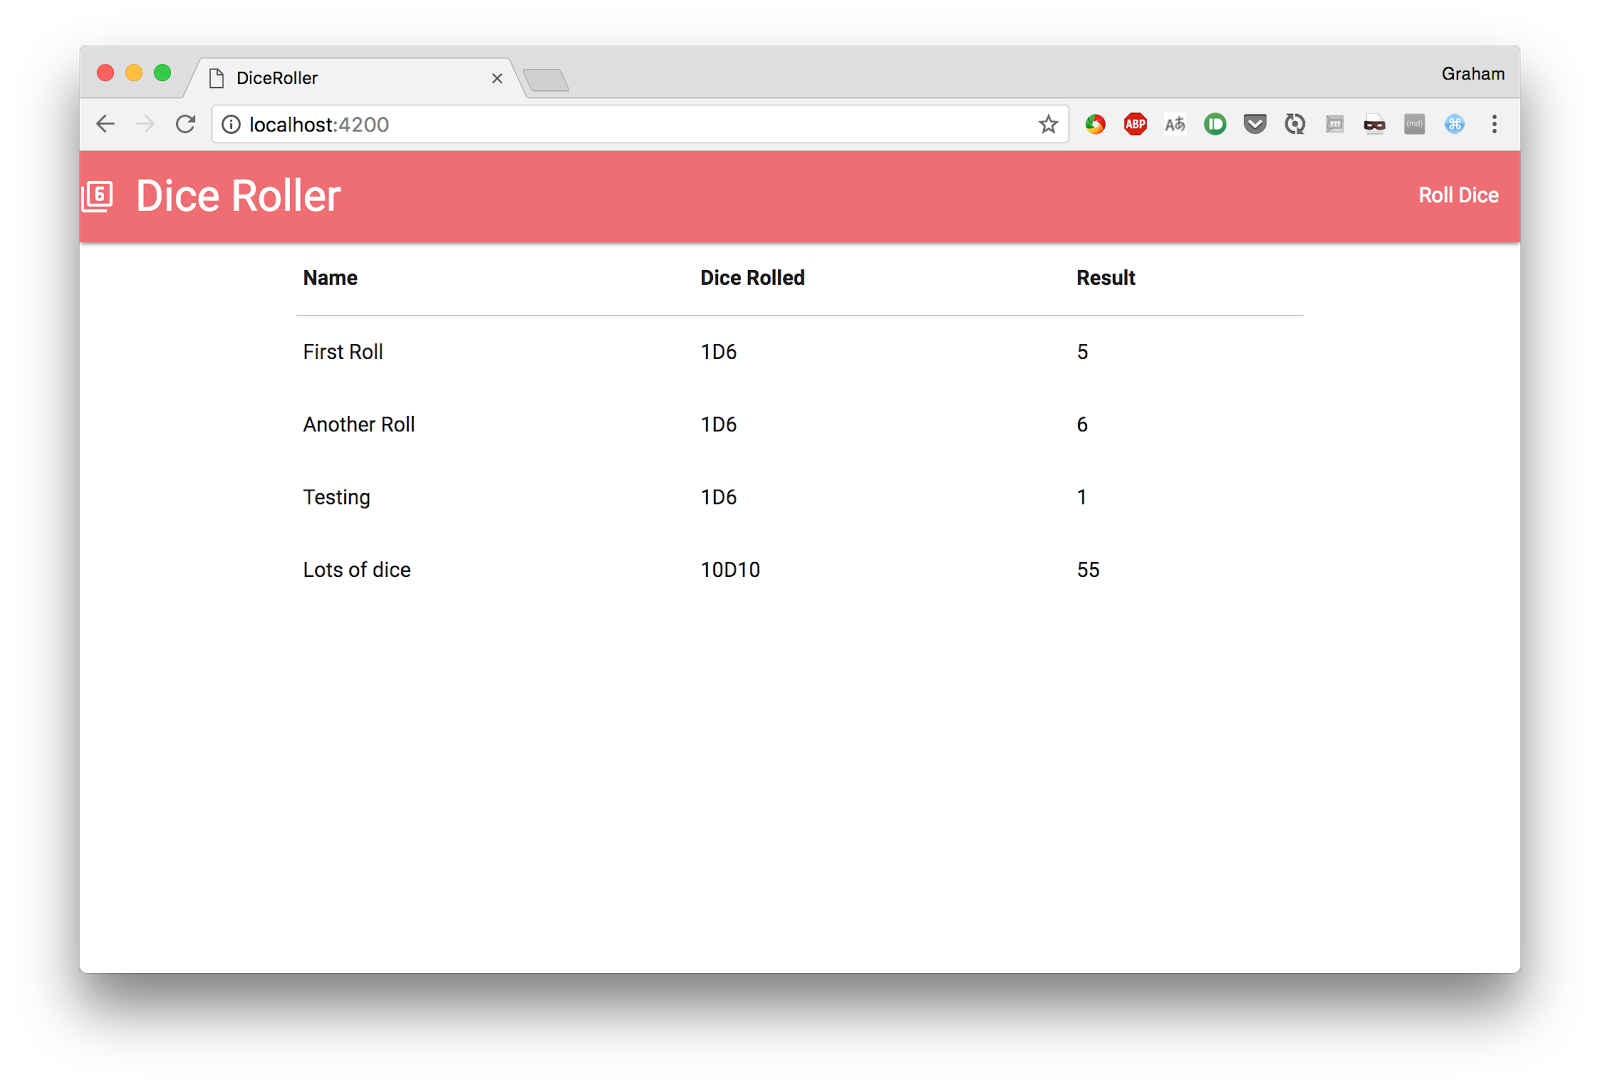
index , . , , , . «» .index , ember-cli . .app/routes/index.js , : import Ember from 'ember'; export default Ember.Route.extend({ model() { return this.get('store').findAll('roll'); } }); findAll «» . , model .index
app/templates/index.hbs : <table> <thead> <tr> <th>Name</th> <th>Dice Rolled</th> <th>Result</th> </tr> </thead> <tbody> {{#each model as |roll|}} <tr> <td>{{roll.rollName}}</td> <td>{{roll.numberOfDice}}D{{roll.numberOfSides}}</td> <td>{{roll.result}}</td> </tr> {{/each}} </tbody> </table> {{outlet}} , . «»:
Results
, , , , «» . , , , . .
Ember . , , React, Ember , - .
ember-cli — , . , , Ember , .Ember . , Ember . , , « », Ember . Ember, , , ( ) , , .
Ember — , -. , , , , , .
Dear readers! Ember.js?
Source: https://habr.com/ru/post/341076/
All Articles