Translation and dubbing of a movie at home - Indie Game: The Movie Special Edition
In August 2014, my friend and I decided that it would be cool to try to voice any film that is not yet in Russian. The choice fell on the continuation of a documentary about developers of indie games that were very popular at the time (Super Meat Boy, FEZ, Braid) - “Indie Game: The Movie Special Edition”. 19 videos total length 01:46:55. Only English subtitles were available.
Inspired by the existing articles on Habré ( one , two , three ), we set to work. The only thing, I was not satisfied with the result in any of the articles, so I decided to go my own way in creating a voice-over. Below, I tried to describe in detail how the whole process went, so that my experience might have been useful to someone else. There will be a lot of text, so get ready.

If you are interested to immediately see what came of it - scroll to the very end.
')
Used software:
- Cubase LE AI Elements 7 64bit
- Adobe Audition CC 2017 (+ Waves vst plugins)
- Adobe Premiere Pro CC 2017
Iron used:
- Condenser usb microphone Behringer C-1U with pop filter
- External sound card Steinberg UR22
- Monitor headphones Fischer Audio FA-003 Ti
- Computer and laptop (I do not think it makes sense to paint the characteristics)
Before we proceed to work, we decided to estimate the stages from which the dubbing process will consist. For this purpose, a table was created in google documents.
With the help of it, we were able to roughly estimate the amount of work, distribute among ourselves the people whom we were to announce, and also outline the next steps.
On the one hand, we were lucky - the commercials already had English subtitles. But on the other hand, they were sewn into some kind of original player and appeared only when playing videos through it. When viewed through third-party players (for example, Media Player Classic) stream with subtitles was simply not observed. So after a couple of hours of torment in trying to get the subtitles out at least in some form - we gave up and began to interrupt them manually.
As soon as 19 files with English text were ready, it could be taken for translation. The clips were divided between us to speed up the process. After each of us finished translating our part, we changed and checked one after the other, making minor corrections. This allowed us to achieve the highest quality translation, which was possible at our levels of knowledge of the English language: D
After reading a lot of different articles on the topic, I realized that the biggest problem with the recording is to “catch” the effect of the room and background noise, which then will be almost impossible to get rid of. So for voice recording, it was decided to equip the balcony.
The walls were covered with maximally fleecy blankets to absorb as many sound waves as possible. A part of that balcony was captured in a photograph with Irina, who voiced female and children's roles in the film.
The microphone was connected to the maximum noiseless laptop with a long cable so that the computer itself stood away (just in case).
Actually, we practically lived on this balcony for a couple of days. For each video, five attempts were recorded so that I could then select the best fragments and assemble them.
Recommendations:
Prior to this whole venture, I was already familiar with Cubase audio editor, so it was decided to use it.
So, we have 5 recorded audio tracks with a Russian voice for each character of each video. What's next?
3.1. "Selection of attempts" and "Placement of phrases under the original track"
For each video in Cubase, a project was created consisting of:
- Original English audio track
- All other tracks related to this video and divided by heroes
All audio tracks of each character were alternately tapped, broken down into phrases, and placed in their places under the original English track. After that, I simultaneously listened to all the tracks, determining in which of the attempts this or that phrase sounded better.
In the end, it turned out one whole attempt, assembled from several. Perhaps the final screenshot from Cubase will help you better understand what I said above.
This process of selecting attempts and placing phrases under the original track was done for each of the 19 videos.
3.2. Sound processing
It would seem that everything is ready. Adjust the volume of the original English track, tracks with Russian voice acting and voila! But no. Our audio tracks are not yet processed. There are extraneous noises (although we tried to create ideal conditions when recording the voice), and the voice still doesn’t sound too expressive, and is most likely lost on the background of the original track. This means that we need to do something about it.
I am grateful to fate that in my search I came across the youtube channel of a remarkable person ( Yuri Gurov ), who described in great detail the process of creating a voice-over. Now I suddenly discovered that he had removed from his channel many videos in which he was talking about voice processing, but what to do, apparently there were reasons for this. So I will try to explain the main points in my article.
After studying all the tips, I realized that I would have to install Adobe Audition for voice processing, since all the competent how-to on the Internet are shown in it.
Next, I broke the voice processing into the following steps:
3.2.1 FFT Filter - remove low and high noise
3.2.2 Noise Reduction - remove complex noise
3.2.3 Waves C1 Gate - remove noise residues
3.2.4 Graphic Equalizer - voice equalization
3.2.5 PSP VintageWarmer2 - voice heating
3.2.6 Speech Volume Leveler - Voice Leveling
3.2.7 Multiband Compressor - remove whistling and other extraneous sounds from the voice
3.2.8 SPL De-Verb - remove room effect
3.2.9 Tube-modeled Compressor - voice compression
3.2.10 Hard Limiter - voice limiting
3.2.11 Normalize - normalization
The items that are not highlighted in bold, while working with this voice acting, I bypassed, because I thought that in my case they should not be affected (due to uselessness or my inexperience).
Now I would like to describe each item in more detail in order to make this article a memo first of all for myself, if I suddenly want to voice something else, and of course for you.
All the steps described below, I have done in Adobe Audition with each Russian audio track. After that, I returned to Cubase, which pulled all the changes after Audition, and already exported ready tracks with Russian voice acting from it.
3.3. Mixing Russian tracks "ducking" with the original track (Waves C1 Gate)
Now that we have cleared our voice from all unnecessary noise, emphasized its features, and performed other treatments, we need only to reduce the received Russian tracks with the original English ones. I did this in Adobe Audition too.
Here I will advise you to watch the video of Yuri Gurov , which I mentioned above. There, everything is clearly and in detail described how this can be done best. Here I will just give you some settings so that you can access them later.
And now, when I had audio tracks fully prepared, I could just add them to the video, but we decided to shuffle even more and translate some titles in the video sequence.
There were two ways to translate labels:
In the first case, everything is simple: in the video editor, you create a black rectangle in a certain area to close the English inscription, and write Russian on top of the desired font. But doing it everywhere was not very beautiful, as it spoiled the picture or completely covered the necessary details. Therefore, where it was possible, I tried to use the second method. (By the way, the fonts were specially selected the same as in the original English signatures. There were many websites on the Internet that could recognize the font by the screenshot, so there were no problems with that. Who cares - in this movie the century gothic bold fonts are used, download available from ufonts.com).
To do this, I dubbed the video on the right seconds. In the path that goes on top of another, a crop is cut into the rectangular area to which the fast blur effect is applied. Then, the Russian text is written on top of all this.
The result is quite pleasing to the eye.
That's all!)
To make it clear what happened, I will give an example of two videos:
If you wish, you can familiarize yourself with the rest of the videos here .
I tried to describe all the stages of creating our voice acting with a friend. Perhaps, somewhere after all the description of some routine actions was omitted. If any of this is not detailed enough - write in the comments and I will try to add it.
From myself I can add that I am rather satisfied with the result.
Believe me, after you listen and watch for one thing for hours, your eyes and ears start to wash up to horror. So I, alas, cannot objectively evaluate my work.
What recommendations can I give myself for the future?
Probably the first is to switch completely to products from Adobe, abandoning Cubase. Because it was not very convenient: you cut and glue the pieces into Cubase, process them in Audition, then go to Cubase again, and so on ...
The second is to simply stop reading the text from the sheet. This turned out to be a very big mistake, because many intonations were lost. Also, some phrases were longer or shorter than required, which led to problems in fitting the phrases to the original track.
The third is to abandon the system when you first record a bunch of attempts, and then you sit down and select the best fragments from them. It turned out to be very dreary and uncomfortable. It is much better to write down a couple of sentences at once, and see how they suit you. And do not move on to the next, until you finish with these. On the one hand, it will delay the recording process, but on the other - it will save a lot of time further, because then you just have to process the voice.
At this I say goodbye to you.
Waiting for your feedback!
Inspired by the existing articles on Habré ( one , two , three ), we set to work. The only thing, I was not satisfied with the result in any of the articles, so I decided to go my own way in creating a voice-over. Below, I tried to describe in detail how the whole process went, so that my experience might have been useful to someone else. There will be a lot of text, so get ready.
If you are interested to immediately see what came of it - scroll to the very end.
')
Used software:
- Cubase LE AI Elements 7 64bit
- Adobe Audition CC 2017 (+ Waves vst plugins)
- Adobe Premiere Pro CC 2017
Iron used:
- Condenser usb microphone Behringer C-1U with pop filter
- External sound card Steinberg UR22
- Monitor headphones Fischer Audio FA-003 Ti
- Computer and laptop (I do not think it makes sense to paint the characteristics)
0. Preparation
Before we proceed to work, we decided to estimate the stages from which the dubbing process will consist. For this purpose, a table was created in google documents.
Google progress table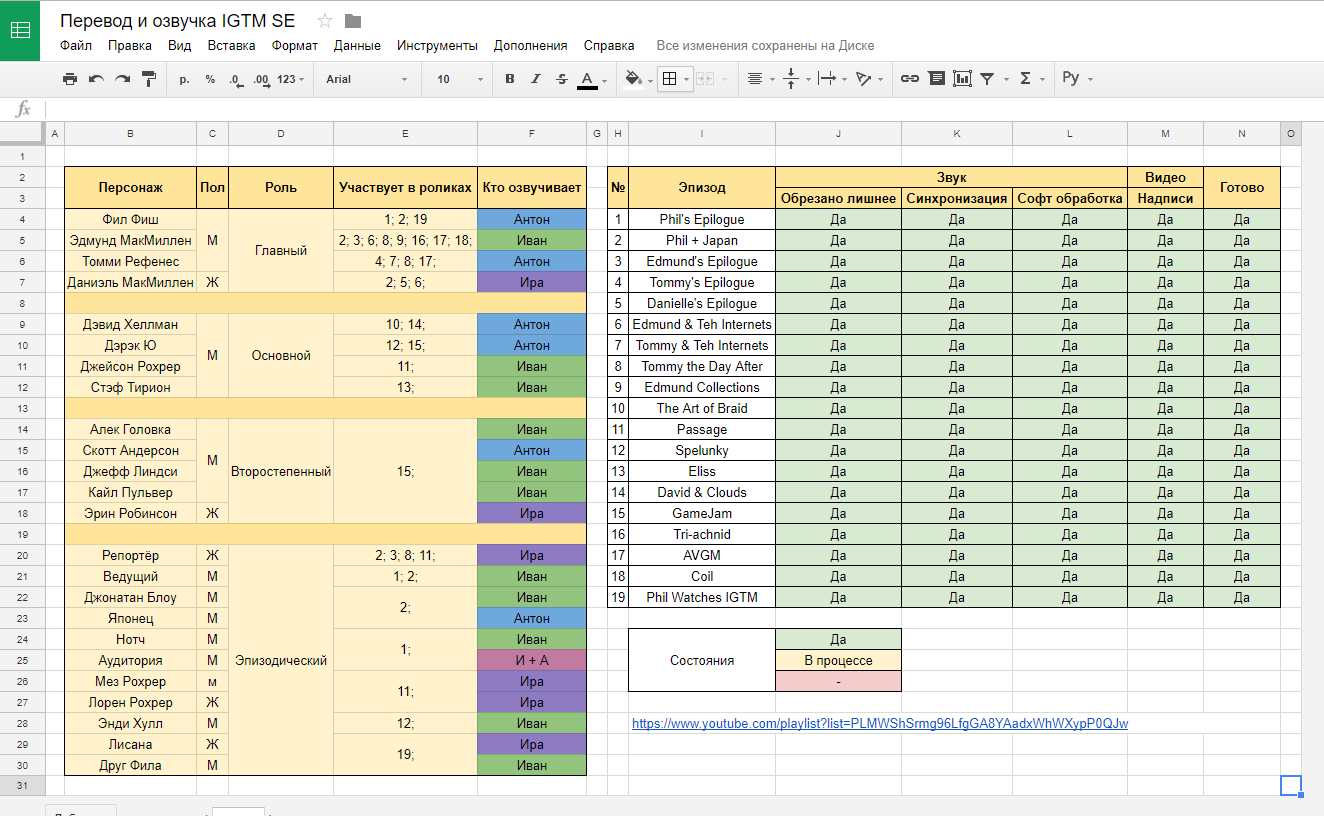
With the help of it, we were able to roughly estimate the amount of work, distribute among ourselves the people whom we were to announce, and also outline the next steps.
1. Translation
On the one hand, we were lucky - the commercials already had English subtitles. But on the other hand, they were sewn into some kind of original player and appeared only when playing videos through it. When viewed through third-party players (for example, Media Player Classic) stream with subtitles was simply not observed. So after a couple of hours of torment in trying to get the subtitles out at least in some form - we gave up and began to interrupt them manually.
As soon as 19 files with English text were ready, it could be taken for translation. The clips were divided between us to speed up the process. After each of us finished translating our part, we changed and checked one after the other, making minor corrections. This allowed us to achieve the highest quality translation, which was possible at our levels of knowledge of the English language: D
2. Reading
After reading a lot of different articles on the topic, I realized that the biggest problem with the recording is to “catch” the effect of the room and background noise, which then will be almost impossible to get rid of. So for voice recording, it was decided to equip the balcony.
The walls were covered with maximally fleecy blankets to absorb as many sound waves as possible. A part of that balcony was captured in a photograph with Irina, who voiced female and children's roles in the film.
Balcony photos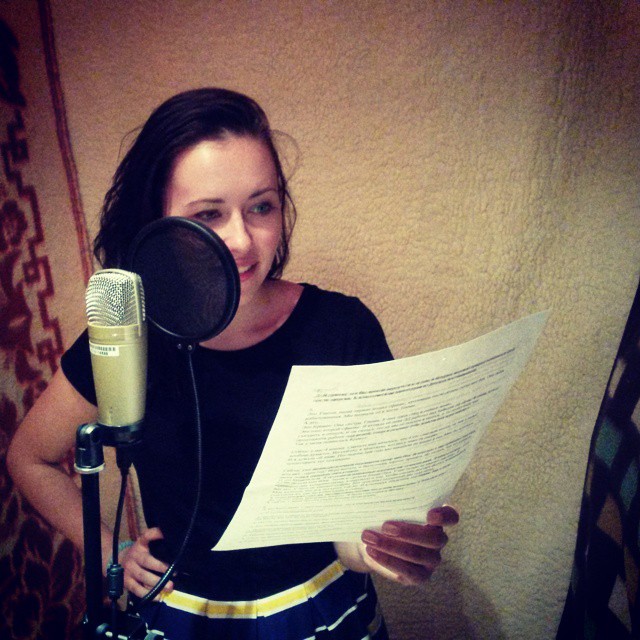
The microphone was connected to the maximum noiseless laptop with a long cable so that the computer itself stood away (just in case).
Actually, we practically lived on this balcony for a couple of days. For each video, five attempts were recorded so that I could then select the best fragments and assemble them.
Recommendations:
- !!! Before you begin to recite the text, wait at the microphone for about 20 seconds and just shut up. So that at this moment the microphone records only extraneous sounds (the noise of the computer cooler, the wind outside the window, the drill of the neighbors from above, etc.). In the future, it will help you to remove all unnecessary sounds from the recording, leaving only your clear voice.
- As mentioned earlier in other articles on home-based dubbing, drink plenty of warm water as you read phrases. This will make your voice more pleasant and will allow him not to die after the first 10 minutes. : D
- Try not to squeeze your teeth and lips, but on the contrary, move them more actively (you can even gesticulate with your hands if it helps you to speak with more openness) so that the words sound clearer and clearer.
3. Work with sound
Prior to this whole venture, I was already familiar with Cubase audio editor, so it was decided to use it.
So, we have 5 recorded audio tracks with a Russian voice for each character of each video. What's next?
3.1. "Selection of attempts" and "Placement of phrases under the original track"
For each video in Cubase, a project was created consisting of:
- Original English audio track
- All other tracks related to this video and divided by heroes
All audio tracks of each character were alternately tapped, broken down into phrases, and placed in their places under the original English track. After that, I simultaneously listened to all the tracks, determining in which of the attempts this or that phrase sounded better.
In the end, it turned out one whole attempt, assembled from several. Perhaps the final screenshot from Cubase will help you better understand what I said above.
Cubase Project
Regarding how best to substitute the Russian phrase under the English track: simultaneously with the beginning of English, some time after the beginning of English or even before the beginning of English?
I thought about it for quite some time and experimented a lot, and in the end I came to the following conclusion:
- If at the moment of the sound of the phrase the person who utters it is not in the frame, then it is better to make the ending of the English phrase coincide with the end of the Russian.
- If at the moment of sounding the phrase the person who utters it is in the frame, then it is better to achieve the effect of maximally hitting the phrase in the movements of the lips of the person speaking. Somewhere it will be almost impossible to do, because during the reading of the text you did not take into account that the English phrase may sound shorter / longer than the Russian one. And here you will have to experiment, try to get into some kind of consonance or intonation / facial expression of the hero. The more you confuse - the better the result will be
This process of selecting attempts and placing phrases under the original track was done for each of the 19 videos.
3.2. Sound processing
It would seem that everything is ready. Adjust the volume of the original English track, tracks with Russian voice acting and voila! But no. Our audio tracks are not yet processed. There are extraneous noises (although we tried to create ideal conditions when recording the voice), and the voice still doesn’t sound too expressive, and is most likely lost on the background of the original track. This means that we need to do something about it.
I am grateful to fate that in my search I came across the youtube channel of a remarkable person ( Yuri Gurov ), who described in great detail the process of creating a voice-over. Now I suddenly discovered that he had removed from his channel many videos in which he was talking about voice processing, but what to do, apparently there were reasons for this. So I will try to explain the main points in my article.
After studying all the tips, I realized that I would have to install Adobe Audition for voice processing, since all the competent how-to on the Internet are shown in it.
Next, I broke the voice processing into the following steps:
3.2.1 FFT Filter - remove low and high noise
3.2.2 Noise Reduction - remove complex noise
3.2.3 Waves C1 Gate - remove noise residues
3.2.4 Graphic Equalizer - voice equalization
3.2.5 PSP VintageWarmer2 - voice heating
3.2.6 Speech Volume Leveler - Voice Leveling
3.2.7 Multiband Compressor - remove whistling and other extraneous sounds from the voice
3.2.8 SPL De-Verb - remove room effect
3.2.9 Tube-modeled Compressor - voice compression
3.2.10 Hard Limiter - voice limiting
3.2.11 Normalize - normalization
The items that are not highlighted in bold, while working with this voice acting, I bypassed, because I thought that in my case they should not be affected (due to uselessness or my inexperience).
Now I would like to describe each item in more detail in order to make this article a memo first of all for myself, if I suddenly want to voice something else, and of course for you.
All the steps described below, I have done in Adobe Audition with each Russian audio track. After that, I returned to Cubase, which pulled all the changes after Audition, and already exported ready tracks with Russian voice acting from it.
3.2.1 FFT Filter - remove low and high noise
Path to effect in Adobe Audition: Effects> Filter & EQ> FFT Filter
1. On the chart we arrange four points as it is shown on the first screenshot. Thus, we cut off from the sound only the region with low frequencies (in the screenshot 100 Hertz and below). You should start with 40-50 hertz and gradually increase this limit until you start to hear sounds that remind you of a human voice: D
2. Once you have found this frequency - swap the points on the graph so that this time we take from the sound track only the “useful” part of the sound without unnecessary noise (in the second screenshot).
3. Everything, now you can apply this effect to the whole track.
Note: You can also try to do this focus in the opposite direction, starting from the highest frequencies to the lowest, until you feel that you start to hear the voice. But here you have to be careful, because you can cut off very important hissing and whistling sounds that emphasize your speech, and not spoil it.
FFT Filter (step # 1)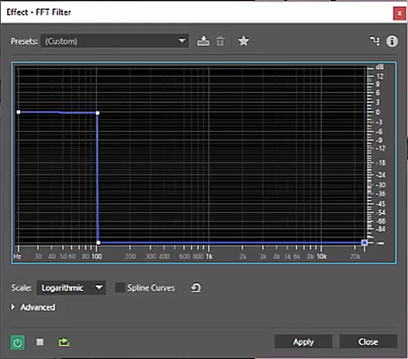
1. On the chart we arrange four points as it is shown on the first screenshot. Thus, we cut off from the sound only the region with low frequencies (in the screenshot 100 Hertz and below). You should start with 40-50 hertz and gradually increase this limit until you start to hear sounds that remind you of a human voice: D
2. Once you have found this frequency - swap the points on the graph so that this time we take from the sound track only the “useful” part of the sound without unnecessary noise (in the second screenshot).
FFT Filter (step # 2)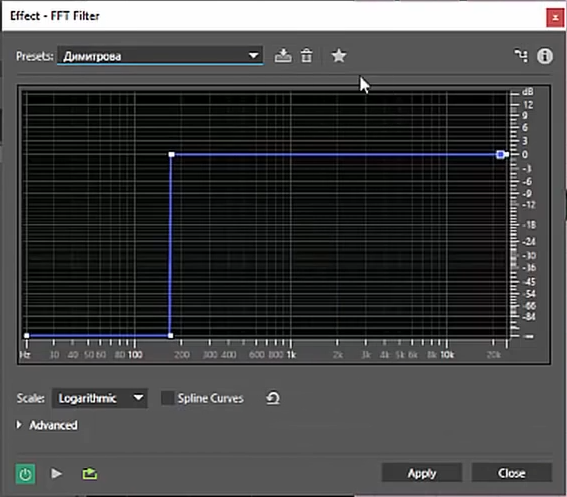
3. Everything, now you can apply this effect to the whole track.
Note: You can also try to do this focus in the opposite direction, starting from the highest frequencies to the lowest, until you feel that you start to hear the voice. But here you have to be careful, because you can cut off very important hissing and whistling sounds that emphasize your speech, and not spoil it.
3.2.2 Noise Reduction - remove complex noise
Path to effect in Adobe Audition: Effects> Noise Reduction
1. Find a section in the audio track, where there is ONLY a uniform noise (for this I recommended that you wait 20 seconds while recording the voice and then begin to speak). Highlight this plot.
2. Add a Noise Reduction effect.
3. FFT Size set from 512 to 2048 (by ear, here you need to experiment). After changing this value, each time press Capture Noise Print to capture the noise with the new parameters.
4. Noise Reduction is best set at 80%. Reduce by (dB) is selected by ear.
I advise you to move the slider from bottom to top, and then from top to bottom, to catch the value you need, when the noise stops being heard for you, and practically no effect on the voice will be made. Below 90 dB, the sound by ear is no longer perceived (I decided for myself that I could not hear the noise already below 83 dB).
Noise Reduction Effect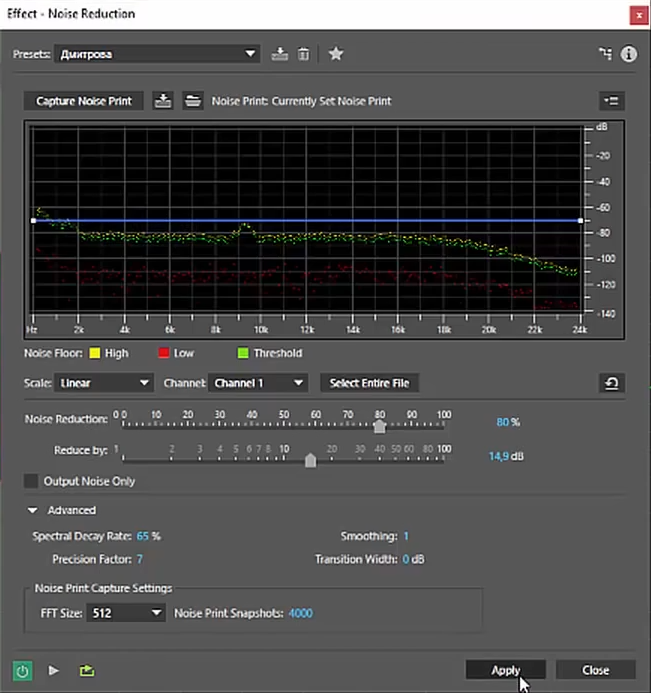
1. Find a section in the audio track, where there is ONLY a uniform noise (for this I recommended that you wait 20 seconds while recording the voice and then begin to speak). Highlight this plot.
2. Add a Noise Reduction effect.
3. FFT Size set from 512 to 2048 (by ear, here you need to experiment). After changing this value, each time press Capture Noise Print to capture the noise with the new parameters.
4. Noise Reduction is best set at 80%. Reduce by (dB) is selected by ear.
I advise you to move the slider from bottom to top, and then from top to bottom, to catch the value you need, when the noise stops being heard for you, and practically no effect on the voice will be made. Below 90 dB, the sound by ear is no longer perceived (I decided for myself that I could not hear the noise already below 83 dB).
3.2.3 Waves C1 Gate - remove noise residues
The path to the effect in Adobe Audition: (this plugin must be downloaded on the Internet and installed separately)
1. Select the quietest phrase and rebuild the gate opening and closing (Gate Open and Gate Close).
2. For the following parameters, you can immediately set certain values: Attack - 1.51, Release - 30.
3. Reduce the opening threshold until the silent phrase itself is “swallowed” by the plugin. This means that it is time to stop, and raise the opening threshold so that the phrase sounds clear.
Note: The difference between Open and Closed should be approximately 10 dB (Open should be larger).
You can stop at this and apply the effect to the whole track.
Waves C1 Gate effect
1. Select the quietest phrase and rebuild the gate opening and closing (Gate Open and Gate Close).
2. For the following parameters, you can immediately set certain values: Attack - 1.51, Release - 30.
3. Reduce the opening threshold until the silent phrase itself is “swallowed” by the plugin. This means that it is time to stop, and raise the opening threshold so that the phrase sounds clear.
Note: The difference between Open and Closed should be approximately 10 dB (Open should be larger).
You can stop at this and apply the effect to the whole track.
3.2.4 Graphic Equalizer - voice equalization
Path to effect in Adobe Audition: Effects> Filter & EQ> Graphic Equalizer (30 Bands) ...
Here, alas, there are no secrets.
For a female voice, you can “cut” (as in the screenshot) everything up to 80 Hz. For men up to 63 Hz. The remaining frequencies - raise and lower at your discretion.
Personally, I was afraid to climb into the equalization, not knowing all the subtleties of this procedure - so I avoided this point, in the hope that the microphone for 4 thousand rubles more or less coped with the task of voice recording: D
Graphic Equalizer Effect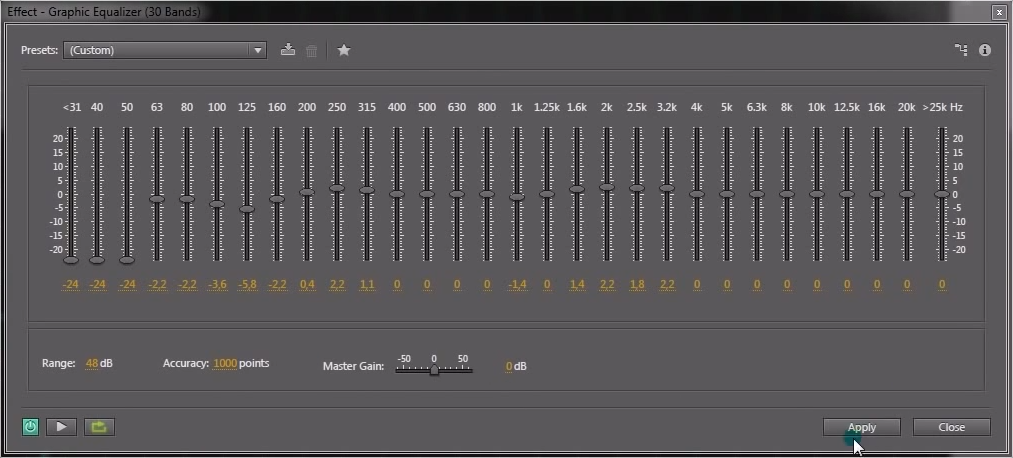
Here, alas, there are no secrets.
For a female voice, you can “cut” (as in the screenshot) everything up to 80 Hz. For men up to 63 Hz. The remaining frequencies - raise and lower at your discretion.
Personally, I was afraid to climb into the equalization, not knowing all the subtleties of this procedure - so I avoided this point, in the hope that the microphone for 4 thousand rubles more or less coped with the task of voice recording: D
3.2.5 PSP VintageWarmer2 - voice heating
The path to the effect in Adobe Audition: (this plugin must be downloaded on the Internet and installed separately)
If you feel that there are not enough colors in your voice, then you can try to warm up your voice with a plug-in from VintageWarmer.
I advise you to set the Release parameter to Auto. In the High and Freq parameters, select the frequency and level required for heating, as far as you want to “warm it up”.
Here everything is also quite individual, so I did not use this plugin when working with my voice acting. However, I saw that he can really work wonders with voices. If there is a desire - you can try to experiment with it.
PSP VintageWarmer2 effect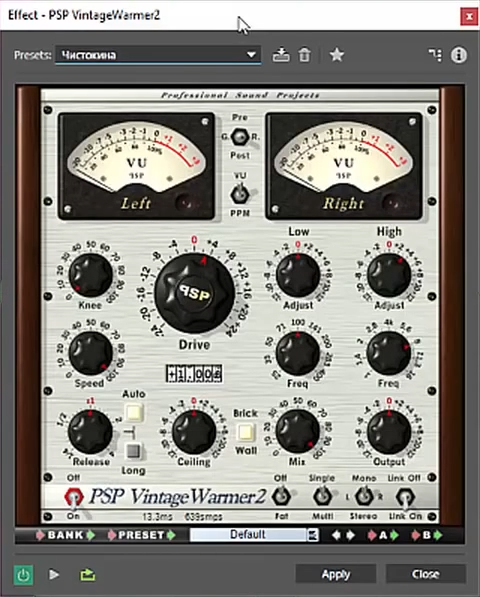
If you feel that there are not enough colors in your voice, then you can try to warm up your voice with a plug-in from VintageWarmer.
I advise you to set the Release parameter to Auto. In the High and Freq parameters, select the frequency and level required for heating, as far as you want to “warm it up”.
Here everything is also quite individual, so I did not use this plugin when working with my voice acting. However, I saw that he can really work wonders with voices. If there is a desire - you can try to experiment with it.
3.2.6 Speech Volume Leveler - Volume Leveling
Path to effect in Adobe Audition: Effects> Amplitude & Compression> Speech Volume Leveler
After recording your voice, it may happen that your places will have a very different level of loudness of your voice (somewhere you shouted, and somewhere you spoke in a whisper).
This effect will help bring the volume of phrases to the same level.
1. Select the loudest phrase in the track and move the Target Volume Level down until we notice that applying the effect has virtually no effect on it. This means that you can already stop.
2. As soon as such a value is found, we begin to select Leveling Amount (from zero and above) and see that quiet phrases start to become the same level as loud phrases.
3. Now apply the effect to the entire track.
After recording your voice, it may happen that your places will have a very different level of loudness of your voice (somewhere you shouted, and somewhere you spoke in a whisper).
This effect will help bring the volume of phrases to the same level.
Effect Speech Volume Leveler (step number 1)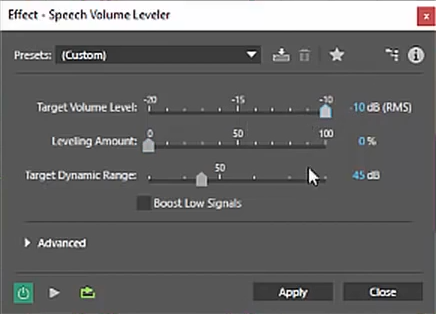
1. Select the loudest phrase in the track and move the Target Volume Level down until we notice that applying the effect has virtually no effect on it. This means that you can already stop.
2. As soon as such a value is found, we begin to select Leveling Amount (from zero and above) and see that quiet phrases start to become the same level as loud phrases.
Effect Speech Volume Leveler (Step # 2)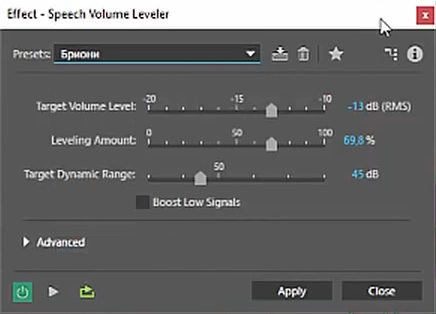
3. Now apply the effect to the entire track.
3.2.7 Multiband Compressor - remove whistling and other extraneous sounds
Path to effect in Adobe Audition: Effects> Amplitude & Compression> Multiband Compressor
I used this effect to suppress hissing / whistling sounds, as well as boomy low sounds.
1. I set the crossover parameters as follows: low - 350, mid - 4000, high - 9122.7 (from high you can play a little to the left / right).
2. The values Gain, Ratio, Attack and Release should be set for each of the areas as follows: Gain - 0, Ratio - 3, Attack - 0, Release - 100.
3. Then you start listening to the audio track, alternately choosing the soloist only one of the areas, trying to choose for each such a parameter of the threshold that suits you (there are also no secrets here, just listen and move the threshold slider so that you like it yourself).
I used this effect to suppress hissing / whistling sounds, as well as boomy low sounds.
Multiband Compressor Effect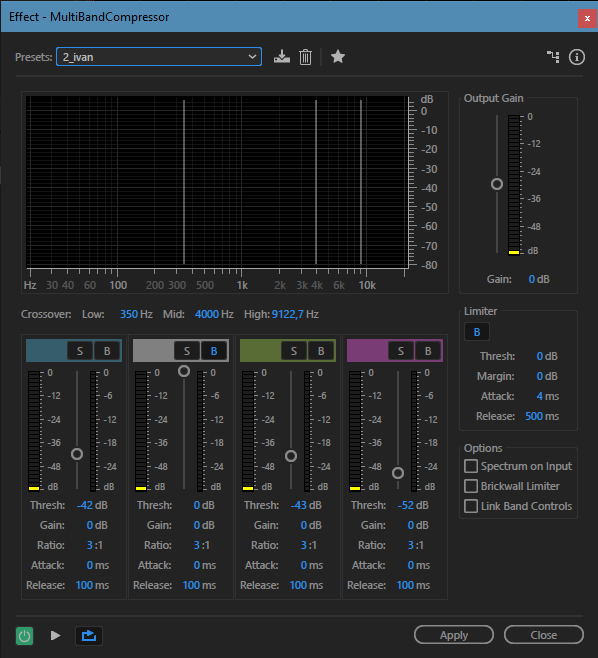
1. I set the crossover parameters as follows: low - 350, mid - 4000, high - 9122.7 (from high you can play a little to the left / right).
2. The values Gain, Ratio, Attack and Release should be set for each of the areas as follows: Gain - 0, Ratio - 3, Attack - 0, Release - 100.
3. Then you start listening to the audio track, alternately choosing the soloist only one of the areas, trying to choose for each such a parameter of the threshold that suits you (there are also no secrets here, just listen and move the threshold slider so that you like it yourself).
3.2.8 SPL De-Verb - Room Removal
The path to the effect in Adobe Audition: (this plugin must be downloaded on the Internet and installed separately)
This plugin will help you remove the “room effect” from your recording if it does get to you.
Turning the left switch to find the value at which your phrases will not be “chewed” by the plugin. Once you have the right value, apply the effect to the entire track.
This plugin will help you remove the “room effect” from your recording if it does get to you.
SPL De-Verb Effect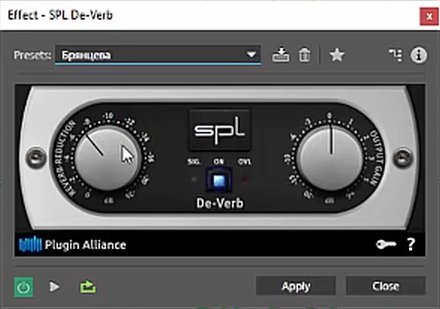
Turning the left switch to find the value at which your phrases will not be “chewed” by the plugin. Once you have the right value, apply the effect to the entire track.
3.2.9 Tube-modeled Compressor - voice compression
Path to effect in Adobe Audition: Effects> Amplitude & Compression> Tube-modeled Compressor
This effect will help your voice to “stand out” when applied with the English track.
We select the thresh parameter so that the voice sounds natural, but it is emphasized (probably said it is not very clear, but when you start moving this slider - it will become clear to you what I'm saying: D).
Other parameters:
Gain - 0
Ratio - 3 (for voice - from 3 (we get a more powerful compression; treshhold set lower) to 5 (we get only crushing of volume peaks; treshhold set exactly at the middle of the volume))
Attack - 0
Release - 100 (from 100 to 300 at your discretion)
This effect will help your voice to “stand out” when applied with the English track.
Tube-modeled Compressor Effect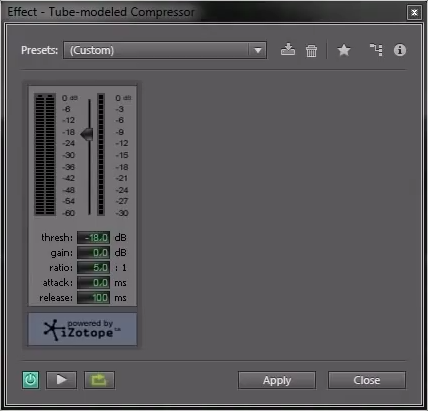
We select the thresh parameter so that the voice sounds natural, but it is emphasized (probably said it is not very clear, but when you start moving this slider - it will become clear to you what I'm saying: D).
Other parameters:
Gain - 0
Ratio - 3 (for voice - from 3 (we get a more powerful compression; treshhold set lower) to 5 (we get only crushing of volume peaks; treshhold set exactly at the middle of the volume))
Attack - 0
Release - 100 (from 100 to 300 at your discretion)
3.2.10 Hard Limiter - voice limiting
Path to effect in Adobe Audition: Effects> Amplitude & Compression> Hard Limitter
If, after all the actions we have done, we want to get rid of any loudness peaks in the voice, then this can be done roughly by the limiter.
Set the parameter maximum amplitude so as to cut off the unnecessary.
We set the “Input Boost”, “Look-Ahead Time” and “Release Time” values to 0, 5 and 40.
If, after all the actions we have done, we want to get rid of any loudness peaks in the voice, then this can be done roughly by the limiter.
Hard Limiter Effect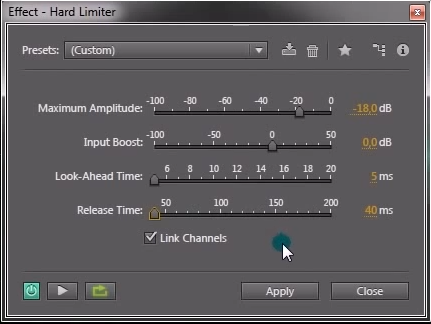
Set the parameter maximum amplitude so as to cut off the unnecessary.
We set the “Input Boost”, “Look-Ahead Time” and “Release Time” values to 0, 5 and 40.
3.2.11 Normalize - voice normalization
Path to effect in Adobe Audition: Effects> Amplitude & Compression> Normalize
This effect allows you to normalize the track (raise the volume level) to a certain value (for example, I raised it to -3 dB).
Normalize effect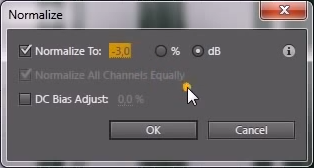
This effect allows you to normalize the track (raise the volume level) to a certain value (for example, I raised it to -3 dB).
3.3. Mixing Russian tracks "ducking" with the original track (Waves C1 Gate)
Now that we have cleared our voice from all unnecessary noise, emphasized its features, and performed other treatments, we need only to reduce the received Russian tracks with the original English ones. I did this in Adobe Audition too.
Here I will advise you to watch the video of Yuri Gurov , which I mentioned above. There, everything is clearly and in detail described how this can be done best. Here I will just give you some settings so that you can access them later.
Description of the process of information "ducking"
Create a new project in Adobe Audition. We cast the original track into it, as well as the track with Russian speech exported from Cubase.
To prepare English tracks for a note - I decided to cut out the voice of the Center Channel Extractor effect (preset Vocal Remove). Having played with the settings for each video, I managed to cut the volume of people's voices without affecting the background music.
Further, the principle is as follows: You create three audio tracks in the project. On two you will lie on the original English audio track, and on the third your Russian voice acting. Adjust the volume of the three tracks so that it becomes the same everywhere. One of the English tracks is deployed in phase (Polarity Reverse option). Now, with an equal volume level of these two tracks, they will be subtracted from each other. And if you turn on only them at the same time, then you will not hear anything, only silence.
The unwrapped track is quieter by 6 db. The C1 Gate Stereo plug-in is hung on it with the following settings: Attack - 5.5, Release - 209, Type - Gate.
In the plugin above, you select “Set Side-Chain Input”. Then you send the message of the Russian audio track to this plugin, and the most interesting begins. You turn on all tracks simultaneously. On the graph you will see how the strip will start running in the plugin on the Russian voice fragments. You need to remember at what volume level your speech is located, and by this value set Gate Open and Gate Close (their values should be the same), then change the Type parameter to “Expander”, and set the Floor value to “-10.0 N "(With Floor you can play a little by ear). Thus, in Russian phrases, its unfolded phase will be mixed into the original English audio track, making the overall English sound quieter. It’s as if you put a person who would turn the volume of the English track up and down, gradually reducing the English language so that it does not interfere with Russian, then add it when it does not interfere. That's the whole secret.
After that, you can safely mix all audio tracks with the mixdown function and get a ready track that can be substituted for your video sequence.
To prepare English tracks for a note - I decided to cut out the voice of the Center Channel Extractor effect (preset Vocal Remove). Having played with the settings for each video, I managed to cut the volume of people's voices without affecting the background music.
Further, the principle is as follows: You create three audio tracks in the project. On two you will lie on the original English audio track, and on the third your Russian voice acting. Adjust the volume of the three tracks so that it becomes the same everywhere. One of the English tracks is deployed in phase (Polarity Reverse option). Now, with an equal volume level of these two tracks, they will be subtracted from each other. And if you turn on only them at the same time, then you will not hear anything, only silence.
The unwrapped track is quieter by 6 db. The C1 Gate Stereo plug-in is hung on it with the following settings: Attack - 5.5, Release - 209, Type - Gate.
Effect C1 Gate Stereo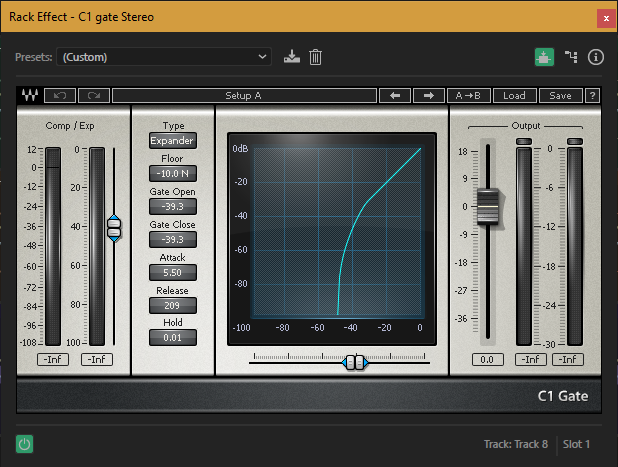
In the plugin above, you select “Set Side-Chain Input”. Then you send the message of the Russian audio track to this plugin, and the most interesting begins. You turn on all tracks simultaneously. On the graph you will see how the strip will start running in the plugin on the Russian voice fragments. You need to remember at what volume level your speech is located, and by this value set Gate Open and Gate Close (their values should be the same), then change the Type parameter to “Expander”, and set the Floor value to “-10.0 N "(With Floor you can play a little by ear). Thus, in Russian phrases, its unfolded phase will be mixed into the original English audio track, making the overall English sound quieter. It’s as if you put a person who would turn the volume of the English track up and down, gradually reducing the English language so that it does not interfere with Russian, then add it when it does not interfere. That's the whole secret.
After that, you can safely mix all audio tracks with the mixdown function and get a ready track that can be substituted for your video sequence.
4. Work with video
And now, when I had audio tracks fully prepared, I could just add them to the video, but we decided to shuffle even more and translate some titles in the video sequence.
There were two ways to translate labels:
Method number 1
Method number 2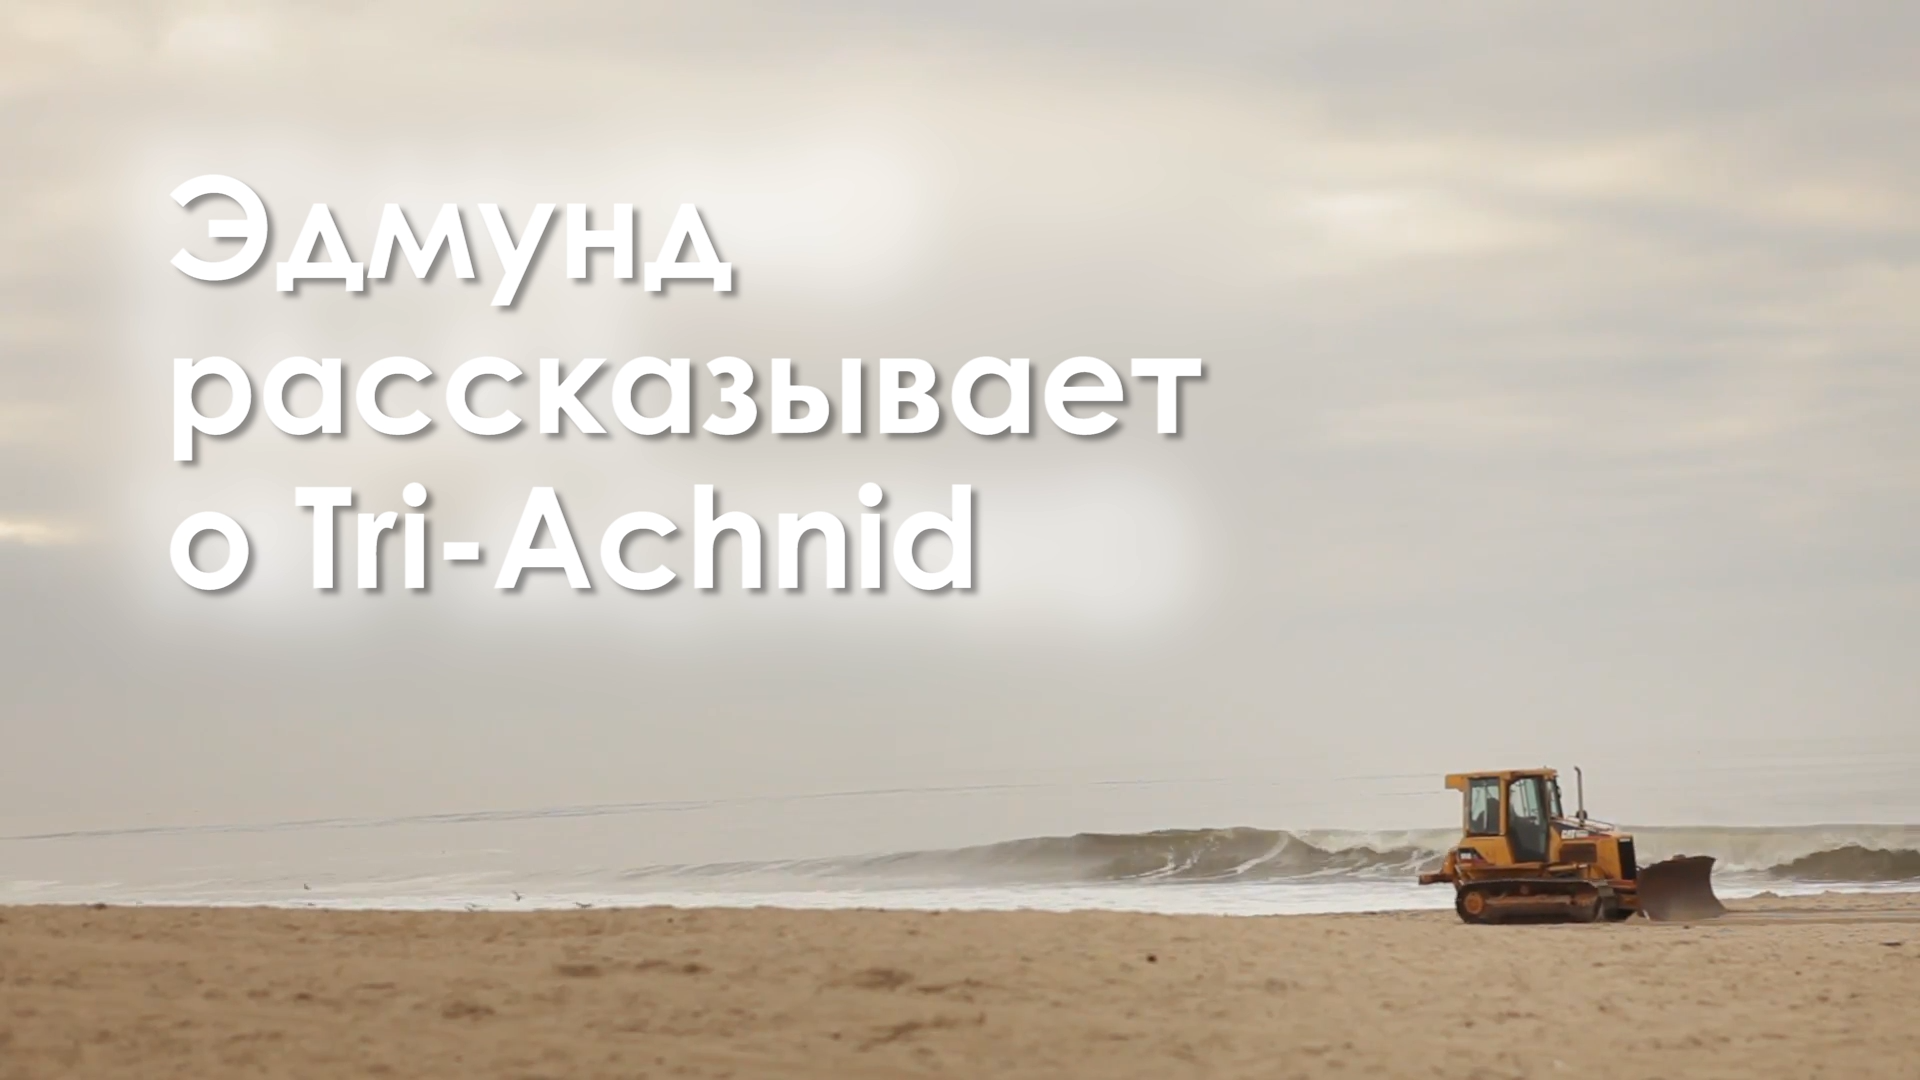
In the first case, everything is simple: in the video editor, you create a black rectangle in a certain area to close the English inscription, and write Russian on top of the desired font. But doing it everywhere was not very beautiful, as it spoiled the picture or completely covered the necessary details. Therefore, where it was possible, I tried to use the second method. (By the way, the fonts were specially selected the same as in the original English signatures. There were many websites on the Internet that could recognize the font by the screenshot, so there were no problems with that. Who cares - in this movie the century gothic bold fonts are used, download available from ufonts.com).
To do this, I dubbed the video on the right seconds. In the path that goes on top of another, a crop is cut into the rectangular area to which the fast blur effect is applied. Then, the Russian text is written on top of all this.
Adobe Premiere Project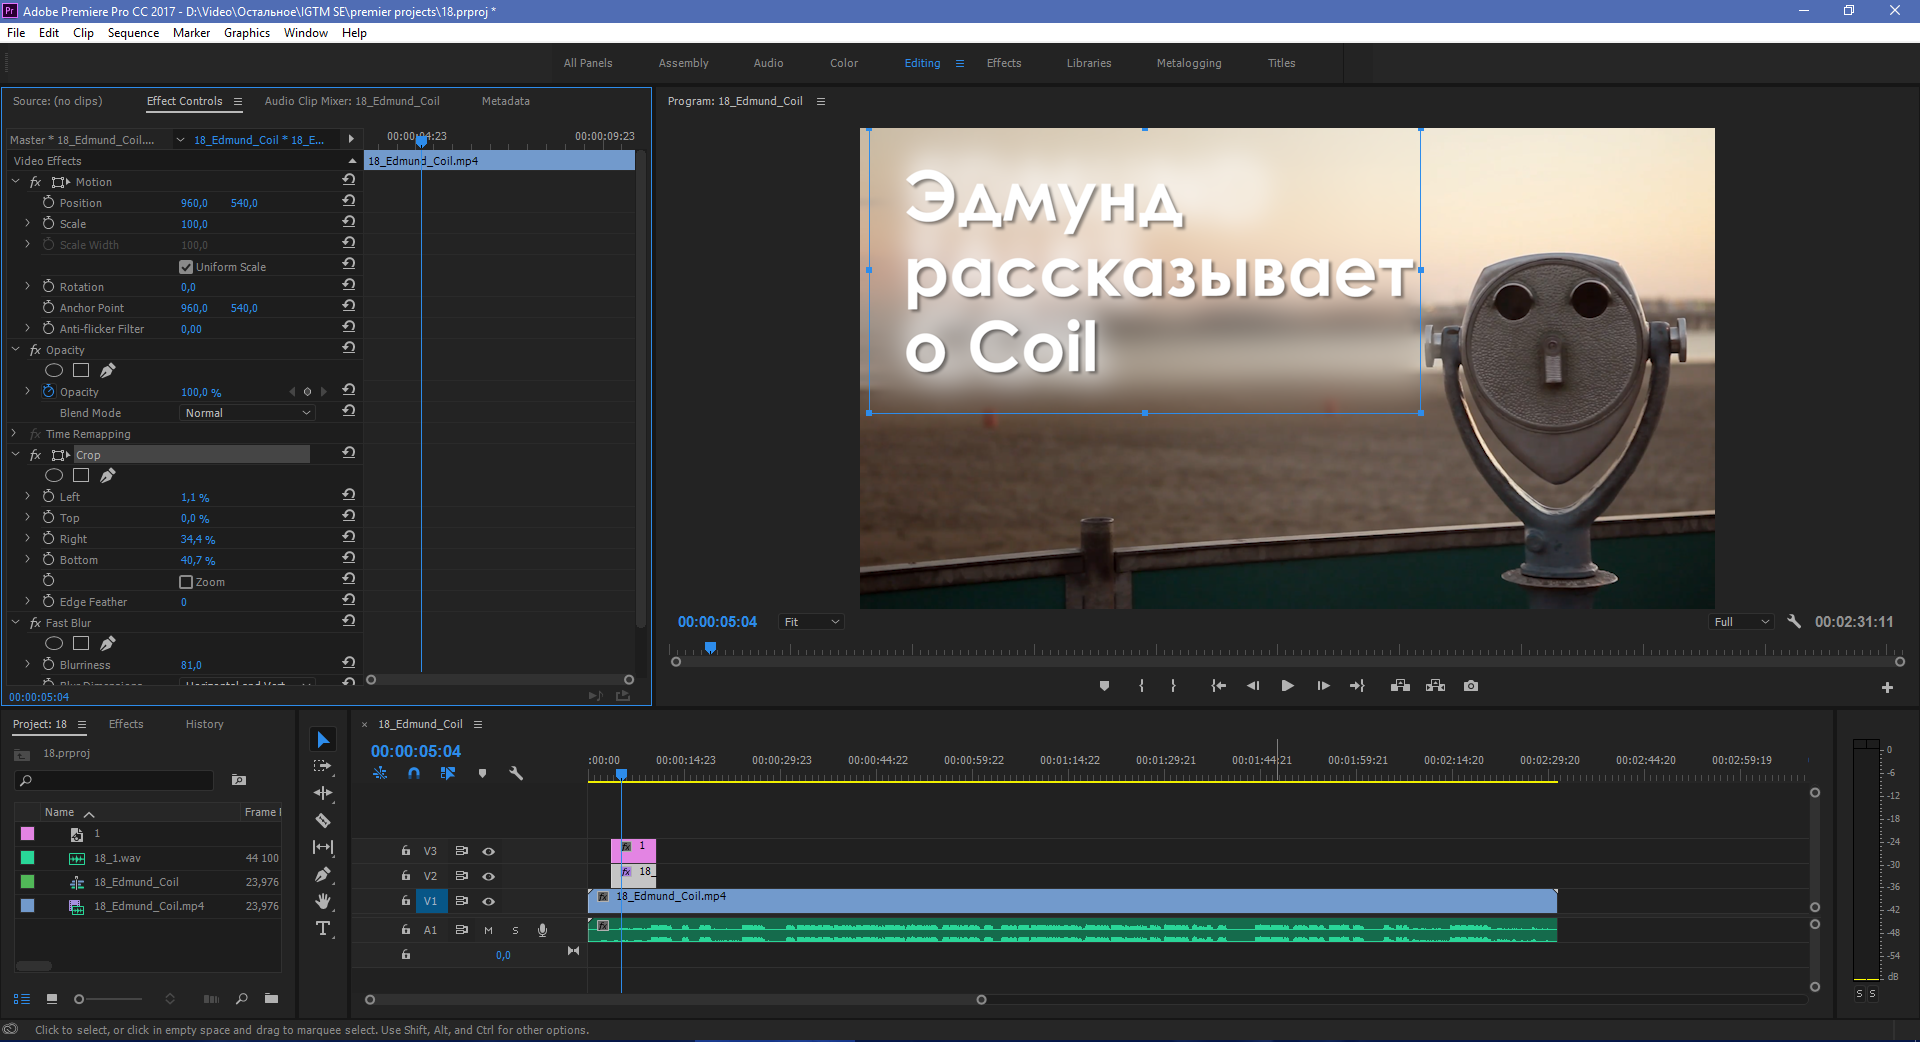
The result is quite pleasing to the eye.
5. Conclusion
That's all!)
To make it clear what happened, I will give an example of two videos:
If you wish, you can familiarize yourself with the rest of the videos here .
I tried to describe all the stages of creating our voice acting with a friend. Perhaps, somewhere after all the description of some routine actions was omitted. If any of this is not detailed enough - write in the comments and I will try to add it.
From myself I can add that I am rather satisfied with the result.
Believe me, after you listen and watch for one thing for hours, your eyes and ears start to wash up to horror. So I, alas, cannot objectively evaluate my work.
What recommendations can I give myself for the future?
Probably the first is to switch completely to products from Adobe, abandoning Cubase. Because it was not very convenient: you cut and glue the pieces into Cubase, process them in Audition, then go to Cubase again, and so on ...
The second is to simply stop reading the text from the sheet. This turned out to be a very big mistake, because many intonations were lost. Also, some phrases were longer or shorter than required, which led to problems in fitting the phrases to the original track.
The third is to abandon the system when you first record a bunch of attempts, and then you sit down and select the best fragments from them. It turned out to be very dreary and uncomfortable. It is much better to write down a couple of sentences at once, and see how they suit you. And do not move on to the next, until you finish with these. On the one hand, it will delay the recording process, but on the other - it will save a lot of time further, because then you just have to process the voice.
At this I say goodbye to you.
Waiting for your feedback!
Source: https://habr.com/ru/post/341074/
All Articles