[SOA] Service Oriented Ansible
Good day. Today we will talk about Ansible and services, you can of course use other spare parts for Docker, Jenkins and Puppet SOA, but today we have Ansible, services and a couple of PHP lines. Many of you have seen such pictures (pictures and symbols are changed).
and read such articles with pictures ( first , second ), where SOA is mentioned.
And more to the point! Today we will
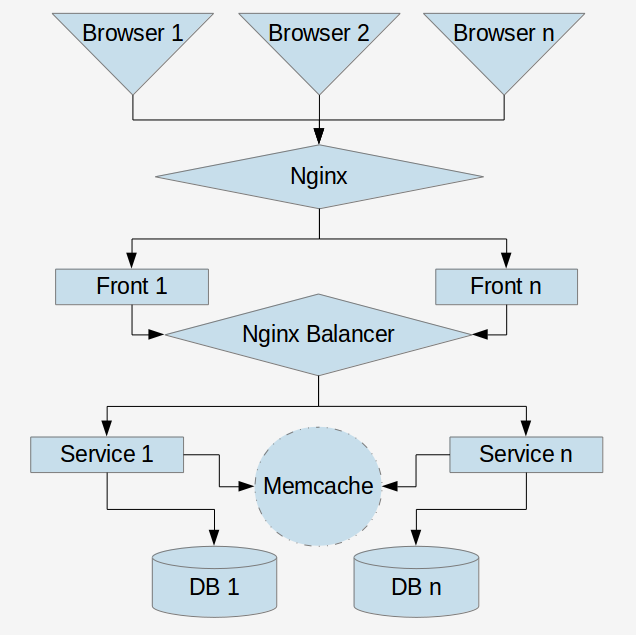
Deploy SOA
2 nginx, 2 fronts and service and deploy. Only 7 VMs are needed to deploy the SOA sandbox.
As the server we will use the local machine and in the same network segment we have deployed virtuals with the user ansible # ansible. Also, our VM requires Internet access to install software. The easiest way is to make 2 network interfaces with NAT and internal network 192.168.0.0 \ 32. If you reuse the VM, you can reduce this number to 4, as a sandbox, but no more.
The main repository that will put all of this on our sandwich from VM and that it works.
We will also use 2 more repositories. They contain a couple of lines of PHP code without reference to any framework or project. One and two .
The task of the front to make a request to the service and display its result.
The task of the service answer 3 large letters. Your captain is obvious. (You can try to slip your repository - ps Your Captain is obvious again).
Inventory
This is the name of the file in which the description of the VM structure and their hosts / prod.ini are stored.
Let's call our VMs and give them names. The front to which we contact the user is
nginx-front-00 ansible_host=192.168.56.102 Basic application that accepts requests
php-front-00 ansible_host=192.168.56.103 php-front-01 ansible_host=192.168.56.101 One small balancer that serves our services
nginx-balance-00 ansible_host=192.168.56.104 One small service that has a word in 3 letters
service-sign-00 ansible_host=192.168.56.101 service-sign-01 ansible_host=192.168.56.103 As you can see, I reuse VMs for service and foreon, but let's think that these are different VMs that are located on different iron servers for fault tolerance.
Inventory structure
We called our hosts, now we will compile the groups of them, and the groups themselves will be divided into several parts. The first group of groups is groups of services.
Group services
[nginx-front] nginx-front-00 [front_app] php-front-00 php-front-01 [nginx-balancer] nginx-balance-00 [sign] service-sign-00 service-sign-01 [deploy] deploy Soft Groups
We have grouped our hosts into groups and now we need to indicate which software each group needs. Another group of groups is needed for this.
[php-cli:children] front_app [php-fpm:children] front_app sign [git:children] front_app [hg:children] [nginx:children] nginx-front nginx-balancer Adding a group to a group will prompt our deployment that you need to install the appropriate software for this group. For hosts included in the php-cli group, install the PHP console version for cron jobs for example.
Ps Your captain is obvious
Group Services
The next group of groups =)
[services:children] sign Groups our services as services.
Feature of Services
Feature of the services is that there are 2 entry points
// server_name {{ service_name }} api/index.php // server_name {{ service_name }}_web web/index.php Why is this necessary? If you want to make the administrative panel of the service, then you don’t need to do an additional service for it, you can use the same VMs and access them as {{service_name}} _ web via ifraym or request. Services may change in this way the service administration code will be updated along with the service.
Keys
Passwords are not very convenient to use each time, so let's scatter keys on our VMs.
ansible-playbook -i hosts/prod.ini task/system/authorized_key.yml -k --ask-sudo-pass especially for you, I have already generated the keys in the roles / authorized_key / keys folder, but you owe can make your own.
Add a private key in the storage key
cp roles/authorized_key/keys/id_rsa ~/.ssh/id_rsa_deploy && chmod 700 ~/.ssh/id_rsa_deploy && ssh-add ~/.ssh/id_rsa_deploy IMPORTANT: after restarting the machine, the key must be added again
Or write it in configurations, for example, in the / etc / ssh / ssh_config file add a line
IdentityFile /etc/ssh/ssh_hg_deploy_key Soft
Install the necessary software on VM
ansible-playbook -i hosts/prod.ini task/system/soft-install.yml This will provide us with the necessary software for our Soft Groups. We can add or remove groups from groups so that on each VM there is only the required set of software. If the VM re is used in another service or large changes occur in the service, then it is easier for the VM to destroy and deploy again.
We installed php-cli, php-fpm, git, nginx on the machine niches, what's next ...
FRONT
We need to configure our frontline NGIKS which is here
roles/nginx-front/templates/nginx.conf.j2 Apparently this is a template with a minimally configured set of parameters, even not specifically configured. Also a very necessary file:
roles/nginx-front/templates/vhosts.conf.j2 Consider it in more detail.
upstream php-front { {% for upstream in groups["front_app"] %} server {{ hostvars[upstream]["ansible_host"] }}:9000; {% endfor %} } We configure our balancer in the simplest way, for a more serious configuration, you can add variables to the hosts and add our balancer, taking into account additional variables.
The virtual host uses upstream php-front.
fastcgi_pass php-front; Apply these settings to our front.
ansible-playbook -i hosts/prod.ini task/nginx/front.yml Now our front has started sending requests to our front app!
But there is still nothing ....
Services
Our front app is also a service like other services, it just accepts a request from the Internet, so it is configurable like all other services.
in the hosts / group_vars / folder, according to the group name, there are group configuration files
#hosts/group_vars/front_app.yml service_name: front_app deploy_via: git repo: 'https://github.com/dangerousvasil/simpleFront' branch: 'master' keep_releases: 10 also common hosts / group_vars / all.yml configurations
releases_path: '/var/www' current_release_dir: 'www' application_configuration_path: '/etc/application/config.ini' keep_releases: 0 apt_cache_valid_time: 86400 www_user: 'www-data' Here we can specify where to deploy the application code and configuration file and many other configurations that you will need later.
Run the task to update the application code
ansible-playbook -i hosts/prod.ini task/app/code-update.yml Now our application is ready to receive the first requests to the front! We can also go to our VM and see where our default code is
{{ releases_path }}/{{ service_name }}/{{ current_release_dir }} /var/www/front_app/www Going to the machine, we will see that this folder is a link that leads to another folder / 20171024121418Z, this is done so that we can always roll back the changes to the last successful release
lrwxrwxrwx /var/www/front_app/www -> /var/www/front_app/releases/20171024121418Z releases: total 40 drwxr-xr-x 2 20171024121418Z drwxr-xr-x 2 20171024120329Z drwxr-xr-x 2 20171024112918Z drwxr-xr-x 2 20171024104100Z drwxr-xr-x 2 20171024102800Z drwxr-xr-x 2 20171024102702Z drwxr-xr-x 2 20171024102548Z drwxr-xr-x 2 20171024102458Z drwxr-xr-x 2 20171024095629Z drwxr-xr-x 2 20171024094949Z There is a task for this.
ansible-playbook -i hosts/prod.ini task/app/code-rollback.yml This will move our link to the previous release, if it was, or throw an exception. If you run the task again, it will move the link further until the releases end.
Balancer
The code is laid out, the front is configured, the matter remains small - the balancer of services.
While we use 1, we can add a few more and banas between them using different ddns or HAProxy tools, or just randomly choose a server on the side of the application - you decide.
Run the task
ansible-playbook -i hosts/prod.ini task/nginx/balancer.yml Using the hosts / group_vars / nginx-balancer.yml file
The configuration of balancing the specified services is created here, respectively, the service name matches the group in the inventory file, but it may not coincide with the service name specified in the server configuration file
with_services: - sign Environment
In order for our application to know what surrounds it (balancers, services) we will generate a small ini file and decompose it into each machine.
ansible-playbook -i hosts/prod.ini task/app/app_config.yml $ cat /etc/application.ini [application] service.host[]=192.168.56.102 Now our application knows who is responsible for communication with services, here you can add other settings for your application.
Testing
Opening our front in the browser http://192.168.56.102 we will see an ugly picture
string(14) "192.168.56.104" string(191) "HTTP/1.1 200 OK Server: nginx/1.10.3 (Ubuntu) Date: Wed, 25 Oct 2017 09:51:43 GMT Content-Type: text/html; charset=UTF-8 Transfer-Encoding: chunked Connection: keep-alive <h1>API</h1>" For some, this seems to be complete nonsense, and someone will see that our service has written us its 3 big letters "API" and will be delighted.
Conclusion
If you added your project as a front and wrote a couple of lines there or connected a couple of libraries to work with services via json-rpc (you probably understand PHP and this will help you a lot)
$ch = curl_init(); curl_setopt($ch, CURLOPT_URL, 'http://' . $serviceHost); // balancer $header[] = "Host: service"; // @curl_setopt($ch, CURLOPT_HTTPHEADER, $header); $output = curl_exec($ch); var_dump($output); Option with the library fguillot / json-rpc
$client = new Client('http://' . $serviceHost); // balancer $http = $client->getHttpClient() ->withHeaders(['Host: service']); // service So congratulations, you plunged your project into the most fashionable and youth trend of the SOA season.
Post Scriptum
The project code still requires a lot of improvements and configurations, so only basic configurations are made for it to work.
')
Source: https://habr.com/ru/post/341016/
All Articles