Web application on Node and Vue, part 2: components, forms, routes
Before you - the second part of a series of materials, which is devoted to creating a budget manager web application using Node.js, Vue.js and MongoDB. In the first part, we dealt with the server, namely, we prepared the main methods of the RESTful API and established JWT authentication. Today we will start working on the client side of the application, create a frontend framework, means for registering with the system and logging into it, let's talk about routes and their protection.
Installing Vue.js is pretty simple. We plan to use
We will continue working on the project by creating the
')
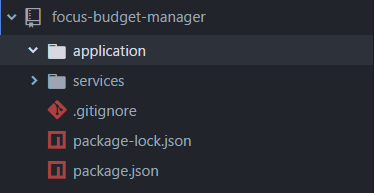
This is how the project looks after creating the
Now let's move to the folder we just created using the command line interpreter, and if
This command allows you to install
Now we will call the following command:
Please note that the project name is not indicated here, since it is assumed that the command is executed in the
After executing the above command and loading the template, you will be asked a series of questions:
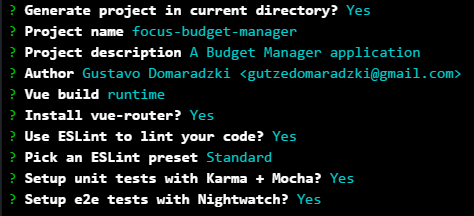
If you want, at this stage you can change the project name, description, information about the author. In order not to deviate from this material, leave everything else as shown in the figure.
Next, still remaining in the
Now you can admire the standard Vue page.

We will remove from the application some standard elements that we do not need. To do this, go to the
Now you need to clear the routes. To do this, open the
Please note that there are many ways to structure routes, but in order not to complicate the project, we simply import the components and specify the routes in this file.
Now, at the last stage of cleaning the standard application, delete the
Before you start developing the frontend of the application, you need to install a few more dependencies. Before executing the following command, check whether you are in the
Now we will install the development dependencies:
We will use
Now that all the preparatory activities have been completed, we will deal with the development. Let's go to the
In the
We will deal with the expansion of this component later, but for now let's move to the
To begin, import the
After that, if you go to http: // localhost: 8080 / # / login , you can see a blank page with the inscription "Auth!" This indicates that the authentication route is working.
Now open the
Let's
Now go to the
In the
In the
Import partial templates into
Now, in the
Set up the appearance of the application by
Here we import the previously prepared scss styles and set the use of a fixed background image for the application. We strive to ensure that on any device the screen of the application looks about the same.
In the

Please note that everything related to styling and working with the background does not affect the functionality of the application, so you can easily skip these steps or decorate the application as you like.
Thanks to this step, we will ensure the correct display of the application on mobile devices. In addition, at this stage of the work, we will upload icons in the Material Design style. To do all this, go to the
Now that we have decorated the application a bit, getting rid of at least the boring white pages, we will continue to work on the
We import into it what we need and declare a constant into which we write the path to the API:
Now we will create an
We begin work on this component by declaring an object named
Now we will write the methods:
The first method uses three arguments:
Axios is used here to execute a POST API request with the
Otherwise, we set the
The second method is very similar to the first, we use it to create a new account. The difference between it and the first method lies in the end point with which we work.
The third method is used to check whether the user is authenticated or not.
The latter method allows the return of the
Now let's continue working on the component by opening the
There is a
Inside it is a pair of signed
The second input field is for a password, it is equipped with an icon that indicates whether the user can see the password entered. This icon has a callback, which is a switch function that allows you to switch the value of the variable
And, finally, there are descriptions of buttons that we use to create a new account or to submit a form to log in.
The following code fragment describes the structure of the registration form in the system, which is visible only if the variable
Further, there is a
Now, in the same
It all starts with importing the
Now let's look at the variables storing the component data:
There are a couple of methods in this component. The
And finally, here is the styling code of the component that needs to be placed in the same
Here are the components for logging in and registering a new user.
Go to the
At the moment in the template of this component, the code of which is presented below, there will be only a few text messages:
This component is the basis for the home page, which we will address in the next part of this series. For now let's execute a GET request to the API to get all registered users using the API debugging method and passing the token in the request header. Here is what it will look like:

Open the
Consider this code.
In this line, we import the
Here we give the name to the
Here we protect the navigation system. Namely, we register the global watchdog hook, using which, before going through each route, we check whether its
This command exports the router.
Now open the
Without this, if the user reloads the page or closes it, and then reopens it, he will be redirected to the login page.
Today we talked about how to create a Vue.js application, how to develop Vue components, looked at how to execute HTTP requests and protect application routes. In the next part, we will refine the Home component and continue the development of the client and server parts of the application.
Dear readers! If you are well versed in Vue.js, please tell us about the projects for which you used it, and are you satisfied with what happened?
Installing Vue.js and using vue-cli
Installing Vue.js is pretty simple. We plan to use
vue-cli with the webpack template. Referring to the Vue tutorial, you can find out that vue-cli are used to install vue-cli and prepare the working environment: # vue-cli $ npm install --global vue-cli # "webpack" $ vue init webpack my-project # $ cd my-project $ npm install $ npm run dev We will continue working on the project by creating the
application folder in its root directory. You can also skip this step by creating a folder while working with vue-cli . If you decide not to create a folder, then you need to give the project a name by running a command like this:')
vue init webpack name-of-your-project This is how the project looks after creating the
application folder:Now let's move to the folder we just created using the command line interpreter, and if
vue-cli is not yet installed, run the following command: npm i --g vue-cli This command allows you to install
vue-cli globally, so it does not matter which folder we will be in by executing it.Now we will call the following command:
vue init webpack Please note that the project name is not indicated here, since it is assumed that the command is executed in the
application folder that has already been created to host the application.After executing the above command and loading the template, you will be asked a series of questions:
If you want, at this stage you can change the project name, description, information about the author. In order not to deviate from this material, leave everything else as shown in the figure.
Next, still remaining in the
application folder, install the dependencies and run the project. npm i npm run dev Now you can admire the standard Vue page.
Cleaning the Vue application
We will remove from the application some standard elements that we do not need. To do this, go to the
application/src/assets folder and delete logo.png , since we will not use this file. Next, open the file of the root component App.vue from the application/src folder and bring it to the form represented by the following code fragment: <template> <div id="app"> <v-container> <router-view/> </v-container> </div> </template> <script> export default { name: 'app' } </script> Now you need to clear the routes. To do this, open the
index.js file in the router folder and bring it to this form: import Vue from 'vue' import Router from 'vue-router' Vue.use(Router) export default new Router({ routes: [ {} ] }) Please note that there are many ways to structure routes, but in order not to complicate the project, we simply import the components and specify the routes in this file.
Now, at the last stage of cleaning the standard application, delete the
HelloWorld.vue file from the components folder.Installing dependencies
Before you start developing the frontend of the application, you need to install a few more dependencies. Before executing the following command, check whether you are in the
application folder: npm i --save axios vuetify vue-cookie Now we will install the development dependencies:
npm i --save-dev sass-loader node-sass We will use
axios to handle HTTP requests. In vuetify we are interested in visual components and the ability to use a grid-based layout. We will use the vue-cookie library to work with cookies. The sass-loader and node-sass allow us to use SCSS.Getting started on the application frontend
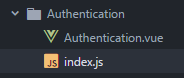
Now that all the preparatory activities have been completed, we will deal with the development. Let's go to the
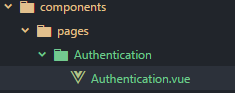
components folder and create the pages folder in it, in which we will create the Authentication folder. In this folder, you need to create an Authentication.vue file representing the component that will be used for authentication. This is what should end up:In the
Authentication.vue file we place the following code: <template> <h1>Auth!</h1> </template> <script> export default {} </script> We will deal with the expansion of this component later, but for now let's move to the
router folder and work with the routes.To begin, import the
Authentication component and configure a route to use it: import Vue from 'vue' import Router from 'vue-router' // Pages import Authentication from '@/components/pages/Authentication/Authentication' Vue.use(Router) export default new Router({ routes: [ { path: '/login', name: 'Authentication', component: Authentication } ] }) After that, if you go to http: // localhost: 8080 / # / login , you can see a blank page with the inscription "Auth!" This indicates that the authentication route is working.
Now open the
main.js file from the src folder and import the vuetify and vue-cookie : import VueCookie from 'vue-cookie' import Vuetify from 'vuetify' import('../node_modules/vuetify/dist/vuetify.min.css') Vue.use(VueCookie) Vue.use(Vuetify) Vue.config.productionTip = false Let's
App.vue to the App.vue component from the src folder and look at the styles. First you need to prepare the style tag. Post it immediately after closing the script tag: <style lang="scss"> </style> Now go to the
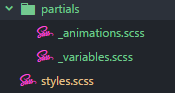
src/assets folder and create the styles.scss file and the partials folder in it. In this folder, create two partial templates, represented by the files _variables.scss and _animations.scss . The result should be the following structure:In the
_variables.scss file _variables.scss we will set the following parameters: // Colors $background-tint: #1734C1; $background-color: rgba(0, 0, 0, .5); In the
_animations.css file _animations.css add the bounceIn and slideInFromLeft animation descriptions: @keyframes bounceIn { to { animation-timing-function: cubic-bezier(.215, .61, .355, 1) } 0% { opacity: 0; transform: scale3d(.3, .3, .3) } 20% { transform: scale3d(1.1, 1.1, 1.1) } 40% { transform: scale3d(.9, .9, .9) } 60% { opacity: 1; transform: scale3d(1.03, 1.03, 1.03) } 80% { transform: scale3d(.97, .97, .97) } to { opacity: 1; transform: scaleX(1) } } @keyframes slideInFromLeft { from { transform: translateX(-2500px); opacity: 0 } 50% { transform: translateX(0); opacity: 1; } 70% { transform: translateX(-20px); } 90% { transform: translateX(10px); } to { transform: translateX(0); } } Import partial templates into
styles.scss : @import "./partials/variables"; @import "./partials/animations"; Now, in the
assets folder, create an images folder. Here you can put any image that will be used as a background. Here , in the repository, you can find the image that is used in this material.Set up the appearance of the application by
App.vue styling block in the App.vue file to the following view: <style lang="scss"> @import "./assets/styles"; body { background: url('./assets/images/background.jpg') no-repeat center center fixed; &:after { content: ''; position: fixed; width: 100%; height: 100%; top: 0; left: 0; background-color: $background-tint; opacity: .3; z-index: -1; } } </style> Here we import the previously prepared scss styles and set the use of a fixed background image for the application. We strive to ensure that on any device the screen of the application looks about the same.
In the
body :after pseudo-element, we set the background-color parameter by writing the value of the $background-tint variable to it. This will apply a magenta color filter to the background image. Here are the different versions of the background image.Please note that everything related to styling and working with the background does not affect the functionality of the application, so you can easily skip these steps or decorate the application as you like.
Scaling the viewing area and loading icons
Thanks to this step, we will ensure the correct display of the application on mobile devices. In addition, at this stage of the work, we will upload icons in the Material Design style. To do all this, go to the
index.html file, which is located in the application folder, and add the following to the head tag: <meta name="viewport" content="initial-scale=1"> <link href='https://fonts.googleapis.com/css?family=Roboto:300,400,500,700|Material+Icons' rel="stylesheet"> Development of the Authentication component
Now that we have decorated the application a bit, getting rid of at least the boring white pages, we will continue to work on the
Authentication component. Create an index.js file in the Authentication folder.We import into it what we need and declare a constant into which we write the path to the API:
import Axios from 'axios' import router from '@/router' const BudgetManagerAPI = `http://${window.location.hostname}:3001` Now we will create an
Authentication object that will contain the methods we need: export default { user: { authenticated: false } } We begin work on this component by declaring an object named
user , which stores information about whether the user is authenticated.Now we will write the methods:
import Axios from 'axios' import router from '@/router' const BudgetManagerAPI = `http://${window.location.hostname}:3001` export default { user: { authenticated: false }, authenticate (context, credentials, redirect) { Axios.post(`${BudgetManagerAPI}/api/v1/auth`, credentials) .then(({data: {token}}) => { context.$cookie.set('token', token, '1D') context.validLogin = true this.user.authenticated = true if (redirect) router.push(redirect) }).catch(({response: {data}}) => { context.snackbar = true context.message = data.message }) }, signup (context, credentials, redirect) { Axios.post(`${BudgetManagerAPI}/api/v1/signup`, credentials) .then(({data: {token}}) => { context.$cookie.set('token', token, '1D') context.validSignUp = true this.user.authenticated = true if (redirect) router.push(redirect) }).catch(({response: {data}}) => { context.snackbar = true context.message = data.message }) }, checkAuthentication () { const token = document.cookie if (token) this.user.authenticated = true else this.user.authenticated = false }, getAuthenticationHeader (context) { return `Bearer ${context.$cookie.get('token')}` } } The first method uses three arguments:
context: this is a component of Vue.credentials: there will be a username (username) and password (password).redirect: here will be the path we are going to redirect the user to.
Axios is used here to execute a POST API request with the
credentials argument passed. Then we unstructure the response, data , since here we are only interested in the value of token , we save this value in the cookie and set the lifetime of this data to be one day. We also set the validLogin variable and the authenticated value of the user object to true , and finally, redirect the user along the path from the redirect argument.Otherwise, we set the
context field's snackbar field to true and write an error message to the message.The second method is very similar to the first, we use it to create a new account. The difference between it and the first method lies in the end point with which we work.
The third method is used to check whether the user is authenticated or not.
The latter method allows the return of the
Authorization header.Now let's continue working on the component by opening the
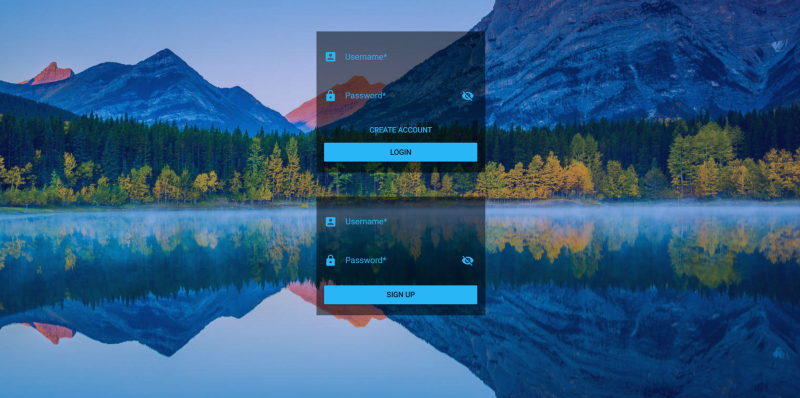
Authentication.vue file. Here we will use the tools Vuetify: <template> <div class="l-auth-container"> <div class="l-auth"> <v-form v-model="validLogin"> <v-text-field label="Username" v-model="credentials.username" prepend-icon="account_box" :rules="rules" required color="light-blue lighten-1"> </v-text-field> <v-text-field label="Password" v-model="credentials.password" prepend-icon="lock" :rules="rules" :append-icon="loginPasswordVisible ? 'visibility' : 'visibility_off'" :append-icon-cb="() => (loginPasswordVisible = !loginPasswordVisible)" :type="loginPasswordVisible ? 'text' : 'password'" color="light-blue lighten-1" required> </v-text-field> <v-btn flat color="light-blue lighten-1" @click.native="signUpVisible = true">Create account</v-btn> <v-btn color="light-blue lighten-1" @click.native="submitAuthentication()">Login</v-btn> </v-form> </div> <div class="l-signup" v-if="signUpVisible"> <v-form v-model="validSignUp"> <v-text-field label="Username" v-model="newUser.username" prepend-icon="account_box" :rules="rules" required color="light-blue lighten-1"> </v-text-field> <v-text-field label="Password" v-model="newUser.password" prepend-icon="lock" :rules="rules" :append-icon="signUpPasswordVisible ? 'visibility' : 'visibility_off'" :append-icon-cb="() => (signUpPasswordVisible = !signUpPasswordVisible)" :type="signUpPasswordVisible ? 'text' : 'password'" color="light-blue lighten-1" required> </v-text-field> <v-btn block color="light-blue lighten-1" @click.native="submitSignUp()">Sign Up</v-btn> </v-form> </div> <v-snackbar timeout="6000" bottom="bottom" color="red lighten-1" v-model="snackbar"> {{ message }} </v-snackbar> </div> </template> There is a
div element with the class l-auth-container , which acts as a container. Next comes another div with the l-auth class, which contains the structure of the elements for organizing the input form, in particular, this is the v-form element bound to the validLogin variable.Inside it is a pair of signed
v-text-field input fields that are bound to data from the credentials (we will deal with this data below). The fields are equipped with icons taken from https://material.io/icons/ , the input validation rules are associated with them (both here and there are the same rules, we will not complicate the project), besides, both of these fields are mandatory.The second input field is for a password, it is equipped with an icon that indicates whether the user can see the password entered. This icon has a callback, which is a switch function that allows you to switch the value of the variable
loginPasswordVisible from true to false and vice versa. If this variable is set to true , then the type parameter of the input field is set to text , otherwise it is a password .And, finally, there are descriptions of buttons that we use to create a new account or to submit a form to log in.
The following code fragment describes the structure of the registration form in the system, which is visible only if the variable
signUpVisible set to true . The device of this form is similar to the device of the login form, only a few lines are changed here. In particular, the variable signUpPasswordVisible is used instead of loginPasswordVisible and another button click handling method.Further, there is a
v-snackbar , which, during authentication, is used to display messages.Now, in the same
Authentication.vue file, we describe the component script: <script> import Authentication from '@/components/pages/Authentication' export default { data () { return { snackbar: false, validLogin: false, validSignUp: false, signUpVisible: false, loginPasswordVisible: false, signUpPasswordVisible: false, rules: [ (value) => !!value || 'This field is required' ], credentials: { username: '', password: '' }, newUser: { username: '', password: '' }, message: '' } }, methods: { submitAuthentication () { Authentication.authenticate(this, this.credentials, '/') }, submitSignUp () { Authentication.signup(this, this.newUser, '/') } } } </script> It all starts with importing the
index.js file from the Authentication folder, since we need the authenticate method defined inside this file.Now let's look at the variables storing the component data:
snackbar: used for message bar.validLogin: used to validate the login form.validSignUp: used to validate the registration form.signUpVisible: used to display the registration form (when set totrue).loginPasswordVisible: indicates whether the user can see the password entered on the login form.signUpPasswordVisible: indicates whether the password entered in the registration form can be seen.rules: rules for checking data entered in form fields.credentials: an object bound to the input fields of the login form used to authenticate the user.newUser: an objectnewUserwith the input fields of the registration form in the system.message: used to display messages during authentication.
There are a couple of methods in this component. The
submitAuthentication method calls the authenticate method from the Authentication file, passing context, credentials, and redirection paths. The submitSignUp method submitSignUp used to call the signup method.And finally, here is the styling code of the component that needs to be placed in the same
Authentication.vue file (here you can unleash the imagination and do everything the way you want): <style lang="scss"> @import "./../../../assets/styles"; .l-auth { background-color: $background-color; padding: 15px; margin: 45px auto; min-width: 272px; max-width: 320px; animation: bounceIn 1s forwards ease; } .l-signup { background-color: $background-color; padding: 15px; margin: 45px auto; min-width: 272px; max-width: 320px; animation: slideInFromLeft 1s forwards ease; } </style> Here are the components for logging in and registering a new user.
Development of the Home component
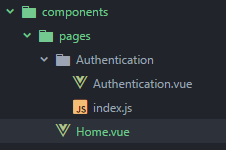
Go to the
pages folder and create the Home.vue component Home.vue :At the moment in the template of this component, the code of which is presented below, there will be only a few text messages:
<template> <div> <h3>Hi! this is our App's Home</h3> <ul> <li v-if="users != null" v-for="user in users"> {{ user.username }} </li> </ul> </div> </template> <script> import Axios from 'axios' import Authentication from '@/components/pages/Authentication' const BudgetManagerAPI = `http://${window.location.hostname}:3001` export default { data () { return { users: [] } }, mounted () { this.getAllUsers() }, methods: { getAllUsers (context) { Axios.get(`${BudgetManagerAPI}/api/v1/users`, { headers: { 'Authorization': Authentication.getAuthenticationHeader(this) } }).then(({data}) => (this.users = data)) } } } </script> This component is the basis for the home page, which we will address in the next part of this series. For now let's execute a GET request to the API to get all registered users using the API debugging method and passing the token in the request header. Here is what it will look like:
Navigation system protection
Open the
index.js file from the router folder. Here is what kind of it needs to lead: import Vue from 'vue' import Router from 'vue-router' import * as Auth from '@/components/pages/Authentication' // Pages import Home from '@/components/pages/Home' import Authentication from '@/components/pages/Authentication/Authentication' Vue.use(Router) const router = new Router({ routes: [ { path: '/', name: 'Home', component: Home, meta: { requiredAuth: true } }, { path: '/login', name: 'Authentication', component: Authentication } ] }) router.beforeEach((to, from, next) => { if (to.meta.requiredAuth) { if (Auth.default.user.authenticated) { next() } else { router.push('/login') } } else { next() } }) export default router Consider this code.
import * as Auth from '@/components/pages/Authentication' In this line, we import the
Authentication file, calling it Auth , since the Authentication component has also been imported. const router = new Router({ routes: [ { path: '/', name: 'Home', component: Home, meta: { requiredAuth: true } }, { path: '/login', name: 'Authentication', component: Authentication } ] }) Here we give the name to the
Router object in order to create a navigation system protection later. We also add the path to the Home component. The meta.requiredAuth parameter will be meta.requiredAuth to true . This means that if an unauthenticated user tries to access this component, it will be redirected to the login page. router.beforeEach((to, from, next) => { if (to.meta.requiredAuth) { if (Auth.default.user.authenticated) { next() } else { router.push('/login') } } else { next() } }) Here we protect the navigation system. Namely, we register the global watchdog hook, using which, before going through each route, we check whether its
meta.requiredAuth parameter is meta.requiredAuth to true . If so, we check the user object from Authentication . If the user is not authenticated, we redirect him to the login page. export default router This command exports the router.
Now open the
main.js file in the application folder. Here we are going to import the Authentication file and call the checkAuthentication method: import Vuetify from 'vuetify' import Authentication from '@/components/pages/Authentication' import('../node_modules/vuetify/dist/vuetify.min.css') Vue.use(VueCookie) Vue.use(Vuetify) Vue.config.productionTip = false Authentication.checkAuthentication() Without this, if the user reloads the page or closes it, and then reopens it, he will be redirected to the login page.
Results
Today we talked about how to create a Vue.js application, how to develop Vue components, looked at how to execute HTTP requests and protect application routes. In the next part, we will refine the Home component and continue the development of the client and server parts of the application.
Dear readers! If you are well versed in Vue.js, please tell us about the projects for which you used it, and are you satisfied with what happened?
Source: https://habr.com/ru/post/340926/
All Articles