Web application on Node and Vue, part 1: project structure, API, authentication
Before you - the first material from the series devoted to the development of a full-fledged web application called Budget Manager. The main software tools that will be used during the work on it are Node.js for the server, Vue.js for the frontend, and MongoDB as a database.

These materials are intended for readers who are familiar with JavaScript, have a general understanding of Node.js, npm, and MongoDB, and want to learn a bunch of Node-Vue-MongoDB and related technologies. We will write the application from scratch, so please be your favorite code editor. In order not to complicate the project, we will not use Vuex and will try to focus on the most important thing, without being distracted by minor things.
')
The author of this material, a developer from Brazil, says that he is far from a JavaScript guru, but he, in search of new knowledge, is ready to share with others what he has been able to find.
Here we will consider the following questions:
The project code on which we will work can be found on GitHub.
To begin with, we will create a folder structure for the project, which, at the very beginning of work, should look like this:

API folder structure
In the course of progress on the material, we will significantly expand this structure.
Now you need to install several dependencies. To do this, go to the root folder of the project (here it is
Consider some of these dependencies and their role in the project:
After installing the packages, if you plan to use Git, create a
Now, when preliminary preparation is complete, we will be engaged in programming.
Create the
This file contains the database connection parameters and the secret key that we use to create JWT tokens.
Here it is supposed to work with the local MongoDB server. In this case, in the line
Create a
The
After that, in the same file, add the following:
This code is intended to create a
Customer details will include email address (email), name (name), phone (phone), and financial documents (budgets). A financial document includes data such as its state (state), title (title), items (items) and price (price).
We continue to work with the file
In this function, we generate a cryptographic salt and hash for user passwords.
Following the code of this function, add a function that will compare passwords, checking the validity of user access to the system:
Now, at the end of the file, create a
After the
The
Now add the following to this file:
Here we create an instance of the
In the
Here we first switched
After we have coped with some of the auxiliary subsystems, we will be engaged in server setup. Go to the
We start by connecting
In order to start the server, go to the root directory of the project and enter the
In the
In the

Thanks to this approach, we can work with
Next, in the
Alternatively, instead of using the
Go to the root directory of the project, open the
Notice that the
Thanks to these changes, you can access the project root directory using the
After setting up the aliases, go to the
We do this in order to ensure that models are loaded before something else is loaded into the application.
Now we start creating some of the API methods.
Please note that by using the
Now, after connecting the packages, we will do the following in the same file:
Here we create an empty
This method searches for a
Now we need another
This method checks the headers and gets the
Let's create the API routes. To do this, go to the
In this module, we pass the
Now let's
Here we check, before performing other actions, whether the contents of the
Let's
The
Now, in the same file, we will create a method used for test purposes, allowing us to display a list of all users who have registered in the application, and needed to test the authentication mechanisms:
Next, create a
Here, when trying to register a new user, it is checked whether the
At this stage of work on the application, we will assume that the API methods for working with users are ready.
Now create the
Here we import the
Let's check what we have created by running the application server and the database server. Namely, if you go to http: // localhost: 3001 /, then in the terminal window where the server is running, you will see information about the request (there should be 200, which means that the request was successful), and the time data answer. It will look something like this:

The client application, that is, the browser, should display a regular page with the text “Budget Manager API”.
Now let's check the route
A message about the GET request with the status 404 will appear in the server window (this indicates that the server was able to be contacted, but it cannot provide what we need) and the response time.

This happens because we use this API endpoint only for POST requests. The server has nothing to answer if we execute a GET request.
Check
All this makes it possible to judge that the authentication system works, however, the question here is how to verify the login methods, if we do not even have a registration form yet.
One way to solve this problem is to use the Postman program. You can either download and install it as a normal application, or use the Chrome browser extension format.
First, connect to the
In the address field, enter
Now we will try to log in with the administrator account.
To do this, use the POST request to the endpoint
The server response should look like the one below.

Next, we get a list of users of the system.

To do this, copy the value of the
The JSON-array should come in response, in which, in our case, there will be information about only one user, who is the administrator.

Now let's check the method of registering a new user,
To do this, open a new tab, configure a POST request to the endpoint

Now, if we return to the

This concludes the first part of this series. Here you learned how to create a Node.js application from scratch and set up a simple JWT authentication. In the next part, let's start developing the user interface of the application using Vue.js.
Dear readers! In your opinion, is the method of user authentication proposed by the author suitable for use in production?
These materials are intended for readers who are familiar with JavaScript, have a general understanding of Node.js, npm, and MongoDB, and want to learn a bunch of Node-Vue-MongoDB and related technologies. We will write the application from scratch, so please be your favorite code editor. In order not to complicate the project, we will not use Vuex and will try to focus on the most important thing, without being distracted by minor things.
')
The author of this material, a developer from Brazil, says that he is far from a JavaScript guru, but he, in search of new knowledge, is ready to share with others what he has been able to find.
Here we will consider the following questions:
- Organization of the project structure.
- Installation of dependencies and description of used libraries.
- Working with MongoDB and creating Mongoose models.
- Development of application API methods.
- Preparation of routes Express.
- JWT authentication with Passport.js.
- Testing a project using Postman.
The project code on which we will work can be found on GitHub.
Project structure and dependency installation
To begin with, we will create a folder structure for the project, which, at the very beginning of work, should look like this:
API folder structure
In the course of progress on the material, we will significantly expand this structure.
Now you need to install several dependencies. To do this, go to the root folder of the project (here it is
focus-budget-manager ) and, after creating package.json with the npm init command, run the following command: npm i --save express body-parser mongoose consign cors bcrypt jsonwebtoken morgan passport passport-jwt module-alias Consider some of these dependencies and their role in the project:
- Express This is a framework for Node.js, we will use it to facilitate the development of the API.
- Body Parser. This package is a means of parsing the request body for Node.js. It helps to parse the bodies of incoming requests before they get to the handlers, as a result, you can work with them using the
req.bodyproperty. - Mongoose. This is an object modeling tool for MongoDB that is designed to work in an asynchronous environment.
- Consign. This package is an aid, it is not necessary to use it. It is intended for organizing autoload scripts.
- CORS. This package is an aid to Connect / Express that can be used to activate CORS.
- Bcrypt. With this package, we will generate cryptographic "salt" and hashes.
- Morgan. This is an auxiliary tool for Node.js, designed to log HTTP requests.
- Module Alias. This package allows you to create aliases for folders and register your own module paths in Node.js.
After installing the packages, if you plan to use Git, create a
.gitignore file in the project root folder. Write the following into it: /node_modules/ Now, when preliminary preparation is complete, we will be engaged in programming.
File BudgetManagerAPI / config / index.js
Create the
BudgetManagerAPI/config file in the BudgetManagerAPI/config index.js and enter the following code into it: module.exports = { secret: 'budgetsecret', session: { session: false }, database: 'mongodb://127.0.0.1:27017/budgetmanager' } This file contains the database connection parameters and the secret key that we use to create JWT tokens.
Here it is supposed to work with the local MongoDB server. In this case, in the line
127.0.0.1:27017 you can use localhost . If you want, you can work with the MongoDB cloud database created, for example, by means of MLabs.File BudgetManagerAPI / app / models / user.js
Create a
User model that will be used for JWT authentication. To do this, go to the BudgetManagerAPI/app folder and create the models directory in it, and the user.js file in it. At the beginning of the file connect dependencies: const mongoose = require('mongoose'), bcrypt = require('bcrypt'); The
mongoose package is needed here to create a User model, the bcrypt package tools will be used to hash user passwords.After that, in the same file, add the following:
const Schema = mongoose.Schema({ username: { type: String, unique: true, required: true }, password: { type: String, required: true }, clients: [{}] }); This code is intended to create a
User data schema. Thanks to this description, the following data will be assigned to the user of our system:- Username.
- Password (
password). - The list of clients (
clients).
Customer details will include email address (email), name (name), phone (phone), and financial documents (budgets). A financial document includes data such as its state (state), title (title), items (items) and price (price).
We continue to work with the file
user.js , add the following code to it: // - Schema.pre('save', function (next) { const user = this; if (this.isModified('password') || this.isNew) { bcrypt.genSalt(10, (error, salt) => { if (error) return next(error); bcrypt.hash(user.password, salt, (error, hash) => { if (error) return next(error); user.password = hash; next(); }); }); } else { return next(); } }); In this function, we generate a cryptographic salt and hash for user passwords.
Following the code of this function, add a function that will compare passwords, checking the validity of user access to the system:
Schema.methods.comparePassword = function (password, callback) { bcrypt.compare(password, this.password, (error, matches) => { if (error) return callback(error); callback(null, matches); }); }; Now, at the end of the file, create a
User model: mongoose.model('User', Schema); File BudgetManagerAPI / config / passport.js
After the
User model is ready, create a file passport.js in the BudgetManagerAPI/config folder. Let's start working on this file with connecting dependencies: const PassportJWT = require('passport-jwt'), ExtractJWT = PassportJWT.ExtractJwt, Strategy = PassportJWT.Strategy, config = require('./index.js'), models = require('@BudgetManager/app/setup'); The
mongoose package is needed to work with the User model, and passport-jwt is needed for authentication.Now add the following to this file:
module.exports = (passport) => { const User = models.User; const parameters = { secretOrKey: config.secret, jwtFromRequest: ExtractJWT.fromAuthHeaderAsBearerToken() }; passport.use(new Strategy(parameters, (payload, done) => { User.findOne({ id: payload.id }, (error, user) => { if (error) return done(error, false); if (user) done(null, user); else done(null, false); }); })); } Here we create an instance of the
User model and find the user by performing a search on the JWT token received from the client.File BudgetManagerAPI / config / database.js
In the
BudgetManagerAPI/config folder, create a database.js file that is responsible for working with the database. Add the following to this file: module.exports = (mongoose, config) => { const database = mongoose.connection; mongoose.Promise = Promise; mongoose.connect(config.database, { useMongoClient: true, promiseLibrary: global.Promise }); database.on('error', error => console.log(`Connection to BudgetManager database failed: ${error}`)); database.on('connected', () => console.log('Connected to BudgetManager database')); database.on('disconnected', () => console.log('Disconnected from BudgetManager database')); process.on('SIGINT', () => { database.close(() => { console.log('BudgetManager terminated, connection closed'); process.exit(0); }) }); }; Here we first switched
mongoose to use the standard Promise object. If you do not do this, you may encounter warnings displayed in the console. Then we created a standard mongoose connection.Server setup, services / index.js file
After we have coped with some of the auxiliary subsystems, we will be engaged in server setup. Go to the
services folder and open the index.js file already in it. Add the following to it: require('module-alias/register'); const http = require('http'), BudgetManagerAPI = require('@BudgetManagerAPI'), BudgetManagerServer = http.Server(BudgetManagerAPI), BudgetManagerPORT = process.env.PORT || 3001, LOCAL = '0.0.0.0'; BudgetManagerServer.listen(BudgetManagerPORT, LOCAL, () => console.log(`BudgetManagerAPI running on ${BudgetManagerPORT}`)); We start by connecting
module_alias , which we will configure later (a step is optional, but this approach will help make the code cleaner). If you decide not to use the module_alias package, then instead of @BudgetManagerAPI you will need to write ./services/BudgetManagerAPI/config .In order to start the server, go to the root directory of the project and enter the
node services command in the command line interpreter you use.File BudgetManagerAPI / config / app.js
In the
BudgetManagerAPI/config directory, create an app.js file. First, let's connect the dependencies: const express = require('express'), app = express(), bodyParser = require('body-parser'), mongoose = require('mongoose'), morgan = require('morgan'), consign = require('consign'), cors = require('cors'), passport = require('passport'), passportConfig = require('./passport')(passport), jwt = require('jsonwebtoken'), config = require('./index.js'), database = require('./database')(mongoose, config); In the
passportConfig = require('./passport')(passport) we import the configuration file for passport , passing passport as an argument, since the following command is available in passport.js :Thanks to this approach, we can work with
passport inside the passport.js file without having to connect it.Next, in the
app.js file, we start working with packages and set the secret key: app.use(express.static('.')); app.use(bodyParser.urlencoded({ extended: true })); app.use(bodyParser.json()); app.use(morgan('dev')); app.use(cors()); app.use(passport.initialize()); app.set('budgetsecret', config.secret); Alternatively, instead of using the
cors package, you can do the following: app.use(function(req, res, next) { res.header("Access-Control-Allow-Origin", "*"); res.header("Access-Control-Allow-Headers", "Origin, X-Requested-With, Content-Type, Accept"); next(); }); Configuring package.json
Go to the root directory of the project, open the
package.json and add to it, just before the dependencies block, the following: "homepage": "https://github.com/gdomaradzki/focus-gestor-orcamentos#readme", "_moduleAliases": { "@root": ".", "@BudgetManager": "./services/BudgetManagerAPI", "@BudgetManagerModels":"./services/BudgetManagerAPI/app/models", "@BudgetManagerAPI":"./services/BudgetManagerAPI/config/app.js", "@config": "./services/BudgetManagerAPI/config/index.js" }, "dependencies": { Notice that the
dependencies block already exists in the file, so you only need to add homepage and _moduleAliases .Thanks to these changes, you can access the project root directory using the
@root alias, the index.js configuration file using the @config alias, and so on.File BudgetManagerAPI / app / setup / index.js
After setting up the aliases, go to the
BudgetManagerAPI/app folder and create a new setup folder, and in it - the index.js file. Add the following to it: const mongoose = require('mongoose'), UserModel = require('@BudgetManagerModels/user');; const models = { User: mongoose.model('User') } module.exports = models; We do this in order to ensure that models are loaded before something else is loaded into the application.
File BudgetManagerAPI / app / api / auth.js
Now we start creating some of the API methods.
BudgetManagerAPI/app to the BudgetManagerAPI/app folder, create the api directory in it, and in it the auth.js file. We write the following in it: const mongoose = require('mongoose'), jwt = require('jsonwebtoken'), config = require('@config'); Please note that by using the
module_alias module module_alias we have made the code cleaner. Otherwise I would have to write something like this: config = require('./../../config); Now, after connecting the packages, we will do the following in the same file:
const api = {}; api.login = (User) => (req, res) => { User.findOne({ username: req.body.username }, (error, user) => { if (error) throw error; if (!user) res.status(401).send({ success: false, message: 'Authentication failed. User not found.' }); else { user.comparePassword(req.body.password, (error, matches) => { if (matches && !error) { const token = jwt.sign({ user }, config.secret); res.json({ success: true, message: 'Token granted', token }); } else { res.status(401).send({ success: false, message: 'Authentication failed. Wrong password.' }); } }); } }); } Here we create an empty
api object, in which we save all the necessary methods. In the login method, we first pass the User argument, since we need a method to access the User model, then we pass the arguments req and res .This method searches for a
User object that matches the username . If the username is not recognized, we give an error, otherwise we check the password and token associated with the user.Now we need another
api method that will receive and parse the token: api.verify = (headers) => { if (headers && headers.authorization) { const split = headers.authorization.split(' '); if (split.length === 2) return split[1]; else return null; } else return null; } This method checks the headers and gets the
Authorization header. After all these steps, we can finally export the api object: module.exports = api; API routes, BudgetManagerAPI / app / routes / auth.js
Let's create the API routes. To do this, go to the
services/BudgetManagerAPI/app folder and create the routes directory in it, in which we will create the auth.js file with the following contents: const models = require('@BudgetManager/app/setup'); module.exports = (app) => { const api = app.BudgetManagerAPI.app.api.auth; app.route('/') .get((req, res) => res.send('Budget Manager API')); app.route('/api/v1/auth') .post(api.login(models.User)); } In this module, we pass the
app object, so you can set routes. Here we set the constant api , which we use to work with the auth.js file in the api folder. Here we set the default route, '/' , when accessing which the string “Budget Manager API” is passed to the user. Right there we create the route '/api/v1/auth' (for which the POST request is used). To serve this route, we use the login method, passing the User model as an argument.File BudgetManagerAPI / config / app.js
Now let's
app.js back to the app.js file, which is located in the BudgetManagerAPI/config folder and add the following (the app.set('budgetsecret', config.secret) line app.set('budgetsecret', config.secret) given as a guideline, you don’t need to add it to the file a second time): app.set('budgetsecret', config.secret); consign({ cwd: 'services' }) .include('BudgetManagerAPI/app/setup') .then('BudgetManagerAPI/app/api') .then('BudgetManagerAPI/app/routes') .into(app); module.exports = app; Here we check, before performing other actions, whether the contents of the
setup folder are downloaded, so that an instance of the model will be created first. Then we load the API methods, and finally the routes.File BudgetManagerAPI / app / api / user.js
Let's
BudgetManagerAPI/app/api back to the BudgetManagerAPI/app/api folder and create the user.js file in it. Put the following code in it: const mongoose = require('mongoose'); const api = {}; api.setup = (User) => (req, res) => { const admin = new User({ username: 'admin', password: 'admin', clients: [] }); admin.save(error => { if (error) throw error; console.log('Admin account was succesfully set up'); res.json({ success: true }); }) } The
setup method allows you to create an administrator account for debugging purposes. In the finished application of this account should not be.Now, in the same file, we will create a method used for test purposes, allowing us to display a list of all users who have registered in the application, and needed to test the authentication mechanisms:
api.index = (User, BudgetToken) => (req, res) => { const token = BudgetToken; if (token) { User.find({}, (error, users) => { if (error) throw error; res.status(200).json(users); }); } else return res.status(403).send({ success: false, message: 'Unauthorized' }); } Next, create a
signup method that will be needed later. It is designed to register new users: api.signup = (User) => (req, res) => { if (!req.body.username || !req.body.password) res.json({ success: false, message: 'Please, pass a username and password.' }); else { const newUser = new User({ username: req.body.username, password: req.body.password, clients: [] }); newUser.save((error) => { if (error) return res.status(400).json({ success: false, message: 'Username already exists.' }); res.json({ success: true, message: 'Account created successfully' }); }) } } module.exports = api; Here, when trying to register a new user, it is checked whether the
username and password fields are filled in, and if so, then, provided that a valid username is entered, a new user is created.At this stage of work on the application, we will assume that the API methods for working with users are ready.
BudgetManagerAPI / app / routes / user.js file
Now create the
user.js file in the BudgetManagerAPI/app/routes folder and write the following code into it: const passport = require('passport'), config = require('@config'), models = require('@BudgetManager/app/setup'); module.exports = (app) => { const api = app.BudgetManagerAPI.app.api.user; app.route('/api/v1/setup') .post(api.setup(models.User)) app.route('/api/v1/users') .get(passport.authenticate('jwt', config.session), api.index(models.User, app.get('budgetsecret'))); app.route('/api/v1/signup') .post(api.signup(models.User)); } Here we import the
passport library to organize the authentication, connect the configuration file to configure the session parameters, and connect the models so that you can check whether the user has the right to work with the API endpoints.Tests
Let's check what we have created by running the application server and the database server. Namely, if you go to http: // localhost: 3001 /, then in the terminal window where the server is running, you will see information about the request (there should be 200, which means that the request was successful), and the time data answer. It will look something like this:
The client application, that is, the browser, should display a regular page with the text “Budget Manager API”.
Now let's check the route
route , which can be accessed at http: // localhost: 3001 / api / v1 / auth .A message about the GET request with the status 404 will appear in the server window (this indicates that the server was able to be contacted, but it cannot provide what we need) and the response time.
This happens because we use this API endpoint only for POST requests. The server has nothing to answer if we execute a GET request.
Check
user routes by going to http: // localhost: 3001 / api / v1 / users . The server will report a GET method with a status of 401. This indicates that the request was not processed because we do not have enough privileges to work with the target resource. The client will display a page with the text “Unauthorized”.All this makes it possible to judge that the authentication system works, however, the question here is how to verify the login methods, if we do not even have a registration form yet.
One way to solve this problem is to use the Postman program. You can either download and install it as a normal application, or use the Chrome browser extension format.
Testing the application using Postman
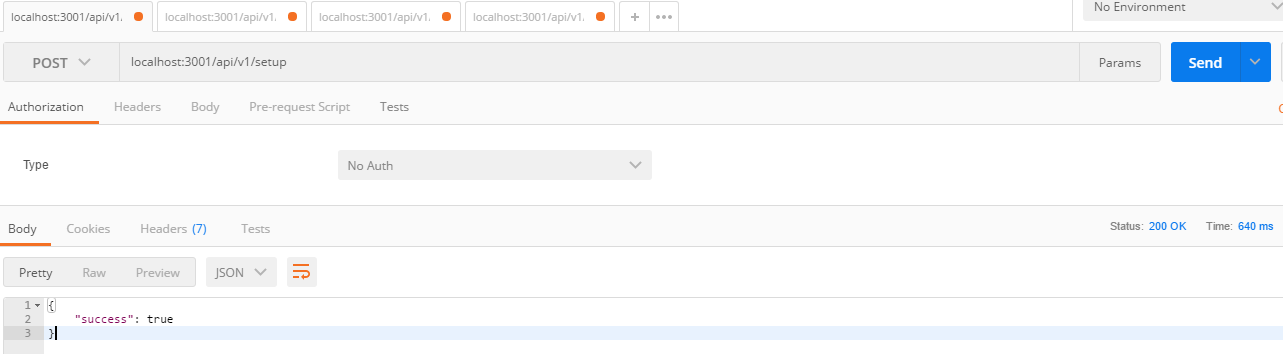
First, connect to the
setup endpoint to create an administrator account. In the Postman interface, it will look like this:In the address field, enter
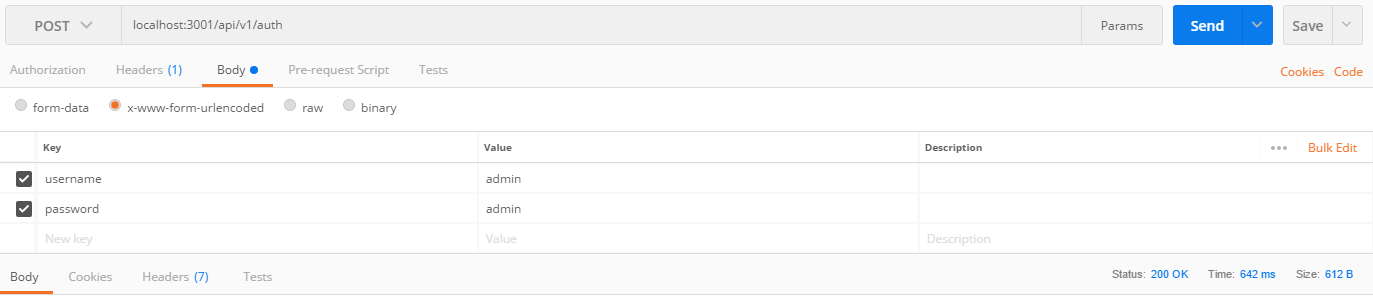
http://localhost:3001/api/v1/setup , change the type of request to POST and click the Send button. The server's JSON response must contain the message "success": true .Now we will try to log in with the administrator account.
To do this, use the POST request to the endpoint
http://localhost:3001/api/v1/auth , on the Body tab, specify the username and password keys with the same admin value and click the Send button.The server response should look like the one below.
Next, we get a list of users of the system.
To do this, copy the value of the
token key, use the GET request, enter http://localhost:3001/api/v1/users in the address field, then add a new Authorization header on the Headers tab with a value of the form Bearer token (instead of token insert the token copied from the previously received server response). In the same place, add a Content-Type header with the value application/x-www-form-urlencoded and click Send .The JSON-array should come in response, in which, in our case, there will be information about only one user, who is the administrator.
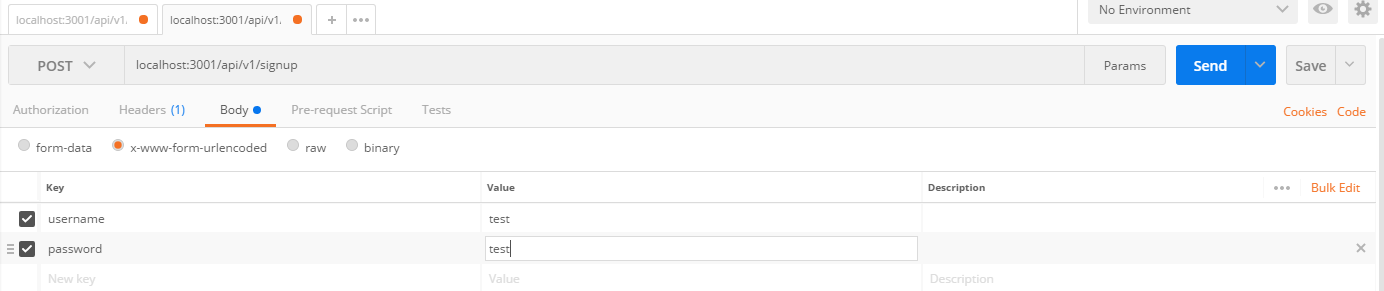
Now let's check the method of registering a new user,
signup .To do this, open a new tab, configure a POST request to the endpoint
http://localhost:3001/api/v1/signup , on the Body tab, select the x-www-form-urlencoded switch, enter the username and password keys with values different from admin , and click Send . If everything works as it should, the following should come back:Now, if we return to the
Postman tab, which accessed http://localhost:3001/api/v1/users to get the list of users, and click Send , an array of two objects representing the administrator and the new user should come back.Results
This concludes the first part of this series. Here you learned how to create a Node.js application from scratch and set up a simple JWT authentication. In the next part, let's start developing the user interface of the application using Vue.js.
Dear readers! In your opinion, is the method of user authentication proposed by the author suitable for use in production?
Source: https://habr.com/ru/post/340750/
All Articles