Pixel adventure: create a clone of Lemmings in Unity
Introduction
I think I'm not the only one playing Amiga at Lemmings as a child. Decades passed, and I became, among other things, a game developer, leading a Youtube channel with tutorials on Unity .
One evening I stumbled upon these two videos ( part 1 , part 2 ) of Mike Dally about re-creating Lemmings using Game Maker 2. Nostalgia flared up and I decided to do something with it. So I started creating my own version in Unity using my own resources (for obvious reasons).
In the article I will talk about my work process. However, to be brief, I will consider only the most important aspects. If it seems to you that this is not enough, you can watch the video here , describing the full development process, line by line.
')
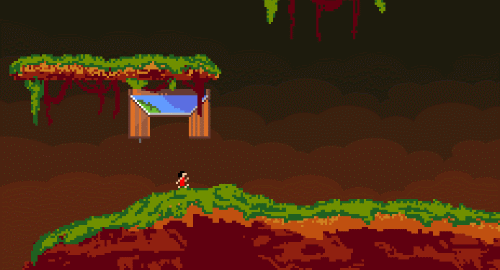
In addition, here you can play the project on WebGL. Possible bugs.
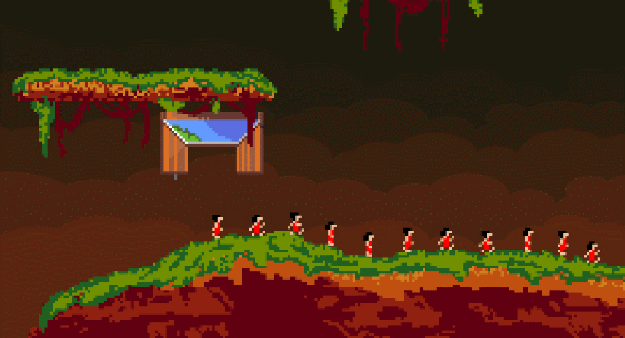
The complexity of the project was to recreate the sensations and mechanics of Lemmings. Including the provision of pixel-perfect-collisions when moving through the level of many characters that can vary depending on their skills.
Creating a map
From the very beginning it was obvious that the level should be a grid that can be edited. The problem was to render this grid with each individual node, while maintaining a high game speed.
Gradually, I came to the decision to use a single texture for the whole level, in which each pixel would be one node, and changes to the nodes would be a change in the texture itself.
To do this, we need to know that when texture changes from a disk, Unity changes the texture itself, not its copy. Therefore, we need to manually create this instance. This is very simply done with the following code:
textureInstance = Instantiate(levelTexture) as Texture2D; However, we need not only to create an instance of the texture, but also to specify nodes based on the color information obtained from the texture. Therefore, we will create a small Node class:
public class Node { public int x; public int y; public bool isEmpty; } Later we will be able to store a bit more information in this class, but for now this is enough. Now, using the following loop, we can create a grid from this class:
//maxX - , Texture2D //maxY - for (int x = 0; x < maxX; x++) { for (int y = 0; y < maxY; y++) { // Node n = new Node(); nx = x; ny = y; // // Color c = levelTexture.GetPixel(x, y); // textureInstance.SetPixel(x, y, c); // ; , 0 -. , . n.isEmpty = (ca == 0); // , . Color mC = minimapColor; if (n.isEmpty) mC.a = 0; miniMapInstance.SetPixel(x, y, mC); // grid[x, y] = n; } } // for .Apply() textureInstance.Apply(); miniMapInstance.Apply(); Note: it is not necessary to set the pixels for each Instance texture, as we do here, creating an instance before the loop also works, but we can use this technique to influence the pixels and give them a color other than the usual. For example, in the case of an opaque pixel, you can replace its normal color with green. This way we can create a minimap.
Note: the above for loop must be executed only once. Therefore, even for large textures (I use a 1000x200 texture), the excess consumption of resources will be only at boot. After that, we will use the address stored in the node to make changes to the map.
Now we have a texture and we need to render it. We add a GameObject with SpriteRenderer (in the code below it is stored as levelRenderer) and convert our Texture2D into a sprite to assign it. This can be done using the following lines:
Rect rect = new Rect(0, 0, maxX, maxY); levelRenderer.sprite = Sprite.Create(textureInstance, rect, Vector2.zero,100,0, SpriteMeshType.FullRect); You can do the same for the minimap, but instead of Sprite Renderer, I used the Image UI component.
Vector2.zero is the axial point, position 0.0 in the lower left corner. The value 100 next to it is the pixel-to-point ratio, the default in Unity is 1 point per 100 pixels. Also, when performing any calculations with world coordinates, it is important to know that, for example, to find a position in the node world (5,6), we multiply x and y by the ratio, i.e. (x * (1/100)) Or you can set the ratio 1: 1 / for all sprites in the import settings
Finally, it is important that the sprite mesh (sprite mesh) is of type FullRect. Otherwise, Unity will optimize the sprites, creating "islands" of opaque pixels. This will not be a problem when removing pixels from the map, but we need to add pixels to empty areas. Having set the type to FullRect, we will force Unity to store the sprite as a whole rectangle the size of the original image.
The picture above shows the problem when sprites are not of the FullRect type.
Thanks to all of the above, we learned how to recreate the texture as a map.
Units and search for ways
In this part, I’ll skip the process of creating animations for units inside Unity, but if you don’t know how they are created, then this process is covered in the video.
So how do we implement pixel-perfect-collisions?
We already know where on our grid are empty nodes and nodes of the earth. Let's decide on which nodes we can walk. The “rule” of our game will be as follows: if the node is the ground, and the node above it is air, then the top node is the node that you can go. As a result, we will be able to walk from one empty node to another, but when we reach a node under which there is no ground, we fall. Thus, creating a search path for each unit will be a relatively simple process.
We just need to do the following in the correct order:
- Check whether the current node is null. If this is true, then we probably fell from the map.
- Check whether curNode is an exit node, and if so, the unit has left the level (more on this below).
- Check if the bottom node is empty. This means that we are in the air, which means we are falling. If we fall more than four frames (if the last four nodes along which we moved were empty), then we switch to the drop animation. Because of this, the animation does not change when we just go down the slope.
- If there is land beneath us, then we need to look ahead. We look forward, if there is an empty knot, then we move there.
- If the node in front is not empty, then we start looking at the four nodes up until we find an empty node.
- If we have not found an empty knot, then just turn around and go in the opposite direction.
As you can see, this search for ways is very rudimentary, but for a game like Lemmings, it's more than enough.
There are also other aspects that need to be taken into account when searching for ways, for example, the “Umbrella” ability that is used in a fall, or the “Digging” ability, when we dug deep, and there is no land beneath us, and so on.
That's the whole search for ways. To move units, we need to interpolate from one pixel to another. Or, you can add a certain number of points to the transform position at specified intervals, but with the help of interpolation we solve two problems. We limit the number of pathfinding operations we use, so as not to execute them every frame, because units use pathfinding only when they reach a pixel. Despite the fact that this is a simple operation, this way we can significantly save computational resources, thus increasing the number of units capable of moving at the same time level.
All units are controlled by a simple dispatcher, which manually executes their Update (). Since Lemmings had an “accelerate” button, to recreate it, we need an imitation of time Scale time (when accelerated, it has a value of 2 or 3), which is transferred to the units along with a scaled version of the time delta. Units use scaled deltaTime (instead of Time.deltaTime) to interpolate between positions and use timeScale to change the speed in their Animator. Thus, it seems that the game is in “fast mode”, although the time scale of Unity retains its normal speed.
Level change
And here the fun begins. We have a level, but the main part of Lemmings gameplay was dynamic interaction with levels.
In other words, we need to learn how to add or remove pixels. In both cases, we use the following code:
textureInstance.SetPixel(x,y,c); Where c = color (color). The only difference between adding and removing a pixel is the alpha channel value. Do not forget. that a node is considered empty if the alpha value is 0.
However, as we remember from the above, when we use .SetPixel (), we also need to call .Apply () on the texture so that it is actually updated. We do not need to do this every time we change a pixel, because we can change several pixels per frame. Therefore, we avoid using .Apply () until the end of the frame. Therefore, at the end of our Update () loop, we have a simple boolean value. When it is true, both for textureInstance and for the minimap .Apply () is executed:
if(applyTexture) { applyTexture = false; textureInstance.Apply(); miniMapInstance.Apply(); } Abilities
After creating this system, we simply need to determine which pixels we are working on and how. In the article I will consider only the high-level logic of events, but you can see the code in the video. Hereinafter, when I say “whether there is a pixel or not,” it means the void of the node, because if you did not fall off the map, then there will always be a pixel in any place.
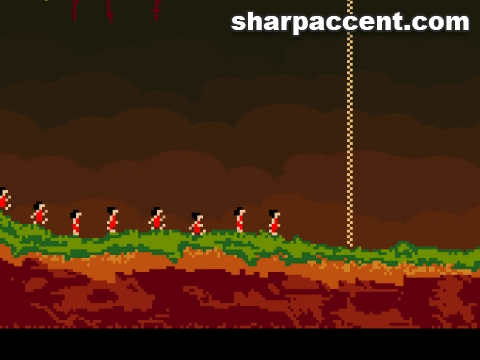
- Walking
- This is a basic ability. Moving on, there is nothing interesting.
- Stop
- Stop! Redirecting units to the other side.
- Umbrella
- When a unit falls from a great height, it dies, but with this ability it smoothly descends, like Mary Poppins. This ability works very simply, it just checks its activity. In addition, it changes the speed of the fall to interpolate between pixels to create the effect of a relaxed fall.
- Forward digging
- In the original game, it was called “Basher” - the unit simply dug the tunnel forward. From the point of view of logic, it redefines the search path: if there is at least one pixel ahead, the unit continues to dig for a certain number of pixels, then for each pixel forward it takes 8 pixels above it and sends them so that they are deleted. The size of eight pixels is chosen because of the growth of our characters.
- Digging down
- It looks like digging forward. Instead of taking pixels from the front and top, the ability takes 2-3 pixels under the unit, 2-3 forward, and, of course, from one row below.
- Blowing up
- This is a simple suicide unit, it just explodes, leaving a hole in its place. Removable pixels are at a given radius around its position.
- Building
- Another classic ability is that the unit builds a row of pixels diagonally upwards from the point at which it is looking. This is achieved by obtaining 4-5 pixels in front and above with their further transfer to “add”. It also affects the properties of nodes (turns a node from empty to full). After that, the ability interpolates to the next diagonal position and repeats operations until it collides with the wall or until the number of pixels allocated for the building is completed.
- Filling
- Another fun ability that seamlessly brings us to the next section. She first appeared in Lemmings 2: this is a unit that throws “sand” pixels that have “fluid” properties — always go down until they reach a resting point. We will discuss them in more detail later.
Obviously, in the Lemmings series of games there are much more other abilities, but I suppose (although I haven’t tested them all) that they will be just combinations of all the above. Miner, for example, is a variation of Basher, but instead of moving forward, it digs forward and down.
Get down smoothly like mary poppins
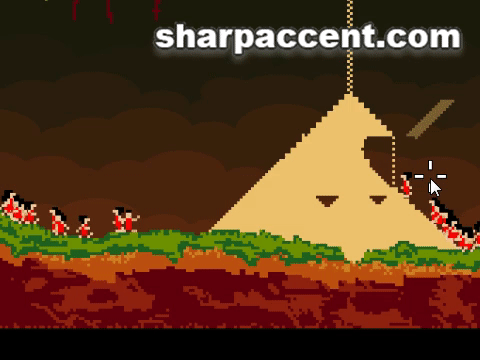
Examples of using some abilities
"Liquids"
Or as I call them, the fill nodes. This is another fun addition. Their high-level logic is as follows: they are dynamic nodes that have their own “search for paths”. Put them all together and get a fluid effect. As shown in the video, you can also create the effect of falling snow.
Here's how it works - we have the following class:
public class FillNode { public int x; public int y; public int t; } x and y is, as you might guess, the node address. t here is the number of times the fill node has been in the “deadlock position”. You can experiment with numbers, but for myself I chose that if it was in it 15 times, then the node is considered to be stopped, thus turning from the filling node into a normal node.
The fill nodes are not updated every frame, because then they would have to change position 60 times per second, because of which they could move too fast. We use the universal timer acting only on them. Personally, I used the update every 0.05 seconds, but you can experiment with it to get various effects of the fluid.
So, when they are updated, their “search for paths” looks like this:
- We check if there is a node under our node, if not, then this filling node has fallen outside the map.
- If it exists, then we check if it is empty. If it is empty, then clear the pixel in which we are and add it to the pixel (node) below. So we keep moving down.
- However, if it is not empty, check the pixel forward-down. If it is empty, move there.
- If the forward-down is full, then move back-down.
- If we are in a position from which there is no place to move, then we add to the filling node t.
- If t is greater than the value we specify, then delete the fill node and leave the pixel full.
t is responsible for three aspects. First, by removing nodes that are not moving, it ensures that we do not have a huge list of filling nodes. Secondly, it allows you to avoid sticking the nodes to each other when falling. Thirdly, if the node is at a dead end, but is not yet considered to be stopped, then the unit digging under it will cause the filling node to fall down during the next update, which creates a beautiful dynamic effect.
Considering all the above, one might think that the “fluid” effect greatly affects the speed, but in our case it is not. As shown in the video, I tested it with large numbers (more than 10,000 filling nodes). Although there was no chance that all 10,000 would be “alive” at the same time, this created a very beautiful effect, shown below.
Play with this extra system. The "placeholder" ability needs only a spawn position, after which it will create several filling nodes and allow them to move independently.
Level editor
You probably guessed that it would not be possible without it, because in essence, all we did was change the colors of the pixels. Therefore, the next logical step will be the creation of a level editor, which, of course, will be a pixel drawing tool. I don’t think that it’s worth going deeper into the analysis of this editor, because it only uses the same functions described above, but focuses not on units, but on the position of the mouse. Of course, if you want to see the whole code, you can watch the video.
But I want to talk more about serialization, so ...
Serialization
As I showed in the video, there are several ways to implement it. I don't even have to use an editor to create levels. We can simply load an image from a disk into .png and use it as a level. The system we have already created opens up wide possibilities. However, we still need to create a game from texture, so we need to maintain the spawn position and exit position (let's call them two events). In the sequels of the original Lemmings there were several such events, but let's focus on each of them, the basis of the logic will be the same.
Of course, there are also many ways to implement these events, for example, creating two textures per level, one with the level itself, the second with color-coded events, but in this case, players can change the level events in a third-party editor. This is not necessarily bad, but is sometimes undesirable, for example, if you have campaign levels.
As a result, I decided to serialize everything necessary on the level into one file. The only thing worth mentioning here is of course that you cannot serialize Texture2D directly, but you can convert it into an array of bytes by encoding the texture. Unity has simplified our lives because we just do the following:
byte[] levelTexture = textureInstance.EncodeToPng(); Advanced level editor
Although the level editor is a good feature of the game, most likely, it will be boring for players to start from scratch each time. As stated above, in the video I have already demonstrated how to load .png from a file, but I wanted the game to work on WebGL without solving complex problems.
I came up with the following solution - allow players to insert a link from the level editor, and then load it as a copy of the texture. After that, the question will be only in setting the level events and saving.
How to do it? In Unity there is a WWW class, so we will create a cortina for loading textures:
IEnumerator LoadTextureFromWWW(string url) { WWW www = new WWW(url); yield return www; // www , if(www.texture == null) { // } else { // , textureInstance = www.texture; } } Note: although the above code is correct, it is still pseudo-code because there are several additional lines in the working code that process the UI, re-initialize the editor, etc. I have not added them here so we can focus on the most important. Of course, the full code is in the video.
All the code written above works great in desktop builds, because you can insert a custom clipboard into your own Unity input fields. But…
Changes for the WebGL assembly
... in WebGL is not allowed. To get around this problem, you can insert a small fragment of javascript into the index file of the WebGL assembly. Something like this:
// ( WebGL-) var gameInstance = UnityLoader.instantiate("gameContainer", "Build/lennys.json"); // function GetUserInput(){ var inp = prompt("link"); gameInstance.SendMessage("GameManager","ReceiveLink",inp); } Thanks to this, a pop-up window will appear in the browser with a text field where you can insert a link. After clicking on OK, the script will transmit the message, find the game object “GameManager” and the function “ReceiveLink”, in the signature of which there is a string inp. The function itself looks like this:
public void ReceiveLink(string url) { linkField.text = url; } Here, the linkField is an element of the UI InputField, nothing special.
It is worth noting the following:
- Even though we have a script called GameManager, JavaScript looks for a game object (and not a class!) With that name. The function we call is located in the UIManager class (which is in the same gameobject).
- The texture does not load until the player clicks on the texture download button in the game UI.
To perform the JavaScript function, you need to add the following lines when you click the url download button:
Application.ExternalEval("GetUserInput()"); In addition, there is another limitation in WebGL. Yes, you guessed it - we can not maintain the level of the user, without securing a headache. How to solve this problem? Very simple - let's set the MVP for our project.
However, we still need to give the players to play uploaded as they are images or hand-drawn levels. Therefore, we will save them "on the fly."This means that all created levels will be lost in the next session. This is not a particularly serious problem, because you can upload images online. First, we determine whether we are on the WebGL platform; this is done like this:
if (Application.platform == RuntimePlatform.WebGLPlayer) isWebGl = true; Note: I do all this mainly in the framework of the tutorial, in fact, I planned to turn everything into WebGL, because I never intended to create builds for desktops or other platforms. Therefore, instead of saving the files locally, we will store them in memory.
Conclusion

. 1-2 , , , «» «» . , .
, API .
pixel-perfect- . , , , .
Source: https://habr.com/ru/post/340660/
All Articles