Environment for developing TypeScript and React web applications: from 'hello world' to modern SPA. Part 1
The purpose of this article is to write together with the reader an environment for developing modern web applications, consistently adding and customizing the necessary tools and libraries. Similar to numerous starter-kit / boilerplate repositories, but ours is our own.
Also, the author writes this article to structure his own thoughts, knowledge, and practical experience, and gets good motivation to learn new aspects of development.
The author is completely open for revision and correction of the current article, and hopes to turn the final material into a relevant and convenient reference book, interesting both for professionals and for those who want to try out new technologies for them.
')

The article does not consider the detailed TypeScript syntax and the basics of working with React, if the reader does not have experience using the above technologies, it is recommended to separate their study.
Link to the second part of the article
Writing a project on TypeScript entails many difficulties, especially at the first acquaintance with the language. In the author's opinion, the advantages of strict typification are worth the effort.
In addition to the capabilities of the language itself, the TypeScript compiler generates JavaScript code for all versions of the standard, and eliminates the use of Babel in the project (the author has nothing against this wonderful tool, but the simultaneous use of TS and Babel introduces a little confusion at the start).
React is a proven library for creating web-based interfaces, with a huge community and infrastructure.
Recently a new version of the library has been released with many improvements and revised documentation.
To build the project, we will use Webpack - the best friend of the frontend developer. The basic settings of this tool are very easy to learn and use. Seriously.
Let's start!
The project repository contains the code in separate branches for each step.
To view the final code:
Install dependencies:
awesome-typescript-loader - TypeScript loader for webpack, considered to be faster than the main competitor - ts-loader .
For the source code of our project, create a folder
The build results will be sent to
The basic settings for the TypeScript compiler are the
The basic settings of the collector are the
Inside
The command to compile and build our code:
In the final
The environment created by us is easy to expand with any libraries, and it is convenient to use for creating prototypes (Your Favorite Technology + TypeScript).
Go ahead!
To view the final code:
Install dependencies:
html-webpack-plugin - a plugin for generating an html-file with attached build results.
clean-webpack-plugin - to clean the directory with the results of the assembly.
@ types / react and @ types / react-dom are packages with the declaration of the corresponding JS libraries, giving the TS compiler information about the types of all exported modules.
Most of the popular JS libraries have declarations, sometimes they are in the source files of the project, sometimes in the wonderful DefinitelyTyped repository, which is actively developed thanks to the community, and if there are no or errors in the existing declaration, you can easily contribute to fix these problems. .
Inside
Update webpack settings:
Update the TypeScript compiler settings:
Let's go to the components.
You need to change the extension from
Add a command to compile and build our code:
Also, the webpack will automatically rebuild the project when the source files change.
At this stage, questions may arise regarding the size of the assembly - the author will pay particular attention to the separation between production and development assemblies in the next steps. At the first stages, there is an emphasis on the minimum necessary settings and libraries, for full awareness of the process.
To view the final code:
Dependencies in this step do not change.
It is recommended to get acquainted with the generalizations at this stage - generics.
More details about the standard React patterns can be found in this article .
1) Standard component with properties and condition
Create a component
2) Higher order component
Description of the higher order components in the official React documentation - by reference.
An article detailing the writing of a higher-order component in TypeScript (the examples from this article are partially borrowed by the author) - by reference
In short, a higher order component (further hoc) is a function that takes a component argument (and optionally additional options), and returns a new component that displays the old component in the
The signature looks like this:
Since TypeScript strictly keeps track of what properties we pass to the components, we need to decide on the interfaces of these properties.
OriginProps - the unique properties of the component, hoc knows nothing about them, only transfers to the component.
ExternalProps - unique hoc properties.
InjectedProps - the properties that we will pass to the component from hoc are calculated based on ExternalProps and State.
State - the hoc state interface. Since we will pass the entire hoc state to the component, the State cannot have properties that are different from InjectedProps (or we must pass the available properties without using the extension operator).
Let's move on to the code, write a simple button press count.
Create a folder
Next, we describe the use of our higher order component:
Summary tree:
Properties and Status WithCount (DisplayCount):
DisplayCount properties and state:

Here we see an extra
3) Lazy loading of components:
To load components on demand, we use the syntax of dynamic import of modules.
In TypeScript, this syntax appeared in version 2.4 .
Webpack, encountering dynamic imports, creates a separate bundle for modules that fall under the import condition.
The simplest expression to import is:
Next we write a component that accepts a function that returns an import, and prints the resulting component.
Create a folder
LazyComponent is a simple functional component, in an actual application it can be a separate page, or a standalone widget:
LazyLoad is a universal component for loading and outputting a dynamic component.
If necessary, prokidyvat properties in the dynamic component, LazyLoad can be rewritten to a higher order component.
Still, update the settings webpack, to be able to set the name of the bundles:
And we will update the tsconfig.json settings - manually specify the libraries that should be used by TypeScript when compiling. We need specifically “es2015.promise”, but for convenience we will add a complete list by ES standards, and of course DOM.
Use component:
4) Render props
Description of components with render property in the official documentation React - by reference
For ease of use of such components, several rendering methods are usually provided.
Consider two main ones: the render property and the children property.
Create a folder
Next, we describe the use of our component:
5) Nuances:
Description of the children property for accessing child elements (optional):
Property description with JSX element, can be used for markup components:
Conclusion
We created an environment for developing on React and TypeScript with the minimum necessary settings, and wrote a few simple components.
TypeScript eliminates the use of PropTypes , and checks the properties of components during development and compilation (PropTypes also produces errors only in a running application).
This advantage of strong typing, like autocompletion, extends to JSX, and in files - declarations of the React library you can quickly see all the possible properties for embedded JSX elements.
In complex projects, using TypeScript will be fully justified - we will see this in such moments as using Redux (thanks to the interfaces for your store), and working with an external API.
In article 2, we consider the following:
1) Connect Redux
2) Standard React, Redux and TypeScript recipes
3) Work with API
4) Production and development project assembly
In subsequent articles, the author plans to describe: creating a progressive web application (PWA), server-side rendering, testing with Jest, and finally optimizing the application.
The author asks for forgiveness for not the most successful design of the article, and asks again to make their proposals to improve the perception and readability of this article.
Thank you for attention!
Update 10/22/2017: Added recipe for lazy load components
Update 02/17/2018: Added component recipe with render property, updated dependencies (to fix errors with ReactNode type)
Also, the author writes this article to structure his own thoughts, knowledge, and practical experience, and gets good motivation to learn new aspects of development.
The author is completely open for revision and correction of the current article, and hopes to turn the final material into a relevant and convenient reference book, interesting both for professionals and for those who want to try out new technologies for them.
')
The article does not consider the detailed TypeScript syntax and the basics of working with React, if the reader does not have experience using the above technologies, it is recommended to separate their study.
Link to the second part of the article
A little about the technologies used:
Writing a project on TypeScript entails many difficulties, especially at the first acquaintance with the language. In the author's opinion, the advantages of strict typification are worth the effort.
In addition to the capabilities of the language itself, the TypeScript compiler generates JavaScript code for all versions of the standard, and eliminates the use of Babel in the project (the author has nothing against this wonderful tool, but the simultaneous use of TS and Babel introduces a little confusion at the start).
React is a proven library for creating web-based interfaces, with a huge community and infrastructure.
Recently a new version of the library has been released with many improvements and revised documentation.
To build the project, we will use Webpack - the best friend of the frontend developer. The basic settings of this tool are very easy to learn and use. Seriously.
Used versions of tools and libraries
NodeJs v6. *. *
Npm v5. *. *
TypeScript v2. *. *
Webpack v3. *. *
React v16. *. *
Npm v5. *. *
TypeScript v2. *. *
Webpack v3. *. *
React v16. *. *
Let's start!
The project repository contains the code in separate branches for each step.
Step one is to add TypeScript to the project.
To view the final code:
git checkout step-1Install dependencies:
npm i webpack typescript awesome-typescript-loader --save-devawesome-typescript-loader - TypeScript loader for webpack, considered to be faster than the main competitor - ts-loader .
For the source code of our project, create a folder
src .The build results will be sent to
dist .The basic settings for the TypeScript compiler are the
tsconfig.json file in the project root directorytsconfig.json
{ "compilerOptions": { "target": "es5", // ts js ES5 "module": "esnext" // } } The basic settings of the collector are the
webpack.config.js file in the root directory of the project:webpack.config.js
const path = require('path'); const webpack = require('webpack'); const paths = { src: path.resolve(__dirname, 'src'), dist: path.resolve(__dirname, 'dist') }; module.exports = { context: paths.src, // entry: { app: './index' // , src/index.ts , - app }, output: { path: paths.dist, // filename: '[name].bundle.js' // , dist/app.bundle.js }, resolve: { extensions: ['.ts'] // , webpack , ( index, index.ts) }, devtool: 'inline-source-map', // , TypeScript source-map-loader tsconfig - "sourceMap": true module: { rules: [ { test: /\.ts$/, loader: 'awesome-typescript-loader' } // .ts ] } }; Inside
src create an index.ts file with any code that uses TypeScript syntax, for example:index.ts
interface Props { world: string; } function hello(props: Props) { alert(`Hello, ${props.world}`); } hello({ world: 'TypeScript!' }); The command to compile and build our code:
webpack - one-time project buildIn the final
dist/app.bundle.js inside the webpack modules you will see a neat and readable JavaScript code of the version of the standard we have chosen.The environment created by us is easy to expand with any libraries, and it is convenient to use for creating prototypes (Your Favorite Technology + TypeScript).
Go ahead!
Step two - create a tiny React application.
To view the final code:
git checkout step-2Install dependencies:
npm i webpack react react-dom --savenpm i webpack @types/react @types/react-dom html-webpack-plugin clean-webpack-plugin --save-devhtml-webpack-plugin - a plugin for generating an html-file with attached build results.
clean-webpack-plugin - to clean the directory with the results of the assembly.
@ types / react and @ types / react-dom are packages with the declaration of the corresponding JS libraries, giving the TS compiler information about the types of all exported modules.
Most of the popular JS libraries have declarations, sometimes they are in the source files of the project, sometimes in the wonderful DefinitelyTyped repository, which is actively developed thanks to the community, and if there are no or errors in the existing declaration, you can easily contribute to fix these problems. .
Inside
src create an index.html file with elements to mount the root react component:index.html
<!DOCTYPE html> <html lang="en"> <head> <meta charset="UTF-8"> <title>React and Typescript</title> </head> <body> <div id="root"></div> </body> </html> Update webpack settings:
webpack.config.js
const path = require('path'); const webpack = require('webpack'); const CleanWebpackPlugin = require('clean-webpack-plugin'); const paths = { src: path.resolve(__dirname, 'src'), dist: path.resolve(__dirname, 'dist') }; const config = { context: paths.src, entry: { app: './index' }, output: { path: paths.dist, filename: '[name].bundle.js' }, resolve: { extensions: ['.ts', '.tsx', '.js', '.jsx'] // tsx react }, devtool: 'inline-source-map', module: { rules: [ { test: /\.tsx?$/, // tsx react loader: 'awesome-typescript-loader' } ] }, plugins: [ new CleanWebpackPlugin(['dist']), new HtmlWebpackPlugin({ template: './index.html' }) // html- ] }; module.exports = config; Update the TypeScript compiler settings:
tsconfig.json
{ "compilerOptions": { "target": "es5", "module": "esnext", "jsx": "react" // JSX } } Let's go to the components.
You need to change the extension from
index.ts to index.tsx . Let's write the code of our component, and display it on the page:index.tsx
// react TS import React from 'react' - TS import * as React from 'react'; import * as ReactDOM from 'react-dom'; // props state interface IAppProps { title: string; } // const App = (props: IAppProps) => <h1>{props.title}</h1>; ReactDOM.render( <App title="Hello, React!" />, document.getElementById('root') ); Add a command to compile and build our code:
webpack-dev-server - we are raising the server with our application, the index.html page will be available at http://localhost:8080/ .Also, the webpack will automatically rebuild the project when the source files change.
At this stage, questions may arise regarding the size of the assembly - the author will pay particular attention to the separation between production and development assemblies in the next steps. At the first stages, there is an emphasis on the minimum necessary settings and libraries, for full awareness of the process.
Step Three - React and TypeScript Cooking Recipes
To view the final code:
git checkout step-3Dependencies in this step do not change.
It is recommended to get acquainted with the generalizations at this stage - generics.
More details about the standard React patterns can be found in this article .
1) Standard component with properties and condition
Create a component
simple.tsx , which will display a controlled input field:simple.tsx
import * as React from 'react'; /** * . * React.HTMLProps * . */ interface Props extends React.HTMLProps<HTMLInputElement> { customProperty: string; } // interface State { value: string; } // React.Component class Simple extends React.Component<Props, State> { // , state: State = { value: '' } /* * onChange , * onChange JSX input. * - MouseEvent, FocusEvent, KeyboardEvent */ handleChange = (event: React.FormEvent<HTMLInputElement>) => { const value = event.currentTarget.value; this.setState(() => ({ value })); } render() { /* * HTMLProps HTMLInputElement, * , , * , . */ const { customProperty, ...inputProps } = this.props; const { value } = this.state; /* * <input {...inputProps} /> - * JSX ( placeholder={inputProps.placeholder} * ) * value onChange {...inputProps}, * , inputProps */ return ( <div> <h4>{customProperty}</h4> <input {...inputProps} value={value} onChange={this.handleChange} /> </div> ); } } export default Simple; 2) Higher order component
Description of the higher order components in the official React documentation - by reference.
An article detailing the writing of a higher-order component in TypeScript (the examples from this article are partially borrowed by the author) - by reference
In short, a higher order component (further hoc) is a function that takes a component argument (and optionally additional options), and returns a new component that displays the old component in the
render method, passing it its properties and state.The signature looks like this:
(Component) => WrapComponent => ComponentSince TypeScript strictly keeps track of what properties we pass to the components, we need to decide on the interfaces of these properties.
OriginProps - the unique properties of the component, hoc knows nothing about them, only transfers to the component.
ExternalProps - unique hoc properties.
InjectedProps - the properties that we will pass to the component from hoc are calculated based on ExternalProps and State.
State - the hoc state interface. Since we will pass the entire hoc state to the component, the State cannot have properties that are different from InjectedProps (or we must pass the available properties without using the extension operator).
Let's move on to the code, write a simple button press count.
Create a folder
hoc , in it the component displayCount.tsx and hoc withCount.tsxcomponent code displayCount.tsx
import * as React from 'react'; import { InjectedProps } from './withCount'; // interface OriginProps { title: string; } /* * , * InjectedProps, withCount */ const DisplayCount = (props: OriginProps & InjectedProps) => ( <div> <h4>{props.title}</h4> <div>Count: {props.count}</div> </div> ); export default DisplayCount; component code withCount.tsx
import * as React from 'react'; // , hoc export interface InjectedProps { count: number; } // , hoc interface ExternalProps { increment: number; } // hoc, InjectedProps, interface State { count: number; } /** * , , , * OriginProps - . * React.ComponentType - ComponentClass StatelessComponent, * , , . * , , * hoc - OriginProps & InjectedProps */ function withCount<OriginProps>(Component: React.ComponentType<OriginProps & InjectedProps>) { // type ResultProps = OriginProps & ExternalProps; return class extends React.Component<ResultProps, State> { /** * name displayName, * , React DevTools */ static displayName = `WithCount(${Component.displayName || Component.name})`; state: State = { count: 0 } increment = () => { const { increment } = this.props; this.setState((prevState: State) => ({ count: prevState.count + increment })); } render() { // {...this.props} {...this.state} - . return ( <div> <Component {...this.props} {...this.state} /> <button type="button" onClick={this.increment} > + </button> </div> ) } } } export default withCount; Next, we describe the use of our higher order component:
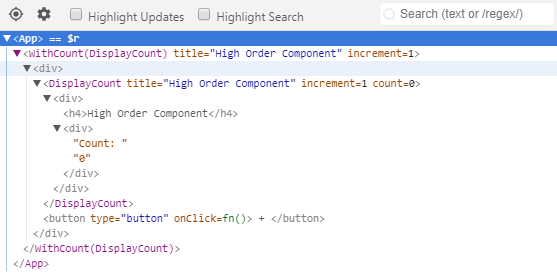
const Counter = withCount(DisplayCount); /* * title - DisplayCount * increment - */ const App = () => <Counter title="High Order Component" increment={1} /> ; Summary tree:
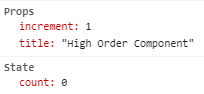
Properties and Status WithCount (DisplayCount):
DisplayCount properties and state:
Here we see an extra
increment property, if necessary, you can get rid of it, using for example the omit method in lodash.3) Lazy loading of components:
To load components on demand, we use the syntax of dynamic import of modules.
In TypeScript, this syntax appeared in version 2.4 .
Webpack, encountering dynamic imports, creates a separate bundle for modules that fall under the import condition.
The simplest expression to import is:
import('module.ts').then((module) => { // , , default const defaultExport = module.default; // , export function foo() {} - , // module.foo const otherExport = module.OtherExport; }); Next we write a component that accepts a function that returns an import, and prints the resulting component.
Create a folder
lazy , in it the components lazyComponent.tsx and lazyLoad.tsxLazyComponent is a simple functional component, in an actual application it can be a separate page, or a standalone widget:
lazyComponent.tsx
import * as React from 'react'; const LazyComponent = () => <h3>I'm so lazy!</h3>; export default LazyComponent; LazyLoad is a universal component for loading and outputting a dynamic component.
If necessary, prokidyvat properties in the dynamic component, LazyLoad can be rewritten to a higher order component.
lazyLoad.tsx
import * as React from 'react'; /* * load : * () => import('path/to/module') * import(), * default. * - * [key: string]: React.ComponentType */ interface LazyLoadProps { load: () => Promise<{ default: React.ComponentType }>; } // interface LazyLoadState { Component: React.ComponentType; } class LazyLoad extends React.Component<LazyLoadProps, LazyLoadState> { // null , state: LazyLoadState = { Component: null } // async await , async componentDidMount() { const { load } = this.props; try { // - const module = await load(); // default const Component = module.default; // state this.setState({ Component }); } catch (e) { // } } render() { const { Component } = this.state; // , . // , LazyLoad return ( <div> <h4>Lazy load component</h4> {Component ? <Component /> : '...'} </div> ); } } export default LazyLoad; Still, update the settings webpack, to be able to set the name of the bundles:
webpack.config.js
const path = require('path'); const webpack = require('webpack'); const HtmlWebpackPlugin = require('html-webpack-plugin'); const CleanWebpackPlugin = require('clean-webpack-plugin'); const paths = { src: path.resolve(__dirname, 'src'), dist: path.resolve(__dirname, 'dist') }; const config = { context: paths.src, entry: { app: './index' }, output: { path: paths.dist, filename: '[name].bundle.js', chunkFilename: '[name].bundle.js' // chunk' }, resolve: { extensions: ['.ts', '.tsx', '.js', '.jsx'] }, devtool: 'inline-source-map', module: { rules: [ { test: /\.tsx?$/, loader: 'awesome-typescript-loader' } ] }, plugins: [ new CleanWebpackPlugin(['dist']), new HtmlWebpackPlugin({ template: './index.html' }) ] }; module.exports = config; And we will update the tsconfig.json settings - manually specify the libraries that should be used by TypeScript when compiling. We need specifically “es2015.promise”, but for convenience we will add a complete list by ES standards, and of course DOM.
tsconfig.json
{ "compilerOptions": { "lib": [ "es5", "es6", "es7", "dom" ], "target": "es5", "module": "esnext", "jsx": "react" } } Use component:
// webpackChunkName - // chunkFilename: '[name].bundle.js' lazy-component.bundle.js const load = () => import(/* webpackChunkName: 'lazy-component' */'./lazy/lazyComponent'); const App = ({title}: IAppProps) => <LazyLoad load={load} />; 4) Render props
Description of components with render property in the official documentation React - by reference
For ease of use of such components, several rendering methods are usually provided.
Consider two main ones: the render property and the children property.
Create a folder
renderProps , in it the displaySize.tsx component and the windowQueries.tsx componentcomponent code displaySize.tsx
import * as React from 'react'; import { IRenderProps } from './windowQueries'; // IRenderProps, , // . interface IProps extends IRenderProps { title: string; } const DisplaySize = ({ title, width, height }: IProps) => ( <div> <h4>{title}</h4> <p>Width: {width}px</p> <p>Height: {height}px</p> </div> ); export default DisplaySize; window component codeQueries.tsx
import * as React from 'react'; // React.ReactNode - . interface IProps { children?: ((props: IRenderProps) => React.ReactNode); render?: ((props: IRenderProps) => React.ReactNode); } interface IState { width: number; height: number; } export interface IRenderProps { width?: number; height?: number; } /** * . */ class WindowQueries extends React.Component<IProps, IState> { state: IState = { width: window.innerWidth, height: window.innerHeight, } componentDidMount() { window.addEventListener('resize', this.handleWindowResize); } componentWillUnmount() { window.removeEventListener('resize', this.handleWindowResize); } handleWindowResize = () => { this.setState({ width: window.innerWidth, height: window.innerHeight, }) } gerRenderProps = (): IRenderProps => { const { width, height } = this.state; return { width, height }; } // , render children // , . // . render() { const { children, render } = this.props; if (render) { return render(this.gerRenderProps()) } if (children) { return children(this.gerRenderProps()) } return null; } } export default WindowQueries; Next, we describe the use of our component:
<WindowQueries> {({ width, height }) => <DisplaySize title="render children" width={width} height={height} />} </WindowQueries> <WindowQueries render={ ({ width, height }) => <DisplaySize title="render property" width={width} height={height} /> } /> 5) Nuances:
Description of the children property for accessing child elements (optional):
interface Props { children: React.ReactNode; } Property description with JSX element, can be used for markup components:
interface Props { header: JSX.Element, body: JSX.Element } <Component header={<h1></h1>} body={<div></div>} /> Conclusion
We created an environment for developing on React and TypeScript with the minimum necessary settings, and wrote a few simple components.
TypeScript eliminates the use of PropTypes , and checks the properties of components during development and compilation (PropTypes also produces errors only in a running application).
This advantage of strong typing, like autocompletion, extends to JSX, and in files - declarations of the React library you can quickly see all the possible properties for embedded JSX elements.
In complex projects, using TypeScript will be fully justified - we will see this in such moments as using Redux (thanks to the interfaces for your store), and working with an external API.
In article 2, we consider the following:
1) Connect Redux
2) Standard React, Redux and TypeScript recipes
3) Work with API
4) Production and development project assembly
In subsequent articles, the author plans to describe: creating a progressive web application (PWA), server-side rendering, testing with Jest, and finally optimizing the application.
The author asks for forgiveness for not the most successful design of the article, and asks again to make their proposals to improve the perception and readability of this article.
Thank you for attention!
Update 10/22/2017: Added recipe for lazy load components
Update 02/17/2018: Added component recipe with render property, updated dependencies (to fix errors with ReactNode type)
Source: https://habr.com/ru/post/340650/
All Articles