We protect the mobile application with the help of "CryptoPro": step by step instructions
The article describes work with one of the largest Russian suppliers of cryptographic information protection and electronic digital signature - the company CryptoPro, which occupies a leading position in Russia. Considered importing the framework for iOS and pitfalls during importing, its use for creating and verifying electronic digital signatures, as well as authorization using a private key.

I would just like to say that the implementation of such a level of protection and functionality in mobile applications, in principle, cannot be as simple as rolling a page or sending a request to a server. You will have to read and learn anyway, especially if you have never worked with cryptography and secure connection through TLS before.
The CryptoPro company provides mobile developers with a powerful tool for implementing such complex functionality into their application for free, but there is also a fly in the ointment. Unfortunately, for a long time the company's existence has not been made convenient and understandable documentation. Separately for mobile developers, it is not in principle.
Development sooner or later will lead you to the forum, and you will have to shovel it to find the answer. The greatest difficulty is the lack of information about what and how to do - we will try to fix this in our article. All links to resources that may be useful will be left at the end of the article.
')
You will also have to work with C ++ and take care of allocating and clearing the memory yourself.
It is worth noting that the article was written with the current version of CryptoPro CSP 4.0, therefore the packages for developers described below may differ in the future.
The first step to use CryptoPro in your application is to implement the framework downloaded from the company's website. In addition to the framework, the package for iOS also contains three examples - the creation of an electronic signature (EDS), the creation of an ssl tunnel and an example that allows you to assemble a browser that has the functionality to create and verify digital signature on web pages. A detailed description is contained within the examples in the Readme files. On their basis, it is easier to understand the algorithm of actions. The MacOS package helps a lot: it contains many useful examples with detailed comments. After its installation, all the examples will be on the disk in the opt / cprocsp / src / doxygen / CSP section.
Instructions for importing the framework itself is in CPROCSP.framework in the ReadMe file, we will sort it out by paragraphs.
1. You are required to go to the console and set the path to the downloaded framework, then run the utility, as described below:
(the specified key is attached in the file, then the license file license.enc will be created in the same directory).
2. Before importing the framework, we recommend moving its CPROCSP.framework file to the project folder. So you protect yourself from accidentally transferring the framework to another folder, which is why the paths in Xcode will “fly off”.
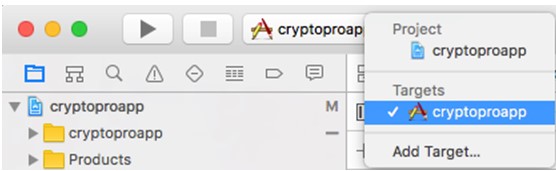
Now to import: open Xcode, select the project in the left sidebar and select the build target in the targets list
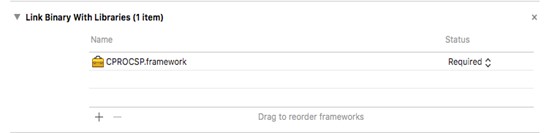
Next, in the Build Phases tab, select Link Binary With Libraries, click on “+” and then Add other to specify the path to the framework manually. Find it and choose Open. The framework is imported, but it will not work yet.
3. Create the Resources folder in the project, open the CPROCSP.framework file, go to the Resources folder and drag all files and folders, except for localization (ru.lroj and en.lproj), to the folder we created with these settings:

4. Drag and drop into the same folder the license file created in the first paragraph, with the settings as in the screenshot above.
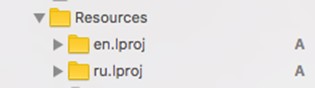
5. Now we transfer the remaining localization folders also to the Resources of the application, but with different settings:

If done correctly, the folders will look like this:
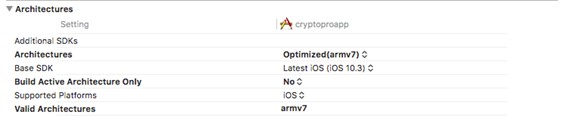
6. The next item is setting up the project for debugging in the emulator. If this is not done, the application can only be launched on the device. In the Build Settings tab of the project, in the Valid Architectures field, leave only armv7. Work to support 64-bit architecture is already underway, but for now we are using 32-bit. Also in Architectures we write Optimized (armv7). You should have the following:
This is where the attached instruction ends, but you won’t be able to start the application - you will see something like this when compiling:
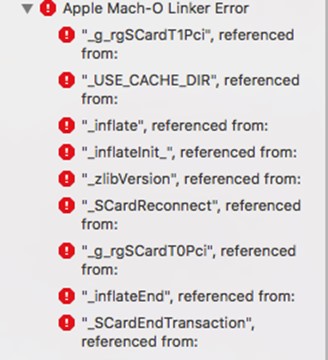
It is not clear for what reasons the developers did not add a couple of points, but for correct linking you need to add some more libraries and a “magic flag”. Now more.
Similar to the scheme described in paragraph 2, we get to the CPROCSP.framework file, go to the reader folder and import the library librdrpcsc_empty.o, which has been dusty there. We add the following library from those laid out in Xcode; to do this, we enter libz in the same window in the search.
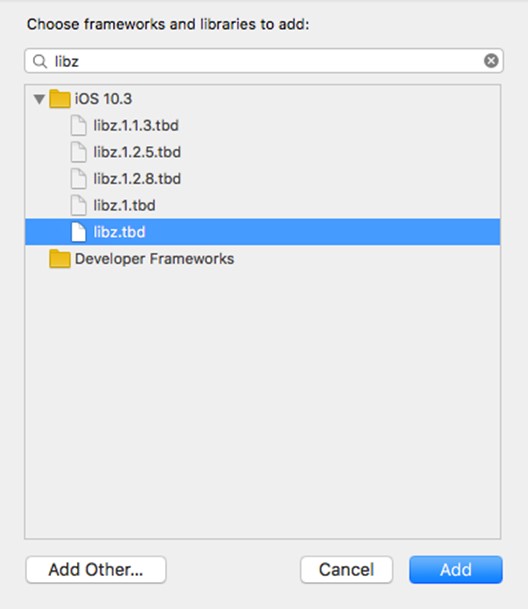
and add it with the Add button.
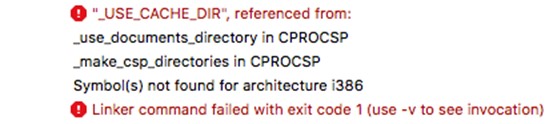
But this will also not be enough, there will be another mistake:
To solve it, place a flag anywhere in the project.
After that, the problem will be solved and the application will be collected successfully. This flag indicates where you want to store the folder with the keys. In the case of false (as we used, the reason will be revealed later) the folder is used
If you set true, then they will be stored in a closed place:
This completes the import of the framework, and you can run the application on the emulator.
At the time of writing, CryptoPro CSP 4.0 does not support working with * .pfx certificates, which contain both public and private keys. It is necessary to use * .000 containers, which can be obtained only with the use of CryptoPro; their format is not described anywhere, and they are written, as a rule, on key carriers, tokens (flash drives, diskettes). In the explorer, they look like folders that contain one key, divided into files header.key, masks.key, name.key and primary.key.
The company also has a test certification center (CA), where you can generate keys and get a CA certificate. Here it is necessary to add that for the certificate request page to work correctly, you need to use Internet Explorer (or any other browser with the plugin installed that can be downloaded in the test CA), and CSP must be installed on the computer, otherwise The necessary hash algorithms are not available. GOST R 34.10-2012.
As the CryptoPro employees themselves write, there are three options for installing the container on the device:
• Via iTunes File Sharing.
• Use a separate application to write files on iOS, such as iExplorer.
• Write your own key export to blob (PRIVATEKEYBLOB) and import it in the application code. An example of this is in the above MacOS package called EncryptKey / DecryptKey.
We used the first option - as the fastest and satisfying customer requirements. For its implementation, the flag USE_CACHE_DIR = false was selected during import; if iTunes File Sharing will not be used by you, or you want to hide from the user the ability to look into the folder with the keys, it is better to hide it by setting the flag to true.
After the first launch with the framework installed, the cprocsp folder will be created in the Documents folder of the application:

Inside this folder are all the key containers. Installed certificates and containers are stored and belong to the application, and not to the key storage device, so after its removal, you will need to install them again.
Then there are two ways: write all the functions yourself or use a ready-made controller, and since it is enough for most tasks, let's talk about it.
The framework contains a header file called PaneViewController.h. If you are not burdened with strict design, you can import the proposed xib files (found in CPROCSP.framework / Resources) and initialize the crypto panel through them - for example, in this way:
But since all xib files are regular UIViews with a table, you can easily customize them for your design.

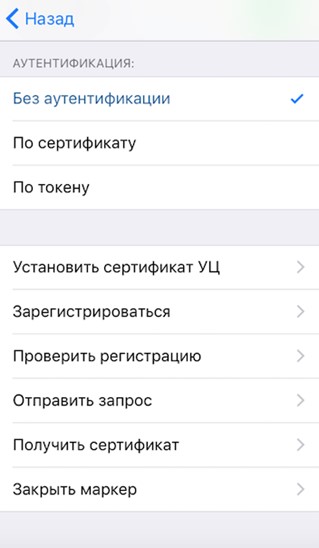
After opening the panel, the first thing that needs to be done is to go to the “Interaction with CA” tab, install the CA certificate (root certificate of the certification authority), go through the registration procedure, send a certificate request and obtain (install) it.
After installing the root certificate of the CA, the mobile folder should appear in the cprocsp / keys folder. It contains * .000 containers. To install them, go back to the CryptoPro panel and on the main screen select “Install certificates and containers”. The containers contained in the cprocsp / keys / mobile folder must be from the crypto-provider "CryptoPro" (if at least one is not or damaged, then the function will return an error without installing any of them).
This completes the installation.
After installing the root CA certificate and the container, you can proceed to sign the documents. The signature creation and verification features can be found in the aforementioned MacOS package called CryptMsgSign. They contain comments on each function used. Similar examples are in the package for iOS, in CreateFile / Classes / SignFie.cpp. Here, unlike the previous implementation of the signature on the entry, the path to the file to be signed is supplied. Due to the large number of functions, we will not analyze each separately. Consider some points that are not so obvious.
The signature function begins by opening the certificate store using
CertOpenSystemStore:
Here it is not the key storage of the device that is meant, but the storage contained in the application in the cprocsp / users / mobile / stores folder. The function works so that if such storage is not found, it will create it, so you can not take care of it. When using the PaneViewController panel, the MY.sto storage will be created and used.
After receiving the pointer to the certificate, extracting the private key from it, and other initializations, the signing procedure begins with the CryptMsgOpenToEncode function, which opens the message for encoding and returns a handle to the open message:
The message remains open until the CryptMsgClose call. Here you should pay attention to the used flag (second parameter): if you set 0, as in the example, the signature will be attached (attached); To obtain a detached (detached) signature, you must set the flag CMSG_DETACHED_FLAG. After that, the signed data is placed in the message and the resulting blob can be output to a separate file.
Signature verification is similar to its creation with a few exceptions. First, a message is opened for decoding, then a certificate attached to the signature is pulled out. The repository opens and searches for the attached certificate. After the certificate has been found, the signature is verified by the CryptMsgControl function, which returns true if verification was successful and false if errors occurred:
The CSP_GetLastError () function returns an error code and a short description.
For authorization using a private key, we need the key itself, which is installed in the manner described above, the CA root certificate installed, the server configured with CryptoPro and added to our key trusted. The server must support TLS version 1.2 for all devices with iOS 9 and higher, as well as have GOST cipher suites from CryptoPro.
To connect to the server, we created a separate manager and rewrote the resume function for its NSURLSessionDataTask. Since our application has the ability to log in both via http and https, we switched between two managers responsible for a different connection. Creating a separate manager is necessary in order to use cipher suites from CryptoPro. If during the handshake in Client Hello you do not put them, then when the server “greets you”, the TLS connection will fail because the wrong cipher suite will be selected.
A program such as WireShark can be useful in identifying the causes of errors and obtaining detailed information on the connection. It has the opportunity to see all the stages of a TLS connection and enough information for analysis. Also in it, you can see which cipher suites are sent and which are supported by the server.
As the manager who will send the necessary cipher suites, UrlRetriever which is a part of a framework is used. When you open the header, you will see many clear functions for sending a request, but it is not immediately obvious how and what to use, especially since you will not find documentation on this on the site or on the forum. And in the file itself there are also no comments, except for one // TODO, which the developers left :)
It will not be possible to look inside the class, so we had to test everything manually and see how it works.
To begin with, we will create the retriever itself, since for each request we will need to clear the information in it. First, the resume function will create an instance of the class:
After that we will write heders. Since they are already contained in our NSUrlRequest, we will take them from there and transform it into the necessary form for a retriever:
If we log in without a certificate, then we can already send a request:
And return the answer in the completion block:
And in case of an error, return error:
This scenario is similar for certificate authorization, only before sending a request to the retriever, you need to write a certificate thumbprint. There are many options for obtaining a print - we will show the most correct (in our opinion).
From the examples for the signature, we take the implementation of some functions, such as CertOpenStore, for opening the repository and CertEnumCertificatesInStore - for obtaining the certificate descriptor PCCERT_CONTEXT. After that, we write a function to get the printout in NSSting:
The first one is using the CertGetCertificateContextProperty function with the CERT_SHA1_HASH_PROP_ID parameter, which tells the function about the parameter to be obtained from the certificate, in this case SHA1 hash. The function is called twice, the first one without substituting the buffer, instead it is set to NULL. This is done to obtain the required amount of memory that needs to be allocated for the buffer. In the second use, a buffer of the now known size is substituted. To convert the data from an array of bytes to a string, use the function CryptBinaryToString - also twice (for the same reasons). After that you will get beautiful view content:
But for a retriever, a different format is needed. To get the required footprint in the CryptBinaryToString flags (the third parameter) you need to write the CRYPT_STRING_HEX flag. The resulting string will be the thumbprint, which is then placed in the retriever:
If everything is done correctly, the connection will be successfully established using GOST encryption algorithms.
MSDN - a detailed description of all the functions included in their parameters, as well as working examples.
Forum - Forum "CryptoPro" where employees answer questions every day. Many answers to the questions have already been given, and despite their prescription (sometimes around 6 years), they can still help you.
Developer's Guide - written by the company, which contains a list of functions included in the crypto-provider with a brief description and examples.
Error description - a large list of possible errors that occur in C ++ functions, with their code and brief description. To get the error code, use the CSP_GetLastError function in the application code, which is part of the framework. It stores the code of the last error received.
Work with CryptoPro
I would just like to say that the implementation of such a level of protection and functionality in mobile applications, in principle, cannot be as simple as rolling a page or sending a request to a server. You will have to read and learn anyway, especially if you have never worked with cryptography and secure connection through TLS before.
The CryptoPro company provides mobile developers with a powerful tool for implementing such complex functionality into their application for free, but there is also a fly in the ointment. Unfortunately, for a long time the company's existence has not been made convenient and understandable documentation. Separately for mobile developers, it is not in principle.
Development sooner or later will lead you to the forum, and you will have to shovel it to find the answer. The greatest difficulty is the lack of information about what and how to do - we will try to fix this in our article. All links to resources that may be useful will be left at the end of the article.
')
You will also have to work with C ++ and take care of allocating and clearing the memory yourself.
It is worth noting that the article was written with the current version of CryptoPro CSP 4.0, therefore the packages for developers described below may differ in the future.
Import of CryptoPro into a mobile application
The first step to use CryptoPro in your application is to implement the framework downloaded from the company's website. In addition to the framework, the package for iOS also contains three examples - the creation of an electronic signature (EDS), the creation of an ssl tunnel and an example that allows you to assemble a browser that has the functionality to create and verify digital signature on web pages. A detailed description is contained within the examples in the Readme files. On their basis, it is easier to understand the algorithm of actions. The MacOS package helps a lot: it contains many useful examples with detailed comments. After its installation, all the examples will be on the disk in the opt / cprocsp / src / doxygen / CSP section.
Instructions for importing the framework itself is in CPROCSP.framework in the ReadMe file, we will sort it out by paragraphs.
1. You are required to go to the console and set the path to the downloaded framework, then run the utility, as described below:
cd /Users/agima//ios-uni/CPROCSP.framework/ ./ SetApplicationLicense 40400-W0037-EKVQK-9YDNG-D3F67 license.enc (the specified key is attached in the file, then the license file license.enc will be created in the same directory).
2. Before importing the framework, we recommend moving its CPROCSP.framework file to the project folder. So you protect yourself from accidentally transferring the framework to another folder, which is why the paths in Xcode will “fly off”.
Now to import: open Xcode, select the project in the left sidebar and select the build target in the targets list
Next, in the Build Phases tab, select Link Binary With Libraries, click on “+” and then Add other to specify the path to the framework manually. Find it and choose Open. The framework is imported, but it will not work yet.
3. Create the Resources folder in the project, open the CPROCSP.framework file, go to the Resources folder and drag all files and folders, except for localization (ru.lroj and en.lproj), to the folder we created with these settings:
4. Drag and drop into the same folder the license file created in the first paragraph, with the settings as in the screenshot above.
5. Now we transfer the remaining localization folders also to the Resources of the application, but with different settings:
If done correctly, the folders will look like this:
6. The next item is setting up the project for debugging in the emulator. If this is not done, the application can only be launched on the device. In the Build Settings tab of the project, in the Valid Architectures field, leave only armv7. Work to support 64-bit architecture is already underway, but for now we are using 32-bit. Also in Architectures we write Optimized (armv7). You should have the following:
This is where the attached instruction ends, but you won’t be able to start the application - you will see something like this when compiling:
It is not clear for what reasons the developers did not add a couple of points, but for correct linking you need to add some more libraries and a “magic flag”. Now more.
Similar to the scheme described in paragraph 2, we get to the CPROCSP.framework file, go to the reader folder and import the library librdrpcsc_empty.o, which has been dusty there. We add the following library from those laid out in Xcode; to do this, we enter libz in the same window in the search.
and add it with the Add button.
But this will also not be enough, there will be another mistake:
To solve it, place a flag anywhere in the project.
extern bool USE_CACHE_DIR; bool USE_CACHE_DIR = false; After that, the problem will be solved and the application will be collected successfully. This flag indicates where you want to store the folder with the keys. In the case of false (as we used, the reason will be revealed later) the folder is used
/private/var/root/Documents/cprocsp/keys If you set true, then they will be stored in a closed place:
/private/var/root/Library/Caches/cprocsp/keys/ This completes the import of the framework, and you can run the application on the emulator.
The container of the private key to work with "CryptoPro"
At the time of writing, CryptoPro CSP 4.0 does not support working with * .pfx certificates, which contain both public and private keys. It is necessary to use * .000 containers, which can be obtained only with the use of CryptoPro; their format is not described anywhere, and they are written, as a rule, on key carriers, tokens (flash drives, diskettes). In the explorer, they look like folders that contain one key, divided into files header.key, masks.key, name.key and primary.key.
The company also has a test certification center (CA), where you can generate keys and get a CA certificate. Here it is necessary to add that for the certificate request page to work correctly, you need to use Internet Explorer (or any other browser with the plugin installed that can be downloaded in the test CA), and CSP must be installed on the computer, otherwise The necessary hash algorithms are not available. GOST R 34.10-2012.
Installing the private key container in the application
As the CryptoPro employees themselves write, there are three options for installing the container on the device:
• Via iTunes File Sharing.
• Use a separate application to write files on iOS, such as iExplorer.
• Write your own key export to blob (PRIVATEKEYBLOB) and import it in the application code. An example of this is in the above MacOS package called EncryptKey / DecryptKey.
We used the first option - as the fastest and satisfying customer requirements. For its implementation, the flag USE_CACHE_DIR = false was selected during import; if iTunes File Sharing will not be used by you, or you want to hide from the user the ability to look into the folder with the keys, it is better to hide it by setting the flag to true.
After the first launch with the framework installed, the cprocsp folder will be created in the Documents folder of the application:
Inside this folder are all the key containers. Installed certificates and containers are stored and belong to the application, and not to the key storage device, so after its removal, you will need to install them again.
Then there are two ways: write all the functions yourself or use a ready-made controller, and since it is enough for most tasks, let's talk about it.
The framework contains a header file called PaneViewController.h. If you are not burdened with strict design, you can import the proposed xib files (found in CPROCSP.framework / Resources) and initialize the crypto panel through them - for example, in this way:
<code>#import “CPROCSP/PaneViewControler.h” … PaneViewController *CPROPane; if(UI_USER_INTERFACE_IDIOM() == UIUserInterfaceIdiomPad) CPROPane = [[PaneViewController alloc] initWithNibName:@"PaneViewController" bundle:nil]; else CPROPane = [[PaneViewController alloc] initWithNibName:@"PaneViewControllerIPhone" bundle: nil]; UINavigationController *navController = [[UINavigationController alloc] initWithRootViewController:CPROPane]; [navController setModalPresentationStyle:UIModalPresentationFullScreen]; [self presentViewController:navController animated:true completion:nil];</code> But since all xib files are regular UIViews with a table, you can easily customize them for your design.
After opening the panel, the first thing that needs to be done is to go to the “Interaction with CA” tab, install the CA certificate (root certificate of the certification authority), go through the registration procedure, send a certificate request and obtain (install) it.
After installing the root certificate of the CA, the mobile folder should appear in the cprocsp / keys folder. It contains * .000 containers. To install them, go back to the CryptoPro panel and on the main screen select “Install certificates and containers”. The containers contained in the cprocsp / keys / mobile folder must be from the crypto-provider "CryptoPro" (if at least one is not or damaged, then the function will return an error without installing any of them).
This completes the installation.
Signature and signature verification with private key
After installing the root CA certificate and the container, you can proceed to sign the documents. The signature creation and verification features can be found in the aforementioned MacOS package called CryptMsgSign. They contain comments on each function used. Similar examples are in the package for iOS, in CreateFile / Classes / SignFie.cpp. Here, unlike the previous implementation of the signature on the entry, the path to the file to be signed is supplied. Due to the large number of functions, we will not analyze each separately. Consider some points that are not so obvious.
The signature function begins by opening the certificate store using
CertOpenSystemStore:
<code>hCertStore = CertOpenSystemStore(0, "My"); if(!hCertStore) { ret = CSP_GetLastError(); fprintf (stderr, "CertOpenSystemStore failed."); }</code> Here it is not the key storage of the device that is meant, but the storage contained in the application in the cprocsp / users / mobile / stores folder. The function works so that if such storage is not found, it will create it, so you can not take care of it. When using the PaneViewController panel, the MY.sto storage will be created and used.
After receiving the pointer to the certificate, extracting the private key from it, and other initializations, the signing procedure begins with the CryptMsgOpenToEncode function, which opens the message for encoding and returns a handle to the open message:
if(hMsg = CryptMsgOpenToEncode(TYPE_DER, // Encoding type 0, // Flags CMSG_SIGNED, // Message type &SignedMsgEncodeInfo, // Pointer to structure NULL, // Inner content object ID NULL)) // Stream information (not used) { printf("The message to be encoded has been opened. \n"); } else { ret = CSP_GetLastError(); fprintf (stderr, "OpenToEncode failed"); } … if(hMsg) CryptMsgClose(hMsg);</code> The message remains open until the CryptMsgClose call. Here you should pay attention to the used flag (second parameter): if you set 0, as in the example, the signature will be attached (attached); To obtain a detached (detached) signature, you must set the flag CMSG_DETACHED_FLAG. After that, the signed data is placed in the message and the resulting blob can be output to a separate file.
Signature verification is similar to its creation with a few exceptions. First, a message is opened for decoding, then a certificate attached to the signature is pulled out. The repository opens and searches for the attached certificate. After the certificate has been found, the signature is verified by the CryptMsgControl function, which returns true if verification was successful and false if errors occurred:
if(CryptMsgControl(hMsg, // Handle to the message 0, // Flags CMSG_CTRL_VERIFY_SIGNATURE, // Control type pSignerCertificateInfo)) // Pointer to the CERT_INFO { printf("\nSignature was VERIFIED.\n"); } else { printf("\nThe signature was NOT VERIFIED.\n"); ret = CSP_GetLastError(); }</code> The CSP_GetLastError () function returns an error code and a short description.
Authorization using a private key
For authorization using a private key, we need the key itself, which is installed in the manner described above, the CA root certificate installed, the server configured with CryptoPro and added to our key trusted. The server must support TLS version 1.2 for all devices with iOS 9 and higher, as well as have GOST cipher suites from CryptoPro.
To connect to the server, we created a separate manager and rewrote the resume function for its NSURLSessionDataTask. Since our application has the ability to log in both via http and https, we switched between two managers responsible for a different connection. Creating a separate manager is necessary in order to use cipher suites from CryptoPro. If during the handshake in Client Hello you do not put them, then when the server “greets you”, the TLS connection will fail because the wrong cipher suite will be selected.
A program such as WireShark can be useful in identifying the causes of errors and obtaining detailed information on the connection. It has the opportunity to see all the stages of a TLS connection and enough information for analysis. Also in it, you can see which cipher suites are sent and which are supported by the server.
As the manager who will send the necessary cipher suites, UrlRetriever which is a part of a framework is used. When you open the header, you will see many clear functions for sending a request, but it is not immediately obvious how and what to use, especially since you will not find documentation on this on the site or on the forum. And in the file itself there are also no comments, except for one // TODO, which the developers left :)
It will not be possible to look inside the class, so we had to test everything manually and see how it works.
To begin with, we will create the retriever itself, since for each request we will need to clear the information in it. First, the resume function will create an instance of the class:
#import <CPROCSP/CPROCSP.h> #import <CPROCSP/UrlRetriever.h> UrlRetriever *retriever = new UrlRetriever(); : retriever->set_verify_host(true); retriever->set_verify_server(true);</code> After that we will write heders. Since they are already contained in our NSUrlRequest, we will take them from there and transform it into the necessary form for a retriever:
__block UrlHeaders headers; [self.request.allHTTPHeaderFields enumerateKeysAndObjectsUsingBlock:^(NSString * _Nonnull key, NSString * _Nonnull obj, BOOL * _Nonnull stop) { NSString *result = [NSString stringWithFormat:@"%@: %@", key, obj]; std::string *string = new std::string([result cStringUsingEncoding:[NSString defaultCStringEncoding]]); headers.push_back(*string); }]; retriever->set_headers(headers); : BYTE *requestBytes = (BYTE *)[self.request.HTTPBody bytes]; retriever->set_postmessage(requestBytes, self.request.HTTPBody.length);</code> If we log in without a certificate, then we can already send a request:
retriever->retrieve_url([self.request.URL.absoluteString cStringUsingEncoding:[NSString defaultCStringEncoding]]); </code> And return the answer in the completion block:
NSHTTPURLResponse *response = [[NSHTTPURLResponse alloc] initWithURL:self.request.URL statusCode:retriever->get_code() HTTPVersion:@"HTTP/1.1" headerFields:self.request.allHTTPHeaderFields]; self.requestCompletion(response, [NSData dataWithBytes:retriever->get_data() length:retriever->get_data_len()], nil); </code> And in case of an error, return error:
self.requestCompletion(response, [[NSData alloc] init], [[NSError alloc] initWithDomain:NSURLErrorDomain code:retriever->get_error() userInfo:nil]);</code> This scenario is similar for certificate authorization, only before sending a request to the retriever, you need to write a certificate thumbprint. There are many options for obtaining a print - we will show the most correct (in our opinion).
From the examples for the signature, we take the implementation of some functions, such as CertOpenStore, for opening the repository and CertEnumCertificatesInStore - for obtaining the certificate descriptor PCCERT_CONTEXT. After that, we write a function to get the printout in NSSting:
- (NSString *)getCertificateHashFromCert:(PCCERT_CONTEXT)certContext { BYTE *pvData = NULL; DWORD cbSize = 0; DWORD cbHash = 0; if(!CertGetCertificateContextProperty(certContext, CERT_SHA1_HASH_PROP_ID, NULL, &cbSize)) NSLog(@"CertGetCertificateContextProperty error %u", CSP_GetLastError()); if (pvData) { free(pvData); } pvData = malloc(cbSize); cbHash = cbSize; if(!CertGetCertificateContextProperty(certContext, CERT_SHA1_HASH_PROP_ID, pvData, &cbSize)) NSLog(@"CertGetCertificateContextProperty error %u", CSP_GetLastError()); DWORD dest; if (!CryptBinaryToString(pvData, cbHash, 0, NULL, &dest)) NSLog(@"CryptBinaryToString error: %u", CSP_GetLastError()); LPWSTR buf = malloc(dest * sizeof(TCHAR)); if (!CryptBinaryToString(pvData, cbHash, 0, buf, &dest)) NSLog(@"CryptBinaryToString error: %u", CSP_GetLastError()); return [[NSString alloc] initWithData:[NSData dataWithBytes:buf length:dest] encoding:[NSString defaultCStringEncoding]]; } </code> The first one is using the CertGetCertificateContextProperty function with the CERT_SHA1_HASH_PROP_ID parameter, which tells the function about the parameter to be obtained from the certificate, in this case SHA1 hash. The function is called twice, the first one without substituting the buffer, instead it is set to NULL. This is done to obtain the required amount of memory that needs to be allocated for the buffer. In the second use, a buffer of the now known size is substituted. To convert the data from an array of bytes to a string, use the function CryptBinaryToString - also twice (for the same reasons). After that you will get beautiful view content:
—----BEGIN CERTIFICATE----- —---- END CERTIFICATE-----</code> But for a retriever, a different format is needed. To get the required footprint in the CryptBinaryToString flags (the third parameter) you need to write the CRYPT_STRING_HEX flag. The resulting string will be the thumbprint, which is then placed in the retriever:
retriever->set_client_cert([thumbPrint cStringUsingEncoding:[NSString defaultCStringEncoding]]);</code> If everything is done correctly, the connection will be successfully established using GOST encryption algorithms.
useful links
MSDN - a detailed description of all the functions included in their parameters, as well as working examples.
Forum - Forum "CryptoPro" where employees answer questions every day. Many answers to the questions have already been given, and despite their prescription (sometimes around 6 years), they can still help you.
Developer's Guide - written by the company, which contains a list of functions included in the crypto-provider with a brief description and examples.
Error description - a large list of possible errors that occur in C ++ functions, with their code and brief description. To get the error code, use the CSP_GetLastError function in the application code, which is part of the framework. It stores the code of the last error received.
Source: https://habr.com/ru/post/340580/
All Articles