Work with videos in Full Throttle Remastered

Full Throttle is a point-and-click adventure game released by LucasArts as early as the twentieth century, on April 30, 1995. In addition to the standard visual gameplay style of point-and-click of those times (the character's sprites move on a static background), the game also features FMV video in non-interactive cutscenes and in interactive gameplay modes. This FMV technology has further strengthened the plot aspect of the genre, because it allowed the creators to use computer-rendered frame sequences that do not require a heavy load on the processor. In addition, compressed FMVs took up less space and were placed on the target medium — a CD-ROM of approximately 650 megabytes.
The classic version of Full Throttle used video technology developed by LucasArts employee Vince Lee under the name INSANE. INSANE stands for IN teractive S treaming AN imation Engine ("interactive streaming animation engine"). It was first created and used in Star Wars: Rebel Assault. The technology has been improved and applied also in later games:
')
- Star Wars: Rebel Assault (November 1993)
- Full Throttle (April 1995)
- Star Wars: Rebel Assault II (November 1995)
- The Dig (November 1995)
- Outlaws (March 1997)
This video playback system allowed the creators to compress large pieces of data into a smaller format that, along with other game data, fit on a CD-ROM. At that time, the I / O speed of the disk and the increased computational power were sufficient for streaming CD-ROM compressed FMV, unpacking them into video frames and display on the screen. Full Throttle's FMVs were encoded at 320x200 resolution and 10 frames per second. In addition, embedded audio video tracks were processed and mixed in real time before being sent to the audio device.
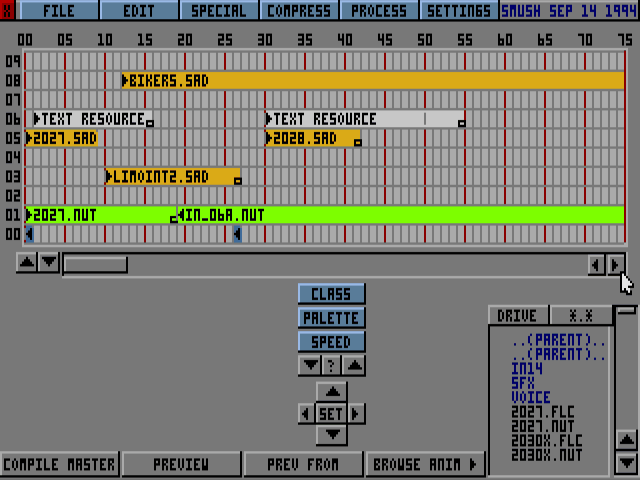
A tool called SMUSHFT.EXE (SMUSH for Full Throttle) was used to encode and compress the video into a .SAN file ( S mush AN imation). Unlike standard video playback systems with one video track and one audio track, the .SAN file could contain one or several video tracks, as well as several audio tracks for playback to the user, depending on the game state. The figure below shows SMUSHFT.EXE with the project source file. You may notice that when scrolling along the timeline, the green bars represent video frames, and the dark yellow bars represent audio files. Also there are gray bars, which indicate lines of text corresponding to the information of the subtitles.
The most important aspect of our approach to the remastering of classic adventure games of LucasArts was the preservation of the integrity of the original game along with the improvement of the old content. We wanted the game to be felt and played the same way as in the 90s, but with new graphics, much better sound and support for new, more convenient input methods. To do this, we first decided to port the original game to modern equipment. Then, when playing the game for the user, we made a queue of the game states every frame and received a sufficient amount of game state data to provide the user with more modern content. That is, the game still works exactly the same way it worked then, in 1995.
This means that we have adapted all the technologies used by the game, including the INSANE engine. To remaster the entire video content, we had to start with the original video files from the 1995 game, and use them as a schema for the updated content. The end result coincides frame by frame with the original, but with a higher resolution and significantly improved sound.
Extract
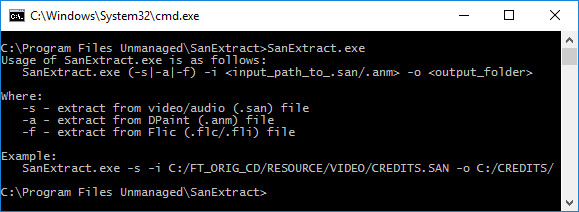
The first task was to obtain the original video files (.SAN files) and extract all the audio and visual information into a format based on which you can make a "scheme". We already had the code that was used to decode these files, so we wrote a tool in C # that was the interface to the original decoder through the compiled native DLL. This tool, called SanExtract, analyzes the .SAN file and separates audio and video content into a convenient directory structure with which to work.
If you have an original game and you can access files on a CD, then try extracting the video yourself! Here is a link to the SanExtract tool: SanExtract.zip
MD5 [ac951d858cd8d252222d31fee61b1ce4]
SHA-1 [2915295a260306292f979788fe047a208e5f4e3b]
Just run SanExtract.exe on the command line, using the original files as input (most likely they are in [CD_DRIVE]: / RESOURCE / VIDEO / and in [CD_DRIVE]: / RESOURCE / DATA /).
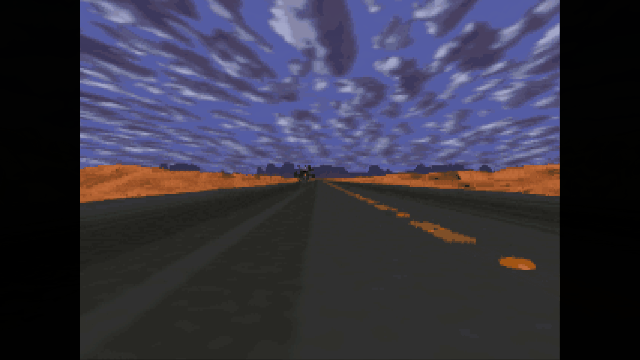
The resulting data will be one or more linear video frame streams, as well as all audio files used during playback. And I was not mistaken: the engine was dynamic enough to enable or disable elements (audio and video) at run time. I will tell you more about this later. Extraction was only the beginning of this process. We needed to know how the original frames were created so that we could recreate a similar workflow for the remastering project. For example, some frames or sequences contain a combination of several graphics sources. Look at the animation from the original game:
Maybe you can’t say that right away, but there are hand-drawn and rendered three-dimensional elements in the frame. Ben's motorcycle, limousine and Ben's motorcycle shadow falling on a limousine, taken from a rendered in 3D sequence. Gilded broken decoration on the hood is a separate hand-drawn animation sequence. The end result is a composition of a 3D render, a drawn animation and a static background image of clouds.
Below are shown all the components used to create the finished video. The leftmost sequence is the hood decoration drawn by hand. Right - the mask used in the compositing of 3D renders (motorcycle and limousine) with clouds in the background. And in the center is a sequence of 3D render + background from clouds. Then hand-drawn and rendered in 3D elements are combined to create the fragment shown above.

To preserve the aesthetics level of the original, we could not just take each frame of video (approximately 16,000 frames) and manually draw on them. We needed to correctly repeat the hard surfaces of motorcycles and cars from the original, including the shadows cast in the scene. In the end, we need to find the original 3D models and the hand-drawn animation, and then re-master these separate parts to combine them with compositing.
So, I mentioned that we need to find the original 3D files and hand-drawn animations. At first we thought, “oh, maybe there are some metadata used to superimpose the original component parts of the video that can be extracted.” But in fact, the files were renamed and the information was lost over time. Metadata does not give anything, and even when searching the archives we find many files with the same names, but with different dates and different contents. We have no idea which files were originally used to generate the finished frame, so we needed to find a solution to this problem.
Archives
Our archive consisted of approximately 67 gigabytes of data, and useful data related to the original FMV were scattered throughout this volume. After examining the data scheme in the backup, we can conclude that by the end of the project all data files from all computers were copied to the backup folder. The result was a mess similar to Indiana Jones’s storage style. We still have a lot of disks containing copies of all employees' hard drives. Upon further study it turned out. that there is no single disk on which all the data we need is collected. Useful information is scattered across all archives. Moreover, there are frequent cases of duplication of names of files containing different content, different dates of changes, etc. To move forward, we needed a way to index all duplicate files and perform a CRC comparison to identify all unique files.
We decided to find file extensions that were used in the process of working with FMV and create a manifest for the following file types: .ANM, .CEL, .FLC, .FLI, .GIF, .MAX, .NUT, .OBJ, .PRO. We wrote a duplicate tracking script in Python to bypass all available archives and create an XML map of each file name with the extensions we need. As a result, we have a cleaned directory of useful files that were easier to sort out and search. Here is an example of a node in the xml manifest file:
 <file>
     <name> b_cm1 </ name>
     <most_recent> C: \ Backup \ Lleslle backup \ THROT-C \ RESTSTOP \ STUFF \ B_CM1.ANM </ most_recent>
     <unique_files count = "2">
         <file_item>
             <path> C: \ Backup \ Lleslle backup \ THROT-C \ RESTSTOP \ STUFF \ B_CM1.ANM </ path>
             <modify_date> 1994/07/30 </ modify_date>
             <size_bytes> 115829 </ size_bytes>
             <crc_value> 2D31393738373530333931 </ crc_value>
         </ file_item>
         <file_item>
             <path> C: \ Backup \ PC2 \ FUL528_Davi_DV2 \ BEN \ RESTOP \ FLICS \ B_CM1.ANM </ path>
             <modify_date> 1994/07/13 </ modify_date>
             <size_bytes> 115829 </ size_bytes>
             <crc_value> 32303432363131303937 </ crc_value>
         </ file_item>
     </ unique_files>
     <all_files count = "4">
         <file_item>
             <path> C: \ Backup \ Lleslle backup \ THROT-C \ RESTSTOP \ STUFF \ B_CM1.ANM </ path>
             <modify_date> 1994/07/30 </ modify_date>
             <size_bytes> 115829 </ size_bytes>
             <crc_value> 2D31393738373530333931 </ crc_value>
         </ file_item>
         <file_item>
             <path> C: \ Backup \ cleslie's-backup \ THROT-C \ RESTSTOP \ STUFF \ B_CM1.ANM </ path>
             <modify_date> 1994/07/30 </ modify_date>
             <size_bytes> 115829 </ size_bytes>
             <crc_value> 2D31393738373530333931 </ crc_value>
         </ file_item>
         <file_item>
             <path> C: \ Backup \ PC2 \ FUL528_Davi_DV2 \ BEN \ RESTOP \ FLICS \ B_CM1.ANM </ path>
             <modify_date> 1994/07/13 </ modify_date>
             <size_bytes> 115829 </ size_bytes>
             <crc_value> 32303432363131303937 </ crc_value>
         </ file_item>
     </ all_files>
 </ file>
The above XML fragment shows that two unique files have been found in the archive named b_cm1 . These manifest files allowed us to narrow the search space when studying frame dependencies.
Sort dependencies
Even finding all these dependencies in the archives, we could not determine which particular dependencies were used in the finished FMV. We could make assumptions and use some fuzzy logic, but in the end we decided to create a special tool with which people can interact and sort all necessary resources visually. This tool, called SanWrangler , allowed us to load the original sequence of frames, and then view all the archived data in search of the intermediate components used to create this frame.
Looking at the SanWrangler example below, you can see on the left in paged form a bank of 36 separate streams of image sequences that the user can learn. This array of sequences represents all the frames found in archives, with the exception of binary duplicates. To the right of the archive array, at the very top, the original sequence is shown, extracted from the .SAN process described above. The user can press Shift + Click on streams from the archive array on the left to move them to the right array. This right-hand array of selected frame sequences is all the threads that contain the parts used to generate the finished frame sequence.
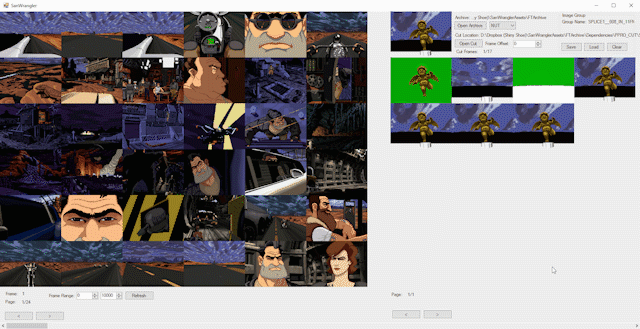
SanWrangler allows you to search in the following files from an archive array:
- .ANM - animation files created in LucasArts own tool. These files contain hand-drawn animation cells. Later, if necessary, they were connected to other files.
- .FLC / .FLI - Autodesk Animator and Autodesk Animator Pro files
- .NUT - they contain sequences of uncompressed linear frames transmitted to SMUSHFT.EXE and later encoded into a compressed format written to the .SAN file
- .MAX is a 3D mesh source file created in 3D Studio 2.0. We were able to run the batch process to render the sequences used in SanWrangler so that we can know what is contained in the binary .MAX files. These frames were critical to understanding which .MAX file was used in a particular FMV sequence.
So, we have reached the point where the direct remastering of old files begins. SanWrangler can save a list of selected file dependencies in a cleaner format. From this point on, the remastering workflow is divided into three branches: remastering of hand-drawn frames, remastering of 3D models and remastering of sound.
Wait for the second part of the article! In the next part, I will talk about the ways of automation and transformation that we used to reassemble all the content.
Source: https://habr.com/ru/post/340564/
All Articles