Testing React-Redux Applications

Reading time: 13 minutes
Have you seen a lot of react developers who cover their code with tests? Do you test yours? Indeed, why, if we can predict the state of the component and the storage? The answer is quite simple: to avoid errors with changes in the project.
All who are interested, I invite under the cat.
Clone the repository project in which tests will be written or try to write tests for your project.
It will be a very simple project.The application looks like this:
')
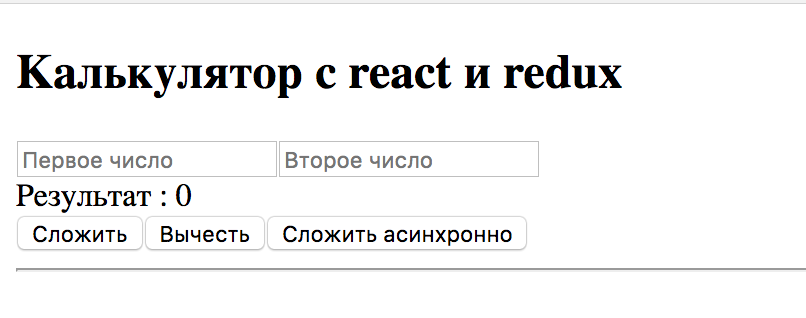
And it can only add and subtract numbers, but with the help of react-redux bundles.
Why I and not only choose jest
And who are these not only? That's what jest blogs write.
We feel incredibly humbled that 100+ companies have adopted the last six months. Companies like Twitter, Pinterest, Paypal, nytimes, IBM (Watson), Spotify, eBay, SoundCloud, Intuit, Formidable Labs, Automattic, Javascript.
Big companies like the simplicity of jest. That is why they love him:
- You will need a minimum time to install and configure Jest
- Ability to run tests in parallel. (In this example, this is not so important, but in large applications the speed of tests plays a big role)
- Snapshot testing is a really great feature, thanks to which you can shorten the writing of some tests, as a snapshot is created, and if something changes in the component, an error will be displayed when the snapshot is generated next time.
- Jest uses jasmine for assertion (mappings)
- The ability to see the test coverage out of the box
When Jest first appeared, it didn’t work very quickly and was not designed very well, but in 2016 Facebook did a great job at improving Jest and I think it will become quite popular in the near future.
Project Setup
Let's see what we need dependencies to run tests.
- jest - I think it is clear why
- babel-jest - for modern JS transpilation to an older one.
- enzyme - for more convenient management and rendering of our components. (library developed by airbnb)
- react-addons-test-utils - as a dependency for the enzyme
- react-test-renderer - allows you to render a component in the markup for snapshot
- redux-mock-store - to create a mock for the store
And that's all you need.
Running tests
Add to package.json in scripts ”test”: “jest”. And now we can run tests using the yarn test command or npm test.
Jest will analyze the __test__ folder and execute all the files in the name of which are .test.js or .spec.js
After we write everything, that's what happens.
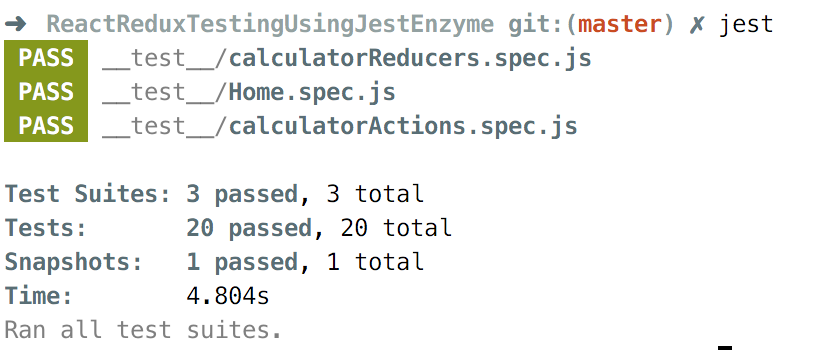
- Home.spec.js - This component has child components and is connected to redux.
- calculatorActions.spec.js - This is a unit test for action.
- calculatorReducers.spec.js - This is the unit test for the reducer.
Now let's write a couple of tests.
Understanding our tests and creating them
There are many unwanted test cases that simply check for the presence of a DOM element. It is not really necessary, and I just left them to let you know how to do it, if there is such a task for you to cope with this test. But I would not advise writing such tests.
I will focus only on the important tests for each section that you need to know. You can simply read the rest in the documentation.
1. Component / Connected Component (Home.spec.js)
What does the connected component mean? This is the component that connect is used to communicate with redux. If you look at the code for the Home component, you will see there are two exports.
import React from 'react'; import ReactDOM from 'react-dom'; import { connect } from 'react-redux'; import { addInputs, subtractInputs, async_addInputs } from '../actions/calculatorActions'; const mapStateToProps = ({ output }) => ({ output }); export class Home extends React.Component{ render(){ ... } } export default connect(mapStateToProps, { addInputs, subtractInputs, async_addInputs })(Home); The first export is needed for the so-called 'stupid components' and the export default is needed for the connected / smart component. And we will test both options to start a component that does not receive values from the outside.
And with the connect component, we will test the react-redux part.
Do not use decorators for the code you are going to test.
@connect(mapStateToProps) export default class Home extends React.Component{ ... 1.1 Stupid component
We import a stupid component (a component without connect).
import { Home } from '../src/js/components/Home' import { shallow } from 'enzyme' // ********************************* describe('>>>HOME --- Shallow Render REACT COMPONENTS',()=>{ let wrapper const output = 10 beforeEach(()=>{ wrapper = shallow(<Home output={output}/>) }) it('+++ render the DUMB component', () => { expect(wrapper.length).toEqual(1) }); it('+++ contains output', () => { expect(wrapper.find('input[placeholder="Output"]').prop('value')).toEqual(output) }); }); We use a shallow render from the enzyme because we only need to get the react object of the component.
We will analyze the following fragment in detail.
beforeEach(()=>{ wrapper = shallow(<Home output={output}/>) }) It means that before each execution of the it () function we will execute the function that is passed to beforeEach (), thereby receiving an updated component each time, as if it were being rendered for the first time.
Notice that in Home.js our output field expects this.props.output, so we need to pass prop during testing.
<div> : <span id="output">{this.props.output}</span> </div> 1.2 Smart components
Now something more interesting, import our smart component to the test. Now the import looks like this.
import ConnectedHome, { Home } from '../src/js/components/Home' And we will also use redux-mock-store.
import configureStore from 'redux-mock-store' Now consider two options for testing smart components. You will need to choose which one you like best.
// store //***************************************************************************** describe('>>>HOME --- REACT-REDUX (Shallow + passing the {store} directly)',()=>{ const initialState = { output:100 }; const mockStore = configureStore(); let store,container; beforeEach(()=>{ store = mockStore(initialState); container = shallow(<ConnectedHome store={store} /> ); }) it('+++ render the connected(SMART) component', () => { expect(container.length).toEqual(1); }); it('+++ check Prop matches with initialState', () => { expect(container.prop('output')).toEqual(initialState.output); }); In this test, we check whether the initialState, which is obtained by the component via mapStateToProps, matches.
// Provider . //***************************************************************************** describe('>>>HOME --- REACT-REDUX (Mount + wrapping in <Provider>)',()=>{ const initialState = { output:10 }; const mockStore = configureStore(); let store,wrapper; beforeEach(()=>{ store = mockStore(initialState); wrapper = mount( <Provider store={store}><ConnectedHome /></Provider> ); }) it('+++ render the connected(SMART) component', () => { expect(wrapper.find(ConnectedHome).length).toEqual(1); }); it('+++ check Prop matches with initialState', () => { expect(wrapper.find(Home).prop('output')).toEqual(initialState.output); }); it('+++ check action on dispatching ', () => { let action; store.dispatch(addInputs(500)); store.dispatch(subtractInputs(100)); action = store.getActions(); expect(action[0].type).toBe("ADD_INPUTS"); expect(action[1].type).toBe("SUBTRACT_INPUTS"); }); }); If you look at the code, we do the same thing as in the first test, plus I also added a couple of other comparisons, but they can be implemented in the first test.
In the first and second versions, we use the mock store and therefore we cannot commit changes, but we can use the real store, without additional libraries.
//******************************************************************************************************* describe('>>>HOME --- REACT-REDUX (actual Store + reducers) more of Integration Testing',()=>{ const initialState = { output:10 }; let store,wrapper; beforeEach(()=>{ store = createStore(calculatorReducers); wrapper = mount( <Provider store={store}><ConnectedHome /></Provider> ); }) it('+++ check Prop matches with initialState', () => { store.dispatch(addInputs(500)); expect(wrapper.find(Home).prop('output')).toBe(500); }); }); But this is not recommended, because it is not part of unit testing.
1.3 Snapshots
Another thing I love about Jest is snapshot testing.
When jest compares snapshot for the first time, when there are none, it puts them in the __snapshots__ folder next to your test file. In order to make a snapshot, we need to first render the component, for this we import the react-test-renderer library.
import renderer from 'react-test-renderer' // snapshot describe('>>>HOME --- Snapshot',()=>{ it('+++capturing Snapshot of Home', () => { const renderedValue = renderer.create(<Home output={10}/>).toJSON() expect(renderedValue).toMatchSnapshot(); }); }); Here's what the snapshot looks like for our Home.js component
exports[`>>>HOME --- Snapshot +++capturing Snapshot of Home 1`] = ` <div className="container"> <h2> using React and Redux </h2> <div> Input 1: <input placeholder="Input 1" type="text" /> </div> <div> Input 2 : <input placeholder="Input 2" type="text" /> </div> <div> Output : <input placeholder="Output" readOnly={true} type="text" value={10} /> </div> <div> <button id="add" onClick={[Function]}> Add </button> <button id="subtract" onClick={[Function]}> Subtract </button> </div> <hr /> </div> `; And if we change something in the Home.js file and try to run the test, we get an error.

To update snapshots, you need to run tests with the -u flag
jest test -u || yarn test -u Because of this, we do not need to spend a lot of time on testing, because if the snapshot does not match, then this means that we will get an error when comparing snapshots. Snapshot does not contain the props and state of your component, if you need to test them in a component, you will have to create two instances.
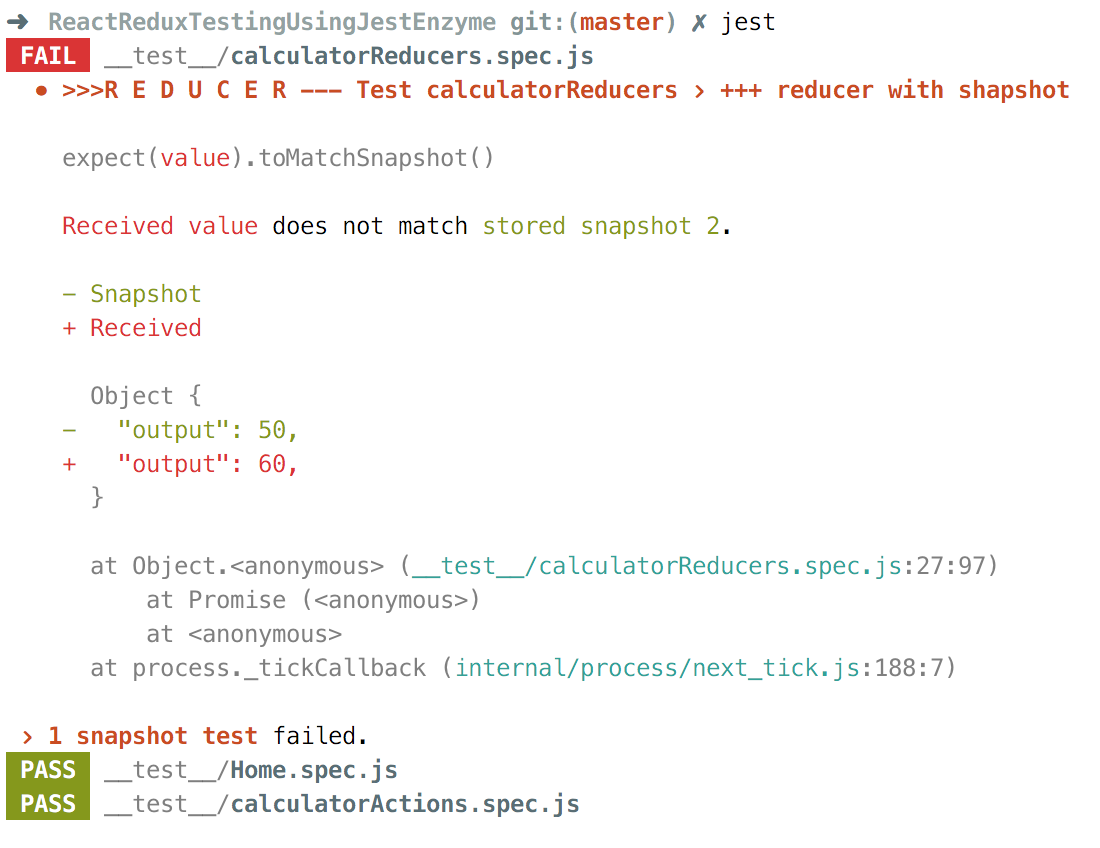
You can create a snapshot not only for the component, but also for the reducer, which is very convenient.
For example, we write such a test.
import reducer from './recipe'; describe('With snapshots ', () => { it('+++ reducer with shapshot', () => { expect(calculatorReducers(undefined, { type: 'default' })).toMatchSnapshot(); }); it('+++ reducer with shapshot', () => { const action = { type: 'ADD_INPUTS', output: 50, }; expect(calculatorReducers(undefined, action)).toMatchSnapshot(); }); }); We get the following:
Now you understand why I mentioned this at the beginning.
2. ActionCreators (calculatorActions.spec.js)
We simply compare what ActionCreators returns to what should be.
import { addInputs,subtractInputs } from '../src/js/actions/calculatorActions' describe('>>>ACTION --- Test calculatorActions', ()=>{ it('+++ actionCreator addInputs', () => { const add = addInputs(50) expect(add).toEqual({ type:"ADD_INPUTS", output:50 }) }); it('+++ actionCreator subtractInputs', () => { const subtract = subtractInputs(-50) expect(subtract).toEqual({ type:"SUBTRACT_INPUTS", output:-50 }) }); }); 3. Reducers (calculatorReducers.spec.js)
As easy as actionCreators, we test reducers.
import calculatorReducers from '../src/js/reducers/calculatorReducers' describe('>>>REDUCER --- Test calculatorReducers',()=>{ it('+++ reducer for ADD_INPUT', () => { let state = {output:100} state = calculatorReducers(state,{type:"ADD_INPUTS",output:500}) expect(state).toEqual({output:500}) }); it('+++ reducer for SUBTRACT_INPUT', () => { let state = {output:100} state = calculatorReducers(state,{type:"SUBTRACT_INPUTS",output:50}) expect(state).toEqual({output:50}) }); }); Async action
One of the most important is testing asynchronous actions or actions with side effects.
For asynchronous actions, we will use redux-thunk. Let's see what our asynchronous action looks like.
export const async_addInputs = output => dispatch => new Promise((res, rej) => { setTimeout(() => res(output), 3000); }).then(res => dispatch(addInputs(res))); Now is the time to write a jest test for this. You need to import everything you need.
import { addInputs, subtractInputs, async_addInputs } from '../src/js/actions/calculatorActions'; import configureMockStore from 'redux-mock-store'; import thunk from 'redux-thunk'; const mockStore = configureMockStore([ thunk ]); Now we write our test.
describe('>>>Async action --- Test calculatorActions', () => { it('+++ thunk async_addInputs', async () => { const store = mockStore({ output: 0 }); await store.dispatch(async_addInputs(50)); expect(store.getActions()[0]).toEqual({ type: 'ADD_INPUTS', output: 50 }); }); }); Look at the async_addInputs function, we wait for the action to finish and return the answer that we need to test (in this case, successful). Thus, we can say that only one and only one action was called, and that is: ADD_INPUTS.
Go ahead and test the primitive caching system.
(just an example not from the project)
it('does check if we already fetched that id and only calls fetch if necessary', () => { const store = mockStore({id: 1234, isFetching: false }}); window.fetch = jest.fn().mockImplementation(() => Promise.resolve()); store.dispatch(fetchData(1234)); // Same id expect(window.fetch).not.toBeCalled(); store.dispatch(fetchData(1234 + 1)); // Different id expect(window.fetch).toBeCalled(); }); As can be seen above, id 1234 is already in the store and we no longer need to receive data with a request for this id.
Here we looked at the most basic tests for asynchronous actions. Also in your application can be with other side effects. For example, working with the database directly, like firebase or working with other api directly.
Code coverage
A test coverage report is maintained out of the box. In order to see the statistics you need to run tests with the --coverage flag
yarn test -- --coverage || npm test -- --coverage It will look like this:
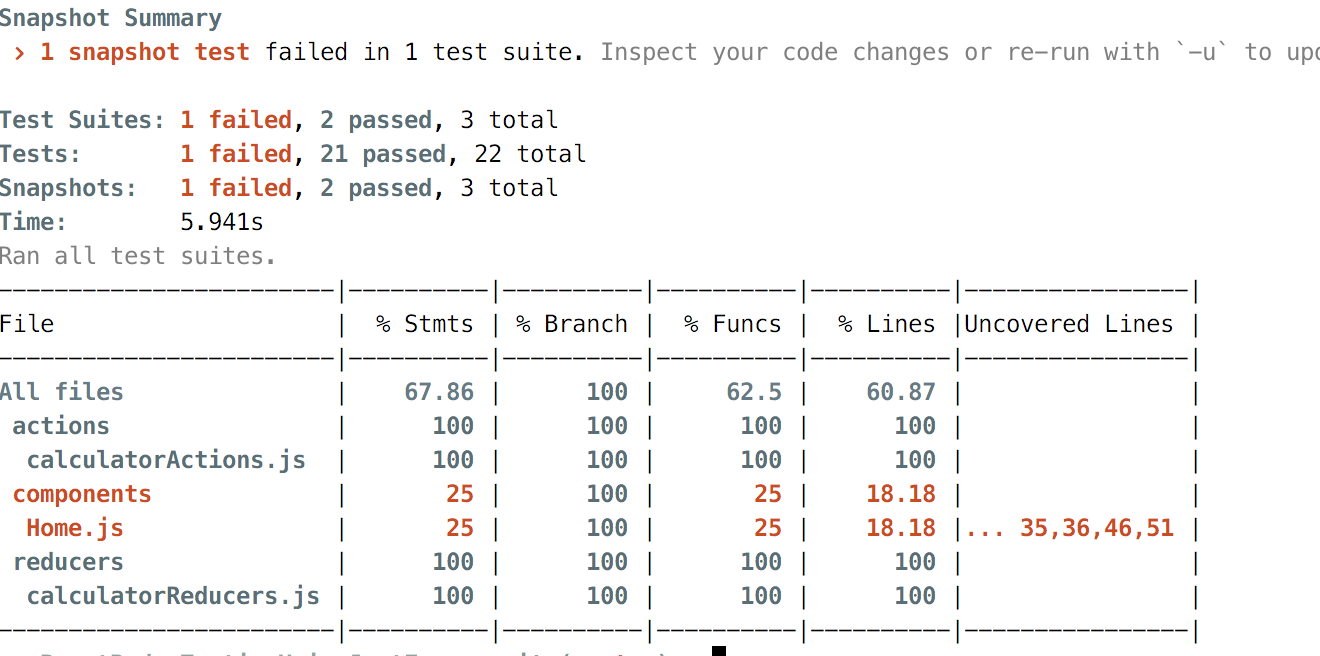
If you check the folder with the project, you will find the folder coverage, where the index.html file is in which the report is to be displayed in the browser.

Click on the file and see detailed test coverage statistics.
That's all the main points in testing on jest. After you master this, you can look at everything else in the documentation in order to broaden your horizons in testing.
Source: https://habr.com/ru/post/340514/
All Articles