Development for Sailfish OS: Work with Bluetooth
Hello! This article is a continuation of a series of articles devoted to the development of the mobile platform Sailfish OS. This time it will be about using Bluetooth to establish a connection between two devices and transfer data.
Bluetooth technology allows you to create a wireless connection, thanks to which absolutely any data can be transferred. There are a number of tasks for which Bluetooth is a common solution, for example, transferring files from one device to another, connecting to Bluetooth headsets, or remotely controlling scanners and printers.
We will consider the use of Bluetooth technology on the example of the implementation of the application for the exchange of lines. Let's call it bluetooth messenger . The application will work in two modes: server and client. The server will register the Bluetooth service and respond to the client connection. The client will search for the created service, connect to it and transfer data. As a result, you need two devices running Sailfish OS.
As a result, the application will work as follows:
The implementation of this application will fully illuminate the necessary tools to establish communication between two devices and exchange data between them.
')
To interact with Bluetooth, an application sometimes requires elevated privileges (to search for services, change visibility settings, to pair devices). In the absence of elevated privileges, some of the functionality will be unavailable, so we recommend issuing them to an application that works with Bluetooth.
To debug, you need to run the application using devel-su with the -p flag. This allows you to run the application with elevated privileges, and debugging output will be available in the console.
In order to start the application with elevated privileges by clicking on the icon, you need to make some settings in the source files of the project. First, the application executable file must be launched using invoker . Invoker finds the main function of the application and launches it with the arguments passed to it. This is configured in the .desktop project file with the following line:
Secondly, you need to create a file with the name corresponding to the name of the executable file in the /usr/share/mapplauncherd/privileges.d/ directory and put the line there:
A comma at the end of the line is definitely needed. Thus, when you click on the application icon, the user will launch it with elevated privileges.
First you need to understand how it is possible to manage the state of Bluetooth. To do this, use the D-Bus system, the interaction with which was described in a previous article . With this system, we have the ability to turn on and off the power of Bluetooth and adjust the visibility for other devices.
To enable Bluetooth, you must use the net.connman service. On the net.connman interface , on the path / net / connman / technology / bluetooth, there is the SetProperty method, with which it is possible to set the value of the Powered property, which is responsible for whether Bluetooth is on or not. The property is set as follows:
Create an instance of QDBusInterface using the previously listed service, path, and interface. Then on the interface we call the SetProperty method with two arguments: the name of the property and the value.
After turning on Bluetooth, it will be useful to configure visibility for other devices. For this we use the service org.bluez . First, you need to get the path corresponding to the current device. To do this, by the root path on the org.bluez.Manager interface, we call the DefaultAdapter method, which in the output arguments contains the path to the current adapter, which we will later use to set the visibility.
After obtaining the path for setting visibility, you must use the SetProperty method on the org.bluez.Adapter interface to set the following properties:
Unlimited time detection includes the following lines:
It should be noted that to configure visibility options, it is necessary that the application be launched with elevated privileges.
First we need to create a server and register a service on it. This service will receive messages from customers and respond to them. To solve this problem, we will create a class MessengerServer , whose header file will contain the following:
Now let's take a closer look at the components and contents of the methods of this class.
The device can notify other devices that search for Bluetooth by registering a service. To do this, use the QBluetoothServer class. With it, you can create a Bluetooth server and register on it a service that will inform the devices what it is.
QBluetoothServer contains a set of methods for installing the server on the device and registering the service. In particular, of interest:
The remaining methods are used to stop the server, get the current address or port, check the status and others. They are not so interesting, and you can read about them in the official documentation.
After we raised the server, you must register the service. A service is a description of a service that performs certain duties. Describes the service using the QBluetoothServiceInfo object by setting attributes using selected methods. To solve the above problem, we use the startServer () method:
The first line we create is a server that uses RFCOMM as the protocol. Then we connect the signal about the new connection with the slot of our class. After that, we enable listening on our address, for which we create an instance of the current device, from which we retrieve its address and pass it to the listen () method. So we install the server.
Registering a service requires more code to specify all the parameters required for its operation:
Here we set the service name, description, service provider (for example, company name) and unique identifier (in this application it is contained in a constant as a string and is given in the format xxxxxxxx-xxxx-xxxx-xxxx-xxxxxxxxxxxx , where x is a hexadecimal number). The first three attributes allow you to get a basic idea of the found service while the fourth one can be used by devices to search for a specific service.
This kind of construct uses a sequence ( QBluetoothServiceInfo :: Sequence ) to set other attributes. In this case, we set a unique identifier for the service. Thus, the server lets you know what services it provides.
These lines set the group of public search that will allow devices to freely find this service. Otherwise, the service will not be found.
Here, to access the service, we install the RFCOMM protocol, similar to that used by the server.
Finally, we perform the registration of the created service on the address obtained earlier and used by the server. From this point on, the service will be visible when searching via Bluetooth with other devices.
Now that the service is registered and the application is ready to accept incoming connections, it is necessary to process them. As mentioned earlier, the application server must receive the string from the client, expand it and send it back.
When the client connects to the server, we create a socket, represented as an instance of QBluetoothSocket , which can be obtained by calling the nextPendingConnection () method on an instance of the QBluetoothServer class. A socket has a whole set of signals to track its state, the most useful of which are:
We use them to process incoming connections. Earlier, we attached a newConnection () signal to the clientConnected () slot, consider its implementation.
The QBluetoothSocket object is a QIODevice descendant; as a result, methods are available for reading a line, a character, a selected number of characters, and so on. Methods for reading (as well as methods for writing) use QByteArray , which allows you to transfer not only strings, but also any other data as a set of bytes. Thus it is possible to transfer any type of data, regardless of content.
In our example, for processing incoming messages, we connected the readyRead () signal with the readSocket () method, whose code looks like this:
To read the data as an array of bytes, we use the readLine () method, then we convert the line read into a string, expand it, and send it back using the write () method, converting it back to an array of bytes. Thus, the server implemented by us is able to receive the string from any other device via Bluetooth and return it back in expanded form.
Now, when the server is implemented, running and waiting for incoming connections, you need to connect to it. How is it possible to find a device that provides the necessary service? First, you need to search for services available on visible Bluetooth devices and only then connect to it.
The client header file has the following contents:
Consider the components that are necessary to implement the search service and send messages.
Qt provides the QBluetoothServiceDiscoveryAgent class for searching services. It allows you to automatically check all devices for the presence of a certain service, which we are looking for by the UUID. Later, when a service is found, an object of this class initiates the corresponding signal, with which we can process the search result. It should be noted that the use of this class requires that the application be launched with elevated privileges. The class contains the following methods of interest:
Signals are useful for processing the result:
To search for our specific service, you must set the setUuidFilter () method to filter by UUID, which we specified when registering the service and using the start () method to start the search. After that, when our service is detected, the serviceDiscovered () signal will be triggered. An instance of QBluetoothServiceInfo contains information about the found service (name, UUID, information about the device on which it is registered, etc.). We will use the instance of this class to connect to the service, which will be mentioned later.
Specifically, in our example, we will consider another class that does not require elevated privileges - QBluetoothDeviceDiscoveryAgent . With it, you can search for devices, not services, and it does not require elevated privileges. For each device found, we will browse the services registered on the device, and if our service is in the list, then we consider the service found and in the future we will connect to it.
QBluetoothDeviceDiscoveryAgent consists of a small number of methods for finding devices. The most useful are the following:
Also, if the device is found, the deviceDiscovered signal (const QBluetoothDeviceInfo & info) will be immediately triggered, which can serve to process the result.
Information about found devices is represented as a QDeviceInfo object. From this object, you can extract data using special methods. The most interesting are the following:
Now that we know how to search for services on Bluetooth devices, let's try to find our own service. In the constructor, initialize the object to search for devices:
First, we create an instance of QBluetoothDeviceDiscoveryAgent , to which we pass the address of the current Bluetooth device as an argument. Then we attach two object signals to our current: deviceDiscovered () to process the newly found device and finished () to handle the completion of the search.
The method to start the search contains the following lines:
Here we save the message that needs to be transmitted and begin the search for devices.
For processing the devices found, the deviceDiscovered () slot is used, to which we have previously connected a signal:
As mentioned earlier, we are looking at the list of unique service identifiers for searching our registered one in it. When the device that provides the required service is found for the first time, we complete the search and call the method for establishing pairing between devices.
Pairing devices is an important aspect in the interaction of devices using Bluetooth. This implies that two devices establish trusting relationships with each other and a wider range of interaction possibilities (for example, remote control) is available to them. Specifically, in our example, pairing is not required, but we will install it to make out how it is done in the general case. Pairing installation requires elevated privileges.
To pair devices, use the QBluetoothLocalDevice class. We have already used it earlier in the server-side code to get the address of the current device. It is also used for pairing devices. We are interested in methods:
and signals:
We can get the address of the remote device by calling the address () method on the QBluetoothDeviceInfo instance, in the future we will use it when setting the pairing and connecting to the service. Now we will try to establish a pairing between the two devices. First, let's add a connection to the signals in the client class constructor:
The QBluetoothLocalDevice instance in this case is a class field. The pairingFinished () slot contains a line that starts the startClient (address) client, and pairingError () contains a debug output.
To set the pairing, we implemented the requestPairing () method with the following content:
If the devices are already paired, then we simply initiate a connection to the server, otherwise we request pairing. As a result, when pairing is successfully established, a connection to the server is also initiated, and in case of an error, we notify the user about the problem.
An instance of the QBluetoothDeviceInfo class corresponding to the device found contains a method for obtaining an address that is sufficient to connect to the service. QBluetoothSocket is used for this purpose ; it is enough to create an instance of this class using the constructor, passing it the RFCOMM protocol and calling the connectToService () method , which is passed the address from the QBluetoothDeviceInfo instance and the port on which you want to connect as arguments . To establish a connection with the service, you need to specify port 1.
Now consider the process of establishing a connection, transmitting and receiving data using a socket. The client uses the same QBluetoothSocketas on the server, which allows us to use the signals discussed earlier to implement handlers and methods to write data to the socket. The startClient () method establishes a connection with a device providing a service using a socket:
We create an instance of a socket with the RFCOMM protocol and connect its signals to the slots of our class. Then, by calling the connectToService () method, we connect to another device. It should be noted that if we used the QBluetoothServiceInfo class , which allows you to get information about the found services as instances of QBluetoothServiceInfo , then it would be enough to call the connectToService () method with one argument that accepts the service information.
The socketConnected () method is called when a connection is established via a socket, inside it we send data to the server:
It uses the same socket class as the server, so we can transfer any data as an array of bytes.
As we remember, the server code allows you to get a string, expand it and return it to us, to process the incoming message, we connected the readSocket () slot with the readyRead () signal . This slot looks like this:
As a result, we have covered most of the functionality required to implement a server and a client for transferring data of any kind with between them. Also reviewed the procedure for finding devices. The material mentioned in the article is enough to realize the transfer of any data between two devices. Sample application code is available on GitHub .
Technical issues can also be discussed on the Sailfish OS Russian-speaking community channel in a Telegram or VKontakte group .
Author: Sergey Averkiev
Bluetooth
Bluetooth technology allows you to create a wireless connection, thanks to which absolutely any data can be transferred. There are a number of tasks for which Bluetooth is a common solution, for example, transferring files from one device to another, connecting to Bluetooth headsets, or remotely controlling scanners and printers.
Sample application
We will consider the use of Bluetooth technology on the example of the implementation of the application for the exchange of lines. Let's call it bluetooth messenger . The application will work in two modes: server and client. The server will register the Bluetooth service and respond to the client connection. The client will search for the created service, connect to it and transfer data. As a result, you need two devices running Sailfish OS.
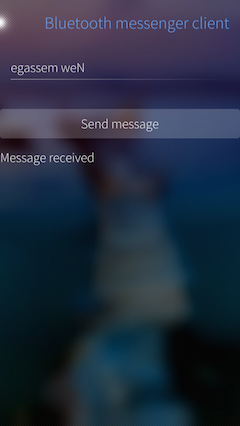
 | 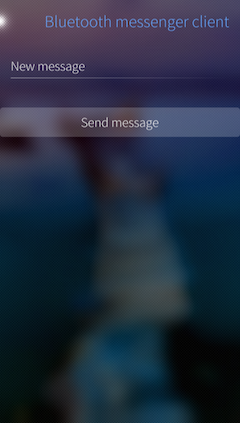 |
As a result, the application will work as follows:
- The client is looking for a server with a registered service.
- To the server found it passes the string.
- The server accepts the string, displays it on the screen.
- The accepted string is expanded and sent back to the client.
- The client displays an expanded line on the screen and disconnects from the server.
 |  |
The implementation of this application will fully illuminate the necessary tools to establish communication between two devices and exchange data between them.
')
Granting elevated privileges to the application
To interact with Bluetooth, an application sometimes requires elevated privileges (to search for services, change visibility settings, to pair devices). In the absence of elevated privileges, some of the functionality will be unavailable, so we recommend issuing them to an application that works with Bluetooth.
To debug, you need to run the application using devel-su with the -p flag. This allows you to run the application with elevated privileges, and debugging output will be available in the console.
devel-su -p /usr/bin/bluetooth-messenger In order to start the application with elevated privileges by clicking on the icon, you need to make some settings in the source files of the project. First, the application executable file must be launched using invoker . Invoker finds the main function of the application and launches it with the arguments passed to it. This is configured in the .desktop project file with the following line:
Exec=invoker --type=silica-qt5 -s /usr/bin/bluetooth-messenger Secondly, you need to create a file with the name corresponding to the name of the executable file in the /usr/share/mapplauncherd/privileges.d/ directory and put the line there:
/usr/bin/bluetooth-messenger, A comma at the end of the line is definitely needed. Thus, when you click on the application icon, the user will launch it with elevated privileges.
Bluetooth state management
First you need to understand how it is possible to manage the state of Bluetooth. To do this, use the D-Bus system, the interaction with which was described in a previous article . With this system, we have the ability to turn on and off the power of Bluetooth and adjust the visibility for other devices.
To enable Bluetooth, you must use the net.connman service. On the net.connman interface , on the path / net / connman / technology / bluetooth, there is the SetProperty method, with which it is possible to set the value of the Powered property, which is responsible for whether Bluetooth is on or not. The property is set as follows:
QDBusInterface bluetoothInterface("net.connman", "/net/connman/technology/bluetooth", "net.connman.Technology", QDBusConnection::systemBus(), this); bluetoothInterface.call("SetProperty", "Powered", QVariant::fromValue(QDBusVariant(true))); Create an instance of QDBusInterface using the previously listed service, path, and interface. Then on the interface we call the SetProperty method with two arguments: the name of the property and the value.
After turning on Bluetooth, it will be useful to configure visibility for other devices. For this we use the service org.bluez . First, you need to get the path corresponding to the current device. To do this, by the root path on the org.bluez.Manager interface, we call the DefaultAdapter method, which in the output arguments contains the path to the current adapter, which we will later use to set the visibility.
QDBusInterface adapterListInterface("org.bluez", "/", "org.bluez.Manager", QDBusConnection::systemBus(), this); QVariant adapterPath = adapterListInterface.call("DefaultAdapter").arguments().at(0); After obtaining the path for setting visibility, you must use the SetProperty method on the org.bluez.Adapter interface to set the following properties:
- DiscoverableTimeout - time in seconds ( unsigned int ), during which the device will be possible to detect after detection is enabled. If set to 0, then detection starts without a timer.
- Discoverable — depending on the true or false value, enables or disables detection.
Unlimited time detection includes the following lines:
QDBusInterface bluetoothAdapter("org.bluez", adapterPath.value<QDBusObjectPath>().path(), "org.bluez.Adapter", QDBusConnection::systemBus(), this); bluetoothAdapter.call("SetProperty", "DiscoverableTimeout", QVariant::fromValue(QDBusVariant(0U))); bluetoothAdapter.call("SetProperty", "Discoverable", QVariant::fromValue(QDBusVariant(true))); It should be noted that to configure visibility options, it is necessary that the application be launched with elevated privileges.
Registering a Bluetooth service
First we need to create a server and register a service on it. This service will receive messages from customers and respond to them. To solve this problem, we will create a class MessengerServer , whose header file will contain the following:
class MessengerServer : public QObject { Q_OBJECT public: explicit MessengerServer(QObject *parent = 0); ~MessengerServer(); Q_INVOKABLE void startServer(); Q_INVOKABLE void stopServer(); signals: void messageReceived(QString message); private: QBluetoothServer *bluetoothServer; QBluetoothServiceInfo serviceInfo; QBluetoothSocket *socket; const QString SERVICE_UUID = "1f2d6c5b-6a86-4b30-8b4e-3990043d73f1"; private slots: void clientConnected(); void clientDisconnected(); void readSocket(); }; Now let's take a closer look at the components and contents of the methods of this class.
The device can notify other devices that search for Bluetooth by registering a service. To do this, use the QBluetoothServer class. With it, you can create a Bluetooth server and register on it a service that will inform the devices what it is.
QBluetoothServer contains a set of methods for installing the server on the device and registering the service. In particular, of interest:
- The QBluetoothServer constructor (QBluetoothServiceInfo :: Protocol serverType, QObject * parent) - serves to initialize the server, takes the protocol and the parent QObject as arguments. In our example, we will use the RFCOMM protocol.
- The listen method (const QBluetoothAddress & address, quint16 port) - starts listening for incoming connections to the transmitted address and port.
- The error signal (QBluetoothServer :: Error error) is called when a server error occurs (Bluetooth is turned off, the service is already registered, etc.), where the error itself is available as an argument.
- The signal newConnection () is called upon a new connection request.
The remaining methods are used to stop the server, get the current address or port, check the status and others. They are not so interesting, and you can read about them in the official documentation.
After we raised the server, you must register the service. A service is a description of a service that performs certain duties. Describes the service using the QBluetoothServiceInfo object by setting attributes using selected methods. To solve the above problem, we use the startServer () method:
bluetoothServer = new QBluetoothServer(QBluetoothServiceInfo::RfcommProtocol, this); connect(bluetoothServer, &QBluetoothServer::newConnection, this, &MessengerServer::clientConnected); QBluetoothAddress bluetoothAddress = QBluetoothLocalDevice().address(); bluetoothServer->listen(bluetoothAddress); The first line we create is a server that uses RFCOMM as the protocol. Then we connect the signal about the new connection with the slot of our class. After that, we enable listening on our address, for which we create an instance of the current device, from which we retrieve its address and pass it to the listen () method. So we install the server.
Registering a service requires more code to specify all the parameters required for its operation:
serviceInfo.setAttribute(QBluetoothServiceInfo::ServiceName, "BT message sender"); serviceInfo.setAttribute(QBluetoothServiceInfo::ServiceDescription, "Example message sender"); serviceInfo.setAttribute(QBluetoothServiceInfo::ServiceProvider, "fruct.org"); serviceInfo.setServiceUuid(QBluetoothUuid(SERVICE_UUID)); Here we set the service name, description, service provider (for example, company name) and unique identifier (in this application it is contained in a constant as a string and is given in the format xxxxxxxx-xxxx-xxxx-xxxx-xxxxxxxxxxxx , where x is a hexadecimal number). The first three attributes allow you to get a basic idea of the found service while the fourth one can be used by devices to search for a specific service.
QBluetoothServiceInfo::Sequence classId; classId << QVariant::fromValue(QBluetoothUuid(QBluetoothUuid::SerialPort)); serviceInfo.setAttribute(QBluetoothServiceInfo::BluetoothProfileDescriptorList, classId); classId.prepend(QVariant::fromValue(QBluetoothUuid(SERVICE_UUID))); serviceInfo.setAttribute(QBluetoothServiceInfo::ServiceClassIds, classId); This kind of construct uses a sequence ( QBluetoothServiceInfo :: Sequence ) to set other attributes. In this case, we set a unique identifier for the service. Thus, the server lets you know what services it provides.
QBluetoothServiceInfo::Sequence publicBrowse; publicBrowse << QVariant::fromValue(QBluetoothUuid(QBluetoothUuid::PublicBrowseGroup)); serviceInfo.setAttribute(QBluetoothServiceInfo::BrowseGroupList, publicBrowse); These lines set the group of public search that will allow devices to freely find this service. Otherwise, the service will not be found.
QBluetoothServiceInfo::Sequence protocol; QBluetoothServiceInfo::Sequence protocolDescriptorList; protocol << QVariant::fromValue(QBluetoothUuid(QBluetoothUuid::Rfcomm)) << QVariant::fromValue(quint8(bluetoothServer->serverPort())); protocolDescriptorList.append(QVariant::fromValue(protocol)); serviceInfo.setAttribute(QBluetoothServiceInfo::ProtocolDescriptorList, protocolDescriptorList); Here, to access the service, we install the RFCOMM protocol, similar to that used by the server.
serviceInfo.registerService(bluetoothAddress); Finally, we perform the registration of the created service on the address obtained earlier and used by the server. From this point on, the service will be visible when searching via Bluetooth with other devices.
Work with incoming connections
Now that the service is registered and the application is ready to accept incoming connections, it is necessary to process them. As mentioned earlier, the application server must receive the string from the client, expand it and send it back.
When the client connects to the server, we create a socket, represented as an instance of QBluetoothSocket , which can be obtained by calling the nextPendingConnection () method on an instance of the QBluetoothServer class. A socket has a whole set of signals to track its state, the most useful of which are:
- connected () - called when creating a socket connection.
- disconnected () - called when the connection is broken.
- error (QBluetoothSocket :: SocketError error) - called when an error occurs, its type is passed as an argument.
- readyRead () is called when new data is available in the socket for reading.
We use them to process incoming connections. Earlier, we attached a newConnection () signal to the clientConnected () slot, consider its implementation.
void MessengerServer::clientConnected() { //... socket = bluetoothServer->nextPendingConnection(); connect(socket, &QBluetoothSocket::readyRead, this, &MessengerServer::readSocket); connect(socket, &QBluetoothSocket::disconnected, this, &MessengerServer::clientDisconnected); } The QBluetoothSocket object is a QIODevice descendant; as a result, methods are available for reading a line, a character, a selected number of characters, and so on. Methods for reading (as well as methods for writing) use QByteArray , which allows you to transfer not only strings, but also any other data as a set of bytes. Thus it is possible to transfer any type of data, regardless of content.
In our example, for processing incoming messages, we connected the readyRead () signal with the readSocket () method, whose code looks like this:
void MessengerServer::readSocket() { //... const QString message = QString::fromUtf8(socket->readLine().trimmed()); emit messageReceived(message); QString reversedMessage; for (int i = message.size() - 1; i >= 0; i--) { reversedMessage.append(message.at(i)); } socket->write(reversedMessage.toUtf8()); } To read the data as an array of bytes, we use the readLine () method, then we convert the line read into a string, expand it, and send it back using the write () method, converting it back to an array of bytes. Thus, the server implemented by us is able to receive the string from any other device via Bluetooth and return it back in expanded form.
Search service
Now, when the server is implemented, running and waiting for incoming connections, you need to connect to it. How is it possible to find a device that provides the necessary service? First, you need to search for services available on visible Bluetooth devices and only then connect to it.
The client header file has the following contents:
class MessengerClient : public QObject { Q_OBJECT public: explicit MessengerClient(QObject *parent = 0); ~MessengerClient(); Q_INVOKABLE void startDiscovery(const QString &messageToSend); Q_INVOKABLE void stopDiscovery(); private: const QString SERVICE_UUID = "1f2d6c5b-6a86-4b30-8b4e-3990043d73f1"; QString message; QBluetoothSocket *socket = NULL; QBluetoothDeviceDiscoveryAgent* discoveryAgent; QBluetoothDeviceInfo device; QBluetoothLocalDevice localDevice; void requestPairing(const QBluetoothAddress &address); void startClient(const QBluetoothAddress &address); void stopClient(); signals: void messageReceived(QString message); void clientStatusChanged(QString text); private slots: void deviceDiscovered(const QBluetoothDeviceInfo &deviceInfo); void pairingFinished(const QBluetoothAddress &address, QBluetoothLocalDevice::Pairing pairing); void pairingError(QBluetoothLocalDevice::Error error); void socketConnected(); void deviceSearchFinished(); void readSocket(); }; Consider the components that are necessary to implement the search service and send messages.
Qt provides the QBluetoothServiceDiscoveryAgent class for searching services. It allows you to automatically check all devices for the presence of a certain service, which we are looking for by the UUID. Later, when a service is found, an object of this class initiates the corresponding signal, with which we can process the search result. It should be noted that the use of this class requires that the application be launched with elevated privileges. The class contains the following methods of interest:
- setUuidFilter (const QBluetoothUuid & uuid) - sets the UUID, the service with which you want to find. There is also a similar method for setting multiple UUIDs.
- setRemoteAddress (const QBluetoothAddress & address) - sets the address of the device where the service is to be found. It can be used if you know the exact address of the device you want to find.
- start () - starts searching for services.
- stop () stops the search for services.
- discoveredServices () - returns a list of found services.
- clear () - clears the list of found services.
Signals are useful for processing the result:
- serviceDiscovered (const QBluetoothServiceInfo & info) - called when a service is detected, information about it is passed with an argument.
- finished () - called when the search is completed.
- error (QBluetoothServiceDiscoveryAgent :: Error error) - called when errors occur.
To search for our specific service, you must set the setUuidFilter () method to filter by UUID, which we specified when registering the service and using the start () method to start the search. After that, when our service is detected, the serviceDiscovered () signal will be triggered. An instance of QBluetoothServiceInfo contains information about the found service (name, UUID, information about the device on which it is registered, etc.). We will use the instance of this class to connect to the service, which will be mentioned later.
Specifically, in our example, we will consider another class that does not require elevated privileges - QBluetoothDeviceDiscoveryAgent . With it, you can search for devices, not services, and it does not require elevated privileges. For each device found, we will browse the services registered on the device, and if our service is in the list, then we consider the service found and in the future we will connect to it.
QBluetoothDeviceDiscoveryAgent consists of a small number of methods for finding devices. The most useful are the following:
- start () - starts searching for devices.
- stop () - stops searching devices.
- discoveredDevices () - returns a list of all found devices.
- error () - returns the type of the last error encountered while searching. There is also a signal that will be triggered immediately after an error occurs with the type of error as an argument.
- errorText () - returns the text of the last error that occurred.
Also, if the device is found, the deviceDiscovered signal (const QBluetoothDeviceInfo & info) will be immediately triggered, which can serve to process the result.
Information about found devices is represented as a QDeviceInfo object. From this object, you can extract data using special methods. The most interesting are the following:
- address () is the mac address of the device found. Used when searching for devices other than macOS and iOS.
- deviceUuid () is a unique identifier for the device found. Used only when searching for devices on macOS and iOS.
- name () is the name of the device found.
- serviceUuids () is a list of unique identifiers for registered services.
Now that we know how to search for services on Bluetooth devices, let's try to find our own service. In the constructor, initialize the object to search for devices:
MessengerClient::MessengerClient(QObject *parent) : QObject(parent) { //... discoveryAgent = new QBluetoothDeviceDiscoveryAgent(localDevice.address()); connect(discoveryAgent, &QBluetoothDeviceDiscoveryAgent::deviceDiscovered, this, &MessengerClient::deviceDiscovered); connect(discoveryAgent, &QBluetoothDeviceDiscoveryAgent::finished, this, &MessengerClient::deviceSearchFinished); //... } First, we create an instance of QBluetoothDeviceDiscoveryAgent , to which we pass the address of the current Bluetooth device as an argument. Then we attach two object signals to our current: deviceDiscovered () to process the newly found device and finished () to handle the completion of the search.
The method to start the search contains the following lines:
void MessengerClient::startDiscovery(const QString &messageToSend) { //... this->message = messageToSend; discoveryAgent->start(); //... } Here we save the message that needs to be transmitted and begin the search for devices.
For processing the devices found, the deviceDiscovered () slot is used, to which we have previously connected a signal:
void MessengerClient::deviceDiscovered(const QBluetoothDeviceInfo &deviceInfo) { //... if (deviceInfo.serviceUuids().contains(QBluetoothUuid(SERVICE_UUID))) { emit clientStatusChanged(QStringLiteral("Device found")); discoveryAgent->stop(); requestPairing(deviceInfo.address()); } } As mentioned earlier, we are looking at the list of unique service identifiers for searching our registered one in it. When the device that provides the required service is found for the first time, we complete the search and call the method for establishing pairing between devices.
Pairing devices
Pairing devices is an important aspect in the interaction of devices using Bluetooth. This implies that two devices establish trusting relationships with each other and a wider range of interaction possibilities (for example, remote control) is available to them. Specifically, in our example, pairing is not required, but we will install it to make out how it is done in the general case. Pairing installation requires elevated privileges.
To pair devices, use the QBluetoothLocalDevice class. We have already used it earlier in the server-side code to get the address of the current device. It is also used for pairing devices. We are interested in methods:
- pairingStatus (const QBluetoothAddress & address) - allows you to get the pairing status between the current device and the device at the address. Returns one of the values:
- requestPairing (const QBluetoothAddress & address, Pairing pairing) - requests changes in the status of pairing with the device (the second argument is Paired for setting pairing or Unpaired for breaking).
and signals:
- pairingFinished (const QBluetoothAddress & address, QBluetoothLocalDevice :: Pairing pairing) - returned when the pairing status is successfully changed.
- error (QBluetoothLocalDevice :: Error error) - returned when an error has occurred changing the pairing status (including the cancellation of the pairing proposal on one of the devices).
We can get the address of the remote device by calling the address () method on the QBluetoothDeviceInfo instance, in the future we will use it when setting the pairing and connecting to the service. Now we will try to establish a pairing between the two devices. First, let's add a connection to the signals in the client class constructor:
connect(&localDevice, &QBluetoothLocalDevice::pairingFinished, this, &MessengerClient::pairingFinished); connect(&localDevice, &QBluetoothLocalDevice::error, this, &MessengerClient::pairingError); The QBluetoothLocalDevice instance in this case is a class field. The pairingFinished () slot contains a line that starts the startClient (address) client, and pairingError () contains a debug output.
To set the pairing, we implemented the requestPairing () method with the following content:
void MessengerClient::requestPairing(const QBluetoothAddress &address) { //... if (localDevice.pairingStatus(address) == QBluetoothLocalDevice::Paired) { startClient(address); } else { localDevice.requestPairing(address, QBluetoothLocalDevice::Paired); } } If the devices are already paired, then we simply initiate a connection to the server, otherwise we request pairing. As a result, when pairing is successfully established, a connection to the server is also initiated, and in case of an error, we notify the user about the problem.
Connect to server
An instance of the QBluetoothDeviceInfo class corresponding to the device found contains a method for obtaining an address that is sufficient to connect to the service. QBluetoothSocket is used for this purpose ; it is enough to create an instance of this class using the constructor, passing it the RFCOMM protocol and calling the connectToService () method , which is passed the address from the QBluetoothDeviceInfo instance and the port on which you want to connect as arguments . To establish a connection with the service, you need to specify port 1.
Now consider the process of establishing a connection, transmitting and receiving data using a socket. The client uses the same QBluetoothSocketas on the server, which allows us to use the signals discussed earlier to implement handlers and methods to write data to the socket. The startClient () method establishes a connection with a device providing a service using a socket:
void MessengerClient::startClient(const QBluetoothDeviceInfo &deviceInfo) { //... socket = new QBluetoothSocket(QBluetoothServiceInfo::RfcommProtocol, this); connect(socket, &QBluetoothSocket::connected, this, &MessengerClient::socketConnected); connect(socket, &QBluetoothSocket::readyRead, this, &MessengerClient::readSocket); socket->connectToService(deviceInfo.address(), 1); } We create an instance of a socket with the RFCOMM protocol and connect its signals to the slots of our class. Then, by calling the connectToService () method, we connect to another device. It should be noted that if we used the QBluetoothServiceInfo class , which allows you to get information about the found services as instances of QBluetoothServiceInfo , then it would be enough to call the connectToService () method with one argument that accepts the service information.
The socketConnected () method is called when a connection is established via a socket, inside it we send data to the server:
void MessengerClient::socketConnected() { //... socket->write(message.toUtf8()); } It uses the same socket class as the server, so we can transfer any data as an array of bytes.
As we remember, the server code allows you to get a string, expand it and return it to us, to process the incoming message, we connected the readSocket () slot with the readyRead () signal . This slot looks like this:
void MessengerClient::readSocket() { //... QString receivedMessage = QString::fromUtf8(socket->readLine().trimmed()); emit messageReceived(receivedMessage); } Result
As a result, we have covered most of the functionality required to implement a server and a client for transferring data of any kind with between them. Also reviewed the procedure for finding devices. The material mentioned in the article is enough to realize the transfer of any data between two devices. Sample application code is available on GitHub .
Technical issues can also be discussed on the Sailfish OS Russian-speaking community channel in a Telegram or VKontakte group .
Author: Sergey Averkiev
Source: https://habr.com/ru/post/340330/
All Articles