The whole web on 60+ FPS: how a new renderer in Firefox got rid of jerks and slowdowns
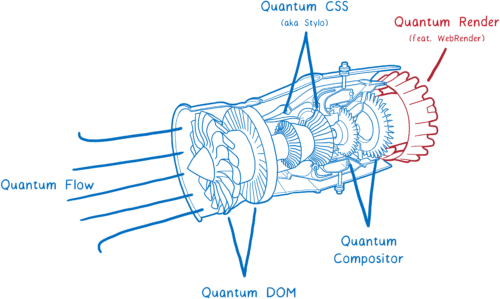
Before the release of Firefox, Quantum has less and less time. It will bring many improvements in performance, including the super-fast CSS engine , which we borrowed from Servo.
But there is another major part of the Servo technology, which has not yet become part of Firefox Quantum, but will soon be included. This is WebRender, part of the Quantum Render project.
')
WebRender is known for its exceptional speed. But the main task is not to speed up the rendering, but to make it smoother.
When developing WebRender, we set the goal for all applications to run at 60 frames per second (FPS) or better, regardless of the size of the display or the size of the animation. And it worked. Pages that puff 15 FPS in Chrome or the current Firefox fly 60 FPS when launching WebRender .
How does WebRender do this? It fundamentally changes the way the rendering engine works, making it more similar to the 3D game engine.
Let's figure out what that means. But first…
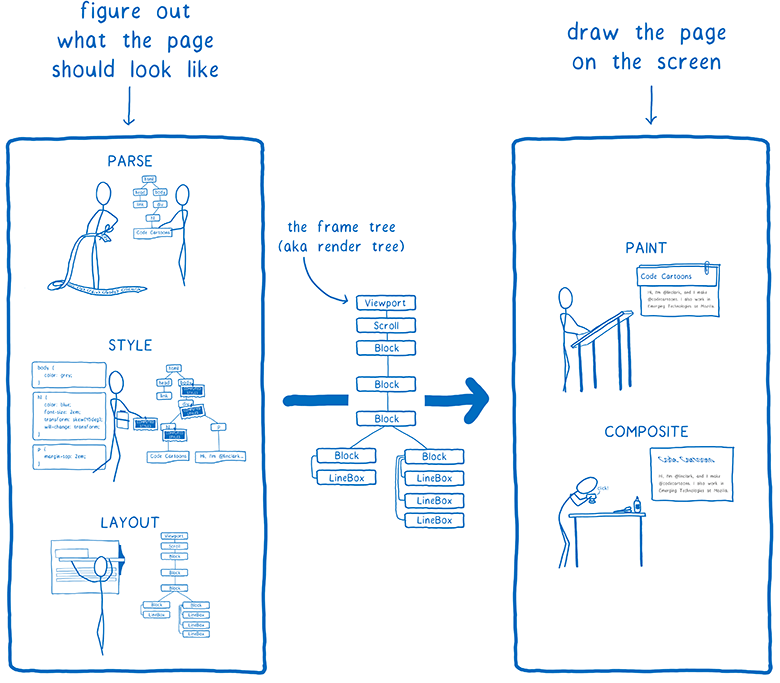
In the article on Stylo, I explained how the browser goes from parsing HTML and CSS to pixels on the screen, and how most browsers do it in five steps.
These five stages can be divided into two parts. The first of these is, in essence, a plan. To plan, the browser parses HTML and CSS, taking into account information such as the size of the viewing area, to find out exactly how each element should look like - its width, height, color, etc. The end result is what is called a “frame tree” or “render tree”.
In the second part - rendering and layout - the renderer starts working. He takes this plan and turns it into pixels on the screen.
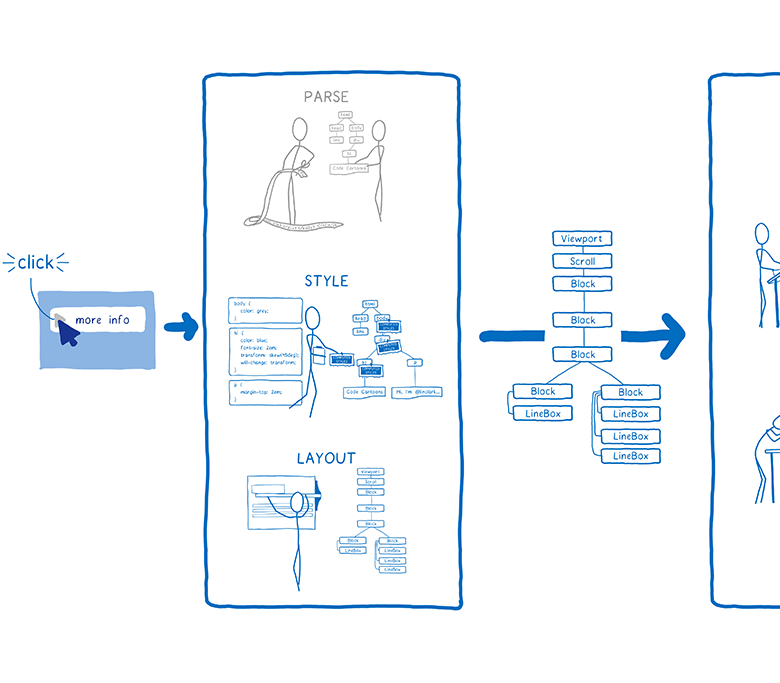
But the browser is not enough to do it only once. He has to repeat the operation again and again for the same web page. Every time something changes on a page — for example, a div opens across a switch — the browser has to go through all the steps repeatedly.
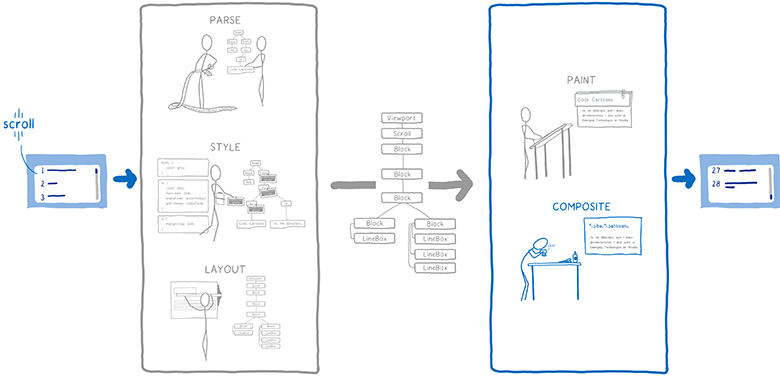
Even if nothing changes on the page — for example, you simply scroll or select text — the browser still has to perform rendering operations to draw new pixels on the screen.
To make scrolling and animation smooth, they must be updated at 60 frames per second.
You may have heard this phrase before - frames per second (FPS) - being unsure what it means. I imagine them as a flipbook. It's like a book with static pictures that you can quickly scroll through, so that creates the illusion of animation.
To make the animation in such a flipbook look smooth, you need to view 60 pages per second.

The pages in the flipbook are made of graph paper. There are many, many small squares, and each square can contain only one color.
The task of the renderer is to fill the squares in graph paper. When they are all filled, the frame is rendered.
Of course, there is no real graph in your computer. Instead, the computer has a memory area called frame buffer. Each memory address in the frame buffer is like a small square on graph paper ... it corresponds to a pixel on the screen. The browser fills each cell with numbers that correspond to the RGBA values (red, green, blue, and alpha).
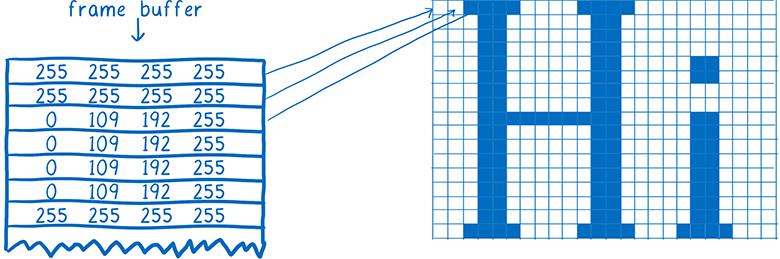
When the screen needs to be updated, it accesses this area of memory.
Most computer displays are updated 60 times per second. That is why browsers try to issue 60 frames per second. This means that the browser has only 16.67 milliseconds for all the work: analysis of CSS styles, layout, rendering - and filling all slots in the frame buffer with numbers that correspond to the colors. This time interval between two frames (16.67 ms) is called the frame budget.
You could hear people sometimes mention missing frames. A missing frame is when the system does not fit into the budget. The display attempts to get a new frame from the frame buffer before the browser has finished working on its display. In this case, the display again shows the old version of the frame.
Missed frames can be compared with a torn page from a flipbook. The animation begins to freeze and twitch, because you have lost the intermediate link from the previous page to the next.

So you need to have time to place all the pixels in the frame buffer before the display checks it again. Let's see how browsers used to cope with this and how technology has changed over time. Then we can figure out how to speed up this process.
Note. Drawing and layout is the part where the rendering engines in browsers are most different from each other. Single-platform browsers (Edge and Safari) work a bit differently than multiplatform browsers (Firefox and Chrome).
Even in the very first browsers, some optimizations were made to speed up the rendering of pages. For example, when scrolling through the page, the browser tried to move the already rendered parts of the page, and then draw the pixels in the free space.
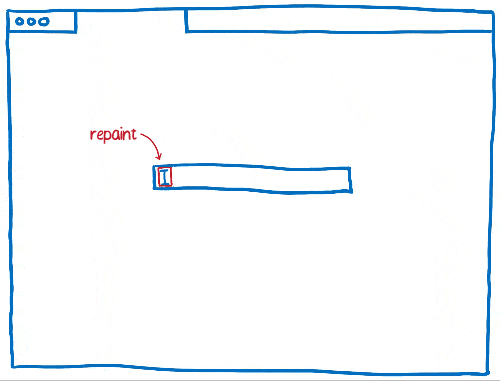
The process of calculating what has changed, and then updating only the changed elements or pixels, is called invalidation.
Over time, browsers began to use more advanced invalidation techniques, such as the invalidation of rectangles. Here, the minimum rectangle is calculated around the changed screen area, and then only the pixels inside these rectangles are updated.
Here the amount of computation is really greatly reduced if only a small number of elements change on the page ... for example, only a blinking cursor.
But it doesn’t help much if large parts of the page change. For such cases, we had to come up with new technology.
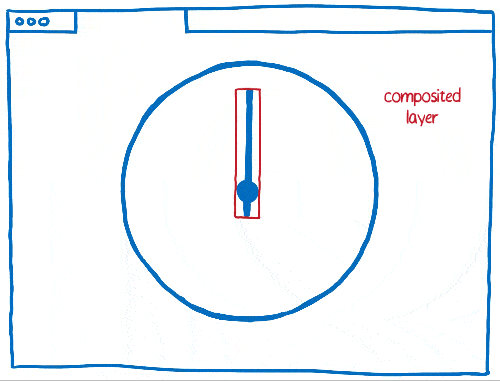
Using layers helps a lot when changing large parts of the page ... at least in some cases.
Layers in browsers look like layers in Photoshop or layers of thin, smooth paper that used to be used to draw cartoons. In general, the various elements of the page you draw on different layers. Then place these layers on top of each other.
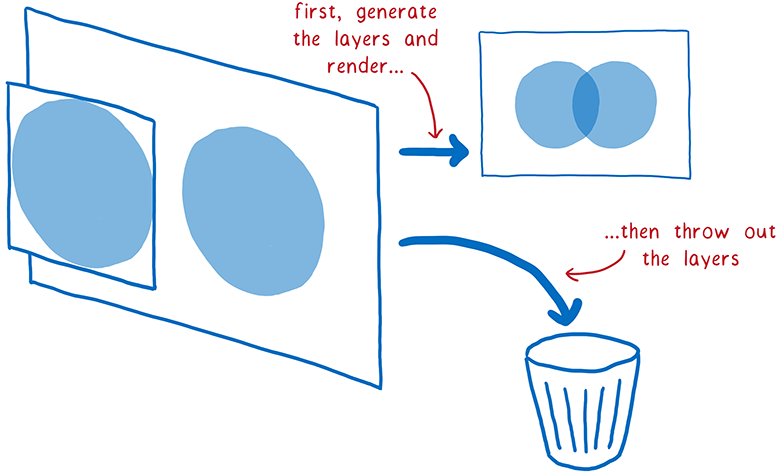
For a long time, browsers used layers, but they did not always accelerate rendering. At first, they were used simply to ensure correct drawing of elements. They implemented the so-called “positioning context” (stacking context).
For example, if you have a translucent element on a page, then it should be in its own positional context. This means that it has its own layer so that it is possible to mix its color with the color of the underlying element. These layers were discarded as soon as the frame was rendered. The next frame had to draw the layers again.
But part of the elements on these layers does not change from frame to frame. For example, imagine a regular animation. The background does not change, even if the characters move in the foreground. It’s much more efficient to save the background layer and just reuse it.
This is exactly what browsers did. They began to keep the layers, updating only the changed. And in some cases, the layers did not change at all. They need only be slightly moved - for example, if the animation moves around the screen or in the case of scrolling an item.
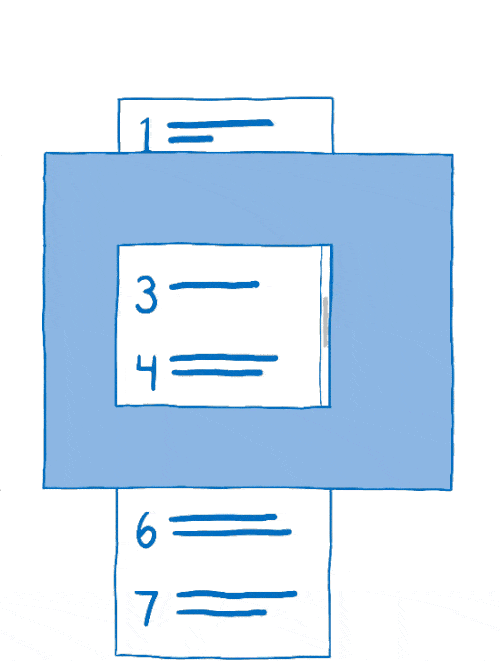
This process of co-location of layers is called a layout. Linker works with the following objects:
First, the layout copies the background to the target bitmap.
Then he must figure out what part of the scrolling content needs to be shown. It will copy this part on top of the target bitmap.
This reduces the amount of rendering in the main thread. But the main thread is still spending a lot of time on the layout. And there are many processes that fight for resources in the main thread.
I gave this example earlier: the main thread is similar to the full-stack developer. He is responsible for DOM, layout and JavaScript. And he is also responsible for the drawing and layout.
Every millisecond spent in the main thread for drawing and layout is the time taken from JavaScript or layout.
But we have other hardware that sits here and does almost nothing. And it is specially created for graphic processing. We are talking about the GPU, which games from the 90s are used for fast frame rendering. And since then, graphics processors have become bigger and more powerful.
So the browser developers began to transfer the work of the GPU.
Theoretically, the graphics accelerator can transfer two tasks:
Drawing can be difficult to transfer to the GPU. So usually multiplatform browsers leave this task on the CPU.
However, the GPU can do the layout very quickly, and this task is easy to hang onto it.
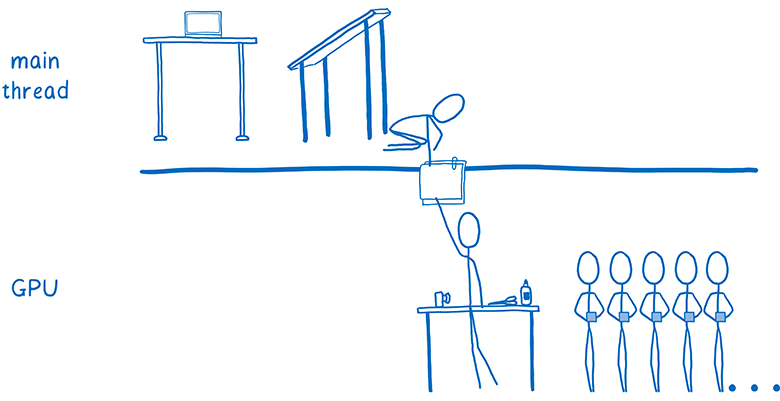
Some browsers force parallelism even more by adding linker flow to the CPU. He becomes the manager of all the work on the layout, which is performed on the GPU. This means that if the main thread is busy with something (for example, it does JavaScript), the linker thread is still active and does work that is visible to the user, such as scrolling through the content.
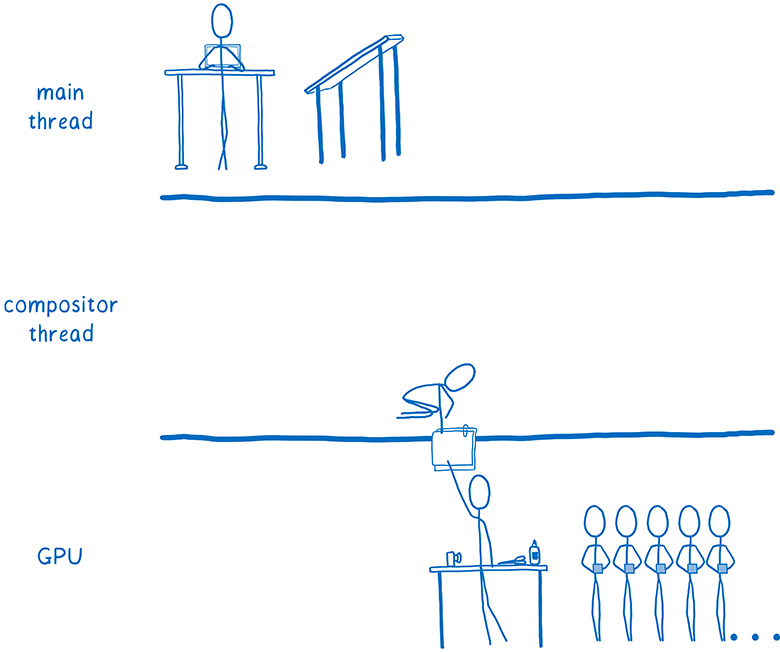
That is, all the work on the layout leaves the main thread. However, there still remains a lot of things. Every time you need to redraw a layer, it makes the main thread, and then passes the layer to the GPU.
Some browsers have moved and rendering to an additional stream (we are also working on this in Firefox). But it will be faster to transfer this last piece of calculations - the drawing - immediately to the GPU.
So, browsers started transferring to the graphics processor and rendering too.

This transition is still ongoing. Some browsers perform all rendering on the GPU, while in others this is only possible on certain platforms (for example, only on Windows or only on mobile devices).
Drawing on the GPU led to several consequences. It allowed the CPU to devote all the time to tasks like JavaScript and layout. In addition, the GPU draws pixels much faster than the CPU, so the whole process of drawing is accelerated. The amount of data that needs to be transferred from the CPU to the GPU has also decreased.
But maintaining such a separation between rendering and layout still requires certain expenses, even if both processes are performed on the GPU. This separation also limits you in the optimization options for accelerating the work of the GPU.
This is where WebRender comes in. It fundamentally changes the rendering method, leveling the distinction between drawing and layout. This allows you to adjust the performance of the renderer to the requirements of the modern web and prepare it for situations that will appear in the future.
In other words, we wanted to not only speed up the rendering of frames ... we wanted them to be rendered more stably, without jerks and slowdowns. And even if you need to draw a lot of pixels, like in WebVR 4K virtual reality helmets, we still want smooth playback.
The above optimization has helped in some cases to speed up the rendering. When a minimum of elements changes on a page — for example, only flashing courses — the browser does the minimum amount of work possible.
After splitting pages into layers, the number of such “ideal” scenarios increased. If you can just draw a few layers and then just move them relative to each other, then the “drawing + layout” architecture works fine.
But the layers have flaws. They take up a lot of memory, and sometimes can slow down rendering. Browsers have to combine layers where it makes sense ... but it's difficult to determine exactly where it makes sense and where it doesn't.
So, if there are a lot of different objects moving on the page, you will have to create a bunch of layers. Layers take too much memory, and transferring to a linker takes too much time.

In other cases, it turns out one layer where there should be several. This single layer will be continuously redrawn and transferred to the linker, which then assembles it without changing anything.
That is, the drawing effort is removed: each pixel is processed twice without any need. Faster would be just to directly render the page, bypassing the layout stage.

There are many cases in which layers are simply useless. For example, if you have an animated background, then the whole layer will still have to be redrawn. These layers only help with a small amount of CSS properties.
Even if the majority of frames fit into the optimal scenario - that is, they take only a small part of the frame budget - the movement of objects can still remain intermittent. In order to perceive jerks and brakes on the eye, it is enough to lose a whole pair of frames that fit into the worst scenario.

These scenarios are called performance cliffs. The application works as if it is normal, until it encounters one of these worst scenarios (such as an animated background) - and the frame rate suddenly drops to the limit.
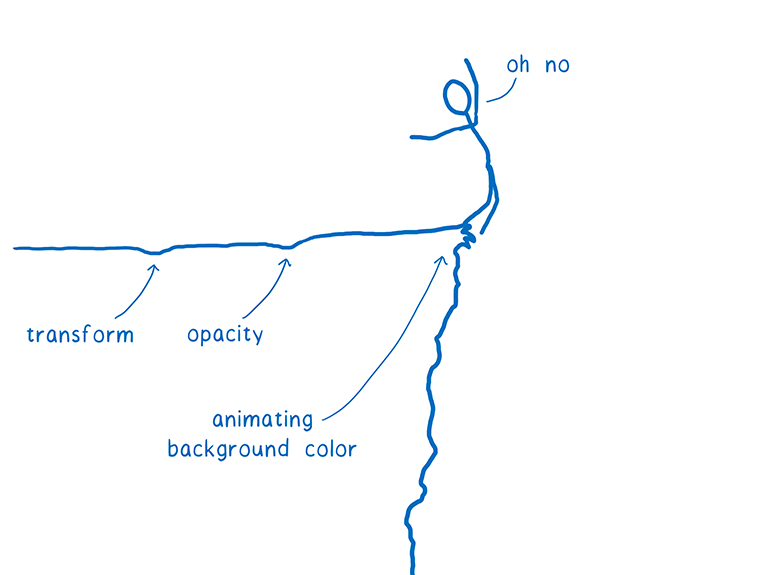
But you can get rid of such cliffs.
How to do it? Let's follow the example of 3D game engines.
What if we stop guessing which layers we need? What if you remove this intermediate step between drawing and layout and just go back to drawing each pixel in each frame?
It may seem a ridiculous idea, but in some places such a system is used. In modern video games, every pixel is redrawn, and they keep the level of 60 frames per second more reliably than browsers. They do this in an unusual way ... instead of creating these rectangles for invalidation and layers that minimize the area to be redrawn, the entire screen is simply updated.
Will rendering web pages in this way be much slower?
If we draw on the CPU, then yes. But the GPUs are specifically designed for this kind of work.
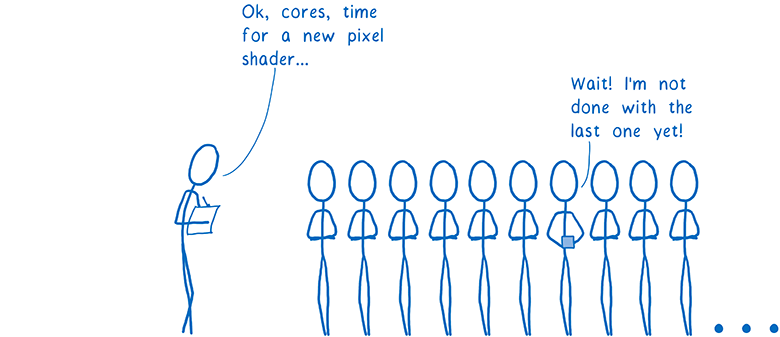
GPUs are built with maximum concurrency. I talked about concurrency in my latest article about Stylo . Thanks to parallel processing, the computer performs several tasks simultaneously. The number of simultaneously performed tasks is limited by the number of cores in the processor.
The CPU usually has from 2 to 8 cores, and in the GPU there are at least several hundred, and often more than 1000 cores.
However, these kernels work a little differently. They cannot function completely independently, like the CPU cores. Instead, they usually perform some kind of joint task, running one instruction on different pieces of data.
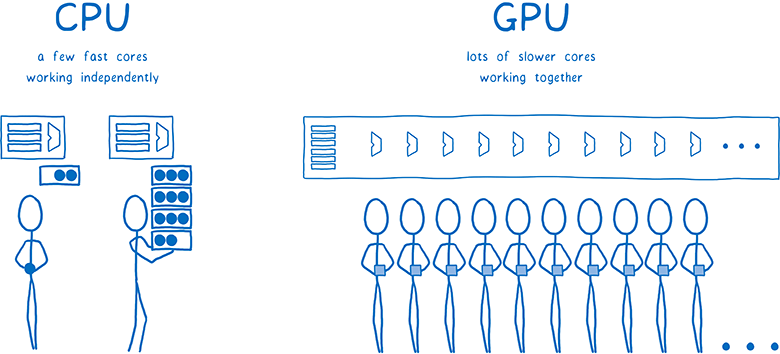
This is exactly what we need when filling the pixels. All pixels can be distributed to different cores. Since the GPU works with hundreds of pixels at the same time, it performs much faster filling of pixels than the CPU ... but only if all the cores are loaded with work.
Since the cores have to work on the same task at the same time, the GPU has a rather limited set of steps to perform, and their program interfaces are very limited. Let's see how it works.
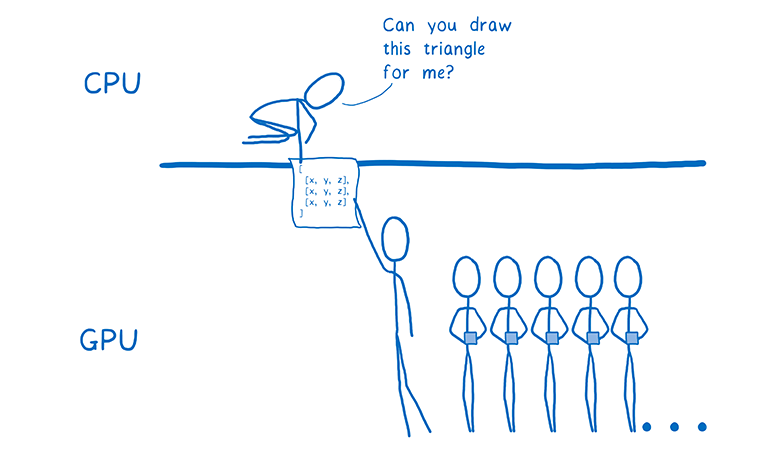
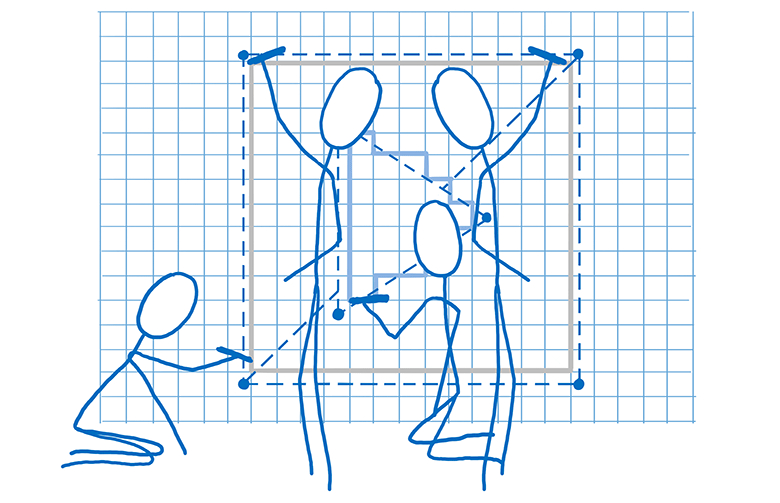
The first step is to tell the GPU what to draw. This means giving them the forms of objects and instructions for filling them out.
To do this, break the whole pattern into simple shapes (usually triangles). These forms are in 3D space, so some of them may obscure others. Then you take the vertices of all the triangles - and add their x, y, z coordinates to the array.
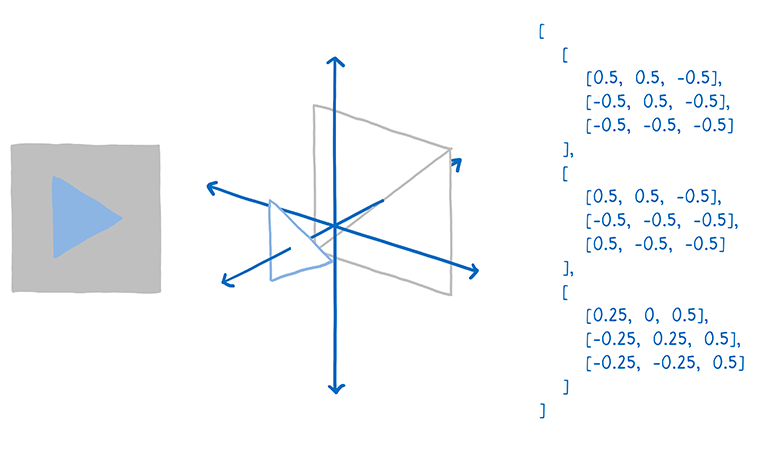
Then send the GPU command to draw these forms (draw call).
From this moment on, the GPU starts working. All cores will perform the same task at the same time. They will do the following:
The last step is done differently. To issue specific instructions, a special program called the “pixel shader” works with the GPU. Coloring pixels is one of the few elements of GPU functionality that you can program.
Some pixel shaders are very simple. For example, if the entire shape is filled with the same color, then the shader should simply assign this color to each pixel of the shape.
But there are more complex shaders, for example, in the background image. Here you have to find out which parts of the image correspond to which pixel. This can be done in the same way that the artist scales the image, increasing or decreasing it ... put a grid with squares for each pixel on top of the image. Then take color swatches inside each square and determine the final pixel color. This is called texture mapping, because here the image (called texture) is superimposed on the pixels.

The GPU will access the pixel shader for each pixel. Different cores work in parallel on different pixels, but they all need the same pixel shader. When you instruct the GPU to draw the shapes of the objects, you simultaneously specify which pixel shader to use.
For almost all web pages, different parts of the page require different pixel shaders.
Since the shader works for all pixels specified in the draw command, you usually need to break these commands into several groups. They are called packages. In order to maximally load all the cores, you need to create a small number of packages with a large number of figures in each of them.

This is how the GPU distributes work across hundreds or thousands of cores. All because of the exceptional parallelism when rendering each frame. But even with such exceptional parallelism, a lot of work still remains. By setting tasks need to be approached wisely to achieve decent performance. Here comes the WebRender case ...
Let's remember what steps the browser is taking to render the page. Here there are two changes.

A display list is a set of high-level drawing instructions. It indicates what needs to be drawn without using specific instructions for a particular graphics API.
As soon as something new needs to be drawn, the main thread passes the display list to RenderBackend - this is the WebRender code running on the CPU.
The task of RenderBackend is to take a list of high-level drawing instructions and convert it into commands for the GPU, which are combined into packages for faster execution.
Then RenderBackend passes these packets to the linker stream, which then passes them to the GPU.
RenderBackend wants the draw commands to run on the GPU at maximum speed. To do this, use several different techniques.
The best way to save time is not to work at all.
First, RenderBackend shortens the display list. It determines which elements of the list will actually be displayed on the screen. To do this, it looks how far from the window in the scroll list is the item.
If the figure falls within the window, it is included in the display list. And if no part of the figure falls here, then it is excluded from the list. This process is called early culling.
Now our tree contains only the necessary forms. This tree is organized in the positional contexts that we talked about earlier.
Effects like CSS filters and positional contexts complicate things a little. For example, you have an element with a transparency of 0.5, and it has a child element. You may think that all children are also transparent ... but in reality the whole group is transparent.

Because of this, you must first display the group on the texture, with full transparency of each square. Then, placing it in the parent object, you can change the transparency of the entire texture.
Positional contexts can be nested inside each other ... and the parent object can belong to another positional context. That is, it will need to be drawn on another intermediate texture, and so on.
Allocating space for these textures is expensive. We would like to maximally accommodate all the objects on the same intermediate structure.
To help the GPU cope with the task, create a tree of tasks for rendering. It indicates which textures need to be created before other textures. Any textures that are independent of others can be created in the first pass, that is, they can then be combined into one intermediate texture.
So in the above example with translucent squares, we would paint one corner of the square with the first pass. (In fact, everything is a little more complicated, but the essence is this).
The second pass can duplicate this angle for the entire square and paint over it. Then render the group of opaque squares.
Finally, it remains only to change the transparency of the texture and place it in the appropriate place of the final texture that will be displayed on the screen.
Having built a task tree for rendering, we find out the minimum possible number of rendering objects before displaying on the screen. This is good, because I mentioned that the allocation of space for these textures is expensive.
The task tree also helps package tasks.
As we have said, you need to create a small number of packages with a large number of figures in each of them.
Careful packet formation allows for much faster rendering. You need to squeeze as many objects as possible into the package. Such a requirement is made for several reasons.
First, whenever the CPU issues a drawing command to the GPU, the CPU always has many other tasks. He needs to take care of things such as configuring the GPU, loading the shader program and checking for various hardware bugs. All this work accumulates, and while the CPU does it, the GPU can stand idle.
Secondly, there are certain costs of state change. Let's say between packages you need to change the state of the shader. On an ordinary GPU, you will have to wait until all cores have completed the task from the current shader. This is called draining the pipeline. While the pipeline is not cleared, the remaining cores will be put on standby.
Because of this, it is advisable to pack the bag as tightly as possible.For an ordinary desktop PC, it is advisable to leave less than 100 drawing commands for each frame, and it would be nice to stuff thousands of vertices into each command. So the maximum from parallelism is squeezed out.
We look at each pass in the task tree for rendering and on which of the tasks to group into one package.
At this time, each type of primitive requires a different shader. For example, there is a border shader, text shader and image shader.

We believe that it is possible to combine many of these shaders, which will make it possible to create even larger packages, although they are well grouped now as well.
Tasks are almost ready to be sent to the GPU. But there is still a little bit of work to get rid of.
Most web pages contain many overlapping shapes. For example, a text field is on top of a div (with a background), which is on top of a body (with a different background).
When determining the color of a pixel, the GPU could calculate the color of the pixel in each shape. But only the top layer will be shown. This is called overdraw, a waste of GPU time.
So you can first render the top layer. When it is the turn to render a pixel for the next figure, we check if this pixel already has a value. If there is, then the extra work is not performed.
True, there is a small problem. If the figure is translucent, then you need to mix the colors of the two figures. And so that everything looks right, rendering should be carried out from the bottom up.
So we divide the work into two passes. First pass on opacity. Render from top to bottom all opaque shapes. We skip rendering all pixels that are closed by others.
Then proceed to the translucent shapes. They are drawn from bottom to top. If the translucent pixel is on top of the opaque, then their colors are mixed. If it is behind the opaque, it is not calculated.
The division into two passes — by opacity and alpha channel — with the further omission of calculations of unnecessary pixels is called Z-culling.
Although this may seem like a simple optimization, here we get a big profit. On a typical web page, the number of pixels to process is significantly reduced. We are now looking for ways to move even more tasks into the opacity passage.
At the moment we have prepared the frame. We did our best to remove the extra work.
The graphics processor is ready to set up and render packages.
The CPU still does some of the rendering work. For example, we still render characters on a CPU (they are called glyphs) in text blocks. It is possible to do this on the GPU, but it is difficult to achieve pixel-by-pixel matching with the glyphs that the computer renders in other applications. So people can get confused when rendering fonts on the GPU. We are experimenting with moving the rendering of glyphs to the GPU as part of the Pathfinder project .
But now these things are drawn into bitmaps on the CPU. Then they are loaded into the texture cache on the GPU. This cache is saved from frame to frame, because usually there is no change in it.
Even though this rendering remains on the CPU, there is still the potential to speed it up. For example, when drawing characters of a font, we distribute various characters across all cores. This is done using the same technique that Stylo uses to parallelize the calculation of styles ... interception of work .
In 2018, we plan to introduce WebRender into Firefox as part of Quantum Render, a few releases after the initial release of Firefox Quantum. After that, the existing web pages will work smoother. And Firefox will be ready for a new generation of high-resolution 4K displays, since rendering performance is extremely important as the number of pixels on the screen increases.
But WebRender is not only useful for Firefox. It is also necessary in our work on WebVR, where you need to render different frames for each eye at a speed of 90 FPS at 4K resolution.
The first version of WebRender is already available in Firefox, if you manually activate the corresponding flag. The integration work continues, so the performance is not as high as it will be in the final release. If you want to monitor the development of WebRender, watch the GitHub repository or the Firefox Nightly twitter , where weekly news is published on the entire Quantum Render project.
About the author: Lin Clark - engineer of the Mozilla Developer Relations group. She works with JavaScript, WebAssembly, Rust and Servo and loves to draw programmer pictures.
But there is another major part of the Servo technology, which has not yet become part of Firefox Quantum, but will soon be included. This is WebRender, part of the Quantum Render project.
')
WebRender is known for its exceptional speed. But the main task is not to speed up the rendering, but to make it smoother.
When developing WebRender, we set the goal for all applications to run at 60 frames per second (FPS) or better, regardless of the size of the display or the size of the animation. And it worked. Pages that puff 15 FPS in Chrome or the current Firefox fly 60 FPS when launching WebRender .
How does WebRender do this? It fundamentally changes the way the rendering engine works, making it more similar to the 3D game engine.
Let's figure out what that means. But first…
What does the renderer do?
In the article on Stylo, I explained how the browser goes from parsing HTML and CSS to pixels on the screen, and how most browsers do it in five steps.
These five stages can be divided into two parts. The first of these is, in essence, a plan. To plan, the browser parses HTML and CSS, taking into account information such as the size of the viewing area, to find out exactly how each element should look like - its width, height, color, etc. The end result is what is called a “frame tree” or “render tree”.
In the second part - rendering and layout - the renderer starts working. He takes this plan and turns it into pixels on the screen.
But the browser is not enough to do it only once. He has to repeat the operation again and again for the same web page. Every time something changes on a page — for example, a div opens across a switch — the browser has to go through all the steps repeatedly.
Even if nothing changes on the page — for example, you simply scroll or select text — the browser still has to perform rendering operations to draw new pixels on the screen.
To make scrolling and animation smooth, they must be updated at 60 frames per second.
You may have heard this phrase before - frames per second (FPS) - being unsure what it means. I imagine them as a flipbook. It's like a book with static pictures that you can quickly scroll through, so that creates the illusion of animation.
To make the animation in such a flipbook look smooth, you need to view 60 pages per second.
The pages in the flipbook are made of graph paper. There are many, many small squares, and each square can contain only one color.
The task of the renderer is to fill the squares in graph paper. When they are all filled, the frame is rendered.
Of course, there is no real graph in your computer. Instead, the computer has a memory area called frame buffer. Each memory address in the frame buffer is like a small square on graph paper ... it corresponds to a pixel on the screen. The browser fills each cell with numbers that correspond to the RGBA values (red, green, blue, and alpha).
When the screen needs to be updated, it accesses this area of memory.
Most computer displays are updated 60 times per second. That is why browsers try to issue 60 frames per second. This means that the browser has only 16.67 milliseconds for all the work: analysis of CSS styles, layout, rendering - and filling all slots in the frame buffer with numbers that correspond to the colors. This time interval between two frames (16.67 ms) is called the frame budget.
You could hear people sometimes mention missing frames. A missing frame is when the system does not fit into the budget. The display attempts to get a new frame from the frame buffer before the browser has finished working on its display. In this case, the display again shows the old version of the frame.
Missed frames can be compared with a torn page from a flipbook. The animation begins to freeze and twitch, because you have lost the intermediate link from the previous page to the next.
So you need to have time to place all the pixels in the frame buffer before the display checks it again. Let's see how browsers used to cope with this and how technology has changed over time. Then we can figure out how to speed up this process.
Brief history of drawing and layout
Note. Drawing and layout is the part where the rendering engines in browsers are most different from each other. Single-platform browsers (Edge and Safari) work a bit differently than multiplatform browsers (Firefox and Chrome).
Even in the very first browsers, some optimizations were made to speed up the rendering of pages. For example, when scrolling through the page, the browser tried to move the already rendered parts of the page, and then draw the pixels in the free space.
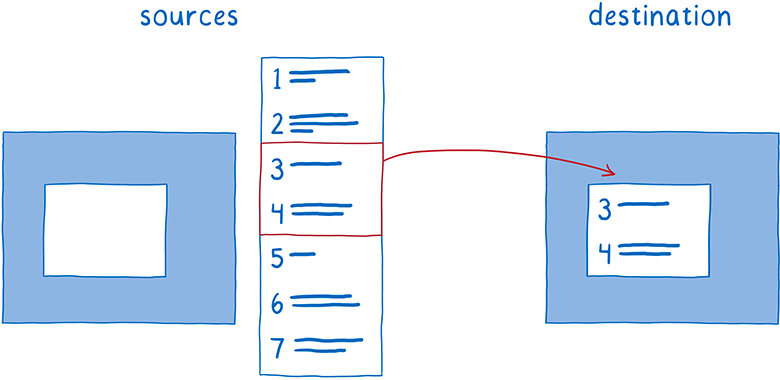
The process of calculating what has changed, and then updating only the changed elements or pixels, is called invalidation.
Over time, browsers began to use more advanced invalidation techniques, such as the invalidation of rectangles. Here, the minimum rectangle is calculated around the changed screen area, and then only the pixels inside these rectangles are updated.
Here the amount of computation is really greatly reduced if only a small number of elements change on the page ... for example, only a blinking cursor.
But it doesn’t help much if large parts of the page change. For such cases, we had to come up with new technology.
Layer appearance and layout
Using layers helps a lot when changing large parts of the page ... at least in some cases.
Layers in browsers look like layers in Photoshop or layers of thin, smooth paper that used to be used to draw cartoons. In general, the various elements of the page you draw on different layers. Then place these layers on top of each other.
For a long time, browsers used layers, but they did not always accelerate rendering. At first, they were used simply to ensure correct drawing of elements. They implemented the so-called “positioning context” (stacking context).
For example, if you have a translucent element on a page, then it should be in its own positional context. This means that it has its own layer so that it is possible to mix its color with the color of the underlying element. These layers were discarded as soon as the frame was rendered. The next frame had to draw the layers again.
But part of the elements on these layers does not change from frame to frame. For example, imagine a regular animation. The background does not change, even if the characters move in the foreground. It’s much more efficient to save the background layer and just reuse it.
This is exactly what browsers did. They began to keep the layers, updating only the changed. And in some cases, the layers did not change at all. They need only be slightly moved - for example, if the animation moves around the screen or in the case of scrolling an item.
This process of co-location of layers is called a layout. Linker works with the following objects:
- source raster images: background (including an empty window where content should scroll) and the scrolling content itself;
- The target bitmap is what is displayed on the screen.
First, the layout copies the background to the target bitmap.
Then he must figure out what part of the scrolling content needs to be shown. It will copy this part on top of the target bitmap.
This reduces the amount of rendering in the main thread. But the main thread is still spending a lot of time on the layout. And there are many processes that fight for resources in the main thread.
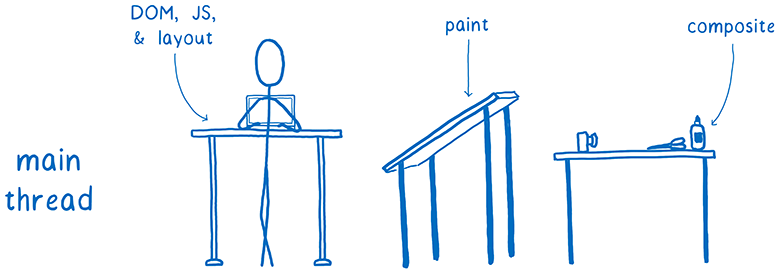
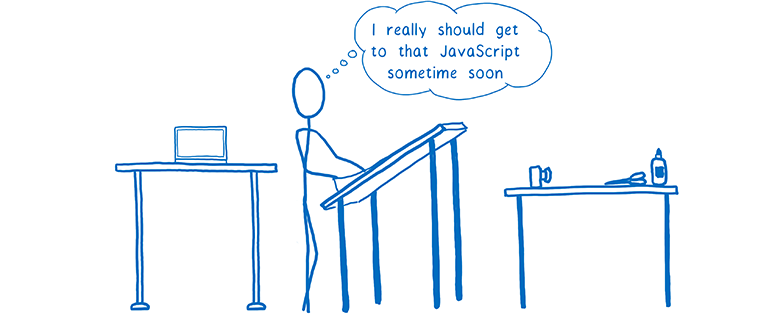
I gave this example earlier: the main thread is similar to the full-stack developer. He is responsible for DOM, layout and JavaScript. And he is also responsible for the drawing and layout.
Every millisecond spent in the main thread for drawing and layout is the time taken from JavaScript or layout.
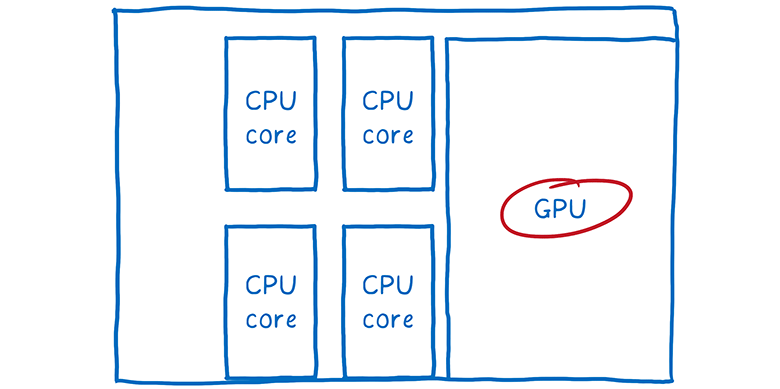
But we have other hardware that sits here and does almost nothing. And it is specially created for graphic processing. We are talking about the GPU, which games from the 90s are used for fast frame rendering. And since then, graphics processors have become bigger and more powerful.
Hardware Accelerated Layout
So the browser developers began to transfer the work of the GPU.
Theoretically, the graphics accelerator can transfer two tasks:
- Drawing layers.
- Layering layers with each other.
Drawing can be difficult to transfer to the GPU. So usually multiplatform browsers leave this task on the CPU.
However, the GPU can do the layout very quickly, and this task is easy to hang onto it.
Some browsers force parallelism even more by adding linker flow to the CPU. He becomes the manager of all the work on the layout, which is performed on the GPU. This means that if the main thread is busy with something (for example, it does JavaScript), the linker thread is still active and does work that is visible to the user, such as scrolling through the content.
That is, all the work on the layout leaves the main thread. However, there still remains a lot of things. Every time you need to redraw a layer, it makes the main thread, and then passes the layer to the GPU.
Some browsers have moved and rendering to an additional stream (we are also working on this in Firefox). But it will be faster to transfer this last piece of calculations - the drawing - immediately to the GPU.
Hardware accelerated rendering
So, browsers started transferring to the graphics processor and rendering too.
This transition is still ongoing. Some browsers perform all rendering on the GPU, while in others this is only possible on certain platforms (for example, only on Windows or only on mobile devices).
Drawing on the GPU led to several consequences. It allowed the CPU to devote all the time to tasks like JavaScript and layout. In addition, the GPU draws pixels much faster than the CPU, so the whole process of drawing is accelerated. The amount of data that needs to be transferred from the CPU to the GPU has also decreased.
But maintaining such a separation between rendering and layout still requires certain expenses, even if both processes are performed on the GPU. This separation also limits you in the optimization options for accelerating the work of the GPU.
This is where WebRender comes in. It fundamentally changes the rendering method, leveling the distinction between drawing and layout. This allows you to adjust the performance of the renderer to the requirements of the modern web and prepare it for situations that will appear in the future.
In other words, we wanted to not only speed up the rendering of frames ... we wanted them to be rendered more stably, without jerks and slowdowns. And even if you need to draw a lot of pixels, like in WebVR 4K virtual reality helmets, we still want smooth playback.
Why is animation so slow in modern browsers?
The above optimization has helped in some cases to speed up the rendering. When a minimum of elements changes on a page — for example, only flashing courses — the browser does the minimum amount of work possible.
After splitting pages into layers, the number of such “ideal” scenarios increased. If you can just draw a few layers and then just move them relative to each other, then the “drawing + layout” architecture works fine.
But the layers have flaws. They take up a lot of memory, and sometimes can slow down rendering. Browsers have to combine layers where it makes sense ... but it's difficult to determine exactly where it makes sense and where it doesn't.
So, if there are a lot of different objects moving on the page, you will have to create a bunch of layers. Layers take too much memory, and transferring to a linker takes too much time.
In other cases, it turns out one layer where there should be several. This single layer will be continuously redrawn and transferred to the linker, which then assembles it without changing anything.
That is, the drawing effort is removed: each pixel is processed twice without any need. Faster would be just to directly render the page, bypassing the layout stage.
There are many cases in which layers are simply useless. For example, if you have an animated background, then the whole layer will still have to be redrawn. These layers only help with a small amount of CSS properties.
Even if the majority of frames fit into the optimal scenario - that is, they take only a small part of the frame budget - the movement of objects can still remain intermittent. In order to perceive jerks and brakes on the eye, it is enough to lose a whole pair of frames that fit into the worst scenario.
These scenarios are called performance cliffs. The application works as if it is normal, until it encounters one of these worst scenarios (such as an animated background) - and the frame rate suddenly drops to the limit.
But you can get rid of such cliffs.
How to do it? Let's follow the example of 3D game engines.
Using the GPU as a game engine
What if we stop guessing which layers we need? What if you remove this intermediate step between drawing and layout and just go back to drawing each pixel in each frame?
It may seem a ridiculous idea, but in some places such a system is used. In modern video games, every pixel is redrawn, and they keep the level of 60 frames per second more reliably than browsers. They do this in an unusual way ... instead of creating these rectangles for invalidation and layers that minimize the area to be redrawn, the entire screen is simply updated.
Will rendering web pages in this way be much slower?
If we draw on the CPU, then yes. But the GPUs are specifically designed for this kind of work.
GPUs are built with maximum concurrency. I talked about concurrency in my latest article about Stylo . Thanks to parallel processing, the computer performs several tasks simultaneously. The number of simultaneously performed tasks is limited by the number of cores in the processor.
The CPU usually has from 2 to 8 cores, and in the GPU there are at least several hundred, and often more than 1000 cores.
However, these kernels work a little differently. They cannot function completely independently, like the CPU cores. Instead, they usually perform some kind of joint task, running one instruction on different pieces of data.
This is exactly what we need when filling the pixels. All pixels can be distributed to different cores. Since the GPU works with hundreds of pixels at the same time, it performs much faster filling of pixels than the CPU ... but only if all the cores are loaded with work.
Since the cores have to work on the same task at the same time, the GPU has a rather limited set of steps to perform, and their program interfaces are very limited. Let's see how it works.
The first step is to tell the GPU what to draw. This means giving them the forms of objects and instructions for filling them out.
To do this, break the whole pattern into simple shapes (usually triangles). These forms are in 3D space, so some of them may obscure others. Then you take the vertices of all the triangles - and add their x, y, z coordinates to the array.
Then send the GPU command to draw these forms (draw call).
From this moment on, the GPU starts working. All cores will perform the same task at the same time. They will do the following:
- Determine the corners of all shapes. This is called vertex shading.
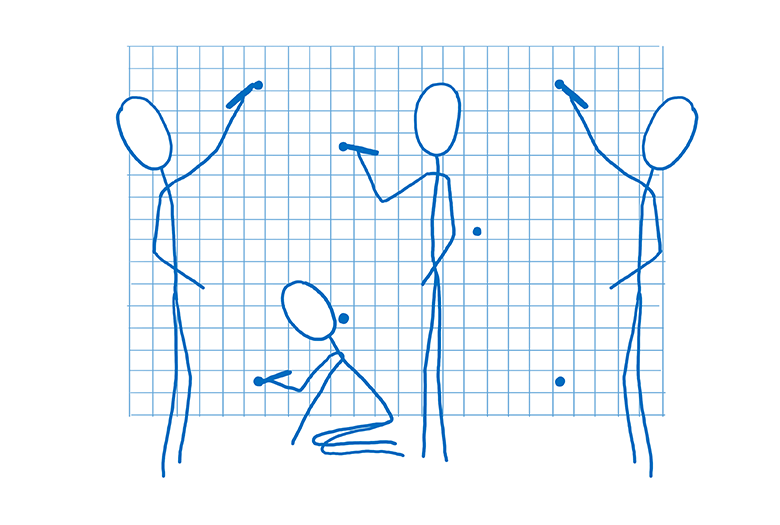
- Set the lines that connect the vertices. Now you can determine which pixels the shapes include. This is called rasterization.
- When we know which pixels belong to each shape, we can go through each pixel and assign a color to it. This is called pixel shading.
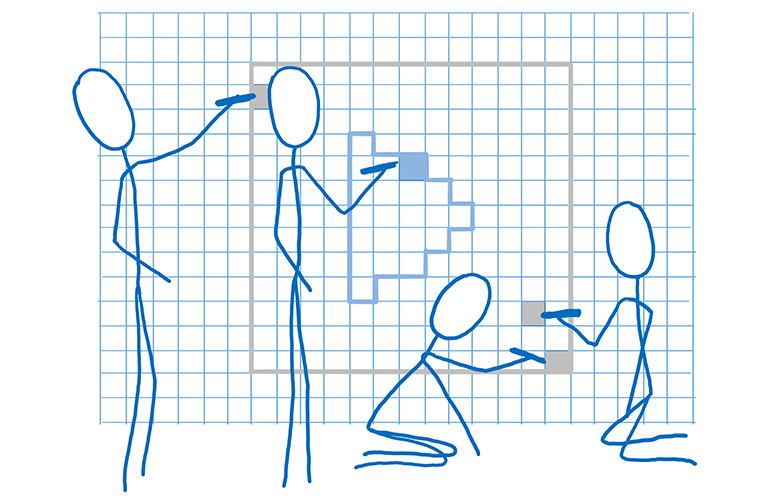
The last step is done differently. To issue specific instructions, a special program called the “pixel shader” works with the GPU. Coloring pixels is one of the few elements of GPU functionality that you can program.
Some pixel shaders are very simple. For example, if the entire shape is filled with the same color, then the shader should simply assign this color to each pixel of the shape.
But there are more complex shaders, for example, in the background image. Here you have to find out which parts of the image correspond to which pixel. This can be done in the same way that the artist scales the image, increasing or decreasing it ... put a grid with squares for each pixel on top of the image. Then take color swatches inside each square and determine the final pixel color. This is called texture mapping, because here the image (called texture) is superimposed on the pixels.
The GPU will access the pixel shader for each pixel. Different cores work in parallel on different pixels, but they all need the same pixel shader. When you instruct the GPU to draw the shapes of the objects, you simultaneously specify which pixel shader to use.
For almost all web pages, different parts of the page require different pixel shaders.
Since the shader works for all pixels specified in the draw command, you usually need to break these commands into several groups. They are called packages. In order to maximally load all the cores, you need to create a small number of packages with a large number of figures in each of them.
This is how the GPU distributes work across hundreds or thousands of cores. All because of the exceptional parallelism when rendering each frame. But even with such exceptional parallelism, a lot of work still remains. By setting tasks need to be approached wisely to achieve decent performance. Here comes the WebRender case ...
How WebRender works with the GPU
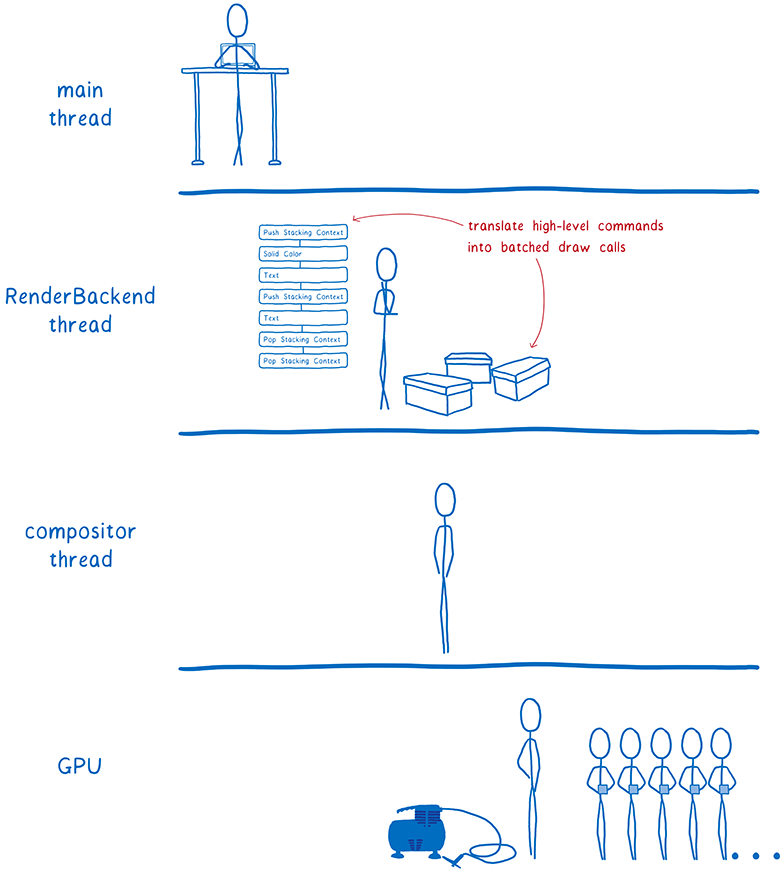
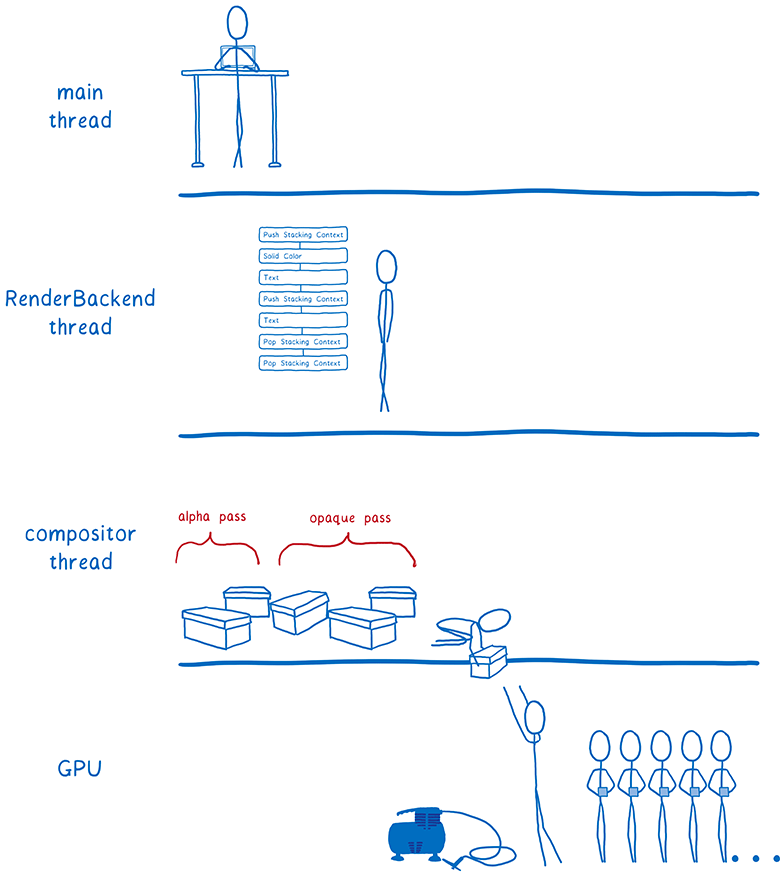
Let's remember what steps the browser is taking to render the page. Here there are two changes.
- There is no longer a separation between drawing and layout ... both processes are performed in one stage. The GPU does them simultaneously, guided by the commands received from the graphics API.
- Layout now gives us a different data structure for rendering. Previously, it was something called a frame tree (or a Chrome visualization tree). And now it passes the display list.
A display list is a set of high-level drawing instructions. It indicates what needs to be drawn without using specific instructions for a particular graphics API.
As soon as something new needs to be drawn, the main thread passes the display list to RenderBackend - this is the WebRender code running on the CPU.
The task of RenderBackend is to take a list of high-level drawing instructions and convert it into commands for the GPU, which are combined into packages for faster execution.
Then RenderBackend passes these packets to the linker stream, which then passes them to the GPU.
RenderBackend wants the draw commands to run on the GPU at maximum speed. To do this, use several different techniques.
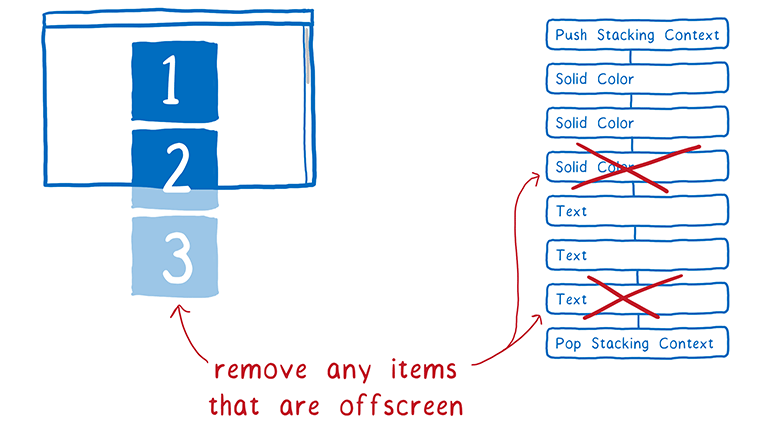
Removing unnecessary pieces from the list (early culling)
The best way to save time is not to work at all.
First, RenderBackend shortens the display list. It determines which elements of the list will actually be displayed on the screen. To do this, it looks how far from the window in the scroll list is the item.
If the figure falls within the window, it is included in the display list. And if no part of the figure falls here, then it is excluded from the list. This process is called early culling.
Minimizing the number of intermediate structures (task tree for rendering)
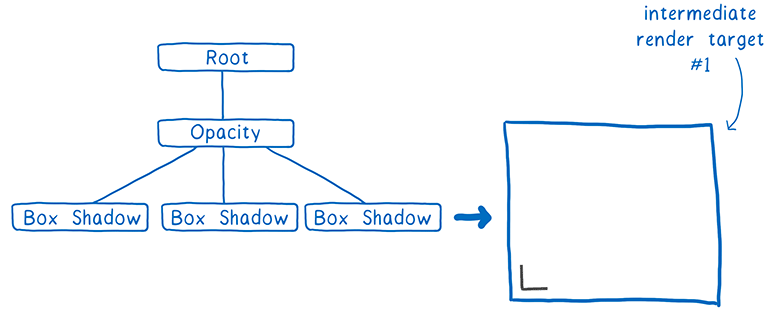
Now our tree contains only the necessary forms. This tree is organized in the positional contexts that we talked about earlier.
Effects like CSS filters and positional contexts complicate things a little. For example, you have an element with a transparency of 0.5, and it has a child element. You may think that all children are also transparent ... but in reality the whole group is transparent.
Because of this, you must first display the group on the texture, with full transparency of each square. Then, placing it in the parent object, you can change the transparency of the entire texture.
Positional contexts can be nested inside each other ... and the parent object can belong to another positional context. That is, it will need to be drawn on another intermediate texture, and so on.
Allocating space for these textures is expensive. We would like to maximally accommodate all the objects on the same intermediate structure.
To help the GPU cope with the task, create a tree of tasks for rendering. It indicates which textures need to be created before other textures. Any textures that are independent of others can be created in the first pass, that is, they can then be combined into one intermediate texture.
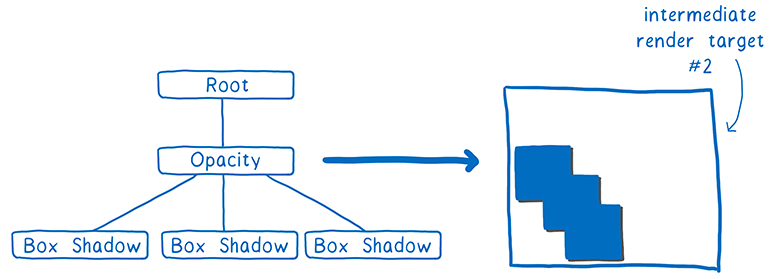
So in the above example with translucent squares, we would paint one corner of the square with the first pass. (In fact, everything is a little more complicated, but the essence is this).
The second pass can duplicate this angle for the entire square and paint over it. Then render the group of opaque squares.
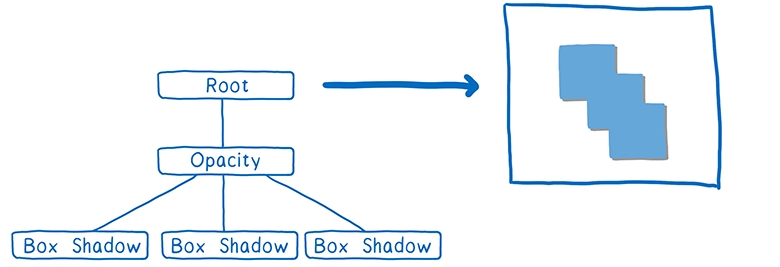
Finally, it remains only to change the transparency of the texture and place it in the appropriate place of the final texture that will be displayed on the screen.
Having built a task tree for rendering, we find out the minimum possible number of rendering objects before displaying on the screen. This is good, because I mentioned that the allocation of space for these textures is expensive.
The task tree also helps package tasks.
Grouping commands for drawing (batch processing)
As we have said, you need to create a small number of packages with a large number of figures in each of them.
Careful packet formation allows for much faster rendering. You need to squeeze as many objects as possible into the package. Such a requirement is made for several reasons.
First, whenever the CPU issues a drawing command to the GPU, the CPU always has many other tasks. He needs to take care of things such as configuring the GPU, loading the shader program and checking for various hardware bugs. All this work accumulates, and while the CPU does it, the GPU can stand idle.
Secondly, there are certain costs of state change. Let's say between packages you need to change the state of the shader. On an ordinary GPU, you will have to wait until all cores have completed the task from the current shader. This is called draining the pipeline. While the pipeline is not cleared, the remaining cores will be put on standby.
Because of this, it is advisable to pack the bag as tightly as possible.For an ordinary desktop PC, it is advisable to leave less than 100 drawing commands for each frame, and it would be nice to stuff thousands of vertices into each command. So the maximum from parallelism is squeezed out.
We look at each pass in the task tree for rendering and on which of the tasks to group into one package.
At this time, each type of primitive requires a different shader. For example, there is a border shader, text shader and image shader.
We believe that it is possible to combine many of these shaders, which will make it possible to create even larger packages, although they are well grouped now as well.
Tasks are almost ready to be sent to the GPU. But there is still a little bit of work to get rid of.
Reduce pixel shading work with opacity and alpha channel passes (Z-culling)
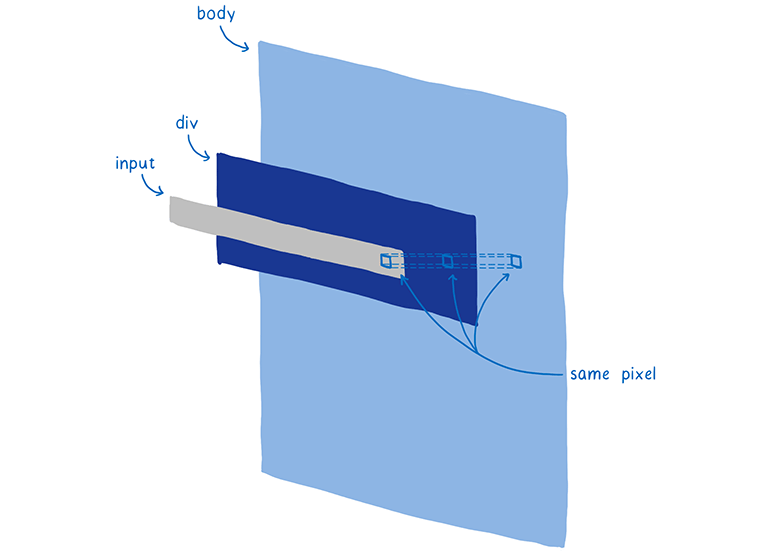
Most web pages contain many overlapping shapes. For example, a text field is on top of a div (with a background), which is on top of a body (with a different background).
When determining the color of a pixel, the GPU could calculate the color of the pixel in each shape. But only the top layer will be shown. This is called overdraw, a waste of GPU time.
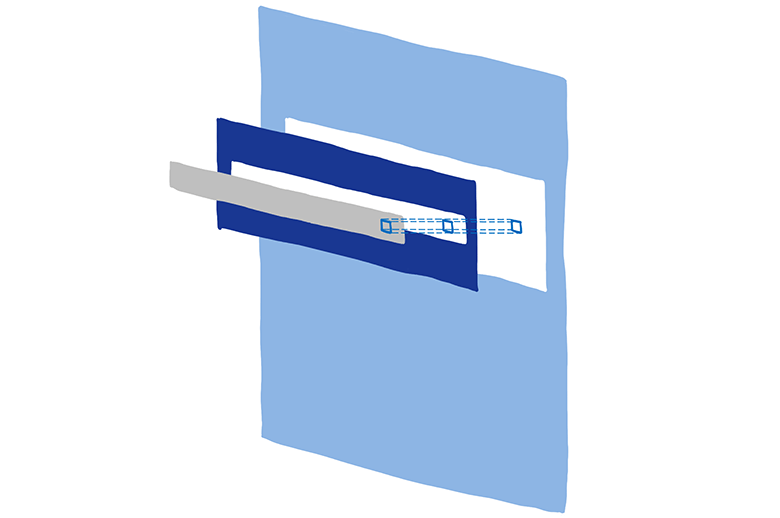
So you can first render the top layer. When it is the turn to render a pixel for the next figure, we check if this pixel already has a value. If there is, then the extra work is not performed.
True, there is a small problem. If the figure is translucent, then you need to mix the colors of the two figures. And so that everything looks right, rendering should be carried out from the bottom up.
So we divide the work into two passes. First pass on opacity. Render from top to bottom all opaque shapes. We skip rendering all pixels that are closed by others.
Then proceed to the translucent shapes. They are drawn from bottom to top. If the translucent pixel is on top of the opaque, then their colors are mixed. If it is behind the opaque, it is not calculated.
The division into two passes — by opacity and alpha channel — with the further omission of calculations of unnecessary pixels is called Z-culling.
Although this may seem like a simple optimization, here we get a big profit. On a typical web page, the number of pixels to process is significantly reduced. We are now looking for ways to move even more tasks into the opacity passage.
At the moment we have prepared the frame. We did our best to remove the extra work.
... And we are ready to draw!
The graphics processor is ready to set up and render packages.
Disclaimer: not everything went away on the GPU
The CPU still does some of the rendering work. For example, we still render characters on a CPU (they are called glyphs) in text blocks. It is possible to do this on the GPU, but it is difficult to achieve pixel-by-pixel matching with the glyphs that the computer renders in other applications. So people can get confused when rendering fonts on the GPU. We are experimenting with moving the rendering of glyphs to the GPU as part of the Pathfinder project .
But now these things are drawn into bitmaps on the CPU. Then they are loaded into the texture cache on the GPU. This cache is saved from frame to frame, because usually there is no change in it.
Even though this rendering remains on the CPU, there is still the potential to speed it up. For example, when drawing characters of a font, we distribute various characters across all cores. This is done using the same technique that Stylo uses to parallelize the calculation of styles ... interception of work .
Future webrender
In 2018, we plan to introduce WebRender into Firefox as part of Quantum Render, a few releases after the initial release of Firefox Quantum. After that, the existing web pages will work smoother. And Firefox will be ready for a new generation of high-resolution 4K displays, since rendering performance is extremely important as the number of pixels on the screen increases.
But WebRender is not only useful for Firefox. It is also necessary in our work on WebVR, where you need to render different frames for each eye at a speed of 90 FPS at 4K resolution.
The first version of WebRender is already available in Firefox, if you manually activate the corresponding flag. The integration work continues, so the performance is not as high as it will be in the final release. If you want to monitor the development of WebRender, watch the GitHub repository or the Firefox Nightly twitter , where weekly news is published on the entire Quantum Render project.
About the author: Lin Clark - engineer of the Mozilla Developer Relations group. She works with JavaScript, WebAssembly, Rust and Servo and loves to draw programmer pictures.
Source: https://habr.com/ru/post/340176/
All Articles