How Android Converts Resource Sizes
 The size of the APK file can be reduced by throwing out “unnecessary” LDPI resources, Android can still generate them on the fly from MDPI. But what will happen if you remove the MDPI directory? And how exactly will the convolution be performed: by averaging or cheaper pixel ejection? Will Android jump in one step to produce a potentially simpler HDPI → LDPI conversion? How exactly does the reduction of pictures in different cases? To answer these questions, I conducted a small test.
Theory
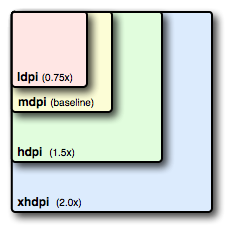
The ldpi-mdpi-hdpi-xhdpi ... directories are separated by ~ 33. (3) or 50% from each other , that is, the MDPI resource should be about 1.33 times more LDPI, and HDPI should be 2 times more. With conversions 2 → 1 and 4 → 1, theoretically, “cheap” discarding of every second pixel is possible, at transition 1.5 → 1 optimization is theoretically possible with discarding one pixel out of three, and during transition 1.33 → 1 - one of four, it remains to check what optimizations and Algorithms uses Android in reality.
Testing method
Create a file with a repeating pattern of multicolored stripes one and two pixels wide to make it easier to see the result of the convolution. Patterns look like this:
')
▣ ▣ ▣ ▣ ▣ ▣ ▣ ▣ and ▣ ▣ ▣ ▣ ▣ ▣ ▣ ▣
and placed at offset 0, 1, and 2 pixels from the border (the patterns are unidirectional, since the vertical and horizontal convolutions must obviously use the same algorithm).
We put the picture (the same) in the LDPI, MDPI, etc. directories under different names and on each copy we draw a “watermark” denoting the directory in which it is located in order to know where Android took the source for the conversion. Display images from all (MDPI-XXXDPI) directories on resolutions from LDPI to XXHDPI. We look under the magnifying glass, what happened, and answer the questions.
Is the convolution algorithm the same for transitions 1.5 → 1 and 1.33 → 1 ?
Obviously not, you can compare how the pattern from the HDPI directory on the MDPI screen and the MDPI pattern on the LDPI look like
1.5 → 1 vs. 1.33 → 1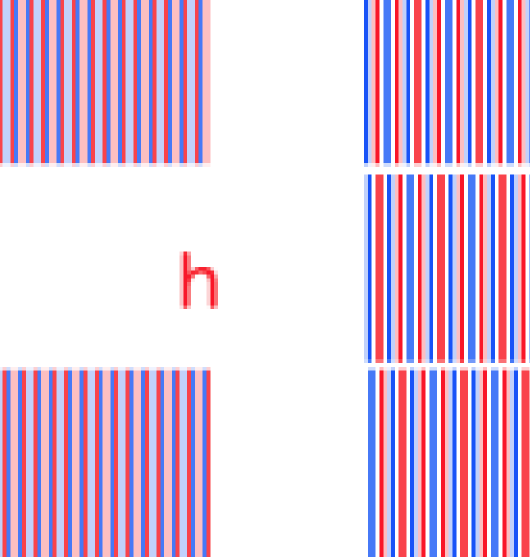

moreover, the results of the convolutions x → h and m → l coincide, which confirms the theory.
Does Android discard an “extra” pixel when convolving 1.5 → 1 ?
Apparently, yes! To do this, we will create another pattern (also with an offset of 0, 1 and 2 pixels)
▣ ▣ ▣ ▣ ▣ ▣ and scale it from HDPI to MDPI
1.5 → 1 RGB
on the final pattern, alternately red, then blue, then green, means that when calculating 2 pixels out of 3, one is not taken into account. The resulting colors are not clean, which means that the remaining two pixels are not taken as they are, but mixed in different proportions.
How does convolution 2 → 1 occur?
By simply mixing adjacent pixels in equal proportions. Here the results of the transitions h → l , xh → m , xxh → h are identical.
2 → 1
No pixel drop artifacts are seen.
How does convolution 4 → 1 occur?
And here, Android still throws out a part of the pixels. Apparently, four pixels are taken, the two extreme ones are removed, and the central ones are mixed in equal proportions. Like that:
▣ ▣ ▣ ▣ → ▣ ▣ → ▣
4 → 1
This algorithm is the cause of an interesting artifact - the complete disappearance of the blue and red colors from the ▣ ▣ ▣ ▣ and ▣ ▣ ▣ ▣ patterns , which differ only in offset.
What resource does Android choose if there are several options?
When convolving to the MDPI resource that is available in the HDPI and XHPI directories, you could use the potentially simpler algorithm 2 → 1 instead of 1.5 → 1 , skipping one step, but Android always chooses the closest resource. Probably also because convolution 2 → 1 uses more resource-intensive kneading, rather than dropping (as we saw above), and it will not be possible to save much on it.
Which of all this can be concluded?
Well, firstly, we must not forget to remind your designer what to draw on the grid and what 1dp! = 1px : any one-pixel line at all resolutions from MDPI and higher can turn into an unpredictable looseness or even disappear. Secondly, SVG / XML is still a more reliable way to save on graphics, if the nature of the image allows. Thirdly, if the final image on the screen must have clear edges, all permissions must be present in the project. Finally, Android really applies interesting optimizations to save CPU resources, and this can be used if you do it wisely.
An example of a test application at different resolutions (on each picture it is written from which catalog, it is taken, next to it - in which catalogs it was present):
LDPI
Mdpi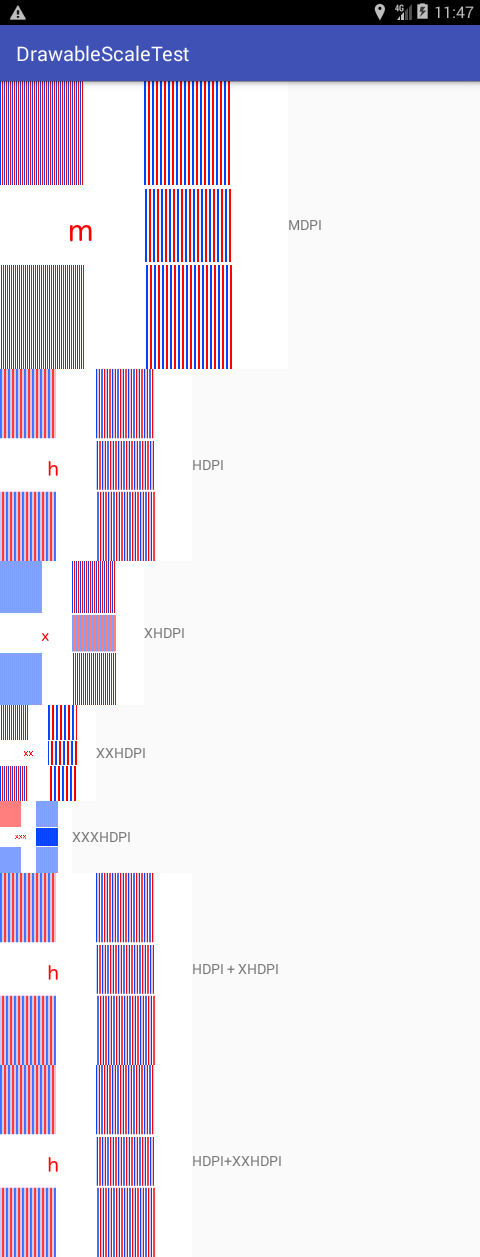
HDPI
XHDPI
XXHDPI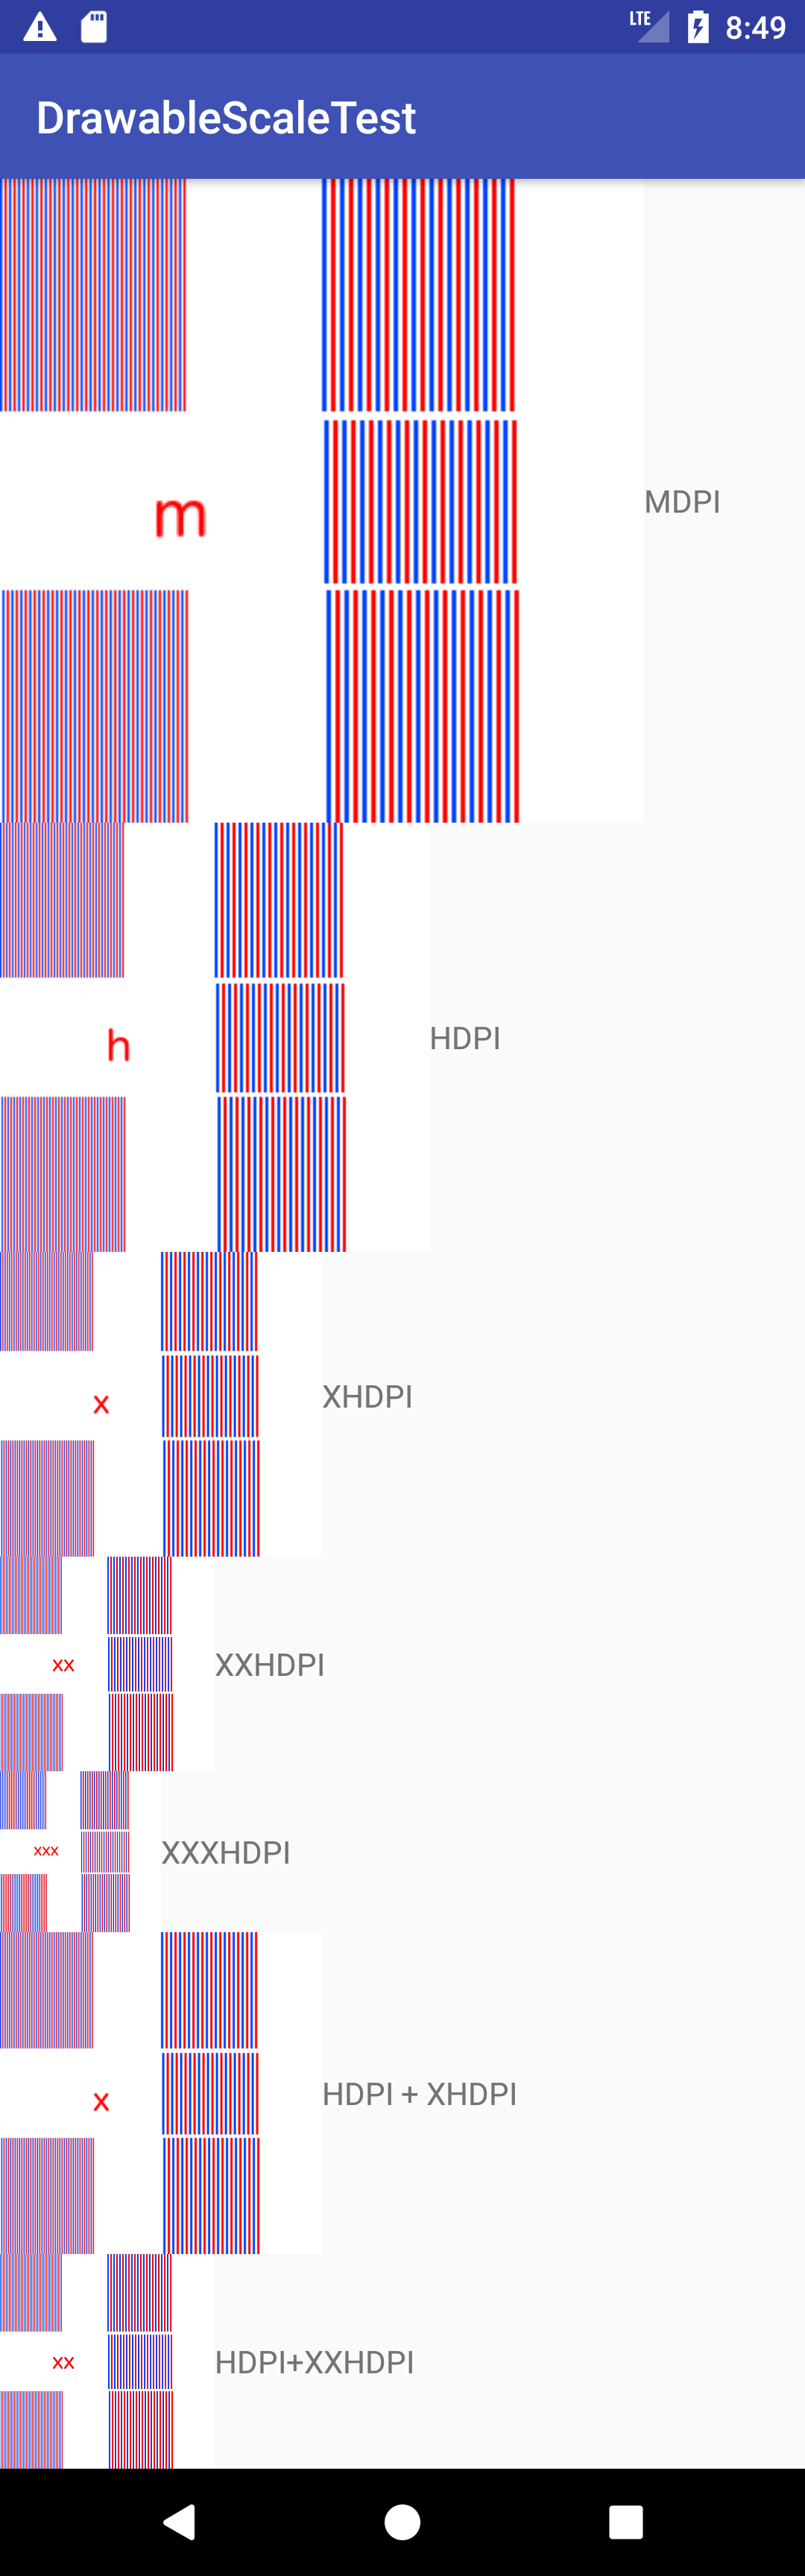
→ Sources on GitHub
Thanks for attention!
Source: https://habr.com/ru/post/340166/
All Articles