Microsoft Bot Framework + IBM Watson = ... bi-linguistic bot
Continuing the started topic I would like to share the successful experience of creating a bilingual Node.JS bot on the Microsoft Bot Framework under Linux. The customer received the task to develop a simple social bot in a question-answer format for a large trading network, but the difficulty lay elsewhere - the bot must be bilingual: in English and Arabic. Although, as will be shown below, the choice of tools for solving the problem made the development easy, pleasant and interesting.
As before, the choice of the framework was made in favor of the Microsoft Bot Framework, which has a huge amount of functionality that greatly facilitates building and deploying the bot: managing the flow of dialogues, trigger actions, state preservation, colorful interactive messages, easy connection of channels such as Facebook Messenger, Skype , Webchat and much more. As it turned out, it also has a very simple and convenient localization mechanism (about it below).
To recognize the meaning of user messages, you can use an AI system, such as LUIS, IBM Watson, Google Dialogflow (Api.ai), etc. It is more natural and more convenient for BotBuilder to use LUIS: there are methods built in the Bot Framework, classes, etc. However, there is no Arabic language in LUIS - the second language in which, at the request of the customer, the bot should work. Therefore, the choice fell on IBM Watson, which, as it turned out, has a much more advanced functionality, stability and usability. The customer initially thought about the possibility of creating 2 bots, but the huge variety of tools in the IBM Watson and Bot Framework made it easy to combine functionality into one. Further we will tell about how this can be done.
Select the new folder in which the project will be located and run:
')
Install the necessary packages for building a bot, connecting to Watson and asynchronous requests:
Create the
This is actually the base, from which you can build on. Here, before creating the bot, we create a Conversation object with the user. Conversation is used to transmit user responses to Watson, which recognizes an intent-entity pair in it. The variables WATSON_URL and WORKSPACE_ID, as you probably already understood, are stored in the
Workspace (workspace) is associated with an instance of the Conversation with the user service, easier - with a trained model. This model is created and trained for one language. For another language, you must create a second workspace . You can get a list of workspaces available to us and their identifiers by running a simple script:
To enable the localization mechanism of the Microsoft Bot Framework, we need to first find out what language the user refers to. And here Watson comes to our rescue again, having in his arsenal a huge number of various APIs for translation, recognition, classification, conversion, etc. There is also an API to identify the language . To use it, create a small module that will be responsible for requests to this API:
We connect this module in the main application:
Initially, the main function of the bot will insert lines to determine the current language and install the appropriate locale. The BotBuilder SDK provides the
The list of recognizable languages can be viewed in the Watson API Explorer , where you can test this API.
For each language we create 2 separate Conversation objects:
These objects remain unchanged, so you can put them at the beginning of app.js or put them in a separate file. Then, after the locale definition code, we insert a line that initializes our conversation variable, and we change the workspace variable - now it will also change dynamically depending on a certain language:
By default, the Bot Builder SDK localization system is file-based and allows the bot to support several languages using JSON files stored on disk. By default, the localization system when calling methods such as
The structure of this JSON file is a simple mapping (correspondence) of the message identifier to a localized text string. The bot automatically extracts the localized version of the message if the message ID is passed to the
Another way to get a localized text string by message id is to call the
Now we can easily implement the answer to the user in any language. When implementing a simple bot in question-answer format, the undoubted advantage of Watson for us was that, regardless of the workspace language , it can return recognized intent-entity pairs in any language ( how to teach ), in our case - in English. Therefore, possible answers were conveniently organized as a single JS object for both languages , which works as an associative array of functions:
Now we can rewrite the callback that is called after the request to Watson:
Here is a simple version of this function; in a real project, of course, it is more complicated.
That's all on the topic! We got a bilingual bot. After launch, we can enjoy the result - the bot's automatic responses:

As before, the choice of the framework was made in favor of the Microsoft Bot Framework, which has a huge amount of functionality that greatly facilitates building and deploying the bot: managing the flow of dialogues, trigger actions, state preservation, colorful interactive messages, easy connection of channels such as Facebook Messenger, Skype , Webchat and much more. As it turned out, it also has a very simple and convenient localization mechanism (about it below).
To recognize the meaning of user messages, you can use an AI system, such as LUIS, IBM Watson, Google Dialogflow (Api.ai), etc. It is more natural and more convenient for BotBuilder to use LUIS: there are methods built in the Bot Framework, classes, etc. However, there is no Arabic language in LUIS - the second language in which, at the request of the customer, the bot should work. Therefore, the choice fell on IBM Watson, which, as it turned out, has a much more advanced functionality, stability and usability. The customer initially thought about the possibility of creating 2 bots, but the huge variety of tools in the IBM Watson and Bot Framework made it easy to combine functionality into one. Further we will tell about how this can be done.
Select the new folder in which the project will be located and run:
')
npm init Install the necessary packages for building a bot, connecting to Watson and asynchronous requests:
npm install dotenv npm install restify npm install botbuilder npm install watson-developer-cloud npm install request-promise Create the
app.js file and copy the following code:Application code:
var restify = require('restify'); var builder = require('botbuilder'); var Conversation = require('watson-developer-cloud/conversation/v1'); // watson sdk require('dotenv').config({ silent: true }); var contexts; var workspace = process.env.WORKSPACE_ID; // Setup Restify Server var server = restify.createServer(); server.listen(process.env.port || process.env.PORT || 3978, function() { console.log('%s listening to %s', server.name, server.url); }); // Create the service wrapper var conversation = new Conversation({ username: process.env.WATSON_USERNAME, password: process.env.WATSON_PASSWORD, url: process.env.WATSON_URL + process.env.WORKSPACE_ID + '/message?version=2017-05-26', version_date: Conversation.VERSION_DATE_2017_05_26 }); // Create chat connector for communicating with the Bot Framework Service var connector = new builder.ChatConnector({ appId: process.env.MICROSOFT_APP_ID, appPassword: process.env.MICROSOFT_APP_PASSWORD }); // Listen for messages from users server.post('/api/messages', connector.listen()); // Create your bot with a function to receive messages from the user var bot = new builder.UniversalBot(connector, function(session) { let payload = { workspace_id: workspace, context: [], input: { text: session.message.text } }; let conversationContext = { workspaceId: workspace, watsonContext: {} }; if (!conversationContext) { conversationContext = {}; } payload.context = conversationContext.watsonContext; conversation.message(payload, function(err, response) { if (err) { console.log(err); session.send(err); } else { console.log(JSON.stringify(response, null, 2)); session.send(response.output.text); conversationContext.watsonContext = response.context; } }); }); This is actually the base, from which you can build on. Here, before creating the bot, we create a Conversation object with the user. Conversation is used to transmit user responses to Watson, which recognizes an intent-entity pair in it. The variables WATSON_URL and WORKSPACE_ID, as you probably already understood, are stored in the
.env file: # Bot Framework Credentials MICROSOFT_APP_ID=... MICROSOFT_APP_PASSWORD=... #Watson Url WATSON_URL=https://gateway.watsonplatform.net/conversation/api/v1/workspaces/ WATSON_USERNAME=... WATSON_PASSWORD=... WORKSPACE_ID=<UUID> Workspace (workspace) is associated with an instance of the Conversation with the user service, easier - with a trained model. This model is created and trained for one language. For another language, you must create a second workspace . You can get a list of workspaces available to us and their identifiers by running a simple script:
workspaces.js
// This loads the environment variables from the .env file require('dotenv-extended').load(); var Conversation = require('watson-developer-cloud/conversation/v1'); // watson sdk var conversation = new Conversation({ username: process.env.WATSON_USERNAME, password: process.env.WATSON_PASSWORD, version_date: Conversation.VERSION_DATE_2017_05_26 }); conversation.listWorkspaces(function(err, response) { if (err) { console.error(err); } else { console.log(JSON.stringify(response, null, 2)); } }); node workspaces.js To enable the localization mechanism of the Microsoft Bot Framework, we need to first find out what language the user refers to. And here Watson comes to our rescue again, having in his arsenal a huge number of various APIs for translation, recognition, classification, conversion, etc. There is also an API to identify the language . To use it, create a small module that will be responsible for requests to this API:
language.js
var request = require("request-promise"); module.exports.Detect = async function LanguageDetect(text) { let options = { baseUrl: "https://watson-api-explorer.mybluemix.net", uri: "/language-translator/api/v2/identify", method: "GET", qs: { // Query string like ?text=some text text: text }, json: true }; try { let result = await request(options); return result.languages[0].language; } catch (err) { console.error(err); } }; We connect this module in the main application:
var language = require('./language'); Initially, the main function of the bot will insert lines to determine the current language and install the appropriate locale. The BotBuilder SDK provides the
session.preferredLocale() method to save or retrieve this property for each user: // Detect language en/ar first and set correspondent locale let locale = await language.Detect(session.message.text); session.preferredLocale(locale); The list of recognizable languages can be viewed in the Watson API Explorer , where you can test this API.
For each language we create 2 separate Conversation objects:
English and Arabic Conversation objects
// Get Watson service wrapper for English var conversation_en = new Conversation({ username: process.env.WATSON_USERNAME, password: process.env.WATSON_PASSWORD, url: process.env.WATSON_URL + process.env.WORKSPACE_ID_EN + '/message?version=2017-05-26', version_date: Conversation.VERSION_DATE_2017_05_26 }); // Get Watson service wrapper for Arabic var conversation_ar = new Conversation({ username: process.env.WATSON_USERNAME, password: process.env.WATSON_PASSWORD, url: process.env.WATSON_URL + process.env.WORKSPACE_ID_AR + '/message?version=2017-05-26', version_date: Conversation.VERSION_DATE_2017_05_26 }); Note. Note: now in the.envfile we have 2 variablesWORKSPACE_ID_ENandWORKSPACE_ID_AR, instead of oneWORKSPACE_ID.
These objects remain unchanged, so you can put them at the beginning of app.js or put them in a separate file. Then, after the locale definition code, we insert a line that initializes our conversation variable, and we change the workspace variable - now it will also change dynamically depending on a certain language:
Modifications to app.js
// Detect language en/ar first and set correspondent locale let locale = await language.Detect(session.message.text); session.preferredLocale(locale); let workspace = (locale == "ar") ? process.env.WORKSPACE_ID_AR : process.env.WORKSPACE_ID_EN; // Get Watson service wrapper according to the locale let conversation = (locale == "ar") ? conversation_ar : conversation_en; // Prepare Watson request let payload = { workspace_id: workspace, context: [], input: { text: session.message.text } }; let conversationContext = { workspaceId: workspace, watsonContext: {} }; ... By default, the Bot Builder SDK localization system is file-based and allows the bot to support several languages using JSON files stored on disk. By default, the localization system when calling methods such as
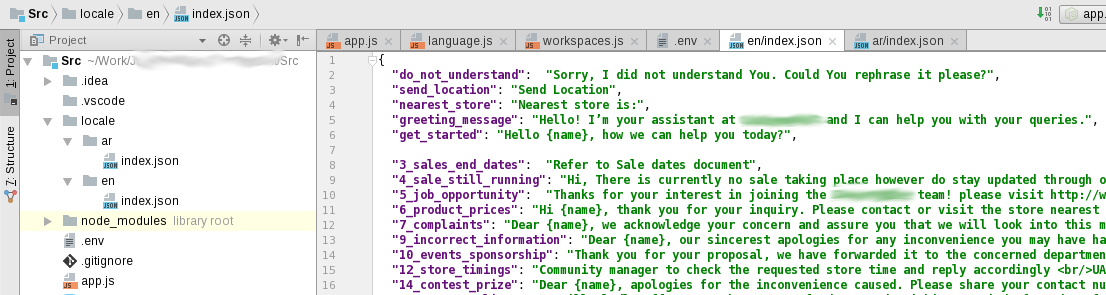
builder.Prompts.choice() or session.send() searches for the bot's messages in the ./locale/<>/index.json file, where the IETF language tag represents the selected locale for which search posts. The following screenshot shows the resulting structure of the project directories for the English and Arabic languages:The structure of this JSON file is a simple mapping (correspondence) of the message identifier to a localized text string. The bot automatically extracts the localized version of the message if the message ID is passed to the
session.send() method instead of the previously localized text string: session.send("greeting_message"); Another way to get a localized text string by message id is to call the
session.localizer.gettext() method. For ease of use, I wrote an extension of the Session class and wrote a wrapper like the tr() function from Qt (all the same, JavaScript is sometimes a very handy thing!). Here you can also implement the substitution of tokens of the type {name}, {id}, {phone}, etc .:tr () extension function
const { Session } = require('botbuilder'); // Object extension function for strings localization (translation) Session.prototype.tr = function (text) { return this.localizer.gettext(this.preferredLocale(), text) .replace("{name}", this.userName()); }; // Object extension function to get user id Session.prototype.userId = function () { return this.message.address.user.id; }; // Object extension function to get user name Session.prototype.userName = function () { return this.message.address.user.name; }; Now we can easily implement the answer to the user in any language. When implementing a simple bot in question-answer format, the undoubted advantage of Watson for us was that, regardless of the workspace language , it can return recognized intent-entity pairs in any language ( how to teach ), in our case - in English. Therefore, possible answers were conveniently organized as a single JS object for both languages , which works as an associative array of functions:
Response object
var responses = { // Responses object "greeting": { "no_entities": async function (session) { session.send("greeting_message"); }, }, "purchase": { "sale-stop": async function (session) { session.send("3_sales_end_dates"); }, "product-sale": async function (session) { session.send("4_sale_still_running"); }, /** @param {Session} session */ "price-product": async function (session) { session.send(session.tr("6_product_prices")); }, "price": async function (session) { session.send(session.tr("6_product_prices")); }, }, "inquiry": { "job": async function (session) { session.send("5_job_opportunity"); }, ... }, ... } Now we can rewrite the callback that is called after the request to Watson:
Watson request callback function
// Send request to Watson conversation.message(payload, async function (err, response) { if (err) { console.log(err); session.send(err); } else { // Generate response to user according to Watson intent-entity pairs let processed = false; // Get intent let intent = (response.intents[0]) ? response.intents[0].intent : undefined; for(i = 0; i < response.entities.length; i++) { // Process single entity in response let entity = (response.entities[i]) ? response.entities[i].entity : undefined; // Process single entity in response if (responses[intent] && responses[intent][entity]) { await responses[intent][entity](session, intent, [response.entities[i]]); processed = true; break; } } // Message was not recognized if(!processed) { session.send(session.tr("get_started")); } conversationContext.watsonContext = response.context; } }); Here is a simple version of this function; in a real project, of course, it is more complicated.
That's all on the topic! We got a bilingual bot. After launch, we can enjoy the result - the bot's automatic responses:
Source: https://habr.com/ru/post/340092/
All Articles