Jupyter Widgets for implementing the Turing UI machine
Hi, Habr! I want to share my experience in quickly creating an interface in Jupyter Notebook. If you have some task for which a simple UI is needed, and for some reason you wanted to do it in Jupiter, then welcome to the cat.
I was faced with the task: to implement a visual interface for a Turing machine. Probably the easiest option is to implement this with C # or Java for the desktop, and maybe even with JS in the browser. Since I do datasensom and I have a jupiter brain - I decided to do it with Jupyter Widgets. On Habré, I did not find information about this technology, I need to fix it. The post implies that the reader is already familiar with the Python language and has worked in Jupyter Notebook.
Jupyter widgets
Jupyter Widgets are interactive HTML widgets for Jupyter Notebook. Their direct purpose is to make the laptop more dynamic, add various controls to it. We have the opportunity to add sliders, buttons, progress bars and other elements in several lines without CSS knowledge. As I see, the main application of this technology is the rapid development of prototypes (especially for ML projects) in which a simple UI is needed. If you need to show the customer something interactive, and not just a table or a graph, then the first thing I would try are widgets in Jupiter (well, then plotly and Dash ). A more everyday use case for datasentists - convenient debugging using the interact function.
Interact is probably the most frequently used feature of this library. It creates a slider and calls some function (callback) when it changes. All this is implemented in one line. He can come up with a lot of useful applications: for example, you can watch how your machine learning model reacts to a change in a parameter or attribute by simply moving the slider. For example, I did not import xgboost, but simply plotted a polynomial, the degree of which can be changed using this interact itself.
xs = np.linspace(-10, 10, 21) def f(x): plt.plot(xs, [math.pow(i, x) for i in xs]) interact(f, x=(0, 5)) 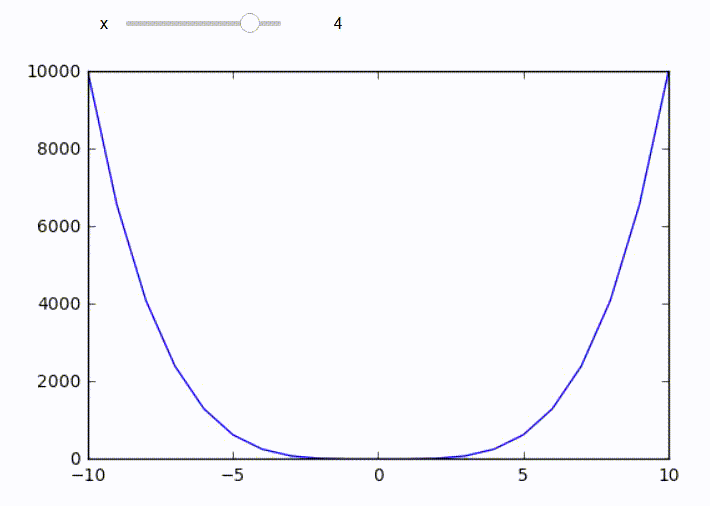
Turing Machine
A Turing machine is an extension of the idea of a finite state machine, with the help of which, theoretically, any algorithm can be presented. It can be formalized through the alphabet, allowed states, input symbols, the initial state, and the transition function. The main part of the machine is a tape with alphabet symbols, which are sequentially processed by the read head moving left and right in accordance with the transition function.
Let the machine is now in the "q1" state and read the "A" symbol. The function of transitions is checked, and if there is a combination of "q1 A", then we know to which next state the transition should take place, which character is written to the current position on the tape, and where the read head moves further. If there is no such combination ("state-symbol"), then the machine is terminated. This knowledge should be enough to understand what needs to be displayed in the interface. An example of the finished class of the Turing machine on the python can be found here , I changed it a little for my needs.
For clarity, consider the following problem. Given an array of letters "A" and "B". It is necessary to compress the array, removing all the letters "B", but leaving the letters "A". The solution is to replace all the characters "B" with the character "*", and then the letters "A" scattered in different positions should be shifted to the right. Login example: "# BAABABA #". The exit for him: "#### AAAA #". Here "#" is a service empty character. The transition function under the spoiler.
transition_function = { ('q0', 'A'): ('q0', 'A', 'r'), ('q0', 'B'): ('q0', '*', 'r'), ('q0', '*'): ('q0', '*', 'r'), ('q0', '#'): ('q1', '#', 'l'), ('q1', 'A'): ('q2', 'A', 'l'), ('q1', '*'): ('q1', '#', 'l'), ('q1', '#'): ('q1', '#', 'r'), ('q2', 'A'): ('q3', '*', 'r'), ('q2', '*'): ('q2', '*', 'l'), ('q2', '#'): ('q5', '#', 'r'), ('q3', 'A'): ('q4', 'A', 'l'), ('q3', '*'): ('q3', '*', 'r'), ('q4', '*'): ('q2', 'A', 'l'), ('q5', '*'): ('q5', '#', 'r') } Visualization
First of all, you need to understand which UI elements should be displayed.
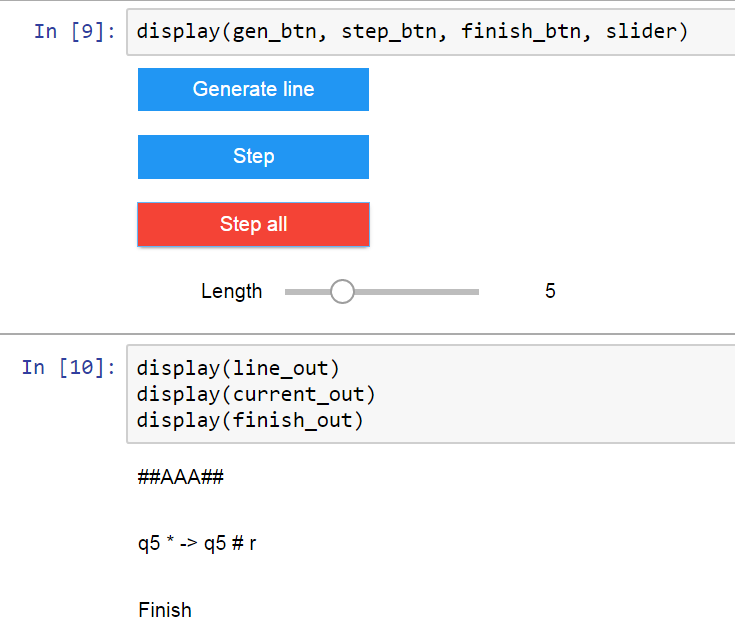
- Three lines of text. The first is a ribbon with characters. The second one displays the current transition of the form "current state, current symbol -> new state, new symbol, direction of movement along the tape". The third displays the status of the completion of the program.
- Three buttons: generation of a string, execution of a single command, execution of a program to the end.
- Slider to select the length of the generated input line.
Text lines can be represented using the ipywidgets.HTML class. This is a widget for displaying html, working with it looks like this:
finish_out = widgets.HTML('In progress') display(finish_out) When you change the value of the value field, the widget automatically redraws. Create three lines of text using three different html widgets.
Buttons for generating a string and executing a command are done using ipywidgets.Button.
step_btn = widgets.Button(description='Step', button_style='primary') The slider is represented by the ipywidgets.IntSlider class. Attributes can be passed the boundaries of valid values.
slider = widgets.IntSlider(min=3, max=10, step=1, value=5, description='Length') Event handling from UI-elements occurs using callbacks: functions that are called when events occur. In our case, the buttons need to subscribe to the click event, and for the slider, the event of changing the value of the element. Inside these callbacks there will be a change in the values of html widgets.
def on_step_btn(d): global is_final if not is_final: is_final = tm.step() line_out.value = tm.get_tape() else: finish_out.value = 'Finish' step_btn.on_click(on_step_btn) To draw elements, you can pass them all to the display function. Concluding everything together, we get:
Everything is working! At this one could stop, but you must admit, it looks quite messy. Let's try to fix it.
Let's collect controls in a more familiar way. Before each html line we will add a label, we will place the buttons in one line, around this we will make a beautiful frame. This can be done using ipywidgets.Layout and ipywidgets.Box. Box is a container in which you can add multiple widgets as a list. Managing the display of elements inside a box is easy with the layout attribute. Thanks to Flexbox technology from modern CSS, you can beautifully arrange elements relative to each other. Here you can find many examples, on the basis of which it is enough just to collect something of your own. In the end, I did this:
form_item_layout = Layout( display='flex', flex_flow='row', justify_content='space-between' ) form_items = [ Box([Label(value='Current line value'), line_out], layout=form_item_layout), Box([Label(value='Current transition'), current_out], layout=form_item_layout), Box([Label(value='Status'), finish_out], layout=form_item_layout), Box([Label(value='Tape length'), slider], layout=form_item_layout), Box([gen_btn, step_btn, finish_btn], layout=form_item_layout) ] form = Box(form_items, layout=Layout( display='flex', flex_flow='column', border='solid 2px', align_items='stretch', width='80%' )) 
Conclusion
In this post, we met with Jupyter Widgets on the example of the visualizer for the Turing machine. Now you can surprise customer Add interactivity to your laptops. If you are missing the functionality of existing widgets, you can create your own, but this requires at least a basic knowledge of JS. The only drawback I encountered is that widgets are not yet displayed on github when browsing laptops (even after Widgets -> Save Notebook Widget State). I hope it will be fixed soon.
All beautiful and dynamic laptops!
')
Source: https://habr.com/ru/post/339914/
All Articles