MvvmCross for a simple iOS application in C #
Hello. Developers of cross-platform applications under .NET (hereinafter all about C #) probably know about the existence of MvvmCross. An excellent product, the main disadvantage of which is very poor documentation. And in Russian, and almost none. Here I want to tell you in general about the structure of a simple MvvmCross-based menu application for iOS.
It should be noted immediately that if you do not have a real iron from Apple, then you can not do anything, because building and debugging projects is possible only on real Apple devices. Although you can work under Windows. Those. about how to run Android applications via USB debugging. That is the policy of this office.
At the time of this writing, MvvmCross does not support .NETStandard, therefore, a project will have to be created at VisualStudio 2015, but not 2017. Although the finished project can be edited in 2017. I was prompted here to work around this problem. Instructions. In addition, the studio must be installed Xamarin.
All code samples are simplified to the maximum and probably not ideologically correct in some places, but they work. For example, it is better to create the menu as a table and connect a data source to it.
')
Connecting MvvmCross: Through “NuGet package management” we put MvvmCross, MvvmCross.iOS.Support, MvvmCross.iOS.Support.XamarinSidebar, SidebarNavigation. A set of packages scrolls from the version, here about MvvmCross 5.12.
So, first of all, you should create a new project like “iOS-Universal-empty application”. Let's call it iOSTest. Different files will appear in the project folder. The main file will be Main.cs. This file will launch your application. The structure and its role is very simple. It will run AppDelegate.cs, which is right next to Main.cs.
AppDelegate.cs creates the main window and transfers control further. To do this, its overloaded FinishedLaunching function should be rewritten as follows:
In addition, you should change the class from which AppDelegate is inherited, i.e. class declaration should look like this:
Leave the rest as is.
In order for this to work, you need to add the Setup.cs file to the project.
Code like this:
The main thing here is CreateApp (). Now the studio shows an error, because the App () does not exist yet.
Now we need to create a new project in a solution where, according to the MVVM paradigm, ViewModels will lie. This project should be of the type “portable” or .NETStandard, but for the time being for MvvmCross it is only a project like PCL. If you have a “blank” of that project, then you can simply copy it to the 2017 studio. It will work without problems. Let's call it “Core”, connect via NuGet MvvmCross and create the App.cs file in its root. We connect the new project with the first one as a link and the error in Setup.cs disappears.
The content of App.cs is quite primitive:
In the line RegisterAppStart (); we finally get to the first real working code. As it is not difficult to guess, “StartViewModel” starts here. All the previous ones were preparations for launching. Create a ViewModels folder and a StartViewModel.cs file in the Core project:
This ViewModel can only do one thing: run the MainViewModel. Here it should be noted that such a strip seems redundant, why not immediately launch MainViewModel? Until some version of MvvmCross it was like that, but now something has changed and we will not see the menu if you start MainViewModel right away. Perhaps this is a bug and it will be corrected. But if you do not use the intermediate class now, the menu will be on the right, not on the left, as in its settings, you can only see it by pulling the edge of the screen, there will be no menu button on top (I suspect that it is outside the screen on the right).
MainViewModel.cs:
Everything is simple here. The model is essentially empty, the only thing it can do is show the menu. In a real project, there can be many different functions as needed.
Next to MainViewModel.cs, create a MenuViewModel.cs to describe the menu behavior:
As you can see, the menu will be only two lines.
Now create a model for the menu. Those. pattern for strings. In the Core project, the Models / MenuModel.cs file:
It describes what the individual menu lines are. The text for the string and the command for execution.
To navigate from the menu items, we will create two more almost identical ViewModels. The difference will be only in the name. AboutViewModel.cs and SettingsViewModel.cs
In real code, you should place the functions that will be executed when accessing this ViewModel.
Now we return to the iOSTest project and begin to practice the magic of MvvmCross. The fact is that the connections between View and ViewModel occur somewhere inside MvvmCross and are not represented explicitly. The code calls the ViewModel, and we see the View, while there is no indication what kind of View to show in the code.
As I understand it, each View is associated with its ViewModel exclusively through the name. Feedback just exists in the ad view. In general, everything is somehow ambiguous.
Create a Views folder in the iOSTest project and view it for all ViewModels: MainView, MenuView, AboutView, SettingsView. Unfortunately, VisualStudio is not the best tool to create a View. You should use "Xamarin iOS Designer" or "Xcode Interface Builder". Details can be found here: link This will allow you to create beautiful views.
But we will go this way: Create the files MainView.cs, MenuView.sc, AboutView.cs, SettingsView.cs as usual classes and describe the representation in them programmatically. It will not be very beautiful, but simple.
Notice the attributes before declaring a class. This is a menu binding to this View.
AboutView.cs (SettingsView is similar)
Attributes look different here. “PushPanel” instead of “ResetRoot” causes the “<Back” button to appear instead of the menu button, which takes you back to the previous window. That is, if you want to have a menu button in all windows, then write “ResetRoot”
And finally, MenuView.cs:
Attributes again slightly changed, it is clear that the menu will be on the left. The menu icon is in the file “menu.png”, which according to all iOS rules should be in the Resources folder, preferably in three resolutions (sizes).
If you refuse to implement the IMvxSidebarMenu interface, the code can be cut almost in half, but the menu icon will not be. There will be an inscription "Menu".
That's all.
The whole project can be viewed here: github
It should be noted immediately that if you do not have a real iron from Apple, then you can not do anything, because building and debugging projects is possible only on real Apple devices. Although you can work under Windows. Those. about how to run Android applications via USB debugging. That is the policy of this office.
All code samples are simplified to the maximum and probably not ideologically correct in some places, but they work. For example, it is better to create the menu as a table and connect a data source to it.
')
Connecting MvvmCross: Through “NuGet package management” we put MvvmCross, MvvmCross.iOS.Support, MvvmCross.iOS.Support.XamarinSidebar, SidebarNavigation. A set of packages scrolls from the version, here about MvvmCross 5.12.
So, first of all, you should create a new project like “iOS-Universal-empty application”. Let's call it iOSTest. Different files will appear in the project folder. The main file will be Main.cs. This file will launch your application. The structure and its role is very simple. It will run AppDelegate.cs, which is right next to Main.cs.
AppDelegate.cs creates the main window and transfers control further. To do this, its overloaded FinishedLaunching function should be rewritten as follows:
AppDelegate.cs
public override bool FinishedLaunching(UIApplication app, NSDictionary options) { Window = new UIWindow(UIScreen.MainScreen.Bounds); var setup = new Setup(this, Window); setup.Initialize(); var startup = Mvx.Resolve<IMvxAppStart>(); startup.Start(); Window.MakeKeyAndVisible(); return true; } In addition, you should change the class from which AppDelegate is inherited, i.e. class declaration should look like this:
public class AppDelegate : MvxApplicationDelegate Leave the rest as is.
In order for this to work, you need to add the Setup.cs file to the project.
Code like this:
Setup.cs
using MvvmCross.Core.ViewModels; using MvvmCross.iOS.Platform; using MvvmCross.iOS.Views.Presenters; using MvvmCross.iOS.Support.XamarinSidebar; using MvvmCross.Platform.Platform; using UIKit; namespace iOSTest { public class Setup : MvxIosSetup { public Setup(MvxApplicationDelegate applicationDelegate, UIWindow window) : base(applicationDelegate, window) { } public Setup(MvxApplicationDelegate applicationDelegate, IMvxIosViewPresenter presenter) : base(applicationDelegate, presenter) { } protected override IMvxApplication CreateApp() { return new App(); } protected override IMvxIosViewPresenter CreatePresenter() { return new MvxSidebarPresenter((MvxApplicationDelegate)ApplicationDelegate, Window); } } } The main thing here is CreateApp (). Now the studio shows an error, because the App () does not exist yet.
Now we need to create a new project in a solution where, according to the MVVM paradigm, ViewModels will lie. This project should be of the type “portable” or .NETStandard, but for the time being for MvvmCross it is only a project like PCL. If you have a “blank” of that project, then you can simply copy it to the 2017 studio. It will work without problems. Let's call it “Core”, connect via NuGet MvvmCross and create the App.cs file in its root. We connect the new project with the first one as a link and the error in Setup.cs disappears.
The content of App.cs is quite primitive:
App.cs
using Core.ViewModels; using MvvmCross.Platform.IoC; namespace Core { public class App : MvvmCross.Core.ViewModels.MvxApplication { public override void Initialize() { CreatableTypes() .EndingWith("Service") .AsInterfaces() .RegisterAsLazySingleton(); RegisterAppStart<StartViewModel>(); } } } In the line RegisterAppStart (); we finally get to the first real working code. As it is not difficult to guess, “StartViewModel” starts here. All the previous ones were preparations for launching. Create a ViewModels folder and a StartViewModel.cs file in the Core project:
StartViewModel.cs
using MvvmCross.Core.ViewModels; namespace Core.ViewModels { public class StartViewModel: MvxViewModel { public void ShowMainView() { ShowViewModel<MainViewModel>(); } } } This ViewModel can only do one thing: run the MainViewModel. Here it should be noted that such a strip seems redundant, why not immediately launch MainViewModel? Until some version of MvvmCross it was like that, but now something has changed and we will not see the menu if you start MainViewModel right away. Perhaps this is a bug and it will be corrected. But if you do not use the intermediate class now, the menu will be on the right, not on the left, as in its settings, you can only see it by pulling the edge of the screen, there will be no menu button on top (I suspect that it is outside the screen on the right).
MainViewModel.cs:
MainViewModel.cs
using MvvmCross.Core.ViewModels; namespace Core.ViewModels { public class MainViewModel : MvxViewModel { public void ShowMenu() { ShowViewModel<MenuViewModel>(); } } } Everything is simple here. The model is essentially empty, the only thing it can do is show the menu. In a real project, there can be many different functions as needed.
Next to MainViewModel.cs, create a MenuViewModel.cs to describe the menu behavior:
MenuViewModel.cs
using System; using System.Collections.Generic; using Core.Models; using MvvmCross.Core.ViewModels; namespace Core.ViewModels { public class MenuViewModel : MvxViewModel { public List<MenuModel> MenuItems { get; } public MenuViewModel() { MenuItems = new List<MenuModel> { new MenuModel {Title = "Settings", Navigate = NavigateCommandSettings}, new MenuModel {Title = "About", Navigate = NavigateCommandAbout} }; } private MvxCommand<Type> _navigateCommandSettings; public MvxCommand<Type> NavigateCommandSettings { get { _navigateCommandSettings = _navigateCommandSettings ?? new MvxCommand<Type>((vm) => { ShowViewModel<SettingsViewModel>(); }); return _navigateCommandSettings; } } private MvxCommand<Type> _navigateCommandAbout; public MvxCommand<Type> NavigateCommandAbout { get { _navigateCommandAbout = _navigateCommandAbout ?? new MvxCommand<Type>((vm) => { ShowViewModel<AboutViewModel>(); }); return _navigateCommandAbout; } } } } As you can see, the menu will be only two lines.
Now create a model for the menu. Those. pattern for strings. In the Core project, the Models / MenuModel.cs file:
MenuModel.cs
using System; using MvvmCross.Core.ViewModels; namespace Core.Models { public class MenuModel { public String Title { get; set; } public MvxCommand<Type> Navigate { get; set; } } } It describes what the individual menu lines are. The text for the string and the command for execution.
To navigate from the menu items, we will create two more almost identical ViewModels. The difference will be only in the name. AboutViewModel.cs and SettingsViewModel.cs
AboutViewModel.cs
using MvvmCross.Core.ViewModels; namespace Core.ViewModels { public class AboutViewModel : MvxViewModel { } } In real code, you should place the functions that will be executed when accessing this ViewModel.
Now we return to the iOSTest project and begin to practice the magic of MvvmCross. The fact is that the connections between View and ViewModel occur somewhere inside MvvmCross and are not represented explicitly. The code calls the ViewModel, and we see the View, while there is no indication what kind of View to show in the code.
As I understand it, each View is associated with its ViewModel exclusively through the name. Feedback just exists in the ad view. In general, everything is somehow ambiguous.
Create a Views folder in the iOSTest project and view it for all ViewModels: MainView, MenuView, AboutView, SettingsView. Unfortunately, VisualStudio is not the best tool to create a View. You should use "Xamarin iOS Designer" or "Xcode Interface Builder". Details can be found here: link This will allow you to create beautiful views.
But we will go this way: Create the files MainView.cs, MenuView.sc, AboutView.cs, SettingsView.cs as usual classes and describe the representation in them programmatically. It will not be very beautiful, but simple.
MainView.cs
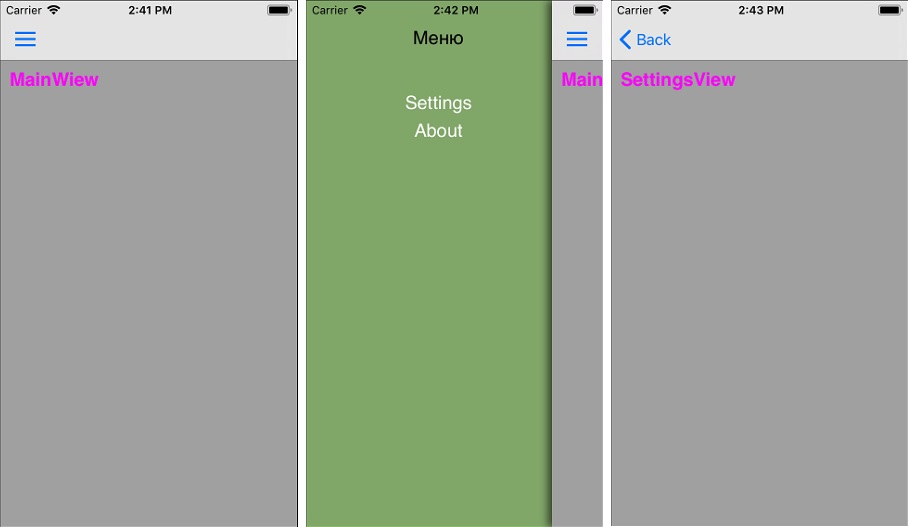
using Core.ViewModels; using CoreGraphics; using MvvmCross.iOS.Support.XamarinSidebar; using MvvmCross.iOS.Views; using UIKit; namespace iOSTest.Views { [MvxSidebarPresentation(MvxPanelEnum.Center, MvxPanelHintType.ResetRoot, true)] public class MainView : MvxViewController<MainViewModel> { public override void ViewDidLoad() { base.ViewDidLoad(); View.BackgroundColor = UIColor.LightGray; var label = new UILabel { Frame = new CGRect(10, 60, 200, 50), TextColor = UIColor.Magenta, Font = UIFont.FromName("Helvetica-Bold", 20f), Text = "MainWiew" }; Add(label); } } } Notice the attributes before declaring a class. This is a menu binding to this View.
AboutView.cs (SettingsView is similar)
AboutView.cs
using Core.ViewModels; using CoreGraphics; using MvvmCross.iOS.Support.XamarinSidebar; using MvvmCross.iOS.Views; using UIKit; namespace iOSTest.Views { [MvxSidebarPresentation(MvxPanelEnum.Center, MvxPanelHintType.PushPanel, true)] public class AboutView : MvxViewController<AboutViewModel> { public override void ViewDidLoad() { base.ViewDidLoad(); View.BackgroundColor = UIColor.LightGray; var label = new UILabel { Frame = new CGRect(10, 60, 200, 50), TextColor = UIColor.Magenta, Font = UIFont.FromName("Helvetica-Bold", 20f), Text = "AboutView" }; Add(label); } } } Attributes look different here. “PushPanel” instead of “ResetRoot” causes the “<Back” button to appear instead of the menu button, which takes you back to the previous window. That is, if you want to have a menu button in all windows, then write “ResetRoot”
And finally, MenuView.cs:
MenuView.cs
using System.Globalization; using Core.ViewModels; using CoreGraphics; using MvvmCross.iOS.Support.XamarinSidebar; using MvvmCross.iOS.Support.XamarinSidebar.Views; using MvvmCross.iOS.Views; using MvvmCross.Platform; using UIKit; namespace iOSTest.Views { [MvxSidebarPresentation(MvxPanelEnum.Left, MvxPanelHintType.PushPanel, false)] public class MenuView : MvxViewController<MenuViewModel>, IMvxSidebarMenu { private CGColor _borderColor = new CGColor(45, 177, 128); private readonly UIColor _backgroundColor = UIColor.FromRGB(140, 176, 116); private readonly UIColor _textColor = UIColor.Black; public override void ViewDidLoad() { base.ViewDidLoad(); View.BackgroundColor = _backgroundColor; EdgesForExtendedLayout = UIRectEdge.None; var label = new UILabel { Frame = new CGRect(10f, 30f, MenuWidth, 20f), TextColor = _textColor, Font = UIFont.FromName("Helvetica", 20f), Text = "", TextAlignment = UITextAlignment.Center }; Add(label); var i = 0; foreach (var item in ViewModel.MenuItems) { var itemButton = new UIButton(); itemButton.Frame = new CGRect(10, 100+i, MenuWidth, 20); itemButton.SetTitle(item.Title, UIControlState.Normal); itemButton.TitleLabel.Font = UIFont.FromName("Helvetica", 20f); itemButton.TitleLabel.TextColor = _textColor; itemButton.BackgroundColor = _backgroundColor; itemButton.TouchUpInside += delegate { item.Navigate.Execute(); Mvx.Resolve<IMvxSidebarViewController>().CloseMenu(); }; i += 30; Add(itemButton); } } public void MenuWillOpen(){} public void MenuDidOpen(){} public void MenuWillClose(){} public void MenuDidClose(){} private int MaxMenuWidth = 300; private int MinSpaceRightOfTheMenu = 55; public bool AnimateMenu => true; public bool DisablePanGesture => false; public float DarkOverlayAlpha => 0; public bool HasDarkOverlay => false; public bool HasShadowing => true; public UIImage MenuButtonImage => new UIImage("menu.png"); public int MenuWidth => UserInterfaceIdiomIsPhone ? int.Parse(UIScreen.MainScreen.Bounds.Width.ToString(CultureInfo.InvariantCulture)) - MinSpaceRightOfTheMenu : MaxMenuWidth; public bool ReopenOnRotate => true; private bool UserInterfaceIdiomIsPhone => UIDevice.CurrentDevice.UserInterfaceIdiom == UIUserInterfaceIdiom.Phone; } } Attributes again slightly changed, it is clear that the menu will be on the left. The menu icon is in the file “menu.png”, which according to all iOS rules should be in the Resources folder, preferably in three resolutions (sizes).
If you refuse to implement the IMvxSidebarMenu interface, the code can be cut almost in half, but the menu icon will not be. There will be an inscription "Menu".
That's all.
The whole project can be viewed here: github
Source: https://habr.com/ru/post/339864/
All Articles