Configure two-factor authentication in VMware Horizon View 7 using JaCarta PKI smart cards

Recently, we talked about how to configure 2FA authentication based on the PKI infrastructure and x509 certificates in a Citrix virtual environment using the JaCarta PKI electronic keys. Today we will talk about the closest "friend" of Citrix XenDesktop in the field of delivering virtual desktops and applications - VMware Horizon View.

How it works?
In simple terms, you can imagine just such a scheme.
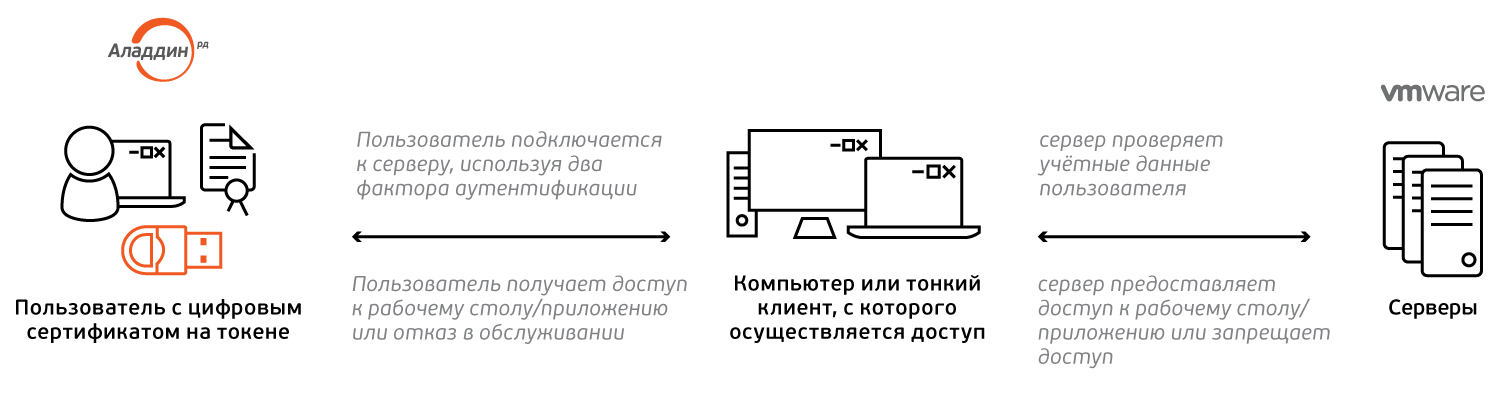
Two-factor authentication in a VDI session using a JaCarta PKI consists of the following steps:
')
- the user presents a token (the first factor is possession of the device) and enters a PIN code (the second factor is knowledge of the PIN code);
- the server is checking the user credentials;
- the user gets a desktop \ application or denial of service.
The reasons for “making friends” of VMware Horizon View with electronic keys, however, like any introduction of 2FA, have a number of advantages in comparison with classical password authentication. First of all, this is a general increase in the level of security that occurs due to the rejection of passwords and the transition to strong authentication using the second authentication factor. We will not dwell on this in detail, there are enough articles, and even whole books on the topic. Secondly, since authentication by tokens or smart cards is implemented, they can and should be used already within the VDI session. For example, for electronic signature in various scenarios and programs, for access to various web-applications, for electronic document management systems and remote banking services. It is possible to use both Western crypto algorithms and the national GOST. Additional benefits include the fact that the same card can be used for authentication, signature and access to the premises (if there is an RFID tag). In this case, there are options for customization - the application of the logo and corporate identity. And as part of the specials. projects there is the possibility of implementing payment applications on the same cards (Mir, MasterCard, Visa).
Introductory
It is assumed that the public key infrastructure is already deployed within Windows Server (version is not important) with the role Active Directory Certificate Services. VDI is deployed as part of VMware Horizon View 7 (working with 6.x and c 5.x) and is configured for simple password authentication. Another condition is that users have JaCarta electronic keys with digital certificates issued by MSCA.
The client is any PC, thin client, laptop with VMware Horizon Client installed.
Customization
All configuration is reduced to configuring certificates and enabling the certificate authentication option on the horizon view server.
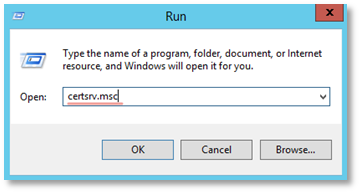
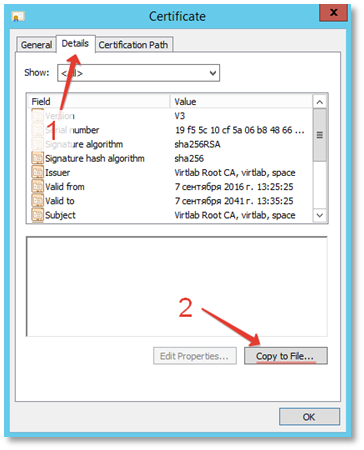
Export Root Certificate
Open the Certification Authority snap-in on the root CA by running the certsrv.msc command
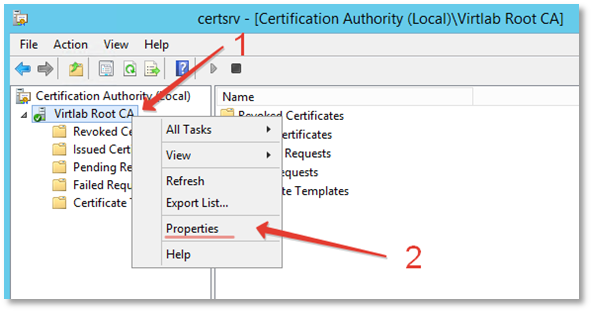
Open the Certification Authority -> CA Name -> Properties window
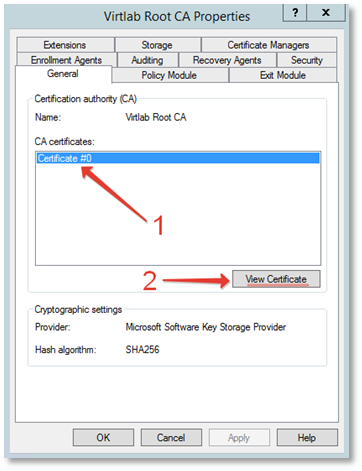
On the General tab, select the root certificate and click the View Certificate button.
Click the Details tab and click the Copy to File button.
On the file format selection page, select Base-64 encoded X.509 (.CER)
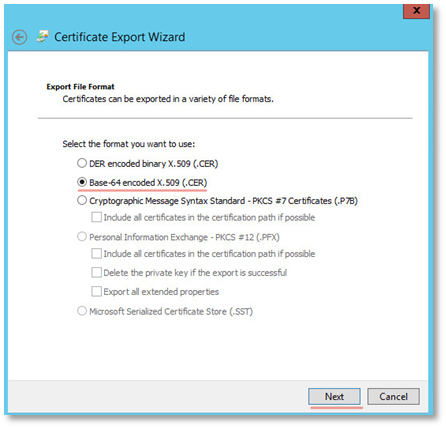
Specify the path to export the file, for example, C: \ temp \ RootCA.cer

Creating a JKS key container file
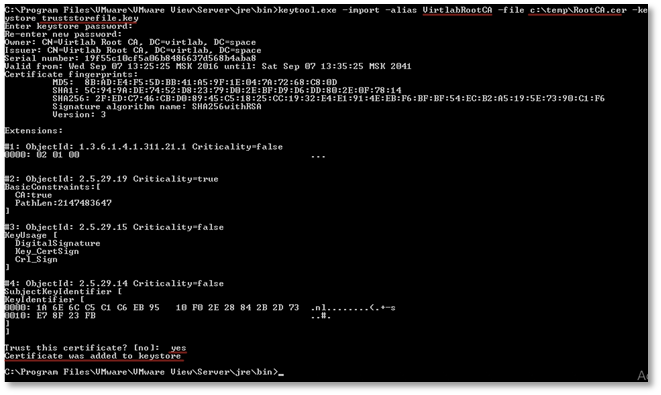
On the VMware Horizon View server, open a command prompt and navigate to the directory with the keytool.exe utility (C: \ Program Files \ VMware \ VMware View \ Server \ jre \ bin).

Import the root certificate into the storage file using the keytool -import -alias alias -file root_certificate -keystore truststorefile.key command , where alias is the alias (any value), root_certificate is the full path to the certificate file, truststorefile.key is the name of the storage file .
During the import process, you will need to enter a password phrase to protect the repository and confirm trust in the certificate.
The storage file truststorefile.key must be copied to the SSL Gateway directory:
install_directory \ VMware \ VMware View \ Server \ sslgateway \ conf \ truststorefile.key
In the SSL Gateway directory (install_directory \ VMware \ VMware View \ Server \ sslgateway \ conf \ locked.properties), you must create a file named locked.properties and edit it (for example, in notepad) before the following content:
trustKeyfile= truststorefile.key trustStoretype=JKS useCertAuth=true Save the file and restart the View Connection Server service .
Certificate Login Setup
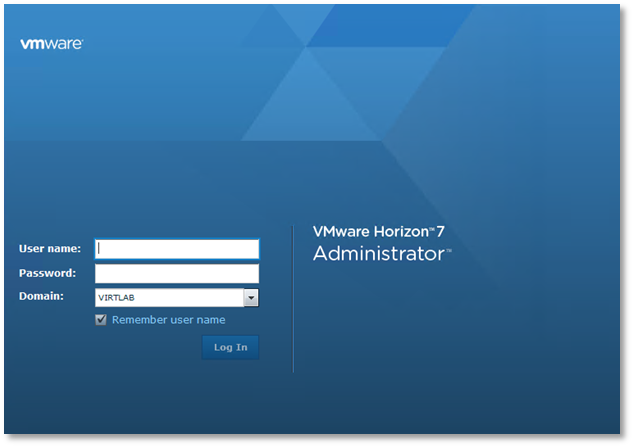
Access the VMware Horizon View web console.
Go to server properties: Inventory → View Configuration → Servers → Connections Servers → Edit .
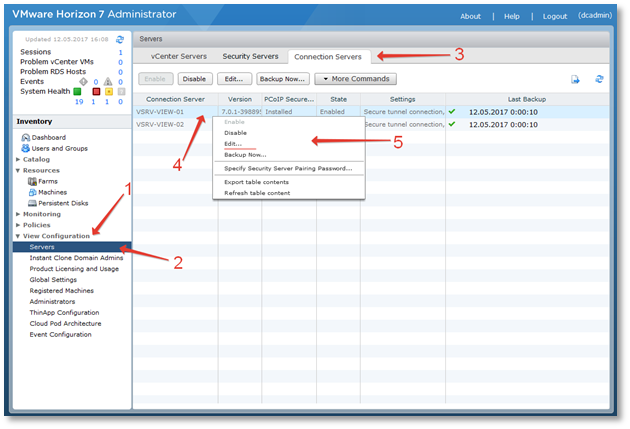
Go to the Authentication tab and select your preferred authentication mode.
Authentication to the administrative console using a smart card is configured from the drop-down list Smart card authentication for administrators :
- Not Allowed - do not use a smart card;
- Optional — mixed authentication — either by password or by smart card;
- Required - mandatory use of a smart card.
User authentication in VDI with a smart card is configured from the Smart card authentication for users drop-down list:
- Not Allowed - do not use a smart card;
- Optional — mixed authentication — either by password or smart card;
- Required - mandatory use of a smart card.
The Disconnect user sessions on smart card removal option defines a policy when a smart card is disabled. Check the box if you need to disconnect the session when removing the smart card.

Click OK .
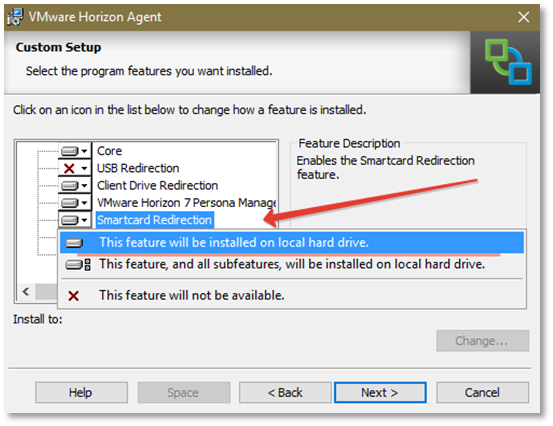
Configuring user smart card forwarding
Allowing a user's smart card allows transparent authentication to a virtual machine with a PIN entered once.
When using Teradici thin clients, configuration is usually not required.
When using Windows, MacOS, Linux software clients, you must install the VMware View Agent with the Smartcard Redirection option activated.
Check
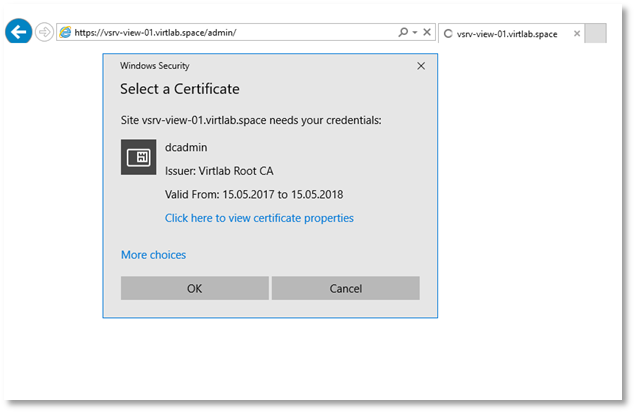
To verify, we will log in to the Horizon View administration console and to the virtual desktop.
Login to admin console
Insert the smart card and go to the administration console.
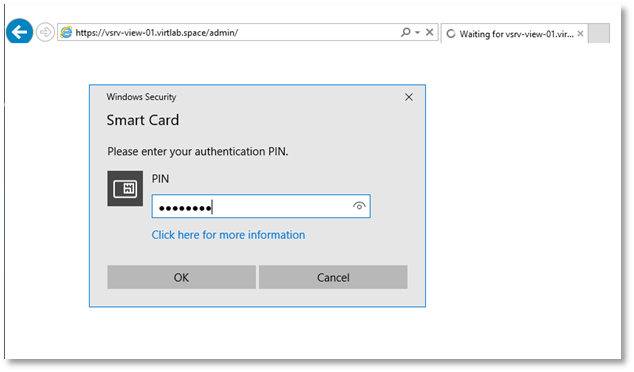
In the login form window that appears, select the administrator certificate and click OK .
You will be prompted to enter a PIN code. After successful verification of the PIN, authentication will be made to the web interface.
Login to virtual desktop
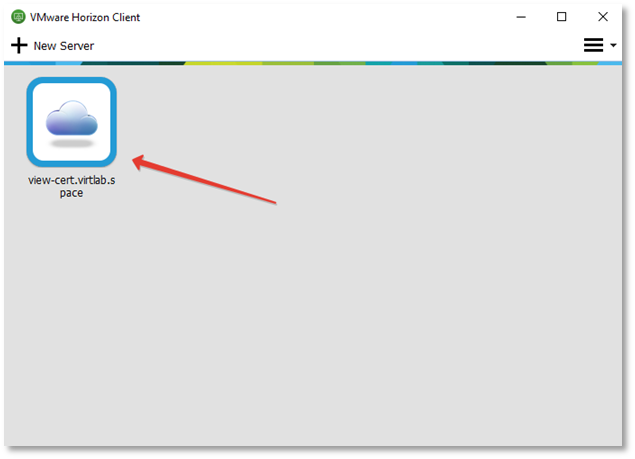
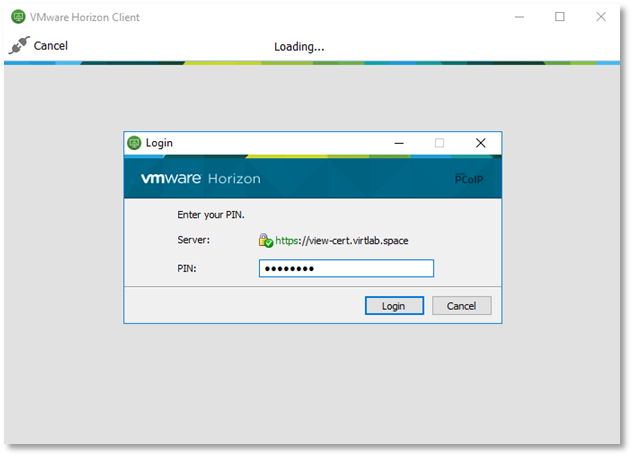
On the client device, launch the VMware Horizon Client and select the required connection.
You will be prompted to enter a PIN code.
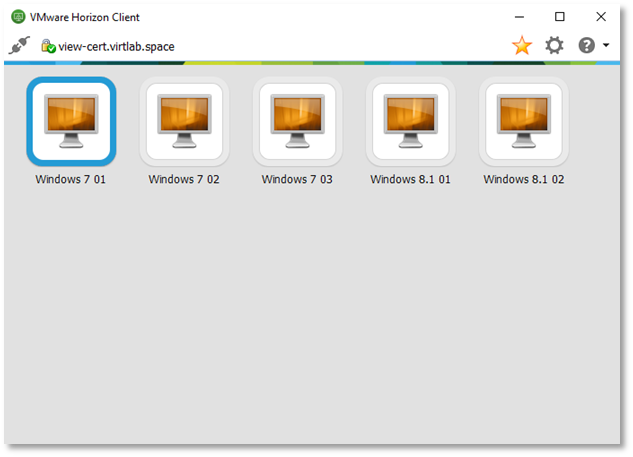
After successful authentication, the available resources are displayed.
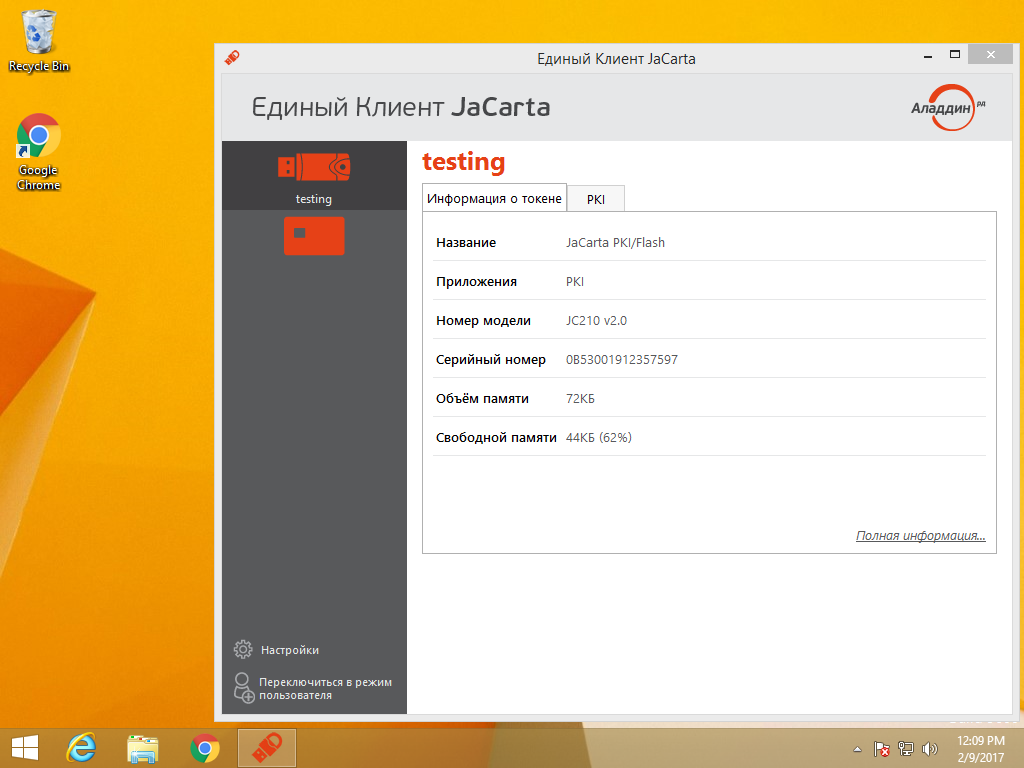
Well, let's make sure that the smart card has been forwarded to the delivered desktop.
That's all.
Source: https://habr.com/ru/post/339824/
All Articles