Cocos2d-x - Action Handling
From the author of the translation
As you already understood, this article is a simple translation of the official documentation for the Cocos2d-x engine. If this is your first time here, you can take a look at the previous article !
ATTENTION : The most difficult thing when translating technical documentation is not the translation itself, but the adaptation of the text for Russian-speaking readers. Many terms may not be translated into Russian. I wriggled out of such situations as I could. This had no effect on the essence and main ideas of this article, but some inaccuracies are possible. I apologize in advance and ask you to tell me about such errors, if they are found. I will be very grateful!
Actions
Action objects are what they are called. Actions allow you to change the properties of Node objects in time. Any objects of the Node base class can have actions that execute in them. As an example, you can move a sprite from one position to another, and do it gradually over a period of time.
Examples of actions:
')
// (50,10) 2 . auto moveTo = MoveTo::create(2, Vec2(50, 10)); mySprite1->runAction(moveTo); // 20 2 auto moveBy = MoveBy::create(2, Vec2(20,0)); mySprite2->runAction(moveBy); “By” and “To”, what are the differences?
You will notice that each action has a By and To version. Why do you need it? The fact is that they differ in the principle of their work. By runs relative to the current state of the node. To actions do not depend on the current parameters of the node. Let's take a look at a specific example:
auto mySprite = Sprite::create("mysprite.png"); mySprite->setPosition(Vec2(200, 256)); // MoveBy - 500 x 2 . // x = 200, x = 200 + 500 = 700 auto moveBy = MoveBy::create(2, Vec2(500, 0)); // MoveTo - (300, 256) // (300, 256) , // . auto moveTo = MoveTo::create(2, Vec2(300, mySprite->getPositionY())); // Delay - auto delay = DelayTime::create(1); auto seq = Sequence::create(moveBy, delay, moveTo, nullptr); mySprite->runAction(seq); 
Basic actions and how to run them
Basic actions, as a rule, are single, that is, they perform a single task.
Let's look at some examples:
Move
Moves a node over a specified period of time.
auto mySprite = Sprite::create("mysprite.png"); // 2 . auto moveTo = MoveTo::create(2, Vec2(50, 0)); mySprite->runAction(moveTo); // 50 0 2 . auto moveBy = MoveBy::create(2, Vec2(50, 0)); mySprite->runAction(moveBy); 
Rotate
Rotates the node clockwise for a specified period of time.
auto mySprite = Sprite::create("mysprite.png"); // 2 auto rotateTo = RotateTo::create(2.0f, 40.0f); mySprite->runAction(rotateTo); // 40 , 2 auto rotateBy = RotateBy::create(2.0f, 40.0f); mySprite->runAction(rotateBy); 
Scale
Scales a node over time.
auto mySprite = Sprite::create("mysprite.png"); // 3 // 2 auto scaleBy = ScaleBy::create(2.0f, 3.0f); mySprite->runAction(scaleBy); // , auto scaleBy = ScaleBy::create(2.0f, 3.0f, 3.0f); mySprite->runAction(scaleBy); // 3 auto scaleTo = ScaleTo::create(2.0f, 3.0f); mySprite->runAction(scaleTo); // , auto scaleTo = ScaleTo::create(2.0f, 3.0f, 3.0f); mySprite->runAction(scaleTo); 
Fade in / out
Gradually makes the node visible / invisible.
FadeIn changes the opacity from 0 to 255. Reverse action - FadeOut
auto mySprite = Sprite::create("mysprite.png"); // 1 auto fadeIn = FadeIn::create(1.0f); mySprite->runAction(fadeIn); // 2 auto fadeOut = FadeOut::create(2.0f); mySprite->runAction(fadeOut); 
Tint
Changes the color tone of the node, from the current to the specified.
auto mySprite = Sprite::create("mysprite.png"); // RGB auto tintTo = TintTo::create(2.0f, 120.0f, 232.0f, 254.0f); mySprite->runAction(tintTo); // auto tintBy = TintBy::create(2.0f, 120.0f, 232.0f, 254.0f); mySprite->runAction(tintBy); 
Animate
Animate allows you to implement frame-by-frame animation for your sprite. This is just a replacement for the displayed frame at set intervals for the animation. Let's look at this example:
auto mySprite = Sprite::create("mysprite.png"); // Vector<SpriteFrame*> animFrames; animFrames.reserve(12); animFrames.pushBack(SpriteFrame::create("Blue_Front1.png", Rect(0,0,65,81))); animFrames.pushBack(SpriteFrame::create("Blue_Front2.png", Rect(0,0,65,81))); animFrames.pushBack(SpriteFrame::create("Blue_Front3.png", Rect(0,0,65,81))); animFrames.pushBack(SpriteFrame::create("Blue_Left1.png", Rect(0,0,65,81))); animFrames.pushBack(SpriteFrame::create("Blue_Left2.png", Rect(0,0,65,81))); animFrames.pushBack(SpriteFrame::create("Blue_Left3.png", Rect(0,0,65,81))); animFrames.pushBack(SpriteFrame::create("Blue_Back1.png", Rect(0,0,65,81))); animFrames.pushBack(SpriteFrame::create("Blue_Back2.png", Rect(0,0,65,81))); animFrames.pushBack(SpriteFrame::create("Blue_Back3.png", Rect(0,0,65,81))); animFrames.pushBack(SpriteFrame::create("Blue_Right1.png", Rect(0,0,65,81))); animFrames.pushBack(SpriteFrame::create("Blue_Right2.png", Rect(0,0,65,81))); animFrames.pushBack(SpriteFrame::create("Blue_Right3.png", Rect(0,0,65,81))); // Animation* animation = Animation::createWithSpriteFrames(animFrames, 0.1f); Animate* animate = Animate::create(animation); // mySprite->runAction(RepeatForever::create(animate)); It is difficult to demonstrate the effect of animation in the text, so try it yourself to test it to see how it works!
Easing
Smooths animation to make it smooth. Remember that smooth actions always start the same way and end at the same time, regardless of the type of smoothing. Smooth action is a good way to fake physics in your game!
Here are the general smoothing functions displayed on the graphs:

Cocos2d-x supports most of the anti-aliasing features of the above. They are also easy to implement. Let's look at a specific use case. Let's reset the sprite from the top of the screen and simulate its rebound.
// auto mySprite = Sprite::create("mysprite.png"); auto dir = Director::getInstance(); mySprite->setPosition(Vec2(dir->getVisibleSize().width / 2, mySprite->getContentSize().height / 2)); // MoveBy , auto move = MoveBy::create(2, Vec2(0, dir->getVisibleSize().height - MySprite->getContentSize().height)); auto move_back = move->reverse(); // - auto move_ease_back = EaseBounceOut::create(move_back->clone()); // , auto delay = DelayTime::create(0.25f); // , // auto seq1 = Sequence::create(move, delay, move_ease_back, nullptr); // mySprite->runAction(RepeatForever::create(seq1)); Test this code to see it in action!
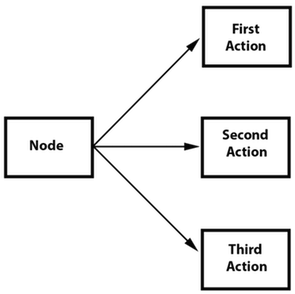
Sequences and how to run them
Sequences are series of actions that are performed sequentially. It can be any number of actions, functions, or even other sequences. Functions? Yes! Cocos2d-x contains a CallFunc object that allows you to create functions and execute them in your sequence. This allows you to add your own functions in a sequence, in addition to the simple actions provided by Cocos2d-x. The sequence process looks like this:

Sequence example
auto mySprite = Sprite::create("mysprite.png"); // auto jump = JumpBy::create(0.5, Vec2(0, 0), 100, 1); auto rotate = RotateTo::create(2.0f, 10); // callbacks auto callbackJump = CallFunc::create([](){ log("Jumped!"); }); auto callbackRotate = CallFunc::create([](){ log("Rotated!"); }); // callbacks auto seq = Sequence::create(jump, callbackJump, rotate, callbackRotate, nullptr); // mySprite->runAction(seq); So what does the Sequence do?
It will perform the following actions sequentially:
Jump -> callbackJump () -> Rotate -> callbackRotate ()
Try it yourself to test this sequence!
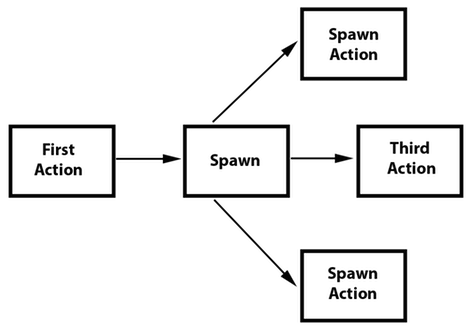
Spawn
Spawn is very similar to Sequence, the only difference is that it performs all actions at the same time. You can have any number of actions or even another Spawn object!
Spawn gives the same result as many consecutive runAction () calls. However, the advantage of using Spawn is that you can include it in the sequence, in order to achieve special effects that cannot be obtained in any other way. The combination of Spawn and Sequence is a very powerful tool.
Example:
// Spawn auto mySprite = Sprite::create("mysprite.png"); auto moveBy = MoveBy::create(10, Vec2(400,100)); auto fadeTo = FadeTo::create(2.0f, 120.0f); Using Spawn:
// Spawn. auto mySpawn = Spawn::createWithTwoActions(moveBy, fadeTo); mySprite->runAction(mySpawn); and the runAction () sequential call:
// mySprite->runAction(moveBy); mySprite->runAction(fadeTo); Both of these methods give one result. However, Cocos2d-x also allows you to use Spawn in the Sequence. This block diagram shows how this might look like:
// auto mySprite = Sprite::create("mysprite.png"); // auto moveBy = MoveBy::create(10, Vec2(400,100)); auto fadeTo = FadeTo::create(2.0f, 120.0f); auto scaleBy = ScaleBy::create(2.0f, 3.0f); // Spawn auto mySpawn = Spawn::createWithTwoActions(scaleBy, fadeTo); // auto seq = Sequence::create(moveBy, mySpawn, moveBy, nullptr); // mySprite->runAction(seq); Run this code to see it in action!
Clone
Clone exactly corresponds to its name. If you have an action, you can apply it to a set of nodes using clone (). Why do you need to clone? Good question. Action objects have an internal state. When they start, they actually change the properties of the node. Without the use of clone (), you will not have a unique action applied to the node. This will lead to unexpected results, since you do not know exactly what values of the action parameters are currently set.
Let's see an example, let's say you have a heroSprite and it has a position (0, 0). If you run the action:
MoveBy::create(10, Vec2(400,100)); This will make the sprite move from point (0, 0) to point (400, 100), and it will cover this distance in 10 seconds. Now heroSprite is in position (400, 100) and, more importantly, the action holds this position in the internal state. Now, let's say you have an enemySprite in position (200, 200). If you apply the same to it:
MoveBy::create(10, Vec2(400,100)); ... to your enemySprite, the action will end in a position (800, 200), and not where you intended. Do you understand why? This is due to the fact that the action no longer has an initial state, after the first launch of MoveBy. Cloning action prevents this. It guarantees you getting unique actions applied to the nodes.
Let's also see an example of incorrect code:
// auto heroSprite = Sprite::create("herosprite.png"); auto enemySprite = Sprite::create("enemysprite.png"); // auto moveBy = MoveBy::create(10, Vec2(400,100)); // heroSprite heroSprite->runAction(moveBy); // enemySprite enemySprite->runAction(moveBy); // , ! // . Correct code using clone ():
// auto heroSprite = Sprite::create("herosprite.png"); auto enemySprite = Sprite::create("enemysprite.png"); // auto moveBy = MoveBy::create(10, Vec2(400,100)); // heroSprite heroSprite->runAction(moveBy); // enemySprite enemySprite->runAction(moveBy->clone()); // ! Reverse
Turns the action in the opposite direction. If you run a series of actions, you can call reverse () for them, which starts them in reverse order. However, this is not just the launch of actions in the opposite direction. A reverse () call is actually controlling the parameters of the original Sequence or Spawn object, in reverse order.
An example of calling Spawn in reverse order:
// mySprite->runAction(mySpawn->reverse()); Most actions or sequences can be run in reverse order!
It's easy to use, but let's see what happens. Given:
// auto mySprite = Sprite::create("mysprite.png"); mySprite->setPosition(50, 56); // auto moveBy = MoveBy::create(2.0f, Vec2(500,0)); auto scaleBy = ScaleBy::create(2.0f, 2.0f); auto delay = DelayTime::create(2.0f); // auto delaySequence = Sequence::create(delay, delay->clone(), delay->clone(), delay->clone(), nullptr); auto sequence = Sequence::create(moveBy, delay, scaleBy, delaySequence, nullptr); // mySprite->runAction(sequence); // mySprite->runAction(sequence->reverse()); What is really going on? If we lay out the steps in a list, this should help:
- mySprite is created
- mySprite gets position (50, 56)
- sequence starts
- mySprite moves 500 pixels, its new position is (550, 56)
- the sequence is delayed by 2 seconds
- mySprite increases 2 times
- the sequence is delayed by another 6 seconds
- We run the reverse sequence, so every action is performed in the opposite direction.
- the sequence is delayed by 6 seconds
- mySprite decreases 2 times
- the sequence is delayed by 2 seconds
- mySprite moves -500 pixels, its position again (50, 56)
You can see that the reverse () method is simple to use, but not too simple in its internal logic. Fortunately, Cocos2d-x will do all the hard work for you!
Source: https://habr.com/ru/post/339794/
All Articles