New 3CX Call Flow Designer: Complicated Call Routing Without Programming
In the final version of 3CX Call Flow Designer , new interesting components have appeared. For example, now you can literally configure complex incoming call routing with your mouse, without using expressions or procedures in C #. Any user can cope with this without programming skills.
In this article, we will look at using the new Date & Time condition component to configure call routing depending on the time of day. The voice application will perform the following actions:
For your convenience, the initial draft of the application is supplied in the 3CX CFD distribution and is located in the Documents \ 3CX Call Flow Designer Demos folder.
')
To create an application, open 3CX CFD, go to File> New> Project , specify the folder where the project will be saved, and the name of the project.
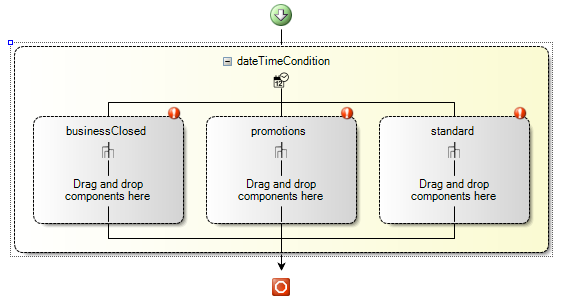
Drag the Date & Time condition component from the Component Panel on the left to the designer workspace. Name the component, for example, dateTimeCondition , by clicking on it and specifying the name in the Properties Window.
Configure 3 component branches. Call them businessClosed , promotions and standard .
Now we set up the conditions of branching. Conditions are checked from left to right, and the first branch is executed that satisfies the condition. Double-click (or right-click) on the businessClosed branch and select the Configure option.

In the condition settings window, DID line selection and time ranges are set. You can set the condition to be met only if the call comes in 3CX only to a certain external number (DID). The AllDIDs option includes all external numbers. The AllDIDsWithExceptions option includes all external numbers, except those listed below (the DID should be separated by a comma). The SpecificDIDs option includes only the numbers listed.
Set the condition AllDIDs , since there is no need to exclude any external numbers from our condition, and click the button Edit Date Time Conditions .

In the opened time interval editor, you can specify the following conditions: Day of week - time ranges of certain days of the week, for example, every Monday; Specific day - time ranges of a specific date, for example, a specific date of a certain holiday; 3CX Office Hours - the time range of working hours of this 3CX system; 3CX Out of Office Hours - the time range of Non-working hours of this 3CX system.
We select the 3CX Out of Office Hours condition, because we want this branch to be performed when our organization is not working. The condition does not require any other parameters.
Now set up branching promotions . It works for any external DID on Monday, Wednesday and Friday from 9 to 12 and from 14 to 17. The condition is configured as shown below.

For the standard branching, we use the 3CX Office Hours condition, which will work if the previous conditions are not met.

After creating branches, we will add the Transfer component to each of them, which will switch the call in one direction or another. Drag the Transfer component from the Component Panel to each branch. Then adjust each component to the appropriate direction. In this example, the Destination property is set to extensions 800, 801, and 802, respectively.

Voice application is ready! Now it should be compiled and uploaded to the 3CX server. For this:
Try to call the queue. You will be switched to the appropriate extension number depending on the current time of day.
In this article, we will look at using the new Date & Time condition component to configure call routing depending on the time of day. The voice application will perform the following actions:
- Outside hours, including holidays, calls will be routed to the Call Queue with the name Business closed .
- During business hours on Monday, Wednesday and Friday from 9 to 12 and from 14 to 17, calls will be routed to the Promotions advertising queue.
- In the remaining work periods, calls will be routed to the Standard Queue.
For your convenience, the initial draft of the application is supplied in the 3CX CFD distribution and is located in the Documents \ 3CX Call Flow Designer Demos folder.
')
To create an application, open 3CX CFD, go to File> New> Project , specify the folder where the project will be saved, and the name of the project.
Adding the Date & Time condition component
Drag the Date & Time condition component from the Component Panel on the left to the designer workspace. Name the component, for example, dateTimeCondition , by clicking on it and specifying the name in the Properties Window.
Configure 3 component branches. Call them businessClosed , promotions and standard .
Now we set up the conditions of branching. Conditions are checked from left to right, and the first branch is executed that satisfies the condition. Double-click (or right-click) on the businessClosed branch and select the Configure option.
In the condition settings window, DID line selection and time ranges are set. You can set the condition to be met only if the call comes in 3CX only to a certain external number (DID). The AllDIDs option includes all external numbers. The AllDIDsWithExceptions option includes all external numbers, except those listed below (the DID should be separated by a comma). The SpecificDIDs option includes only the numbers listed.
Set the condition AllDIDs , since there is no need to exclude any external numbers from our condition, and click the button Edit Date Time Conditions .
In the opened time interval editor, you can specify the following conditions: Day of week - time ranges of certain days of the week, for example, every Monday; Specific day - time ranges of a specific date, for example, a specific date of a certain holiday; 3CX Office Hours - the time range of working hours of this 3CX system; 3CX Out of Office Hours - the time range of Non-working hours of this 3CX system.
We select the 3CX Out of Office Hours condition, because we want this branch to be performed when our organization is not working. The condition does not require any other parameters.
Now set up branching promotions . It works for any external DID on Monday, Wednesday and Friday from 9 to 12 and from 14 to 17. The condition is configured as shown below.
For the standard branching, we use the 3CX Office Hours condition, which will work if the previous conditions are not met.
Adding Transfer Components
After creating branches, we will add the Transfer component to each of them, which will switch the call in one direction or another. Drag the Transfer component from the Component Panel to each branch. Then adjust each component to the appropriate direction. In this example, the Destination property is set to extensions 800, 801, and 802, respectively.
Compiling and installing the application on the 3CX server
Voice application is ready! Now it should be compiled and uploaded to the 3CX server. For this:
- Go to Build> Build All , and the CFD will create the DateTimeRouting.tcxvoiceapp file.
- Go to the 3CX management interface in the Call Queues section. Create a new Call Queue, specify the name and extension number of the Queue, and then set the Voice Applications option and download the compiled file.
- Save your changes to the Queue. Voice application is ready to go.
Try to call the queue. You will be switched to the appropriate extension number depending on the current time of day.
Source: https://habr.com/ru/post/339694/
All Articles