Cocos2d-x - Working with sprites
Foreword
This article is the second in a series of translations of documentation for the Cocos2d-x game engine. If you have not seen the first part of the translation, I advise you first to get acquainted with it:
Cocos2d-x - Basic Concepts
Now let's continue!
What is sprite
A sprite is a 2D image that can be animated or transformed by changing properties such as: rotation , scale , color , and so on.
Creating sprites
There are various ways to create sprites, depending on what you need to do. You can create a sprite using images of various graphic formats, including: PNG , JPEG , TIFF and others. Let's look at some of the creation methods and talk about each of them.
')
Create a simple sprite
Sprite can be created by specifying an image file.
auto mySprite = Sprite::create("mysprite.png"); 
The code above creates a sprite using the image mysprite.png . As a result, the created sprite uses the whole image. It has the same dimensions as mysprite.png . If the image file is 200 x 200 then the resulting sprite will also be 200 x 200.
Creating a sprite using Rect (rectangle)
In the previous example, the created sprite was the same size as the original image. If you want to create a sprite using only part of the image file, you can do this by specifying a rectangular area - Rect .
Rect has 4 values: origin x, origin y, width and height.
auto mySprite = Sprite::create("mysprite.png", Rect(0,0,40,40)); 
Rect takes the upper left corner for the origin. This is the opposite of the principle we used when we set the position on the screen, reading the coordinates from the bottom left corner. Thus, the resulting sprite is only part of the original image file. In this case, the size of the sprite 40 x 40 starting from the upper left corner.
If you do not specify a Rect, Cocos2d-x will automatically use the full height and width of the specified image. Take a look at the code below. If you use an image with dimensions of 200 x 200, then the following two expressions will have the same results.
auto mySprite = Sprite::create("mysprite.png"); auto mySprite = Sprite::create("mysprite.png", Rect(0,0,200,200)); Creating a Sprite from a Texture Atlas (Sprite Sheet)
Sprite sheet is a way to combine sprites into one file. Using the sprite sheet helps achieve better performance by batch drawing call processing. They can also save disk and video memory if the sprites are packaged more efficiently (usually special tools are required). You will read more about this in the advanced chapter, but this is only one of many standard methods for improving game performance.
When using a sprite sheet , it is first loaded into SpriteFrameCache. SpriteFrameCache is a caching class that stores SpriteFrame objects for quick access to them. SpriteFrame is loaded once and saved to SpriteFrameCache.
Here is an example of a sprite sheet :

Let's take a closer look at what happens:
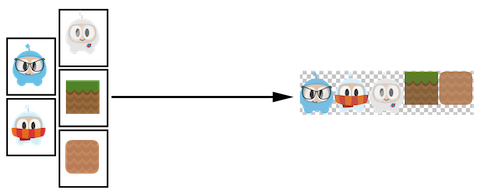
As you can see, the sprite sheet combines all the sprites into one file and minimizes the extra space.
Sprite Sheet download
Most likely, you will download in AppDelegate :
// Sprite Sheet auto spritecache = SpriteFrameCache::getInstance(); // .plist spritecache->addSpriteFramesWithFile("sprites.plist"); Now that we have a texture atlas loaded into SpriteFrameCache, we can create a sprite.
Create a Sprite SpriteFrameCache
This is the creation of a sprite, by pulling it out of SpriteFrameCache.
// .plist , . // "mysprite" – sprite sheet: auto mysprite = Sprite::createWithSpriteFrameName("mysprite.png"); Create SpriteFrame Sprite
Another way to create the same sprite is to get SpriteFrame from SpriteFrameCache, and then create a sprite with SpriteFrame. Example:
// , // , SpriteFrame . auto newspriteFrame = SpriteFrameCache::getInstance()->getSpriteFrameByName("Blue_Front1.png"); auto newSprite = Sprite::createWithSpriteFrame(newspriteFrame); Tools for creating Sprite Sheets
Creating a sprite sheet manually is a tedious process. Fortunately, there are tools that can generate them automatically. These tools offer many features to maximize your sprites!
Here are a few tools:
Sprite manipulation
After creating the sprite, you will get access to its various properties that can be manipulated.
Given:
auto mySprite = Sprite::create("mysprite.png"); Anchor point and position
The Anchor Point is the point you set to indicate which part of the sprite will be used when setting its coordinates. The reference point affects only the properties associated with the transformation. They include: scale , rotation , skew . And do not include: color and opacity . The pivot point uses a coordinate system from the bottom left corner. Keep this in mind when doing your calculations. By default, all Node objects have a standard reference point (0.5, 0.5) .
Setting the reference point is simple:
// DEFAULT mySprite->setAnchorPoint(0.5, 0.5); // mySprite->setAnchorPoint(0, 0); // mySprite->setAnchorPoint(0, 1); // mySprite->setAnchorPoint(1, 0); // mySprite->setAnchorPoint(1, 1); To present this visually:
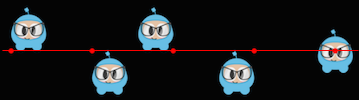
Properties of sprites affected by an anchor point
The use of an anchor point affects only the properties associated with the transformation. Such as: scale , rotation , skew .
Position
The pivot point affects the position of the sprite, since it is this point that is used as the main point during positioning. Let's see how this happens. Pay attention to the color line, and then where are the sprites relative to it. It is important to note that this effect was obtained only by changing the reference point. We did not use setPosition () to achieve this:
The position of the sprite can also be set using the setPosition () method.
// x = 100, y = 200. mySprite->setPosition(Vec2(100, 200)); Rotation
Changes the sprite's rotation to a positive or negative number of degrees. Positive values rotate the sprite clockwise, while negative values rotate counterclockwise. The default value is 0.0
// +20 mySprite->setRotation(20.0f); // -20 mySprite->setRotation(-20.0f); // +60 mySprite->setRotation(60.0f); // -60 mySprite->setRotation(-60.0f); 
Scale
Changes the sprite scale, either on each axis separately, or evenly on both. The standard value is 1.0.
// 2 mySprite->setScale(2.0); // x mySprite->setScaleX(2.0); // y mySprite->setScaleY(2.0); 
Skew
Changes the slope of the sprite, either separately along the x and y axes, or evenly for all. The default value is 0.0
// X 20.0 mySprite->setSkewX(20.0f); // Y 20.0 mySprite->setSkewY(20.0f); Sprite properties that are not affected by the reference point
There are several properties of the Sprite object that are not affected by the reference point. Why? Because they only change the look, like the color and opacity properties.
Color
Changes the color of the sprite. This is done using Color3B. We have not yet come across Color3B, but this is just an object representing the RGB color. RGB color includes 3 values (Red, Green, Blue), from 0 to 255. Cocos2d-x also provides predefined colors from which you can choose. Using them will be a little faster since they are already defined in advance. Here are some examples:
// Color3B. mySprite->setColor(Color3B::WHITE); // Color3B. mySprite->setColor(Color3B(255, 255, 255)); // Color3B::WHITE 
Opacity
Changes the sprite's opacity to the specified value. This property takes values from 0 to 255, where 255 is not complete transparency, and 0 is absolute invisibility. The standard value is 255 (full visibility).
// opacity 30, 11.7%. // (30 / 256 = 0.1171875...) mySprite->setOpacity(30); 
Polygonal sprites
A polygonal sprite is also a sprite, which is used to output 2d images. However, unlike a normal sprite, which is a rectangle consisting of two triangles, a polygonal sprite consists of a series of triangles.
Why use a polygonal sprite?
The answer is simple - performance!
There are many technical terms about the speed of pixel filling that we could throw out here, but you just need to understand that PolygonSprite is drawn based on the shape of your sprite, and not a rectangle with excess area. This way of drawing, allows you to save on unnecessary work. Consider an example:
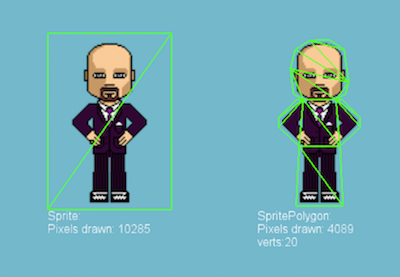
Notice the differences between the left and right versions?
On the left, a typical sprite that is drawn using two triangles.
On the right, PolygonSprite, drawn by a large number of small triangles.
Whether it is worth making such a compromise, purely for performance reasons, depends on a number of factors (the shape / detail of the sprite, size, number drawn on the screen, and so on), but mostly vertices are cheaper than pixels on modern graphics processors.
Autopolygon
AutoPolygon is a helper class. Its goal is to create a 2d polygon mesh based on the image.
There are functions for each step of processing this process, from defining all points to triangulation. The result can be passed to the create function of the sprite object, to create a PolygonSprite. Example:
// polygon info. auto pinfo = AutoPolygon::generatePolygon("filename.png"); // polygon info. auto sprite = Sprite::create(pinfo); Next article: Handling Actions
Source: https://habr.com/ru/post/339690/
All Articles