Translation of two articles: “How to commit changes to a Docker image” and “Guide for Moving Docker Containers”
(Translator's note: to start Docker from under the current user, the following commands are needed:
sudo usermod -aG docker $ (whoami)
sudo usermod -aG docker your_current_username )
Jack Wallen, April 27, 2017
If you like to use docker images as templates for efficient container deployment, Jack Wallen will show you how to commit changes to a running container to create a new docker image.
')

One way your company can handle docker containers is to create template images for use in your containers. Let's say, for example, you use containers for development purposes and want to be sure that all secured containers start with the same basic toolbox. You can pull the image, launch the container, modify it to suit your needs, and then start developing with this container, but you will have to repeat the same process every time you need to deploy this container.
Or, you can make a pull of the image, run the container, modify it to meet the basic needs of your developers, and commit these changes to the new image. Now, all your developers need is to launch a new container based on a modified image, and they can do it. They do not need to modify the source image for this.
If all this looks like a process that you want to implement, luck is on your side - it's really quite simple. Let's say you need an image based on the latest version of nginx, with PHP, build-essential and nano installed. I will guide you through the process of pulling an image, launching a container, connecting to it, adding software, and committing changes to a new image that can easily be used as a base for your containers.
The first step is to pull the last nginx image. This is accomplished with the command:
docker pull nginx
Once the image is loaded, we can launch it, so that we can use the terminal window like this:
docker run --name nginx-template-base -p 8080: 80 -e TERM = xterm -d nginx
I called it nginx-template-base, since this will be what our template will be based on.
Next we need to access the container. When you run the docker run command, it will show you a long identifier. Run the command:
docker exec -it CONTAINER_ID bash
Where CONTAINER_ID is the ID shown on the screen when you run the run command.
After running this command, you will appear from the terminal of the running container. Now let's add the necessary software to the template. To do this, run the following commands.
apt-get install nano
Apt-get install build-essential
Apt-get install php5
Note: for the official image, nginx PHP 7 is not available for installation without adding a repository.
Now, since we have modified the container, we need to commit the changes. First, exit the container with the exit command. To commit changes and create a new image based on the changes above, run the command:
docker commit CONTAINER_ID nginx-template
Where CONTAINER_ID is the ID given to you when you initially launched the container.
If you run the docker images command, you will see a new container (Figure B):
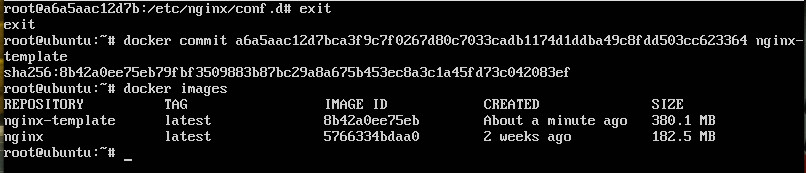
Illustration B. A freshly created pattern image ready for use.
At this point, you can prepare to launch a new container, using a new image, having all the modifications in place. Remember. when you launch a new container, the command will look something like this:
docker run --name nginx-dev -p 8080: 80 -e TERM = xterm -d nginx-template
If you enter this new container (using the docker exec command), you will see that everything is in place and ready to use.
If you are looking for a way to make working with Docker containers a little more efficient, this is enough for you for a long time. Once you create image templates, developing with Docker containers will become much easier.
Rick Donato, October 28, 2016.
Docker provides various commands / methods for moving containers. In this article, you will see all these commands needed to move your Docker containers between your hosts and repositories, in the examples.
Let's take a look at how we get the image from the repository, and how we deliver our local image to the remote repository.
The docker pull command is used to get an image from the repository.
$ docker pull busybox
Using default tag: latest
latest: Pulling from library / busybox
Digest: sha256: 29f5d56d12684887bdfa50dcd29fc31eea4aaf4ad3bec43daf19026a7ce69912
Status: Up to date for busybox: latest
Tip: by default, Docker will pull from docker.io. For a pool from another repository, add the host name of your registry to the docker pull command , i.e. docker pull registry.fir3net.com/busybox ([1]).
To move images from the repository to the repository, docker push is used . Below are the steps that affect the push image to the repository.
Here is an example:
// LOGIN
$ docker login registry.fir3net.com
Username: felix001
Password:
Login Succeeded
// TAG
$ docker tag busybox registry.fir3net.com/busybox-v0.0.1
// PUSH
$ docker push registry.fir3net.com/busybox-v0.0.1
The push refers to a repository [registry.fir3net.com/busybox-v0.0.1] (len: 1)
Sending image list
Pushing repository registry.fir3net.com/busybox-v0.0.1 (1 tags)
d3a1f33e8a5a: Image successfully pushed
c22013c84729: Image successfully pushed
d74508fb6632: Image successfully pushed
91e54dfb1179: Image successfully pushed
Pushing tag for rev [91e54dfb1179] on {https://registry.fir3net.com/v1/repositories/busybox-v0.0.1/tags/latest}
We can take a local image or container and then load it or import it into another Docker environment.
Well, let's take a look at the docker export and docker save commands. docker export saves a running (paused) instance ([2]) of the container to a tar file. docker save saves the image to a tar file.
Below are examples of these two commands:
Export
$ docker ps
CONTAINER ID IMAGE COMMAND
5e8f397be6fa busybox "sh"
$ docker export 5e8f397be6fa -o busybox-container.tar
Save
$ docker images
REPOSITORY TAG IMAGE ID
busybox latest e02e811dd08f
$ docker save -o busybox-image.tar busybox
Finally, the docker import and docker load commands are applied to the tar files that were originally created.
docker import is used to import a tar file (that is, a container) created through docker export . docker load to load the tar file (i.e. image) created via docker save .
// SAVE
$ docker import busybox-container.tar
sha256: 94f13e1b4a26cd15a6c6d33da835e7319491a9c1dbeca16583750f7b96235403
// LOAD
$ docker load --input busybox-image.tar
Loaded image: busybox: latest
References:
[1] stackoverflow.com/questions/33054369/how-to-change-the-default-docker-registry-from-docker-io-to-my-private-registry
[2] blog.giantswarm.io/moving-docker-container-images-around
sudo usermod -aG docker $ (whoami)
sudo usermod -aG docker your_current_username )
How to commit changes to a Docker image
Jack Wallen, April 27, 2017
If you like to use docker images as templates for efficient container deployment, Jack Wallen will show you how to commit changes to a running container to create a new docker image.
')
One way your company can handle docker containers is to create template images for use in your containers. Let's say, for example, you use containers for development purposes and want to be sure that all secured containers start with the same basic toolbox. You can pull the image, launch the container, modify it to suit your needs, and then start developing with this container, but you will have to repeat the same process every time you need to deploy this container.
Or, you can make a pull of the image, run the container, modify it to meet the basic needs of your developers, and commit these changes to the new image. Now, all your developers need is to launch a new container based on a modified image, and they can do it. They do not need to modify the source image for this.
If all this looks like a process that you want to implement, luck is on your side - it's really quite simple. Let's say you need an image based on the latest version of nginx, with PHP, build-essential and nano installed. I will guide you through the process of pulling an image, launching a container, connecting to it, adding software, and committing changes to a new image that can easily be used as a base for your containers.
Pull the image and launch the container
The first step is to pull the last nginx image. This is accomplished with the command:
docker pull nginx
Once the image is loaded, we can launch it, so that we can use the terminal window like this:
docker run --name nginx-template-base -p 8080: 80 -e TERM = xterm -d nginx
I called it nginx-template-base, since this will be what our template will be based on.
Container connection and modification
Next we need to access the container. When you run the docker run command, it will show you a long identifier. Run the command:
docker exec -it CONTAINER_ID bash
Where CONTAINER_ID is the ID shown on the screen when you run the run command.
After running this command, you will appear from the terminal of the running container. Now let's add the necessary software to the template. To do this, run the following commands.
apt-get install nano
Apt-get install build-essential
Apt-get install php5
Note: for the official image, nginx PHP 7 is not available for installation without adding a repository.
Exit the container and commit the changes.
Now, since we have modified the container, we need to commit the changes. First, exit the container with the exit command. To commit changes and create a new image based on the changes above, run the command:
docker commit CONTAINER_ID nginx-template
Where CONTAINER_ID is the ID given to you when you initially launched the container.
If you run the docker images command, you will see a new container (Figure B):
Illustration B. A freshly created pattern image ready for use.
At this point, you can prepare to launch a new container, using a new image, having all the modifications in place. Remember. when you launch a new container, the command will look something like this:
docker run --name nginx-dev -p 8080: 80 -e TERM = xterm -d nginx-template
If you enter this new container (using the docker exec command), you will see that everything is in place and ready to use.
Easy way to container templates
If you are looking for a way to make working with Docker containers a little more efficient, this is enough for you for a long time. Once you create image templates, developing with Docker containers will become much easier.
Guide to Moving Docker Containers
Rick Donato, October 28, 2016.
Docker provides various commands / methods for moving containers. In this article, you will see all these commands needed to move your Docker containers between your hosts and repositories, in the examples.
From repository to repository
Let's take a look at how we get the image from the repository, and how we deliver our local image to the remote repository.
PULL
The docker pull command is used to get an image from the repository.
$ docker pull busybox
Using default tag: latest
latest: Pulling from library / busybox
Digest: sha256: 29f5d56d12684887bdfa50dcd29fc31eea4aaf4ad3bec43daf19026a7ce69912
Status: Up to date for busybox: latest
Tip: by default, Docker will pull from docker.io. For a pool from another repository, add the host name of your registry to the docker pull command , i.e. docker pull registry.fir3net.com/busybox ([1]).
Push
To move images from the repository to the repository, docker push is used . Below are the steps that affect the push image to the repository.
- Authentication - if it is required by the repository, it is performed by the docker login command.
- Tagging - provided by the docker tag command
- Push - docker push command is used for this
Here is an example:
// LOGIN
$ docker login registry.fir3net.com
Username: felix001
Password:
Login Succeeded
// TAG
$ docker tag busybox registry.fir3net.com/busybox-v0.0.1
// PUSH
$ docker push registry.fir3net.com/busybox-v0.0.1
The push refers to a repository [registry.fir3net.com/busybox-v0.0.1] (len: 1)
Sending image list
Pushing repository registry.fir3net.com/busybox-v0.0.1 (1 tags)
d3a1f33e8a5a: Image successfully pushed
c22013c84729: Image successfully pushed
d74508fb6632: Image successfully pushed
91e54dfb1179: Image successfully pushed
Pushing tag for rev [91e54dfb1179] on {https://registry.fir3net.com/v1/repositories/busybox-v0.0.1/tags/latest}
From host to host
We can take a local image or container and then load it or import it into another Docker environment.
EXPORT or SAVE
Well, let's take a look at the docker export and docker save commands. docker export saves a running (paused) instance ([2]) of the container to a tar file. docker save saves the image to a tar file.
Below are examples of these two commands:
Export
$ docker ps
CONTAINER ID IMAGE COMMAND
5e8f397be6fa busybox "sh"
$ docker export 5e8f397be6fa -o busybox-container.tar
Save
$ docker images
REPOSITORY TAG IMAGE ID
busybox latest e02e811dd08f
$ docker save -o busybox-image.tar busybox
IMPORT or LOAD
Finally, the docker import and docker load commands are applied to the tar files that were originally created.
docker import is used to import a tar file (that is, a container) created through docker export . docker load to load the tar file (i.e. image) created via docker save .
// SAVE
$ docker import busybox-container.tar
sha256: 94f13e1b4a26cd15a6c6d33da835e7319491a9c1dbeca16583750f7b96235403
// LOAD
$ docker load --input busybox-image.tar
Loaded image: busybox: latest
References:
[1] stackoverflow.com/questions/33054369/how-to-change-the-default-docker-registry-from-docker-io-to-my-private-registry
[2] blog.giantswarm.io/moving-docker-container-images-around
Source: https://habr.com/ru/post/339610/
All Articles