Development of browser-based online games without frameworks and engines
Hi, Habr!
This post will describe the process of developing online games in pure javascript and WebGL (without frameworks and engines). Some algorithms, rendering techniques, artificial intelligence of bots and network game will be considered. The project is completely open source, at the end of the post there will be a link to the repository.
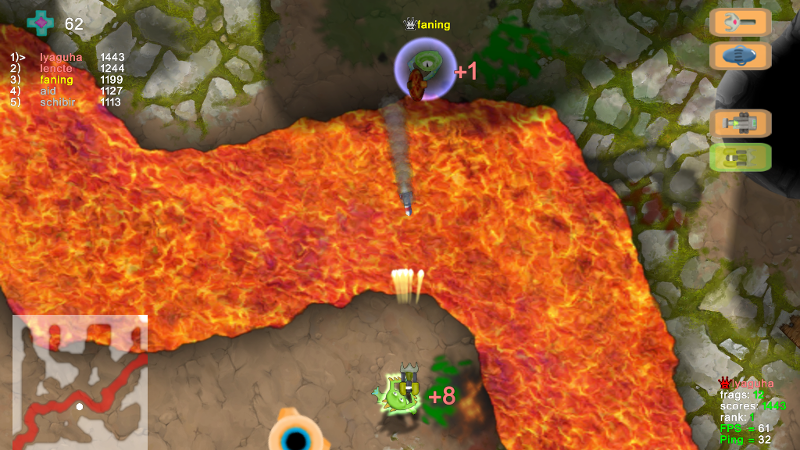
Immediately gameplay video:
Here plays a bot called Lyaguha and other bots
')
Introduction
The game is a 2D shooting game "top view". The game contains the following elements: land; walls that limit visibility; lava, on which you can not walk; bridges over lava; 6 types of weapons and 5 types of power; characters, one of which is controlled by the player.
The gameplay, as in Quake III, is an ordinary deathmatch, that is, you need to kill more enemies than they do. There are bots in the game, but as soon as a live player enters it, one of the bots is removed (the one who recently died and did not have time to respawn). A set of weapons is traditional for such games. It is worth noting only that the rail infinite damage, and the rocket launcher shoots "smart" missiles - they are undermined automatically when they fly at a minimum distance from the enemy.
The client is written in javascript using WebGL, and the server is in node.js. This project uses the following libraries:
- game-shim.js - for requestAnimationFrame, fullscreen and mouselock
- gl-matrix.js - matrix library
- howler.js - sound library
- bootstrap and jquery especially for the page with the input of the nickname, have not been used anywhere else
- the server uses express, ws (WebSocket) and others
We now turn directly to the description of the algorithms used.
The level (map) is rendered with the help of the so-called levelmapy - this is a regular texture, each channel of which contains a certain mask (these masks will be discussed below). In this game, the maximum card size is 256x256, where 1x1 corresponds to the size of the characters. This card is designed for about 110 players. For simplicity, consider the 64x64 map. But first you need to generate it.
Level generation
To generate the map, the usual Perlin noise is used, plus some transformations and filtering:

Where perlinNoise () is Perlin noise, ranging from 0 to 1,
abs (x) is the modulus of a number
clamp (x) - if x <0, then x = 0. If x> 1, then x = 1,
norm (-0.5, 2) - normalizes noise in this range.
Such a sequence of transformations at the output gives the required topology of the map: it consists of rooms and corridors, 2-3 pixels wide.
The resulting texture is the mask of the earth (black is the earth, white is the wall).
Next, a lava river is generated in a separate buffer. For this, a polyline is generated (if inflows are needed, then several polylinea) and each segment of the polyline is “drawn” into the buffer using the Bresenham algorithm . Then this buffer with segments is blurred according to Gauss. The blur radius is selected based on the required width of the river. A two pass algorithm is used to optimize the blur. The blur function will come in handy more than once. Blur the buffer with lava is needed in order to give the river width, as well as in the future for rendering.
In the mask of the earth, where the lava passes and in close proximity to it, the walls are removed:
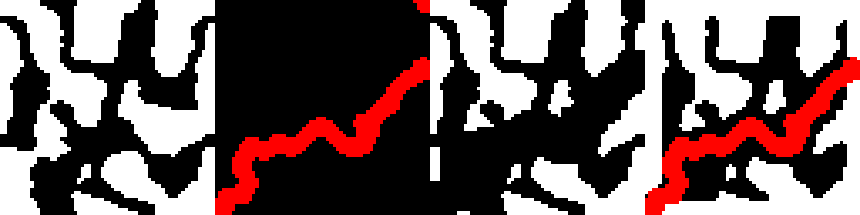
From left to right: the ground mask from the previous stage; lava mask; clearing the walls of the lava; final result
Before you get this very final result, several transformations are performed above the earth's mask: filtering small details (walls and aisles one pixel wide are undesirable); Filling of isolated areas (in the process of generation, zones can be formed that are completely isolated by walls from all sides, it is better to fill them with white so that players do not spawn there); At the edges, a layer of walls 5 pixels wide is added to prevent players from escaping from the map.
And so, for example, looks like a map of 256x256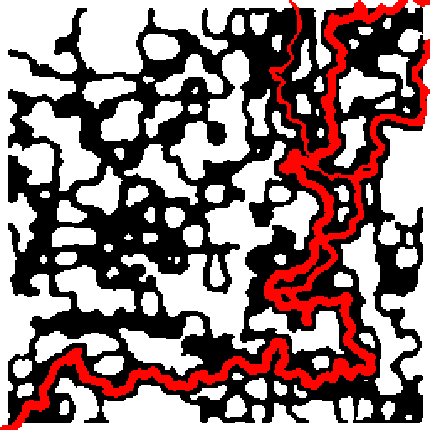
Well, in the end bridges are generated. Everything is simple: random points on the lava are chosen so that the bridges are not too close to each other or too far, and they are oriented perpendicular to the lava flow at this point (naturally, bridges are not baked in the level map, they are stored simply as an array of objects).
In addition to the earth and lava masks, two additional auxiliary masks are generated: a mask for textures (since two different textures are superimposed on the ground in the game, this mask sets the mixing coefficients of these textures) and the mask of static shadows from the walls. The texture mask is the same Perlin noise.
Before you bake the mask of the earth in the levelmap it should be blurred according to Gauss. This is needed to create smooth contours.
All of the above masks and make up our level. This is what it consists of: the R channel contains a mask of lava; G - the mask of the earth; B - mask for mixing diffuse textures; A - shadows.
Ready Levelmap
The truth here is not visible alpha channel, in which shadows are baked
The truth here is not visible alpha channel, in which shadows are baked
Rendering level
If right now we take and render the levelmap, we get something like this:

On the left, a rectangle on the levelmap shows the camera coverage.
How to get this? Suppose we have a camera matrix (we know for sure the position of our player and the angle of his turn). In the vertex shader, this matrix is multiplied by the texture coordinates of full-screen quad, and the result is transferred to the fragment shader. These texture coordinates are nothing more than the coordinates of a fragment inside a levelmap. Therefore, we simply do a sample of it from these coordinates. In the screenshot above, only RG channels are displayed.
It turned out too blurry (Gauss filter makes itself felt). Let's apply the clamping to the result of the sample from the levmapy:
vec4 level = texture2D(levelmap, texcoord.xy); vec2 color = clamp((level.rg * 2.0 - 1.0) * 30.0, 0.0, 1.0); The meaning of this formula: level.rg changes smoothly from 0 to 1 (seen in the screenshot above). After clamping, all sample values less than 0.5 turn to 0, and large 0.516 turn to 1, and the values in the [0.5, 0.516] segment “stretch” to the [0, 1] segment. This is how it looks like:

The time has come for textures: two diffuse textures are mixed by a mask from the B-channel of the levelampa, a texture of the wall by the G-channel is mixed with them, and the result is mixed with the texture of the lava by the R-channel of the level (the colors are mixed in the GLSL shaders ordinary linear interpolation of two values by the mixing coefficient). For sampling from textures, all the same texture coordinates are used multiplied by a certain coefficient, which affects the number of repetitions of this texture throughout the entire map:
Everything looks too flat. To fix this in our shader you need to transfer another texture with Perlin noise. A sample of this texture is added to the value of the R-channel levelmapy (lava mask). The resulting coefficient is used not only for mixing lava and earth, but also for shading the coastline. Also add static shadows that are stored in the level channel A-channel:
It looks better already, pay attention to how the coastline has changed, now it is not so flat and flat.
It remains to solve the last problem: we can see through the wall (that is, we see areas that are fenced off by the wall from our character). To solve this problem, the fragment trace is used: a ray is ejected from the studied fragment to the character’s side and samples are leveled from the level (we are only interested in the G channel with a mask of the wall), this project uses 12 samples. From the results of the samples, it is possible to determine whether a fragment is visible from the character’s position or not. Such a trace is too expensive for a full-screen passage, so it is performed in a separate small-size framebuffer (64x64). This texture is called the visibility map:
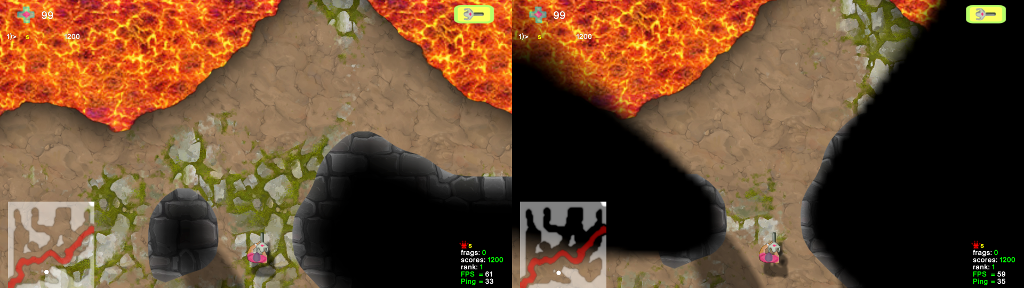
Before and after the visibility map
The visibility map is used not only in the full screen aisle for rendering maps, but also for rendering all game objects (bridges, cannons, characters).
Lava rendering
Now let's animate the lava. To do this, create an offset map. In this texture, a 2D vector is stored in the RG channels, which is added to the texture coordinates for sampling from the lava texture. And not just the displacement map is needed, but the displacement map that changes with time. In this game, a 512x512 framebuffer is used to create the displacement map. The texture with the Perlin noise and the time measured from 0 to 1 is transferred to the shader of this pass.
Piece of fragment shader (simplified):
vec4 d1 = texture2D(noise, (texcoord.xy + time.xy)); vec4 d2 = texture2D(noise, (texcoord.xy + time.yx) * 2.0); vec4 d3 = texture2D(noise, (texcoord.xy + vec2(1.0 - time.x, 1.0)) * 4.0); vec4 d4 = texture2D(noise, (texcoord.xy + vec2(1.0, 1.0 - time.x)) * 8.0); vec2 d = (d1.rg + d2.gr + d3.rg + d4.gr) * 0.25; gl_FragColor = vec4(d.rg, 0.0, 0.0); where noise is a noise texture (it is static).
The meaning of this shader is that 4 samples are made from the same noise texture, but with a different scale of texture coordinates. Moreover, they are shifted with time in perpendicular directions (pay attention to the second sample, the time.yx offset is used there, and time.xy is used in the first one). The time is sewn only in the x-component of the time variable, and the y-component contains 0.
Animated Offset Map
Hereinafter, the animation is intermittent, because it was not possible to loop it for the gif, but in the game it is smooth
Hereinafter, the animation is intermittent, because it was not possible to loop it for the gif, but in the game it is smooth
Now this animated texture can be transferred to the lava shader. In this shader, we sample the displacement map and add the resulting 2D vector to the texture coordinates of the lava.
Simplified Shader Piece:
vec4 wave = texture2D(tex_wave, texcoord.zw) * 0.1; vec4 color = texture2D(lava, texcoord.xy + wave.rg); where tex_wave is the displacement map (well, or the wave map).
With a coefficient of 0.1 you can play, it affects the "disturbance" of the lava.
Animated lava:

In principle, this could be stopped, it looks pretty good. But you can do even better - make the lava flow. To create the flow, we need to generate another texture: the velocity map. When the lava was generated, we created a polyline and drew the segments of this polyline into the lava buffer. Now we will get another buffer for the velocity map. Let's draw in it segments of a broken line, but at the same time each segment will bring in this buffer the vector of the direction of the segment. Then we blur this buffer according to Gauss, thus we not only “mix” speeds at river bends and at intersections with tributaries, but also get the effect of “viscous lava”, that is, the velocity of lava flow in the middle of the river is higher than that of the coast.
Velocity map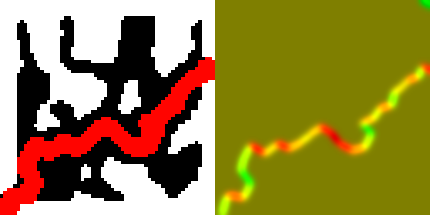
Right is the velocity map. RG channels correspond to the velocity vector
Right is the velocity map. RG channels correspond to the velocity vector
The velocity map is used to offset the texture coordinates of the lava. In order for a flow effect to appear, it is necessary to displace it in time.
So, the updated lava shader (simplified):
vec4 vel = texture2D(tex_velocity, texcoord.xy); vec4 wave = texture2D(tex_wave, texcoord.zw) * 0.1; vec4 col1 = texture2D(lava, texcoord.xy + wave.rg + vel.xy * time.x); vec4 col2 = texture2D(lava, texcoord.xy + wave.rg + vel.xy * time.x - vel.xy); vec4 color = mix(col1, col2, time.x); Here two samples are taken from the lava texture at a distance from each other exactly equal to vel.xy and mixed by the time value.
Why make two samples instead of one?
The fact is that time.x is measured from 0 to 1 and when moving from 1 to 0, a jump in texture coordinates occurs, which is also expressed in jumps in the animation of the texture itself. If the time is not reset to zero (even if it always grows), then even worse, the texture will flatten, because we have different lava flow rates (even for neighboring fragments, they are generally different). The first sample gives the color of the lava in the present tense, and the second gives the color that was a unit of time ago. These samples are interpolated in time. Thus, smooth animation is achieved.
All together looks like this:

Rendering decals
The decals in this game are pools of blood, traces of rocket blasts and other bullets.
Decals, like objects, are not stored by themselves anywhere and are not processed. Each decal, at the time of its appearance, is rendered into a huge texture that covers the entire map. This texture is then “stretched” on the levelmap. That is, it contains all the decals that have ever appeared (of course, it is not cleaned).
Now let's find out what resolution this decal texture should have. Experimentally, it was found that 16x16 texels of textures per one card tile looks optimal (if you take 32x32, then this is already larger than the size of the decal itself, for example, the explosion trace, and 4-fold loss from memory). The largest map has a size of 256x256, then the resolution of the decal texture is 16 * 256 = 4096x4096.
In fact, the 4K * 4K texture is not created; instead, the entire map is “sawn” into 32x32 zones. Each such zone has its own texture with decals 512x512. There are 64 such textures for a large map. In order not to transfer a pack of these textures to the main pass of the map rendering (and not to process from which sample to make the samples), another framebuffer was created. For it, exactly the same matrix of the camera is configured as for rendering the map. And all the textures with decals are rendered one by one into it taking into account their positions on the map (of course, most of them are clipped before the drawcall call). Now, only this ready-made framebuffer is transferred to the main pass of the map rendering.
Physics
To determine whether a point collides with a wall or hits a point in the lava, you need to read the value from the array with a blurred level on the integer coordinates of this point, as well as on the neighboring coordinates. Manually perform a linear interpolation of these values and compare with a certain threshold value.
Collision Detection (Simplified)
this.getCollide = function(pos) { const frac = (x) => x - (x | 0); const lerp = (a, b, t) => a * (1 - t) + b * t; const buffer = level.getGroundMap(); const cx = pos.x | 0; const cy = pos.y | 0; const t00 = buffer.getData(cx, cy); const t10 = buffer.getData(cx + 1, cy); const t01 = buffer.getData(cx, cy + 1); const t11 = buffer.getData(cx + 1, cy + 1); const dx = frac(pos.x); const dy = frac(pos.y); const xx1 = lerp(t00, t10, dx); const xx2 = lerp(t01, t11, dx); const yy = lerp(xx1, xx2, dy); return yy * 255 | 0; }; To determine the normal to the wall at the point (X, Y), it is necessary to perform this operation three times: for points (X, Y), (X + 0.25, Y), (X, Y + 0.25):
this.getNorm = function(dest_normal, pos) { const t00 = this.getCollide(pos); const t10 = this.getCollide(new Vector(pos.x + 0.25, pos.y)); const t01 = this.getCollide(new Vector(pos.x, pos.y + 0.25)); dest_normal.set(t10 - t00, t01 - t00); return t00; }; Normals are used not only to calculate bounce, but also to collide a character with a wall. When a character crosses a wall with a body, then in the same frame it kind of pushes him out in the direction of the normal.
Ricochets:
Advantages and disadvantages of using levelmaps in comparison with the tile renderer.
Pros:
- Rendered in one call and all in one shader
- Easy to create bumps and smooth transitions, while physics does not suffer
- Free antialiasing
- No need to store a ton of tiles and think about how to cut them around the camera
- Something else
Minuses:
- Rendered in one call and all in one shader, so it's pretty heavy
- We are limited in diffuse textures, because the blending masks need to be placed in the channels of the levelmapy, of which there are only 4. Well, it is generally more difficult to create diversity on the map
- Something else
Artificial intelligence bots
The first and most important task of AI bots is to teach them to just run around the map, not paying attention to enemies and objects. That is adequate movement in the corridors and rooms, as well as on bridges over the lava. For this purpose, a special graph is used, whose nodes are called waypoints. Such a graph should cover the entire map, go through all the corridors and rooms. The bot simply has a link to the current waypoint, and when it reaches it, it randomly selects the next waypoint from those referenced by its current one. It looks kind of simple. But first, you need to build this waypoint graph.
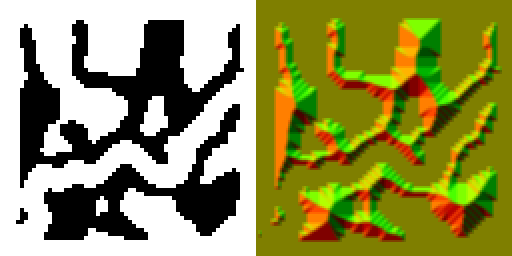
So, we have a land mask and a lava mask. We will add these two masks to get a map of the terrain (hereinafter we will deal with it when building the graph).
Passability map for our level
Surely there are many ways to build a waypoint graph. In this project, the graph construction algorithm is based on the Distance Field method (distance map). Here in this post describes the algorithm for constructing a Distance Field. The meaning of the distance map - at each point is recorded the distance to the nearest impassable point.
Distance Map:

Here the distance is coded in the picture in color, the darker the further
In principle, there are already guessed the outlines of the future graph. The next preparatory stage is the calculation of the gradient of the distance map. Where the gradient is close to zero, there will be waypoint.
The gradient of the distance map at the point (i, j) is calculated like this:
const val00 = distance_field.getData(i - 1, j - 1); const val10 = distance_field.getData(i , j - 1); const val20 = distance_field.getData(i + 1, j - 1); const val01 = distance_field.getData(i - 1, j); const val11 = distance_field.getData(i , j); const val21 = distance_field.getData(i + 1, j); const val02 = distance_field.getData(i - 1, j + 1); const val12 = distance_field.getData(i , j + 1); const val22 = distance_field.getData(i + 1, j + 1); const dx = (val00 - val11) + (val01 - val11) + (val02 - val11) + (val11 - val20) + (val11 - val21) + (val11 - val22); const dy = (val00 - val11) + (val10 - val11) + (val20 - val11) + (val11 - val02) + (val11 - val12) + (val11 - val22); gradient_x.setData(i + j * size | 0, dx); gradient_y.setData(i + j * size | 0, dy); So for all pixels of the map, we execute this code (in fact, only for passable pixels).
Gradient Distance Map:
Here, according to tradition, RG channels encode a vector
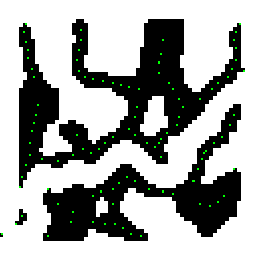
This map resembles a mountain range. The idea is to scatter the waypoints at the points where the ridge of this ridge passes. How to find a comb? The components of the gradient vector vary from -1 to 1. The ridge ridge will be there where the gradient is in the range [-α, α], where α is a certain constant chosen experimentally (in this project it is equal to 0.4). All points at which this condition is satisfied will be the first approach to the set of waypoints. In addition to the “ridge” waypoints, two waypoints are also added for each bridge (at the points where the bridge rests on the ground). Weypoint Card:
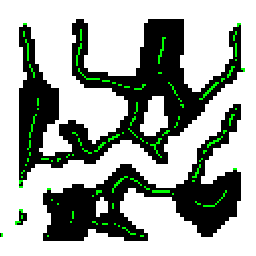
Green dots are waypoints
The waypoints are too thick. Some of them need to be removed. In this project, the minimum allowable distance between the waypoints is 4 pixels. Therefore, we enumerate all pairs of waypoints, and if the distance is less than the allowable distance, then we delete one of them. Naturally we pass bridge waypoints, since they should never be removed.
Now you need to connect these waypoints with ribs. We iterate over all pairs of waypoints and connect a pair with an edge when both of the waypoint are visible from each other. Tracing is used to determine visibility: we make n samples from the permeability map along the segment connecting these waypoints; where n is the length of the segment. If all the samples gave a passable pixel, then we connect these two waypoints with an edge:

The red lines are the edges of the graph.
It turned out too many extra edges. To solve this problem you need to get rid of the triangles. How it works? Take any edge with two waypoints A and B. Suppose among neighbors A there is a waypoint C, which in turn is a neighbor B. Ie triangle ABC is formed. The longest edge of this triangle needs to be removed. Do the same for all edges:
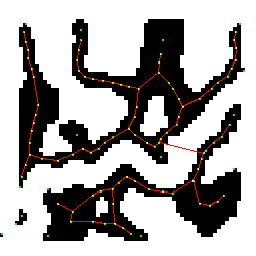
Some wapoints are not connected by ribs to others - they are filtered out. Also in the picture you can see that one edge passed over the bridge over the lava.
This is the final graph. Now every bot can navigate it.
AI bot consists of state machines, there are three of them. One state machine sets the general state of the bot, and the other two control two degrees of freedom: legs (movement) and body. At the output of the AI, the bot produces the rotation angle and the press of its keys, i.e. The only difference between a bot and a real player is that the player’s character receives input from the keyboard and mouse, and the bot’s character receives input from the AI. In addition to running around in the waypoint graph, the bot also knows how to respond to objects: rolling cannons and powerpops, other bots and some bullets. Moreover, a bot responds to these objects if and only if they are in its visibility zone: within its “camera” (as a player’s) and not fenced off by walls.
The following video demonstrates an AI bot named Frog in a duel with other bots on the big map:
So, we just generated a map, lava and graph for AI. And what about performance? I measured the time of all stages of generation for the largest 256x256 card on Mac mini (end of 2012), let me remind you, all the code is written in js and runs in a regular chrome browser:
| Algorithm | Time, ms |
|---|---|
| Particle texture generation | 280 |
| Blood texture generation | 190 |
| Lava River Generation | 700 |
| Generate the rest of the card | 630 |
| Creating a graph | 210 (720) |
| Total: | 2010 (2520) |
The time in brackets is indicated without the use of the hashpoint hash. This hash is used to quickly find the waypoints near the data in some graph construction algorithms. Without this hash in these algorithms, the waypoints with complexity O (n 2 ) get over.
Network part
The server is written in node.js using WebSocket. The entire server consists of three parts: master-server - http-server, distributes statics; game-server - connects to the master server and is invisible to the user, owns the game rooms; the game room - the user is connected to it via a web socket, other players and bots are running there.
In the development of the server side, an approach using fakekroket was applied. What it is? Feyksokety are two objects in a client part with interfaces of the real client and server socket. They emulate the work of real sockets. The “client” and “server” feixocket (in quotes, because they are both client, that is, browser-based) exchange data with each other via setTimeout (for debugging purposes, it was also the ping interval of 30 milliseconds). The idea is that the real server code can be given to the browser, telling it to work in the fakebox mode. At the same time, the real client code does not even suspect that the server works next to it in the browser, it simply sends data to the socket (which is a fake-socket) and receives data from it. Feyksokety used in the development and debugging server code. But real online works through real sockets.
Even after the development of the server code, the fakeboxes were not in vain, they remained in the project and serve as a safety net in case the game room is unavailable for some reason. How it works? When a user enters the game, two options can happen: the room is free and ready to accept a new player, then he simply gives the ip address and port of the room and he plays online. The second option is: if there are no places in the rooms or all the rooms are damaged, then the master server tells the browser to switch to fakeboxes, also sends it all server code (well, not all, but only the code of the game room). And the user plays the game with bots exclusively locally (well, not lucky for him), while the user will not even know that he plays locally (well, it's in the idale).
Feyksokety played a huge role in the development of the server. Since Both the client and server are running in the browser - they are very easy to debug, you can also display debug-render, i.e. Schematically render objects in exactly those positions where they are actually located on the server at a given time. You can play with the ping: change the interval in the setTimeout function to implement any predictions and see how they work on different pings (in this project, however, no predictions were implemented).
Benefits of fakexets:
- Easy debugging - both the server and client are in the browser
- You can put any ping and see how it will be played at its different values.
- debag-render allows you to understand how objects look right now on the server
Cons fake:
- Bots must be in the game, if there are no bots, then fake-pockets are useless.
- The server must be written in the same language as the client.
- With them, you can only debug the logic of the server code, but the full server picture (traffic, load on the network, different ping for different clients ...) they will not give
ArrayBuffer is used to transfer data between the client and the server. All data is serialized to this buffer, and a 2-byte float method is also used. Before forming a package for a client, all objects are maximally cut off over the camera of this client, so as not to send him extra information. As a result, it was estimated that the average size of the server package for a single client is approximately 110-120 bytes. And it contains all the information needed to render this frame to this client.
Conclusion
In addition to all of the above, the game also has its own console, which is invoked by the tilde key (with commands, variables, auto-completion and history). There is also a pretty good nickname generator and event system.
The full source code of the game is posted on github .
Startup Guide (you must have node.js installed).
If you already have bower installed, then skip this step, otherwise:
npm install -g bower At the root of the project we execute two commands:
bower install npm install Starting the master server:
npm run master If port 80 is busy, you can do this:
npm run master -- --master-server:port=8800 In principle, this is already enough, you can go to localhost (well, or localhost: 8800, if you changed the port) and there will already be a game, though local through feyksokety. If you need an honest online, then in another console we do:
npm run game Now you can enter the game not only from this computer, but also from any other computer, simply by entering the ip master server in the address bar. To find out whether the game is local, you need to call the game console and issue the status command . Another interesting command is the spectator nick , where nick is the player's name, then the camera will move to this player. By default, a large map of 110 players will be generated. To generate other maps, you need to run:
npm run game -- -- --game-server:seed=314 --game-server:size=0 This is not a typo, the number of hyphens is exactly that.
This command will generate a small map, which is described in this post. The following sizes are supported: 0 - small map, 1 - medium and 2 - large map (by default).
It is best to run in the chrome browser, in other browsers the correct operation is not guaranteed.
Thank you all for your attention.
Source: https://habr.com/ru/post/339566/
All Articles