Cocos2d-x - Basic Concepts
Foreword
I'll start with a little background. Not so long ago, my friend and I decided to develop our two-dimensional game for a graduation project. After we decided on its genre and got a rough idea about the gameplay, we were faced with the question of choosing an engine. Unreal or Unity we dropped immediately, as they seemed to us too "heavy" tools for 2d games. Cocos2d-x would be ideal if not for one detail - the almost complete absence of introductory lessons. Those articles that we managed to find were either not completed or not detailed enough. And then, I decided to translate the official documentation, practically without knowledge of English and at the same time share my translation with the others (who if not me).
This article is an almost literal translation of the official Cocos2d-x documentation. If you do not want to understand all the intricacies of the engine device, and want to immediately start writing your game, I can advise you this article: Cocos2d-x - developing a simple game .
If you have not installed Cocos2d-x or can not create a project, then you will find detailed instructions here: Creating multiplatform games using Cocos2d-x version 3.0 and higher .
')
Original article: Cocos2d-x programmers guide .
PS: I do not advise cloning cocos2d-x with gitHub. After cloning, I lacked several important files. But maybe I just had no luck.
Let's get started!
Cocos2d-x Basic Concepts
This chapter assumes that you have just begun to familiarize yourself with Cocos2d-x and are ready to begin work on the game of your dreams. Do not worry, it will be fun!
Cocos2d-x cross-platform game engine. The game engine is software that provides the basic functionality needed by all games. You may have heard that this is called an API or framework, but in this guide we will call it the 'game engine'.
Game engines include many components that, when used together, increase development speed and often work better than home-made libraries. A game engine typically contains some or all of the following components: a visualizer, 2d / 3d graphics, a collision handler, a physics engine, sound, animation, and more. Game engines typically support multiple platforms, so they simplify porting your game to various devices.
Since Cocos2d-x is a game engine, it provides an API for developing cross-platform games. Thanks to the encapsulation of power inside the easy-to-use API, you can focus on developing your game and worry less about the technical basis. Cocos2d-x will do the hard work.
Cocos2d-x provides the following objects: Scene , Transition , Sprite , Menu , Sprite3D , Audio and many others. Everything you need to create a game is included.
Main Components
This may seem very difficult, but using Cocos2d-x is easy. Before diving, we need to understand some of the concepts used in Cocos2d-x. At the heart of Cocos2d-x are the objects: Scene , Node , Sprite , Menu and Action . Look at any game and you will see all these components in one form or another!
Take a look here. Perhaps you will find similarities with one very popular game:

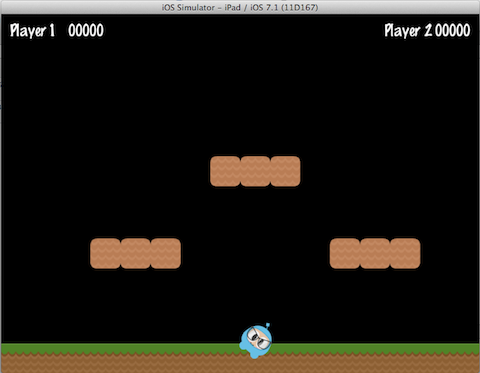
Let's take another look, but divide the screenshot into the components used to create it:

You can see the menu, some sprites and labels, they all have counterparts in Cocos2d-x. Take a look at your own concept of the game and see what components you have, most likely you will find a match.
Director
Cocos2d-x uses the concept of a director ( Director ), like in the movies! The Director object controls the workflow and tells everyone what to do. The main task of the director is to control transitions and scene changes. Director is a basic singleton (in fact, there can be only one instance of this class at a time) that can be called anywhere in your code.
Here is an example of a typical game stream. Director will take care of his performance, in accordance with the criteria of your game:
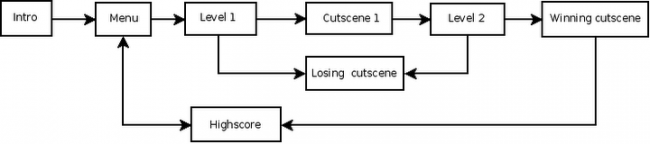
You are the director of your game. You decide what happens when and how.
Scene
In your game, you probably want to see the main menu, several levels and the final scene. How do you organize all this? As you guessed, with scenes ( Scene ). Remember any movie you like. You may notice that it is clearly divided into scenes or separate parts of the story. If we apply the same approach to games, we have to come up with at least a few scenes, no matter how simple the game is.
Take another look at the image already familiar to us:
This is the main menu and it is a separate scene. This scene consists of several parts, which together give us the final result. Scenes are drawn when rendering . Render is responsible for displaying sprites and other objects on the scene. To better understand this, we need to talk a little about the scene graph .
Scene graph
Scene graph is a data structure that organizes a graphical scene. Scene graph contains Node objects in a tree (yes, this is called a graph, but, in fact, is a tree) structure.

I'm sure you are wondering why you should think about these technical details if Cocos2d-x does the hard work for you? This is really important for understanding how the scenes are rendered during the render.
As soon as you start adding nodes, sprites and animations to your game, you want to be sure that the screen will display exactly what you expected. But what if this did not happen? What if your sprites were hidden behind the background, and you want them to be in front? It's okay, just take a step back and go over the scene graph on a piece of paper, and I'm sure you can easily find your mistake.
Because the Scene Graph is a tree; you can bypass it. Cocos2d-x uses the in-order traversal algorithm. The above-mentioned in-order algorithm starts a detour on the left side of the tree, then passes through the root and ends on the right side of the tree. Since the right side of the tree is rendered last, it is displayed first on the screen.

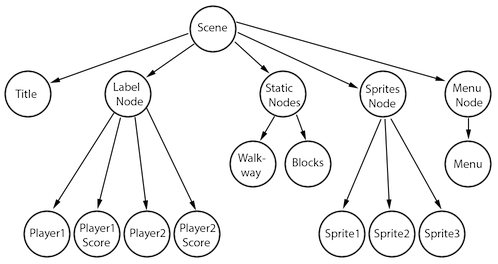
The scene graph is easy to demonstrate, let's take a look at our game scene:
It will be displayed on the screen according to the tree below:
Another point to tell about is that elements with negative order Z ( z-order ) are on the left side of the tree, while elements with positive order Z are on the right side. Keep this in mind when organizing your items! Of course, you can add items in any order, and they are automatically sorted based on the z-order custom parameter.
Based on this concept, we can think of the scene as a collection of nodes ( Node ). Let's split the scene from top to bottom to see how the scene graph uses the z-order to build the scene:

In fact, the scene is assembled from a set of nodes, with various z-order parameters stacked on top of one another.
In Cocos2d-x, you build a scene graph using the addChild () call:
// z-order -2, // ( z-order ) scene->addChild(title_node, -2); // z-order, 0 scene->addChild(label_node); // z-order -2, // ( z-order ) scene->addChild(sprite_node, 1); Sprites
All games contain sprites, and you probably already have an idea about them. Sprites are graphic objects that you move around the screen. The main character of your game, most likely, is also a sprite. I know, you might ask, isn't every graphic object a sprite? Not! Why? A sprite is a sprite only if you move it. If you do not move it, then this is a regular Node.
Take another look at the familiar image, note where the sprites and where the nodes are:

Sprites are important in every game. When writing a platformer, you probably have a main character that was created using some kind of image. This is the sprite.
Sprites are easy to create and they have the following customizable parameters: position , rotation , scale , opacity , color and others.
// auto mySprite = Sprite::create("mysprite.png"); // mySprite->setPosition(Vec2(500, 0)); mySprite->setRotation(40); mySprite->setScale(2.0); // X Y mySprite->setAnchorPoint(Vec2(0, 0)); Let's demonstrate each property from this code, consider the following screenshot:

If we specify a position using mySprite-> setPositon (Vec2 (500, 0)); :

The node-sprite has changed its position from the original to the one given by us.
If we now set the rotation using mySprite-> setRotation (40); :
... you can see that the sprite has been rotated by the amount that was specified.
If we now set the new scale using mySprite-> setScale (2. 0) ;:

Again, we can see that the sprite has changed according to the code.
Finally, all nodes (since Sprite is a subclass of Node) have an anchor point . We haven't talked about it yet, so now is the time. You can think of the reference point as a way of determining which part of the sprite will be used as the base coordinate when setting the position.
We will set the reference point for the character of our game using the following call:
mySprite->setAnchorPoint(Vec2(0, 0)); This will result in the lower left corner of our sprite being used as the basis for each setPosition () call. Let's take a look at a few such examples in action:
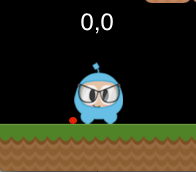
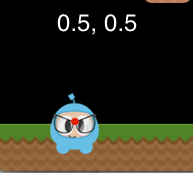

Notice the red dot in each image. This red mark illustrates where the pivot point is!
As you can see, the pivot point is very useful when positioning nodes. You can even adjust the pivot point dynamically to simulate the effects of your game.
Actions
Creating a scene and adding sprites to the screen is only part of what we need to do. To make the game, we need to make things move! Action objects are the main part of each game. Actions ( Action ) allow you to transform Node objects in time. Want to move a sprite from one point to another? No problems! You can even create a sequence ( Sequence ) of actions to be performed on a node. You can change the parameters of the node such as position , rotation and scale . Examples of actions: MoveBy , Rotate , Scale .
Now we will demonstrate the work of action:
... and after 5 seconds the sprite will move to a new position:
Action objects are easy to create:
auto mySprite = Sprite::create("Blue_Front1.png"); // 50 10 2 auto moveBy = MoveBy::create(2, Vec2(50,10)); mySprite->runAction(moveBy); // . auto moveTo = MoveTo::create(2, Vec2(50,10)); mySprite->runAction(moveTo); Sequence and Spawn
With the sprites moving across the screen, we have everything we need to create our game, right? Not quite. How to run a few actions? Cocos2d-x implements this in several ways.
Sequence is a set of actions that run in a specific order. Need to run a sequence in reverse order? No problem, Cocos2d-x does this without additional work.
Take a look at the following sequence example for a sprite's gradual movement:

This sequence is easy to create:
auto mySprite = Node::create(); // 50, 10 2 auto moveTo1 = MoveTo::create(2, Vec2(50,10)); // 100, 10 2 auto moveBy1 = MoveBy::create(2, Vec2(100,10)); // 150, 10 2 auto moveTo2 = MoveTo::create(2, Vec2(150,10)); // auto delay = DelayTime::create(1); mySprite->runAction(Sequence::create(moveTo1, delay, moveBy1, delay.clone(), moveTo2, nullptr)); This example starts the sequence, in order, but how to run all the specified actions at the same time? This feature also exists in Cocos2d-x, it is called Spawn. Spawn will take all the specified actions and launch them simultaneously. Some may be longer than others, in which case they will not all be finished at the same time.
auto myNode = Node::create(); auto moveTo1 = MoveTo::create(2, Vec2(50,10)); auto moveBy1 = MoveBy::create(2, Vec2(100,10)); auto moveTo2 = MoveTo::create(2, Vec2(150,10)); myNode->runAction(Spawn::create(moveTo1, moveBy1, moveTo2, nullptr)); Parents, children and their relationship
Cocos2d-x uses the principle of inheritance properties of parents and children. This means that changes to the parent node also apply to child elements. Consider one sprite that has heirs:

Changing the rotation of the parent also changes the rotation of all children:

auto myNode = Node::create(); // myNode->setRotation(50); By analogy with the rotation, if you change the scale of the parent, the heirs will also be given a new scale:

auto myNode = Node::create(); // myNode->setScale(2.0); // 2 Not all parent changes are reflected in children. Changes to the parent pivot point affect only the transformation operations (scale, position, rotate, skew, and so on ...) and do not affect the positioning of the heirs. In fact, children will always be added to the bottom-left (0,0) angle of the parent.
Logining as a way to display messages
Sometimes, when your application is running, you may want to see a message output to the console for information or debugging purposes. Implemented by the engine using log ().
// log("This would be outputted to the console"); // string string s = "My variable"; log("string is %s", s); // double double dd = 42; log("double is %f", dd); // integer int i = 6; log("integer is %d", i); // float float f = 2.0f; log("float is %f", f); // bool bool b = true; if (b == true) log("bool is true"); else log("bool is false"); If you prefer std :: cout , you can use it instead of log () , however log () could provide simplified formatting for complex output.
Conclusion
We have analyzed a lot of Cocos2d-x concepts. You can take a deep breath. Do not worry. Just immerse yourself in your ideas and implement them, step by step. Cocos2d-x and programming are not skills that are learned overnight. They require practice and understanding. Remember that forums will also help answer your questions.
From translator
Perhaps a lot of this article you already knew. But it was only an introductory part of a series of lessons on cocos2d-x. In the future, I will continue to translate new articles and post them here if it is interesting to someone.
Continued: Cocos2d-x - Working with sprites
Source: https://habr.com/ru/post/339564/
All Articles