Part 2: MVVM: Complete Understanding (+ WPF)
In this article, as an example, we will have a slightly more complicated program, namely, a vending machine, the implementation of which is often found as a test task before the interview. The interaction of several View with one VM and vice versa will be shown, the “View first” approach will be shown and not the final code will be shown, with a story which part is needed (download link, by the way, Vending Machine (program code) , but the whole process of creating and, most importantly, a consistent train of thought.
But before that, I will try once again to answer the question, which is usually not asked by people who have experience in debugging unstructured projects, namely: “So why do we still need the MVVM pattern?”
')
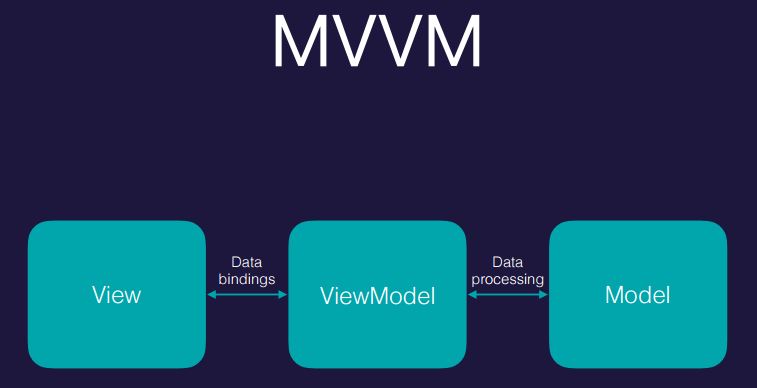
Formally and briefly, the MVVM pattern is used primarily to share responsibility, to increase readability, manageability, maintainability, and code testability. A software product consists of a model (domain model and business logic) and an infrastructure code in a ratio of, say, 20% to 80%. The infrastructure code should be simple, understandable, almost automatic, like Scaffolding. But the model ...
it's good to have it not evenly distributed across the infrastructure code, but grouped in one place. Then it is readable - i.e. one can see the business logic of the processes of the subject area, which is not spread over the event handlers of the heap of controls that are collecting dust in different places. It is controlled - that is, I can, for example, change the access modifier in one place - prevent client code from changing a certain factor in the entire program. It is supported and expandable, i.e. You can easily fix the program, according to the new requirements, and introduce new functionality. And increased testability allows us to cover the model with unit and integration tests, so that when we introduce this new functionality, the old functionality will not fall off. And if it fell off, we would have noticed it right away, and not at the customer’s acceptance. People who have been debugging three thoughtful evenings for three days before the deadline do not ask the question about the benefits of all of the above.
Specifically, MVVM, rather than, say, MVP or MVC, is used in WPF because MVVM is “hardware” supported by WPF. View understands and INotifyPropertyChange, and Observable, etc. - do not need to update anything by hand through the presenter, etc. For example, WinForm's MVP required more infrastructure code, moreover a manual one, and there the advantages of sharing responsibility were overshadowed by a large amount of rough work.
Task
Let's return to the task. She has the following wording: create a program that emulates the interaction of a person with a snack / drinks vending machine.
The program interface should display:
- The contents of the user's wallet (initially 10 bills / coins of the same value) and his purchases.
- Contents of the automatic deposit box (initially 100 bills / coins of the same value)
- List of products available for purchase in the machine (in the machine initially 100 units of each item)
- Current credit in the machine (how much money the user has invested there)
The program interface should allow:
- Depositing funds by the user into the machine
- Making purchases of products in the machine
- Require and receive, sometimes, change
Plus will be:
- The list of products with prices is not fixed in the code
- The values of coins / bills are not fixed in the code
- Compliance with the MVVM formal pattern
- Setting minimum access to fields and properties of model classes
- Beautiful design!
We will hardly do the last, but everything else is completely.
In the first part, we used the “Model first” technique:
- Develop a program model.
- Draw the program interface.
- Connect interface and model with VM layer.
The peculiarity of this approach is that we must clearly present the model and its capabilities in advance. What properties and methods it will provide to the outside, how its interaction with the interface will be arranged. But at the first stage of development, we do not even know whether this or that interaction will be necessary. We need additional points of support, in addition to the described behavior in TK. Such points of support can provide us with an interface, i.e. View and VM to it. In VM, we could formulate client code, i.e. that public access code (public) that we would like to see in the model. Those. The technique is as follows:
Method "View first":
- Draw the program interface - View
- Develop a VM to this View, and generate client code (model call code)
- Having a model interaction interface, implement its structure and internal logic
Sketches in the morning, model in the evening.
In creating the user interface there is little MVVM-specific, but this point is not bypassed, so let's proceed to item # 1.
Interface creation
In TZ we read that we need to display the user's wallet and its purchases and the interface of the machine. Let's physically divide the interface (i.e., according to different files) into two parts: one for the user, the other for the machine. This is necessary so that the XAML files are smaller. Working with large XAML files is (personally) uncomfortable. Moreover, such a partition will not cost us anything, in WPF it is very easy to do: create a pair of UserControls - UserView.xaml and AutomatView.xaml, and use them in the main View - MainView.xaml. And they (UserView.xaml and AutomatView.xaml) will use DataContext from the main form. Those. if they do not specify the DataContext, they seem to go up the logical tree and stumble upon the DataContext of the main form in which they are located, and use it.
Let's start with UserView.xaml. We need here to display the contents of the wallet and purchase. Shopping is uniquely a ListBox. Is a wallet just a number? Amount of cash? Not. The TK says that the user has 10 bills of each denomination. Those. This is also a ListBox of different bills with an indication of the quantity. Let's release it:
UserView.xaml:
<!-- / --> <ListBox ItemsSource="{Binding UserWallet}"> <ListBox.ItemTemplate> <DataTemplate> <StackPanel Orientation="Horizontal"> <Image Width="32" Height="32" Source="{Binding Icon}"></Image> <Label Content="{Binding Name}"/> <Label Content="{Binding Amount}"/> </StackPanel> </DataTemplate> </ListBox.ItemTemplate> </ListBox> The listbox itself binds to the non-existent while UserWallet property (user’s wallet), and its Item also shows non-existent Name (“5 rubles” or “2 rubles”, for example), Amount and Icon (banknote icon, if it is a banknote or coin, respectively ). Icon - just a deliberately unsuccessful attempt to perform an additional paragraph 5 of the TK: "Beautiful design." By the way, add this pair of pictures to the project in the “Solution folder” of the “Images”. In the properties, specify Build action: resource. "Coin.png" and "Banknote.png" respectively.
Listbox with purchases will not be fundamentally different (unless we will not add icons)
UserView.xaml:
<!----> <DockPanel> <Label DockPanel.Dock="Top" Content=" "/> <ListBox ItemsSource="{Binding UserBuyings}"> <ListBox.ItemTemplate> <DataTemplate> <StackPanel Orientation="Horizontal"> <Label Content="{Binding Name}"/> <Label FontWeight="DemiBold" Content="{Binding Price}"/> <Label Content="{Binding Amount}"/> </StackPanel> </DataTemplate> </ListBox.ItemTemplate> </ListBox> </DockPanel> Let's frame this, as expected, in the two columns of the Grid and UserControl. And add the amount of user's cash:
UserView.xaml:
<UserControl ...> <Grid> <Grid.ColumnDefinitions> <ColumnDefinition/> <ColumnDefinition/> </Grid.ColumnDefinitions> <!----> <DockPanel> <Label DockPanel.Dock="Top" Content=" "/> <!----> <StackPanel DockPanel.Dock="Bottom" Orientation="Horizontal"> <Label Content=" :"/> <Label Content="{Binding UserSumm}"/> </StackPanel> <!-- / --> <ListBox ... /> </DockPanel> <!----> <DockPanel Grid.Row="0" Grid.Column="1" .../> </Grid> </UserControl> So, the user is ready. Now we will start implementation of the interface for the automatic machine. According to the TK, it is necessary to show the depository and possible purchases - as well as the user. Therefore, let's try to cut these DataTemplates from UserView.xaml file for reuse. These DataTemplates can be laid out in separate files and used as the Merged Resource Dictionary, but we simply put them in the resources in the main View.
MainView.xaml:
<Window ...> <Window.Resources> <!-- / --> <!-- DataType ( ) --> <DataTemplate DataType="{x:Type local:ProductVM}"> <StackPanel Orientation="Horizontal"> <Label Content="{Binding Name}"/> <Label FontWeight="DemiBold" Content="{Binding Price}"/> <Label Content="{Binding Amount}"/> </StackPanel> </DataTemplate> <!-- / --> <DataTemplate DataType="{x:Type local:MoneyVM}"> <StackPanel Orientation="Horizontal"> <Image Width="32" Height="32" Source="{Binding Icon}"></Image> <Label Content="{Binding Name}"/> <Label Content="{Binding Amount}"/> </StackPanel> </DataTemplate> </Window.Resources> <!-- ( ) VM - MainViewVM.cs --> <Window.DataContext> <local:MainViewVM/> </Window.DataContext> <!-- , , - ( ) --> <!-- DataContext DataContext --> <Grid> <Grid.ColumnDefinitions> <ColumnDefinition/> <ColumnDefinition/> </Grid.ColumnDefinitions> <local:UserView Margin="10" /> <local:AutomatView Grid.Column="1" Margin="10"/> </Grid> </Window> Pay attention to DataType in DataTemplates. This is such a tricky thing in WPF that does the following: when an item of the specified type is assigned as the content of an item (in this case ListBoxItem), then this object becomes the DataContext of that item, and as Content is favored by this template. ProductVM or MoneyVM are VMs for these templates that we have not yet created. You can create all three VMs for now:
MainViewVM.cs file:
public class MainViewVM : BindableBase { } public class ProductVM { } public class MoneyVM { } Yes, connect Prism (6.3.0, the seven under Wpf is not working yet) and follow MainViewVM from BindableBase.
Those. again, what happens: ListBox as an ItemsSource uses a List for example. For each item in this sheet, a ListBoxItem is created and its contents are assigned this object of type ProductVM. WPF sees that it has a DataTemplate for the ProductVM type, and this DataTemplate assigns the contents for this ListBoxItem, and the ProductVM object itself is used as the DataContext and is bound to it by Binding. If an array is used as an ItemsSource ListBox, where not only ProductVM but also MoneyVM are located (if both are inherited from a common base class, for example BindableBase), then DataTemplates will be applied to them different!
It remains to implement AutomatView.xaml.
AutomatView.xaml:
<UserControl ...> <Grid> <Grid.ColumnDefinitions> <ColumnDefinition/> <ColumnDefinition/> </Grid.ColumnDefinitions> <!----> <DockPanel Grid.Row="0" Grid.Column="1"> <Label DockPanel.Dock="Top" Content=""/> <!----> <StackPanel Orientation="Horizontal" DockPanel.Dock="Bottom"> <Label Content=":"/> <Label Content="{Binding Credit}"/> </StackPanel> <!----> <ListBox ItemsSource="{Binding AutomataBank}" /> </DockPanel> <!-- --> <DockPanel Grid.Row="0" Grid.Column="0"> <Label DockPanel.Dock="Top" Content=""/> <ListBox ItemsSource="{Binding ProductsInAutomata}"/> </DockPanel> </Grid> </UserControl> We read TK further: the program should allow ... to deposit money into the machine, make purchases and receive change.
It is possible to attach a button next to each product in ListBox'e “Automaton Products”, by clicking on which purchase will be made.
Similarly, in the coin acceptor, in the “Money Deposit” ListBox, you can attach a button to each bill / coin, according to which the user will deposit money into the machine.
To prevent these buttons from being displayed in the user interface part, you need to set the necessary properties “Show ...”.
And next to the text field denoting a loan, you can create a button “Return the change”.
Make the necessary changes:
<!-- / --> <DataTemplate DataType="{x:Type local:ProductVM}"> <StackPanel Orientation="Horizontal"> <Button Visibility="{Binding IsBuyVisible}" Command="{Binding BuyCommand}">+</Button> ... <!-- / --> <DataTemplate DataType="{x:Type local:MoneyVM}"> <StackPanel Orientation="Horizontal"> <Button Visibility="{Binding IsInsertVisible}" Command="{Binding InsertCommand}">+</Button> ... <!----> <StackPanel Orientation="Horizontal" DockPanel.Dock="Bottom"> <Button Command="{Binding GetChange}" Margin="5"> </Button> ... All stage number 1 is generally over. Moving on to create a VM.
Creating ViewModels
We have already created (create, if not already) the classes MainViewVM, ProductVM and MoneyVM.
If you have ReSharper, and if you add the following line to UserView.xaml and AutomatView.xaml files in the top grid:
<Grid d:DataContext="{d:DesignInstance {x:Type local:MainViewVM}}">which will indicate to the WPF editor the DataContext type (but this will not affect runtime), then through Alt + Enter you can add the corresponding fields to the VM classes. If you don’t have ReSharper, you can do it with your hands:
public class MainViewVM : BindableBase { public int UserSumm { get; } public ObservableCollection<MoneyVM> UserWallet { get; } public ObservableCollection<ProductVM> UserBuyings { get; } public DelegateCommand GetChange { get; } public int Credit { get; } public ReadOnlyObservableCollection<MoneyVM> AutomataBank { get; } public ReadOnlyObservableCollection<ProductVM> ProductsInAutomata { get; } } public class ProductVM { public Visibility IsBuyVisible { get; } public DelegateCommand BuyCommand { get; } public string Name { get; } public string Price { get; } public int Amount { get; } } public class MoneyVM { public Visibility IsInsertVisible { get; } public DelegateCommand InsertCommand { get; } public string Icon { get; } public string Name { get; } public int Amount { get; } } You see, we almost created three VMs. Now you can implement them sequentially, property by property. We are free to write such client code that we would like it to be. For example: UserSumm => _user.UserSumm; Those. implies that there is some _user object of the class of the User model, which has the UserSumm property. Let's even create such a class. We will now have a model, or rather, a point of contact between the model and VM, which will form some of the external boundaries of the model.
Only now a small digression.
The TOR states that we must provide "... the minimum necessary access to the fields and properties of the model classes" (from the client code). Such a requirement should not only be in this TZ, but generally should occupy an honorable place in the principles of your software structure. Client code should not accidentally (or deliberately) intrude into the model, forcing it to come to an unplanned state. Especially since you are currently developing a code related to anonymous cash transactions. Imagine that you will now make an error in the code, using which users across the country drink free coffee for 6 million rubles, and this loss will be imposed on you through the court, you will work forcibly on this software company and, until the end of their life, code on the Delphi + bundle 1C for cookies.
In general, our model will consist of several classes. And it is necessary to make so that from the one class 'A' of the model it was possible to call the method SomeMethod () of another class 'B' of the model, and from our client code this method B.SomeMethod () could not be called.
In order to achieve this, you can of course make class B an internal class of class A, and implement an interface in it that is exposed to the outside ... But in general there is a specially designed solution for such purposes - the access modifier internal. Those. you just need to select the model in a separate project in the solution. Thus, we will be able to use the internal modifier, physically separate our client code from the model code. Now this separate model can be easily used, for example, in a web solution.
Create a project class library, call it VendingMachine.Model, add the User model class there and create the UserSumm property for it
In MainViewVM, we will declare a private user type _user variable and create it in the constructor:
MainViewVM file:
public class MainViewVM : BindableBase { public MainViewVM() { _user = new User(); } public int UserSumm => _user.UserSumm; //... private User _user; } The next item we come across the money - UserWallet, which for us is a collection of MoneyVM. We read the statement of work: "... The denominations of coins / bills are not fixed rigidly in the code."
Those. there is some set of denominations (ruble, two, five, ten) that comes from somewhere (from a database, from a configuration file, from a web service, etc.). We need the user and the machine to have the same set of denominations, and so that it could not suddenly create some of its denomination (a coin of 8 rubles, for example). If it is necessary to prohibit the creation, then a private constructor will work well. If, however, a certain set of denominations is needed, then a factory method suitable for such a list of denominations will do. Or, if multithreading is not planned (and it is not planned), you can use a static list. Let's do it.
//, , , public struct Banknote { //, public static readonly IReadOnlyList<Banknote> Banknotes = new[] { new Banknote("", 1, true), new Banknote(" ", 2, true), new Banknote(" ", 5, true), new Banknote(" ", 10, false), new Banknote(" ", 50, false), new Banknote(" ", 100, false), }; private Banknote(string name, int nominal, bool isCoin) { Name = name; Nominal = nominal; IsCoin = isCoin; } public string Name { get; } public int Nominal { get; } public bool IsCoin { get; } // . } Now the second. We have a face value, but we have a UserWallet - this is such an array of pairs of face value / quantity. Like stacks of casino chips: a stack of $ 1, a stack of chips of $ 250, etc. We need just such a pile (Stack):
public class MoneyStack { public MoneyStack(Banknote banknote, int amount) { Banknote = banknote; Amount = amount; } public Banknote Banknote { get; } public int Amount { get; } } We could use structures like Dictionary, but the programmer's instinct tells us that we need functions like reduce, increase, etc. Now we do not add them, because no client code calling them. While there is no such code, we do not add these functions. This is like with events - we do not add events to the control we are developing (for example, double-click with the mouse) until there is a handler for it. Otherwise, we can create dozens of events, of which we will need two or three. The same with the class: we can create many different external functions, of which we will need only a couple, and even then not with that signature.
Now, accordingly, update the User class and add the UserWallet there. As it should be, the UserWallet will be a ReadOnlyObservableCollection and to ensure this collection will be another - a private collection. In addition, the user is supposed to issue 10 bills of each value at initialization. We do this in the user constructor.
User.cs:
public class User { public User() { // _userWallet = new ObservableCollection<MoneyStack> (Banknote.Banknotes.Select(b => new MoneyStack(b, 10))); UserWallet = new ReadOnlyObservableCollection<MoneyStack>(_userWallet); } public ReadOnlyObservableCollection<MoneyStack> UserWallet { get; } private readonly ObservableCollection<MoneyStack> _userWallet; ... } Now update the MainViewVM constructor. Since in User, we have a collection of objects of the MoneyStack model class, and in MainViewVK a collection of VM classes, MoneyVM, then we need to do some transformations. In MoneyVM, create a constructor that accepts MoneyStack.
Then, first at initialization, and then when changing the collection, we have to add the appropriate VM (model changes are single, so the a.NewItems? ?Count == 1 construction works):
public MainViewVM() { _user = new User(); // UserWallet = new ObservableCollection<MoneyVM>(_user.UserWallet.Select(ms => new MoneyVM(ms))); // ((INotifyCollectionChanged) _user.UserWallet).CollectionChanged += (s, a) => { if(a.NewItems?.Count == 1) UserWallet.Add(new MoneyVM(a.NewItems[0] as MoneyStack)); if (a.OldItems?.Count == 1) UserWallet.Remove(UserWallet.First(mv => mv.MoneyStack == a.OldItems[0])); }; } We make the corresponding changes in MoneyVM. We accept MoneyStack as a parameter and assign it to the MoneyStack property for reading for easy retrieval. The visibility of the button depends on the presence of the InsertCommand command. We also return the image, quantity, name of the banknote:
public class MoneyVM { public MoneyStack MoneyStack { get; } public MoneyVM(MoneyStack moneyStack) { MoneyStack = moneyStack; } public Visibility IsInsertVisible => InsertCommand == null ? Visibility.Collapsed : Visibility.Visible; public DelegateCommand InsertCommand { get; } public string Icon => MoneyStack.Banknote.IsCoin ? "..\\Images\\coin.jpg" : "..\\Images\\banknote.png"; public string Name => MoneyStack.Banknote.Name; public int Amount => MoneyStack.Amount; } We continue to implement MainViewVM. Next in line is the ObservableCollection UserBuyings.
UserBuyings is implemented very similar to the previous construction. We also create a class of the Product model with a closed constructor. There we also create a collection of products available in the program (such as from a database). In the same way we create ProductStack. And in the same way we transform from ProductStack to ProductVM.
Product.cs:
public class Product { //, web service public static IReadOnlyList<Product> Products = new List<Product>() { new Product("",12), new Product(" ", 25), new Product("",6), new Product("",23), new Product("",19), new Product("",670), }; private Product(string name, int price) { Name = name; Price = price; } public string Name { get; } public int Price { get; } } ProductStack.cs: public class ProductStack { public ProductStack(Product product, int amount) { Product = product; Amount = amount; } public Product Product { get; } public int Amount { get; } } In the User class, we create approximately the same ReadOnlyObservableCollection. Is that the designer now does not supply the user with all the names of goods for 10 pieces, because this is not specified in the statement of work:
public class User { public User() { ... // UserBuyings = new ReadOnlyObservableCollection<ProductStack>(_userBuyings); } public ReadOnlyObservableCollection<ProductStack> UserBuyings { get; } private readonly ObservableCollection<ProductStack> _userBuyings = new ObservableCollection<ProductStack>(); ... } Update ProductVM accordingly:
public class ProductVM { public ProductStack ProductStack { get; } public ProductVM(ProductStack productStack) { ProductStack = productStack; } public Visibility IsBuyVisible => BuyCommand == null ? Visibility.Collapsed : Visibility.Visible; public DelegateCommand BuyCommand { get; } public string Name => ProductStack.Product.Name; public string Price => $"({ProductStack.Product.Price} .)"; public Visibility IsAmountVisible => BuyCommand == null ? Visibility.Collapsed : Visibility.Visible; public int Amount => ProductStack.Amount; } And finally, the constructor in MainViewVM:
public MainViewVM() { ... // UserBuyings = new ObservableCollection<ProductVM>(_user.UserBuyings.Select(ub => new ProductVM(ub))); ((INotifyCollectionChanged)_user.UserBuyings).CollectionChanged += (s, a) => { if (a.NewItems?.Count == 1) UserBuyings.Add(new ProductVM(a.NewItems[0] as ProductStack)); if (a.OldItems?.Count == 1) UserBuyings.Remove(UserBuyings.First(ub => ub.ProductStack == a.OldItems[0])); }; } Synchronization of the model and VM of the user's purchases - and the models and VM of the user's wallet - are almost identical. Moreover, the queues are the same synchronization in the case of money storage and goods inside the machine. Therefore, to avoid duplication of the code, we will write the following synchronization function:
private static void Watch<T, T2> (ReadOnlyObservableCollection<T> collToWatch, ObservableCollection<T2> collToUpdate, Func<T2, object> modelProperty) { ((INotifyCollectionChanged)collToWatch).CollectionChanged += (s, a) => { if (a.NewItems?.Count == 1) collToUpdate.Add((T2)Activator.CreateInstance(typeof(T2), (T) a.NewItems[0])); if (a.OldItems?.Count == 1) collToUpdate.Remove(collToUpdate.First(mv => modelProperty(mv) == a.OldItems[0])); }; } And we will use it in the constructor as follows:
Watch(_user.UserWallet, UserWallet, um => um.MoneyStack); Watch(_user.UserBuyings, UserBuyings, ub => ub.ProductStack); The function uses templates, delegates and Activator, to create an instance of the specified type - i.e. the function departs from “simplicity and planarity”, in which it is necessary to contain VM. However, duplication of the code, in which so annoying typos are so often encountered (especially if it is necessary to make small but numerous changes to duplicate fragments), requires such a separation. In this case, such a function should provide a clear comment.
Next: in the MainViewVM class, which we consistently implement, the properties and commands related to the automaton are still unimplemented. Let's implement them, the good thing is now going faster, because for money and product models we have already created. As in the case of the User class, we will create a class of the Automata model and in it the same two collections for products and money. We also implement the Credit property in it.
public class Automata { public Automata() { // _automataBank = new ObservableCollection<MoneyStack> (Banknote.Banknotes.Select(b => new MoneyStack(b, 100))); AutomataBank = new ReadOnlyObservableCollection<MoneyStack>(_automataBank); // _productsInAutomata = new ObservableCollection<ProductStack>(Product.Products.Select(p => new ProductStack(p, 100))); ProductsInAutomata = new ReadOnlyObservableCollection<ProductStack>(_productsInAutomata); } public ReadOnlyObservableCollection<MoneyStack> AutomataBank { get; } private readonly ObservableCollection<MoneyStack> _automataBank; public ReadOnlyObservableCollection<ProductStack> ProductsInAutomata { get; } private readonly ObservableCollection<ProductStack> _productsInAutomata; public int Credit { get; } } MainViewVM Automata :
public class MainViewVM : BindableBase { public MainViewVM() { ... _automata = new Automata(); // AutomataBank = new ObservableCollection<MoneyVM>(_automata.AutomataBank.Select(a => new MoneyVM(a))); Watch(_automata.AutomataBank, AutomataBank, a => a.MoneyStack); // ProductsInAutomata = new ObservableCollection<ProductVM>(_automata.ProductsInAutomata.Select(ap => new ProductVM(ap))); Watch(_automata.ProductsInAutomata, ProductsInAutomata, p => p.ProductStack); } ... private Automata _automata; } , .
, . MVVM. , VM . VM , . (View first) , , , , .
Now, in order to continue development, we need to combine the user and the machine within one entity. This association is usually dictated by this preliminary sketch. We, in our case, simply create a hard connection of one arbitrary user and one automaton within a class object, for example, PurchaseManager. Accordingly, we will address our, not yet implemented, requests for the behavior of the model to the object of this particular class.
Why can't we stay within the User and Automata classes? In principle, of course, possible. See: we need the opportunity to take a certain amount of money from the user and deposit this amount of money into the machine. We cannot perform such an operation in the VM, since this is valid only in the model. Those.This operation must be performed by either the User class or the Automata class. According to the principle of separation of Single responsibility, this responsibility should be assigned to the third class, carrying out their interaction. Therefore, we will create a class PurchaseManager and edit our MainViewVM.cs to use this class, instead of creating User and Automat ourselves.
PurchaseManager.cs: public class PurchaseManager { public User User { get; } = new User(); public Automata Automata { get; } = new Automata(); } MainView.cs: public class MainViewVM : BindableBase { private PurchaseManager _manager; public MainViewVM() { _manager = new PurchaseManager(); _user = _manager.User; _automata = _manager.Automata; ... } ... } Now, we deposit money by clicking on the button and then invoking the DelegateCommand InsertCommand view of the MoneyVM view model. There are different ways to forward such communication between the VM and the model. You can pass DelegateCommand in the VM constructor. It is possible to transfer the entire model (PurchaseManager), this is generally the most universal way and we can do it quite safely, the device of the model, thanks to encapsulation, it allows us quite well. Let's make the appropriate edits:
MoneyVM Constructor:
public MoneyVM(MoneyStack moneyStack, PurchaseManager manager = null) { MoneyStack = moneyStack; if (manager != null) // Null, , DelegateCommand InsertCommand = new DelegateCommand(()=>{ manager.InsertMoney(MoneyStack.Banknote); }); } Accordingly, we change the call of the Watch function to transfer the model in the constructor of the MainViewVM class. But only for the user, for the machine, this is not necessary. (Although nothing terrible will happen, there will even be an unplanned opportunity to make money on both the right and left sides of the interface).
Now you need to implement the InsertMoney function. It must extract a certain banknote from the user, and, if successful, enter it into the machine. The function of extracting banknotes from the user should be accessible from the model, but not available from the client code - the already mentioned internal access modifier will help us with this.
PurchaseManager.cs:
public void InsertMoney(Banknote banknote) { if (User.GetBanknote(banknote)) // , Automata.InsertBanknote(banknote); // } User.cs:
// MoneyStack , / // false internal bool GetBanknote(Banknote banknote) { if(_userWallet.FirstOrDefault(ms => ms.Banknote.Equals(banknote))?.PullOne() ?? false) { RaisePropertyChanged(nameof(UserSumm)); // ! return true; } return false; } // public int UserSumm { get { return _userWallet.Select(b => b.Banknote.Nominal * b.Amount).Sum(); } } MoneyStack.cs:
internal bool PullOne() { if (Amount > 0) { --Amount; return true; } return false; } Automata.cs:
// internal void InsertBanknote(Banknote banknote) { _automataBank.First(ms => ms.Banknote.Equals(banknote)).PushOne(); Credit += banknote.Nominal; } // private int credit; public int Credit { get { return credit; } set { SetProperty(ref credit, value); }} and again MoneyStack.cs:
internal void PushOne() => ++Amount; INotifyPropertyChanged View.
MoneyStack BindableBase Amount :
public class MoneyStack : BindableBase { ... private int _amount; public int Amount { get { return _amount; } set { SetProperty(ref _amount, value); } } } MoneyVM BindableBase — MoneyVM:
... moneyStack.PropertyChanged += (s, a) => { RaisePropertyChanged(nameof(Amount)); }; UserSumm Credit MainViewVM:
_user.PropertyChanged += (s, a) => { RaisePropertyChanged(nameof(UserSumm)); };
_automata.PropertyChanged += (s, a) => { RaisePropertyChanged(nameof(Credit)); };
/- ! . - . , . ProductVM .
ProductVM:
public ProductVM(ProductStack productStack, PurchaseManager manager = null) { ProductStack = productStack; productStack.PropertyChanged += (s, a) => { RaisePropertyChanged(nameof(Amount)); }; if (manager != null) BuyCommand = new DelegateCommand(() => { manager.BuyProduct(ProductStack.Product); }); } PurchaseManager.cs:
public void BuyProduct(Product product) { if (Automata.BuyProduct(product)) User.AddProduct(product); } Automata.cs:
internal bool BuyProduct(Product product) { if(Credit >= product.Price && _productsInAutomata.First(p=>p.Product.Equals(product)).PullOne()) { Credit -= product.Price; return true; } return false; } User.cs:
internal void AddProduct(Product product) { var stack = _userBuyings.FirstOrDefault(b => b.Product == product); if (stack == null) _userBuyings.Add(new ProductStack(product, 1)); else stack.PushOne(); } ProductStack.cs:
public int Amount { get { return _amount; } set { SetProperty(ref _amount, value); } } internal bool PullOne() { if (Amount > 0) { --Amount; return true; } return false; } internal void PushOne() => ++Amount; INotifyPropertyChanged View ProductVM:
... productStack.PropertyChanged += (s, a) => { RaisePropertyChanged(nameof(Amount)); }; —
— , , — ( , ) .
class PurchaseManager { ... public void GetChange() { IEnumerable<MoneyStack> change; if (Automata.GetChange(out change)) User.AppendMoney(change); } } // Automata internal bool GetChange(out IEnumerable<MoneyStack> change) { change = new List<MoneyStack>(); if (Credit == 0) return false; var creditToReturn = Credit; var toReturn = new List<MoneyStack>(); foreach (var ms in _automataBank.OrderByDescending(m => m.Banknote.Nominal)) { if (creditToReturn >= ms.Banknote.Nominal) { toReturn.Add(new MoneyStack(ms.Banknote, creditToReturn / ms.Banknote.Nominal)); creditToReturn -= (creditToReturn / ms.Banknote.Nominal) * ms.Banknote.Nominal; } } if (creditToReturn != 0) return false; // , foreach (var ms in toReturn) // for (int i = 0; i < ms.Amount; ++i) // _automataBank.First(m => Equals(m.Banknote, ms.Banknote)).PullOne(); change = toReturn; Credit = 0; return true; } // User internal void AppendMoney(IEnumerable<MoneyStack> change) { foreach (var ms in change) for(int i=0; i<ms.Amount;++i) UserWallet.First(m => Equals(m.Banknote.Nominal, ms.Banknote.Nominal)).PushOne(); RaisePropertyChanged(nameof(UserSumm)); } Everything. : Vending Machine ( )
Source: https://habr.com/ru/post/339538/
All Articles