Generalized search for paths for AI in platformers
Foreword
If you are creating a platform game in the “run and jump” style, you may have already thought about adding an AI to it. He can control opponents, objects that the player must pursue, and so on ... And too often, for the sake of simplicity, the implementation programmer abandons the intelligent AI, which results in the AI not being able to cope with cunning jumps, an especially intelligent player or moving objects level
This article presents a technique that allows you to send an AI to any static location on the map. The path chosen by the AI requires a lot of jumps with precisely chosen time or bypassing parts of the scene if this path begins and ends from a static point (but this condition is not always necessary).
We will look at the main idea and create a complete implementation. More complex cases, including moving platforms / destructible walls, we will look at in another article.
')
This technique is used in the game Nomera, see on www.dotstarmoney.com or on Twitter .
Before you begin, check that you may be able to implement a simpler algorithm that corresponds to the simplified map geometry. For example, if the collisions in the levels are recognized by a grid of squares (as in most 2D games). In such cases, you can implement a reliable search for AI paths using more simple techniques. My method is mainly suitable for those who want a more "humane" behavior of AI.
Training
Before starting work, it will be nice to refresh your knowledge of mathematical graphs and algorithms for traversing graphs . Also, for preprocessing and determining distances along surfaces, you should understand vector mathematics well.
This technique is applicable to levels composed mainly of static parts of a level with moving objects, and not to levels that are constantly changing on the fly. It is important to have access to static level collision data as straight line segments; this simplifies the work, however, this technique can be easily extended to support any geometric objects used for collisions.
main idea
In simple terms: you, as a developer, move around the level and jump on platforms, and the engine records the user input used at the point where you jump / fall from the platform until you find yourself in the next one. This data is considered the “edge” in which the recorded player input is stored. When an AI wants to create a path through a level, it processes a series of platforms (from now on, we will call them nodes ) as vertices, and edges written between them will act as a graph. The AI then travels the path, moving along different nodes and using the recorded input in the edges to reach the end point. We need to consider many more important details, but first we will focus on more general concepts.
The technique we use will be a combination of two algorithms. This is the creation of a path graph , or “the creation of a data structure that the AI will use to find a path through a level” and bypassing the path graph , or “directing the enemy along the level to a given point”. Obviously, the second algorithm requires the first. Creating a path graph can be described as follows:
- We load static data of collisions of level and we calculate from them a set of nodes.
- We load all the edges (paths) written for the level and add them to the corresponding starting nodes.
- Using the model of collisions and parameters of the movement of enemies, we write the paths between the nodes and add them to the graph.
- When exiting the level, we export the edges recorded for the level.
While this may seem confusing, but below we will analyze the algorithm in detail. Now it’s enough to have a general idea of the stages.
And now a general view of the path graph traversal :
- We get the end point in the form of the end node, and the distance in the direction of this node; we calculate similar parameters for the initial (initial) node.
- We calculate the path using any algorithm for traversing the graph from the source to the end point, where the path is a set of nodes and edges.
- We carry out the AI through the knot to the edge by walking (or running, ie, by any movement known to the AI) to achieve the desired initial speed of the next edge on the way.
- When the AI reaches the starting point of the next node on the path with a certain tolerance of position and speed, disable the automatic control of the AI and execute control through the frame data entered frame by frame.
- When the recorded data is completed, we return control to the automatic movement for the node where the AI is located.
- Repeat the last three steps until the end point is reached.
Already starting to understand? Let's take a closer look at each stage.
We realize the search for ways step by step
Creating a path graph
The path graph consists of platforms / nodes connected by records / edges. It is important to begin to clearly define what is the platform and what is the record.
The node / platform has the following properties :
- This is a subset of line segments that form the level geometry.
- In normal gravity, all segments of the node are oriented in such a way that their first vertex has a strictly smaller x coordinate than the second (if the gravity is inverted, the situation will be reversed).
- Each subsequent segment of the node begins where the last segment ended.
- Each segment of the node can be passed by AI, walking on its surface.
What does this give us? The next important idea is that a node can be completely passed by an AI moving along its surface without jumping or falling, and the AI can pass to any point along the node from any other point.
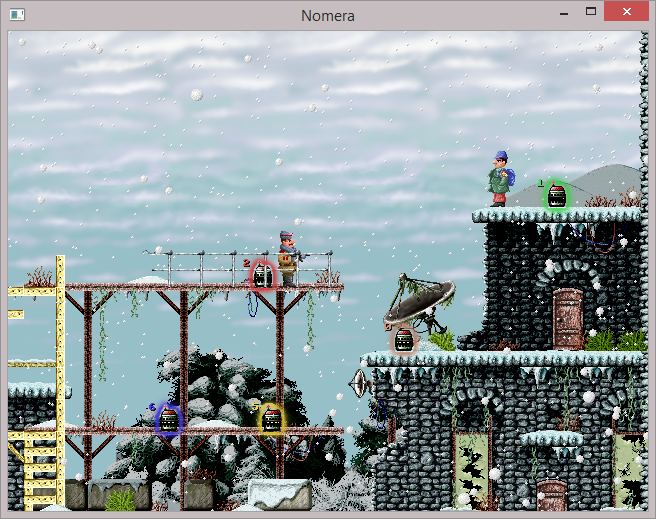
Here is an image of the level collision geometry:

But the image of the nodes extracted from it (for clarity, they are marked with numbers and different colors). In my implementation, the extraction of nodes is performed at boot level. Thus, when the level is already built, you do not need to go back and mark the surface. You will notice that, in essence, this is the extraction of "all surfaces we can walk on":
Note: There is a small error in this image: 26 and 1 are different nodes, but as you can see, they must be one.
Depending on the method of storing the level geometry, you may need a little extra processing to convert arbitrary straight line segments into connected nodes.
Another important note: if you have static geometry that makes it difficult to move along a node (for example, a wall that does not touch the floor), then you will have to divide the nodes along this obstacle. In my example, they are not, but if you do not perform such a test, it can lead to serious complications.
After receiving the nodes, you complete the first step of creating a path graph. We also need to figure out how to quantify a position. The position that we use when determining the start and end points when searching for paths is the node (in our case by the number) and the horizontal displacement along this node relative to its leftmost point. Why horizontal offset instead of arc length along a node? For example, an AI collider is a square or circle that runs along a flat surface towards a rising slope. Can its surface touch the inner corner point of the slope? No, therefore, the position is measured as a horizontal displacement, so that we can consider the horizontal displacement as a “curved horizontal line”.
To complete the second and third stages, we need to decide what the edge / entry is.
The edge has the following properties:
- The edge has a start and end position in two different nodes (however, it can be one node if you want to create a jump on the platform using a jump!)
- The edge has a set of pre-frame recorded data that, when specifying the AI in the edge of the initial position and initial velocity, will direct the AI to the position defined by the final position.
Here it is necessary to note the following: it is absolutely necessary that the generated set of the recorded frame-by-frame input have the SAME properties of collisions and movement, which is the AI for which the path is being created. The big question here is where do the recorded frame-by-frame data come from. The correct answer is from the developer!
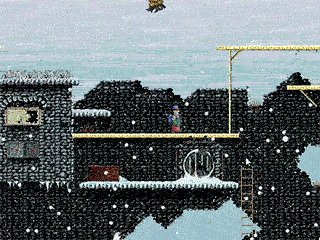
Here is the jump:
In the developer mode of the Nomera game engine, you can turn on recording, that is, as soon as a player jumps from a node or falls from a node, a node is created with a starting position equal to the position from which he fell / jumped. From this point on, user input is recorded frame by frame. When a player lands on a node from free fall / jump, the recording ends and is added as an edge between the starting node and the current node (of course, with positions).
In other words, fragments of the recorded player input are created. If the AI is set to the initial position, then it can transfer control of this input data to reach the final position.
It is also important that when recording the properties of collisions and player movement, they instantly switch to the AI properties, and the edge is marked as “accessible to reach” only by the AI itself, with whose properties it was recorded.
The second step in creating a path graph is loading all previously created edges, and the third is the recording process itself. The recording method is completely up to you. Here is a screenshot of Nomera with ribs painted on the screen. Lines connect only the initial and final position, and do not track the path, but clearly explain the technique:
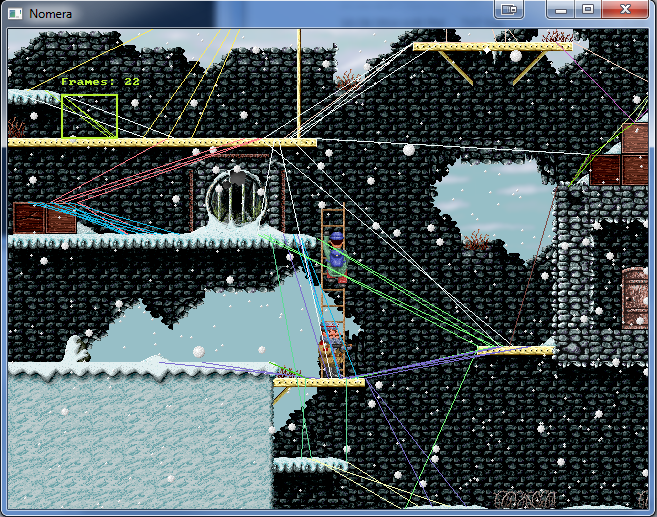
In the upper left corner are visible marks in-game edge editor. It allows you to remove any edges that you do not like, or which the AI does not need to take into account. It also shows the number of frames for which input was recorded.
Of course, an edge needs more properties than just recorded frames and a start with an end position. As I said earlier, the speed at the beginning of the edge is critical, and this will become more apparent later. It is also useful to have convenient access to the number of frames occupied by the edge, because it helps to find the shortest path to the final position.
At this stage, you already have the knowledge to build a graph of the paths of the nodes of the platforms and the recorded edges connecting them. However, it is more interesting how the AI performs navigation using this graph.
Traversing path graph
Before you start using the path graph, talk a little about implementation. Since we, in essence, record the actions of AI along the paths, it would be nice if the AI was controlled by an interface similar to the player's interface. Suppose we have a player class that looks something like this:
class Player{ public: // ... void setInputs(int left, int right, int jump); // ... private: // ... } Where "left, right, jump" are entered from the keyboard. First of all, these will be the values that you will record while edge recording. Secondly, since the AI also needs a “setInputs” control interface, why not write a REAL interface? Then the code becomes more modular:
enum PC_ControlMode{ MANUAL, RECORDED } class PlatformController{ public: // ... void setManualInput(int left, int right, int jump); void bindRecordedInput(RecordedFrames newRecord); int getLeft(); int getRight(); int getJump(); void step(timestep as double); // ... protected: PC_ControlMode controlMode; RecordedFrames curRecord; void setInputs(int left, int right, int jump); // ... } class Player : public PlatformController{ // ... } class AI : public PlatformController{ // ... } Now both AI and player classes are controlled by an interface that expands and can switch between manual and recorded controls. This scheme is also convenient for pre-recorded cutscenes in which the player loses control.
Okay, now in the controller of the AI, we need black-box-style methods:
createPath(positionType destination); step(double timestep); The first line sets the path between the current position and the end position, and the second line passes the input to setInputs () to bring the AI to the end position. In our step-by-step statement of the algorithm, createPath performs the first two steps, and step the last three. Let's look at creating a path.
The path will consist of an ordered sequence of different nodes and edges, starting at the edge and ending at the last edge, leading us to the final node.
First we need to be able to determine the current position, whether it is in the air or in a node. When we are in a node, we need a reference to this node and the horizontal position along it (remember, our general position ?).
To build the path, we use the graph traversal algorithm. In my implementation, I used the Dijkstra algorithm. For each stored node, we also store the position in which we find ourselves by choosing a leading edge (for future generations, we will call it edgeStartNodeCurrentPositionX ). Thus, the edge weights for a given edge are calculated as follows:
edgeFrameLength = walkToEdgeDist = abs(edgeStartX - edgeStartNodeCurrentPositionX) edgeWeight = edgeFrameLength * TIMESTEP + walkToEdgeDist / (HORIZONTAL_WALKING_SPEED) if(edgeDestinationNode == destinationPositionNode){ edgeWeight += abs(edgeEndX - destinationPositionX) / (HORIZONTAL_WALKING_SPEED) } As you can see, the weight of the final edge is expressed in seconds and is the sum of the time spent on the record and the time taken to walk to the beginning of the edge. This calculation is inaccurate, and will be different if running is used in the movement of the enemy. We also check whether we are in the final node, and if this is the case, then the time of walking from the final position of the rib to the final position of the path is added to the weight.
If we can calculate the weights of our ribs, then we can use the Dijkstra algorithm! (Or any other algorithm for traversing a graph, A * is well suited here if you use heuristics like “Euclidean distance to final position”).
At this stage you should have a way! We have almost completed and completed 4 stages of our algorithm. In essence, we have two procedures, between which we switch depending on whether we are in a node or edge-controlled.
If we are in a node , we go from our current position towards the edge that we need next. Earlier, I mentioned that we also need to know the initial velocity of the recorded edges. It is needed because very often the AI has a slight acceleration or deceleration at the beginning or end of the walk. One of these transient velocities can be the starting point of the target edge. So when we go to the starting point of the edge, we sometimes have to slow down a bit or increase our speed to get ready for the start of the run / walk.
When we reach the initial position of the edge, along which we will move, then most likely, our position will not exactly correspond to the initial position of the edge. In my implementation, the position was rarely shifted by more than a pixel. It is important that we reach the initial position of the edge with a certain tolerance, and as soon as we reach it, we will change the position / speed of the AI to the initial position / speed of the edge.
Now we are ready to transfer control to the edge record.
If we are on the edge , then each frame simply receives the control transmitted by the edge record and increases the number of the read frame read. And it's all! Sooner or later the recording will end, and if it was accurate before the frame, the AI will be in the next node and control will be transferred to the node.
Additions
To configure this technique in the game, you can make some changes to it.
It is highly recommended to add an in-game interface to record and erase paths, which will help you conveniently create paths through the level: in Nomera, creating paths in a level takes about 10 minutes, and this is quite fun.
It is also convenient to provide automatic extraction of nodes. Although technically you can do it yourself, adding automatic extraction makes the workflow MUCH easier.
To quickly get the parameters of the nodes, Nomera stores all the nodes in a hash table, and all the edges in the lists for each of the nodes. For ease of display, the edges are also saved in a general list, allowing them to show the lines of the start / end points on the screen.
If you have not yet noticed, static interactive elements like ladders or ropes that are not objects with collisions are processed by this technique automatically. Suppose to climb the ladder, you need to press "up", then if this press "up" is recorded and the AI uses an interface similar to the one offered above, then it will register the entered data and lead to climbing.
Summarize
We studied the way of conducting AI on a level with platforms, which works regardless of the geometry of collisions. It allows AI to take advantage of all the control potential in the platformers. First, we generated a path graph for the level, then built a path for the graph, and finally, we spent the AI on this path.
But does it work? How does it work? Here is the gif:
These guys are in "hug mode." They are trying to get close to me, wherever I go.
If you have questions or suggestions, email me at chris@dotstarmoney.com. Thanks for reading!
Source: https://habr.com/ru/post/339504/
All Articles