Photogrammetry research
Friends, I want to share the experience that I acquired in the process of practical study of the discipline, like photogrammetry. I would be glad if any of you give your opinion, correct me or point out mistakes that you made. Perhaps this article on the study of my photogrammetry will help and will be useful to you. My work is described on the example of nature photography in a city park, in the central zone of Russia, in the period August-September 2017.
So, let's start from the very beginning: after reading and reviewing a certain amount of information on this topic, I chose the Agisoft PhotoScan program, which helps to get 3d models that are textured based on the original images. Having adopted the instruction from Agisoft PhotoScan - on proper photography, the rules of which must be followed in order to get the best result. It is known that there are many programs on this subject: Photoscan (Agisoft), 123D Catch (Autodesk), ReCap360 (Autodesk), Arch3D (Epoch project), Bundler / PMVS2, Apero / MicMac, 3DF Zephyr (3DFlow), Photomodeller scanner (EOS systems), Smart3D (Acute3D).
The next stage of work includes the settings of the camera, camera, images and the preparation of the necessary equipment for shooting.
After the necessary preparation and choosing an auspicious day, cloudy weather is best; it is the most favorable for photography, we need neutral lighting, because with further actions we will get a 3d model with a texture and set it in the right lighting, of course, you can also shoot an object in sunny weather - if you need, only a 3d model and in this case the texture can be corrected in Photoshop, but this is an additional manipulation, I will write more about this method.
')
We go to the forest park or to the place where the object we need is located. So, having arrived at the scene, I tried to find more interesting objects with a pronounced texture. Nature creates, in its beauty and form, such instances with a unique color, the pattern from which it is impossible to tear off a look, our task is to borrow all this magnificence and transfer it to our 3d world. Let's start taking pictures.
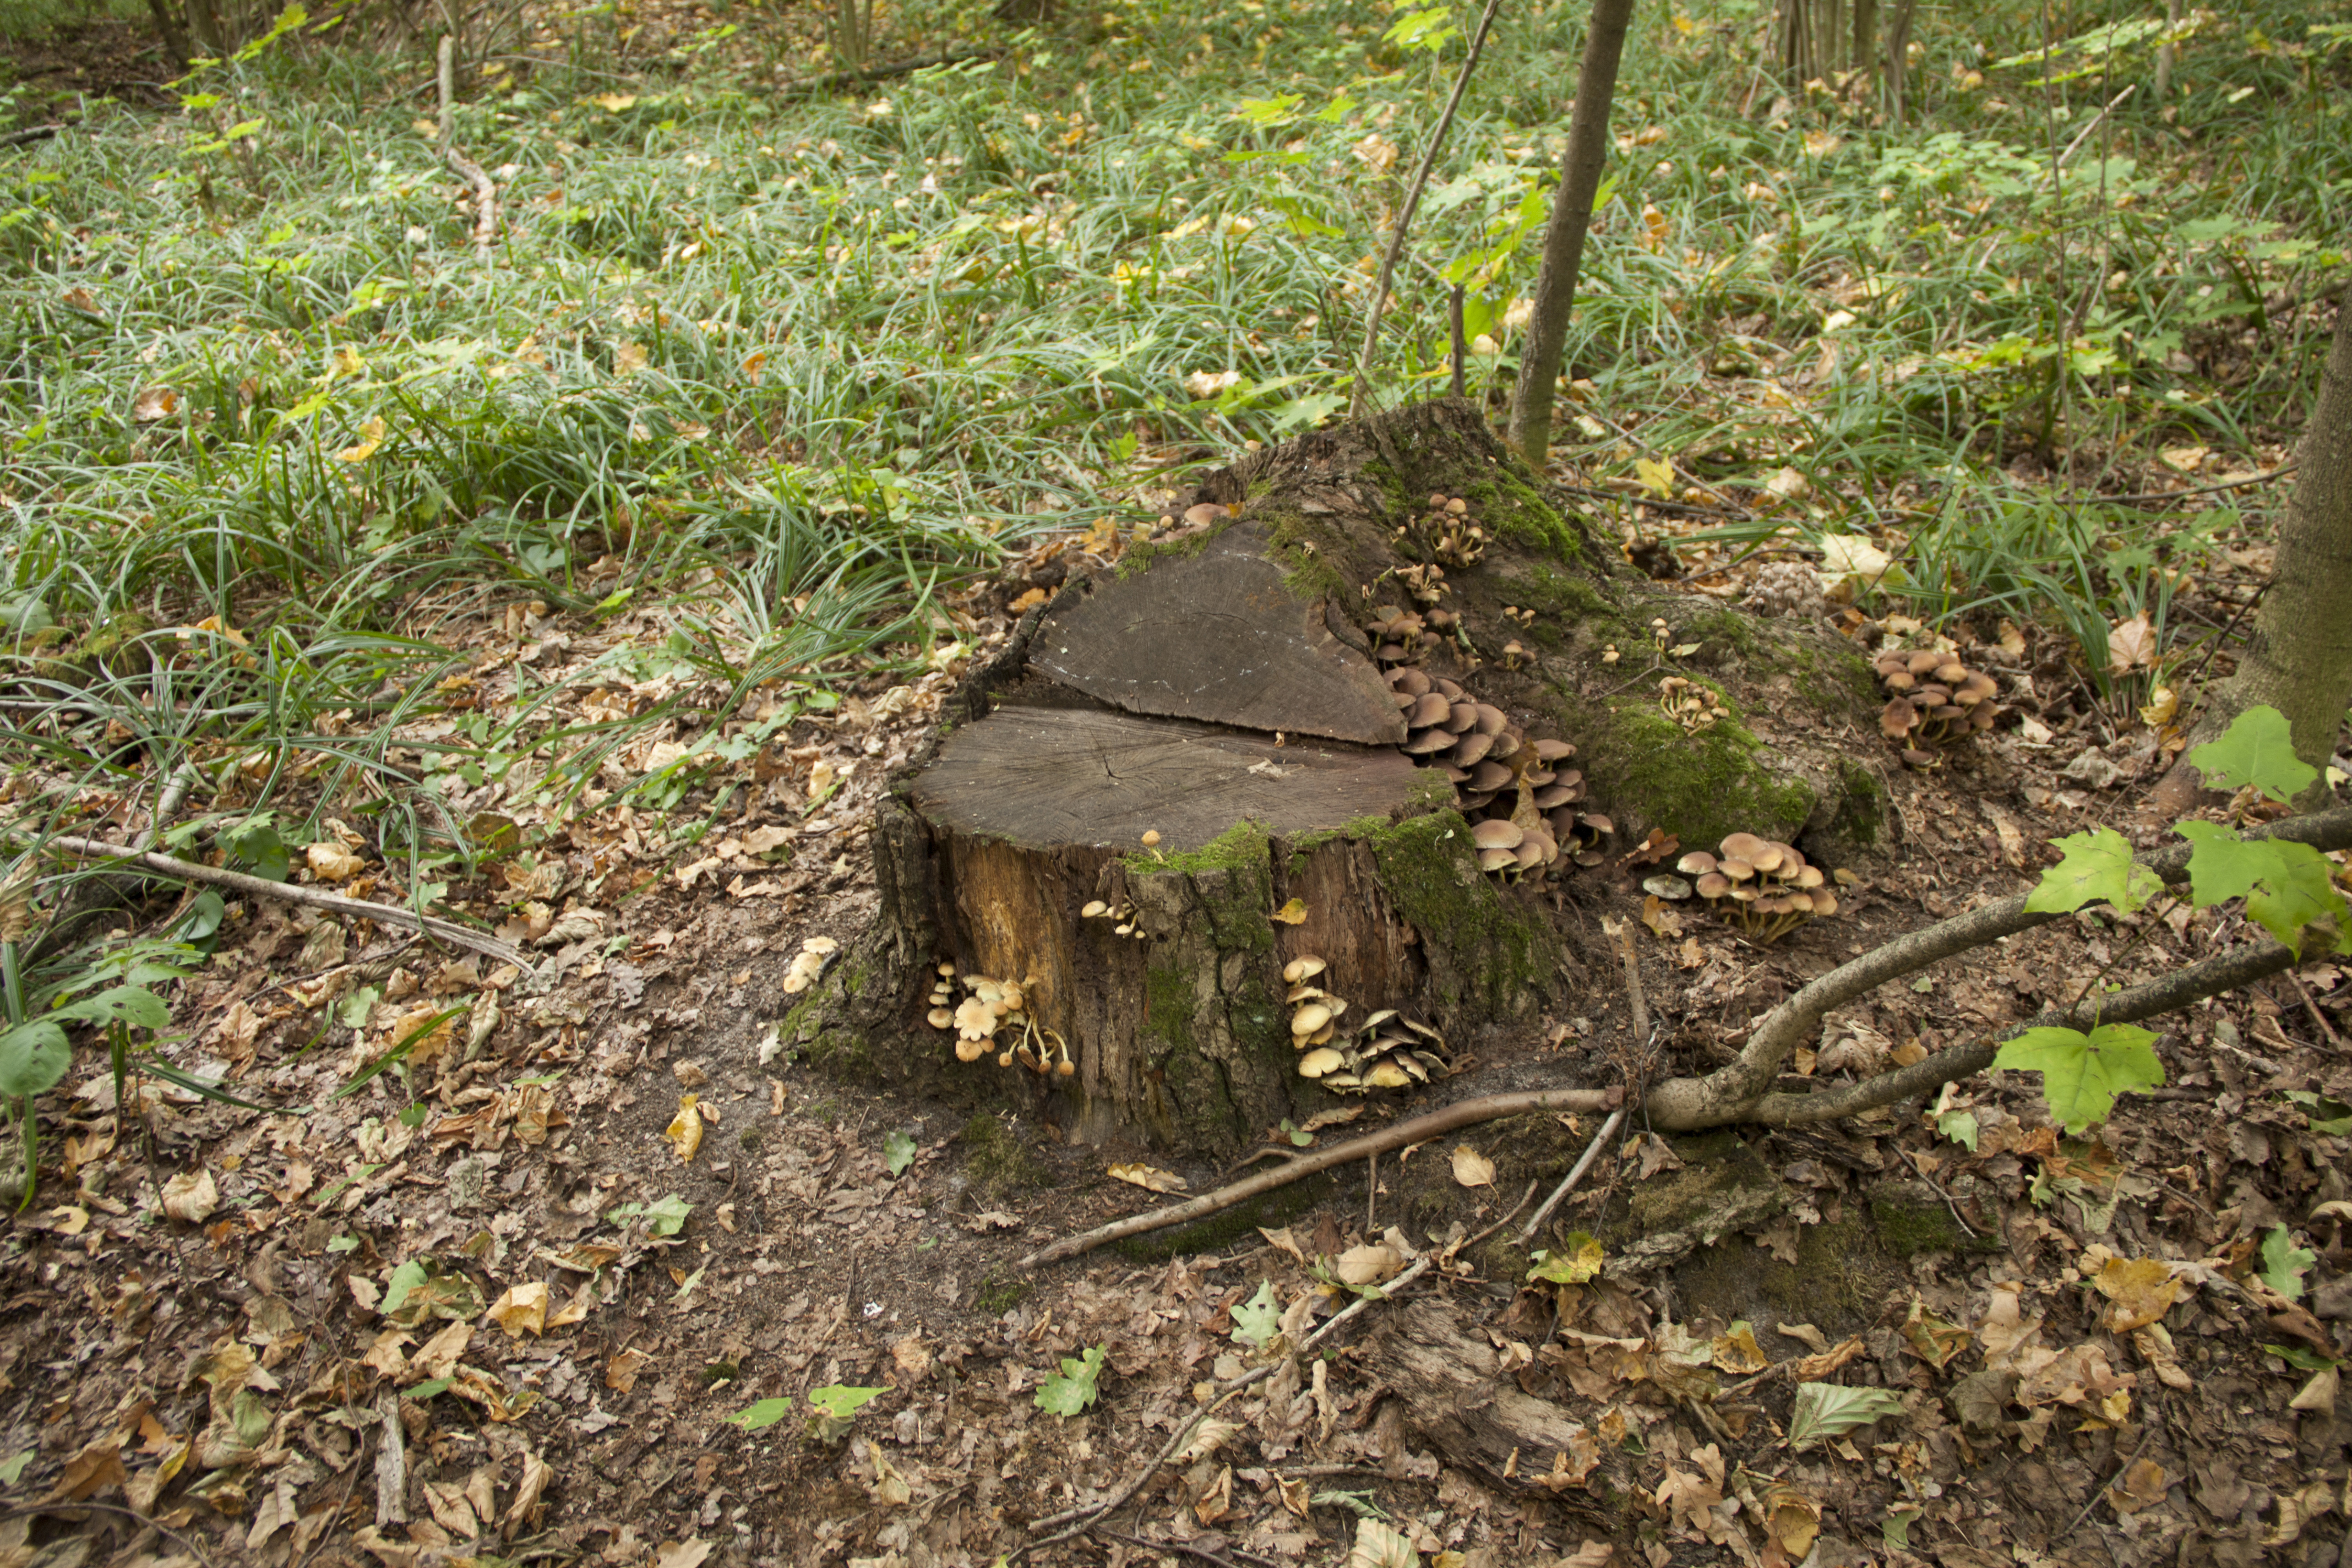
For the implementation of the photographing process, it is necessary, taking each subsequent frame, to provide an overlap between frames of approximately 60%, these 60% will form our model with a texture. It is desirable maximum resolution, which can allow your camera, you need to bypass the object completely, i.e. take a 360% round and take about 36 shots on 1 lap; there may be several shooting circles. Again, in no case need to zoom in, if you need to fix some details, then you need to come closer, sit down or lie down to take the desired picture. If the object has concavities and bumps, and the shooting is done only by standing and the object is not removed from below, then in some places that look “normal” to the ground and do not fall into the frame, in these areas there will be holes on the 3d model and therefore no texture , we will fix such moments further in the programs, but it is better to avoid this from the very beginning. I have to replace another important point, strive to avoid sprigs and grass in the frame that are near the roots and at the base of the objects we need, because later on these objects will be printed on our texture and we will clean it, which in some cases is inevitable . I found this interesting stump.
So, after making the necessary number of pictures of all the objects that we liked, the next stage began.
Many people know that there are some programs for editing Raw formats, CameraRaw and Lightroom, I stopped at Lightroom.
Next, import all our Raw images into Lightroom and make the following settings. Highlights lower, and Shadows increase, remove chromatic aberration and lens distortion. Based on the settings of one photo, we create a Preset to further speed up the processing of photos, there may be a different number from several tens to several thousand, depending on what your task is and how many objects you are shooting.
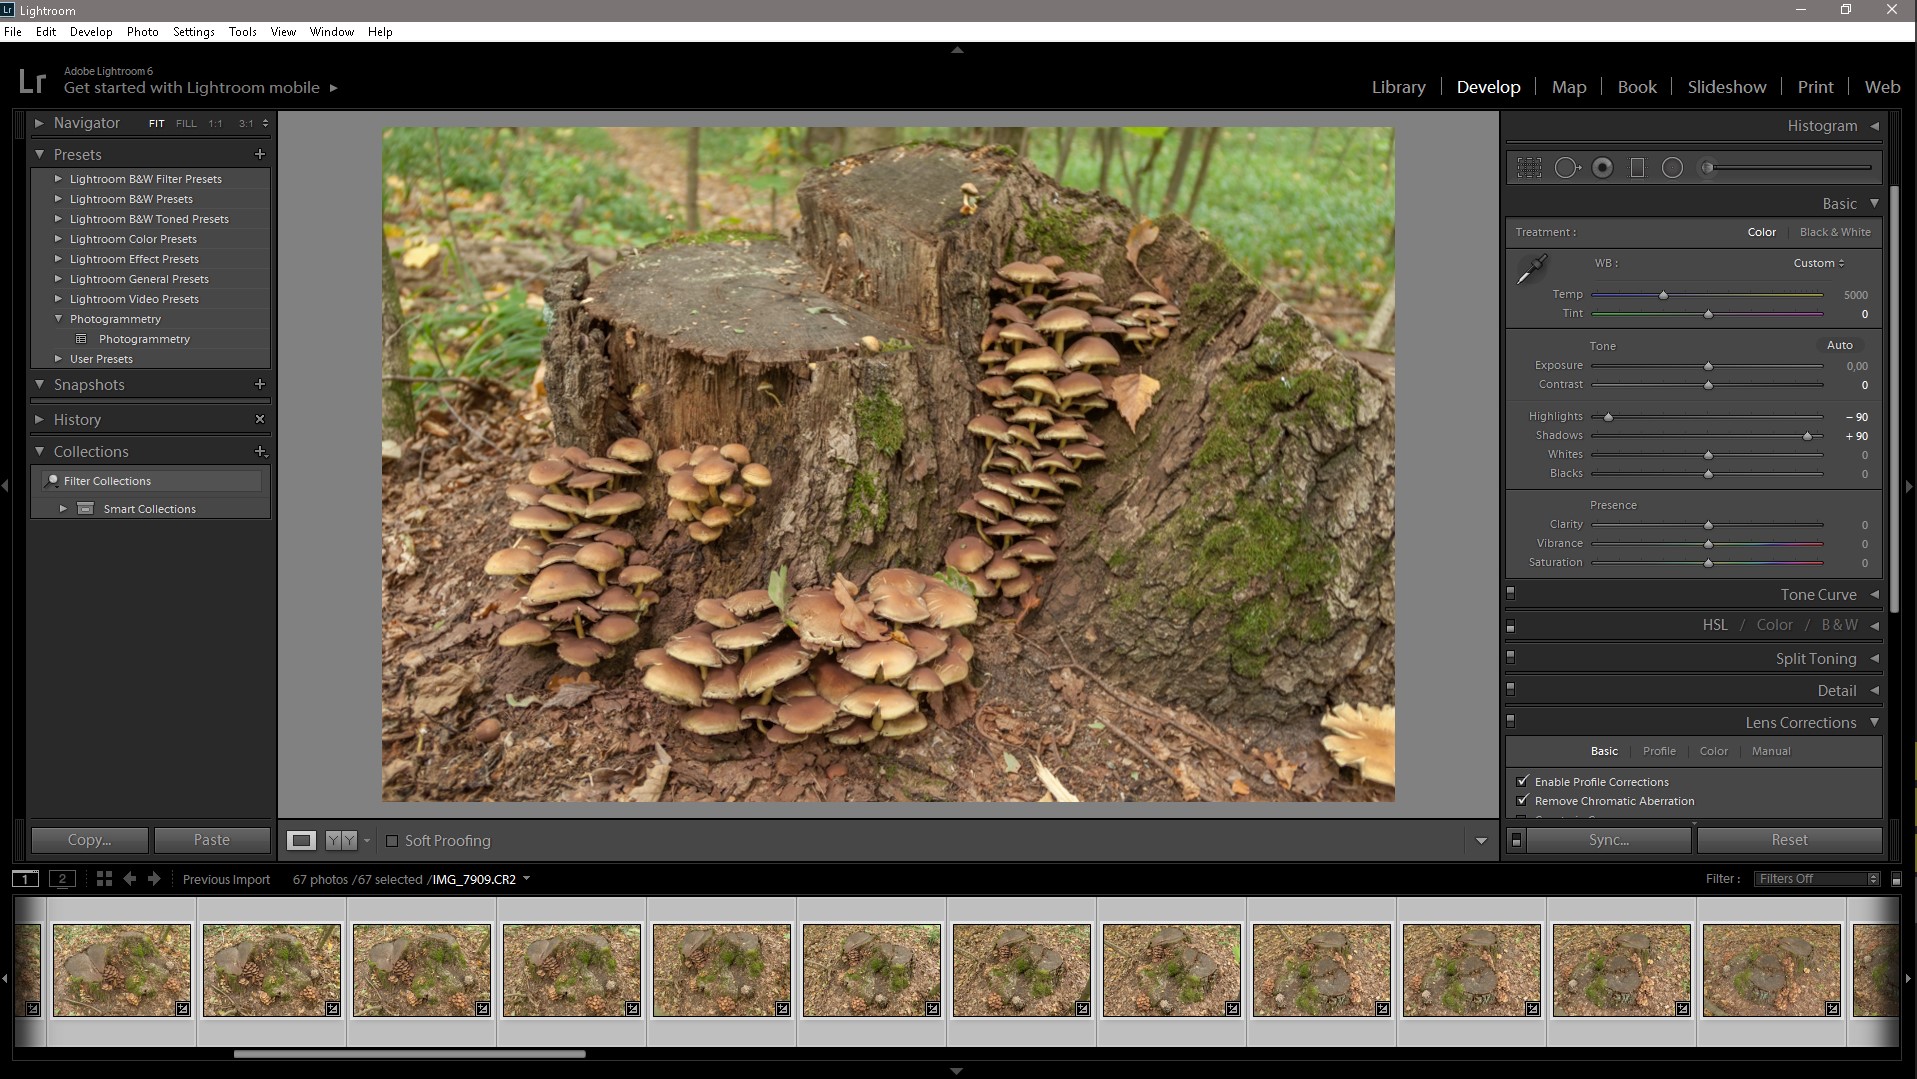
We create the Preset we apply to the remaining photos and export them to TIFF format in the appropriate folder for each object separately and the library of this category, it’s best to organize the workflow, from the very beginning, to avoid subsequent chaos and loss of the necessary files, Raw files are deleted.

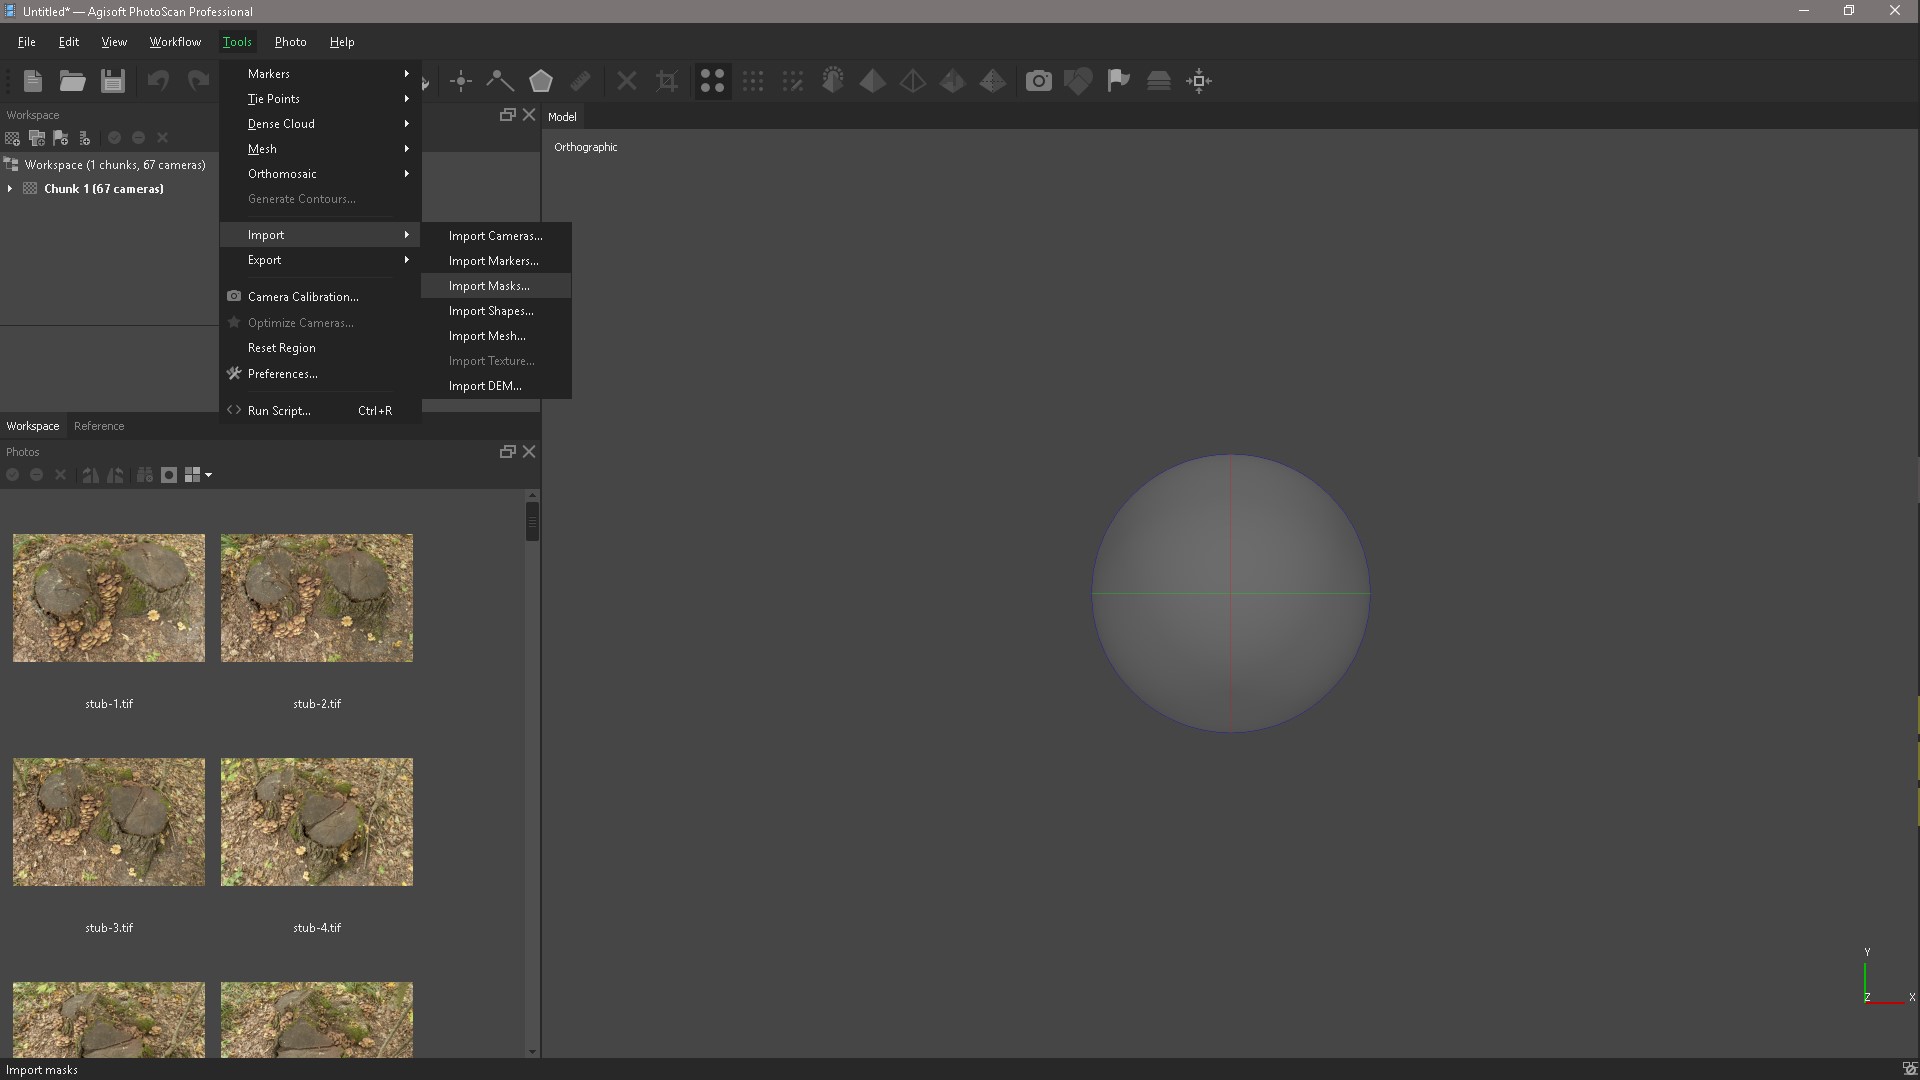
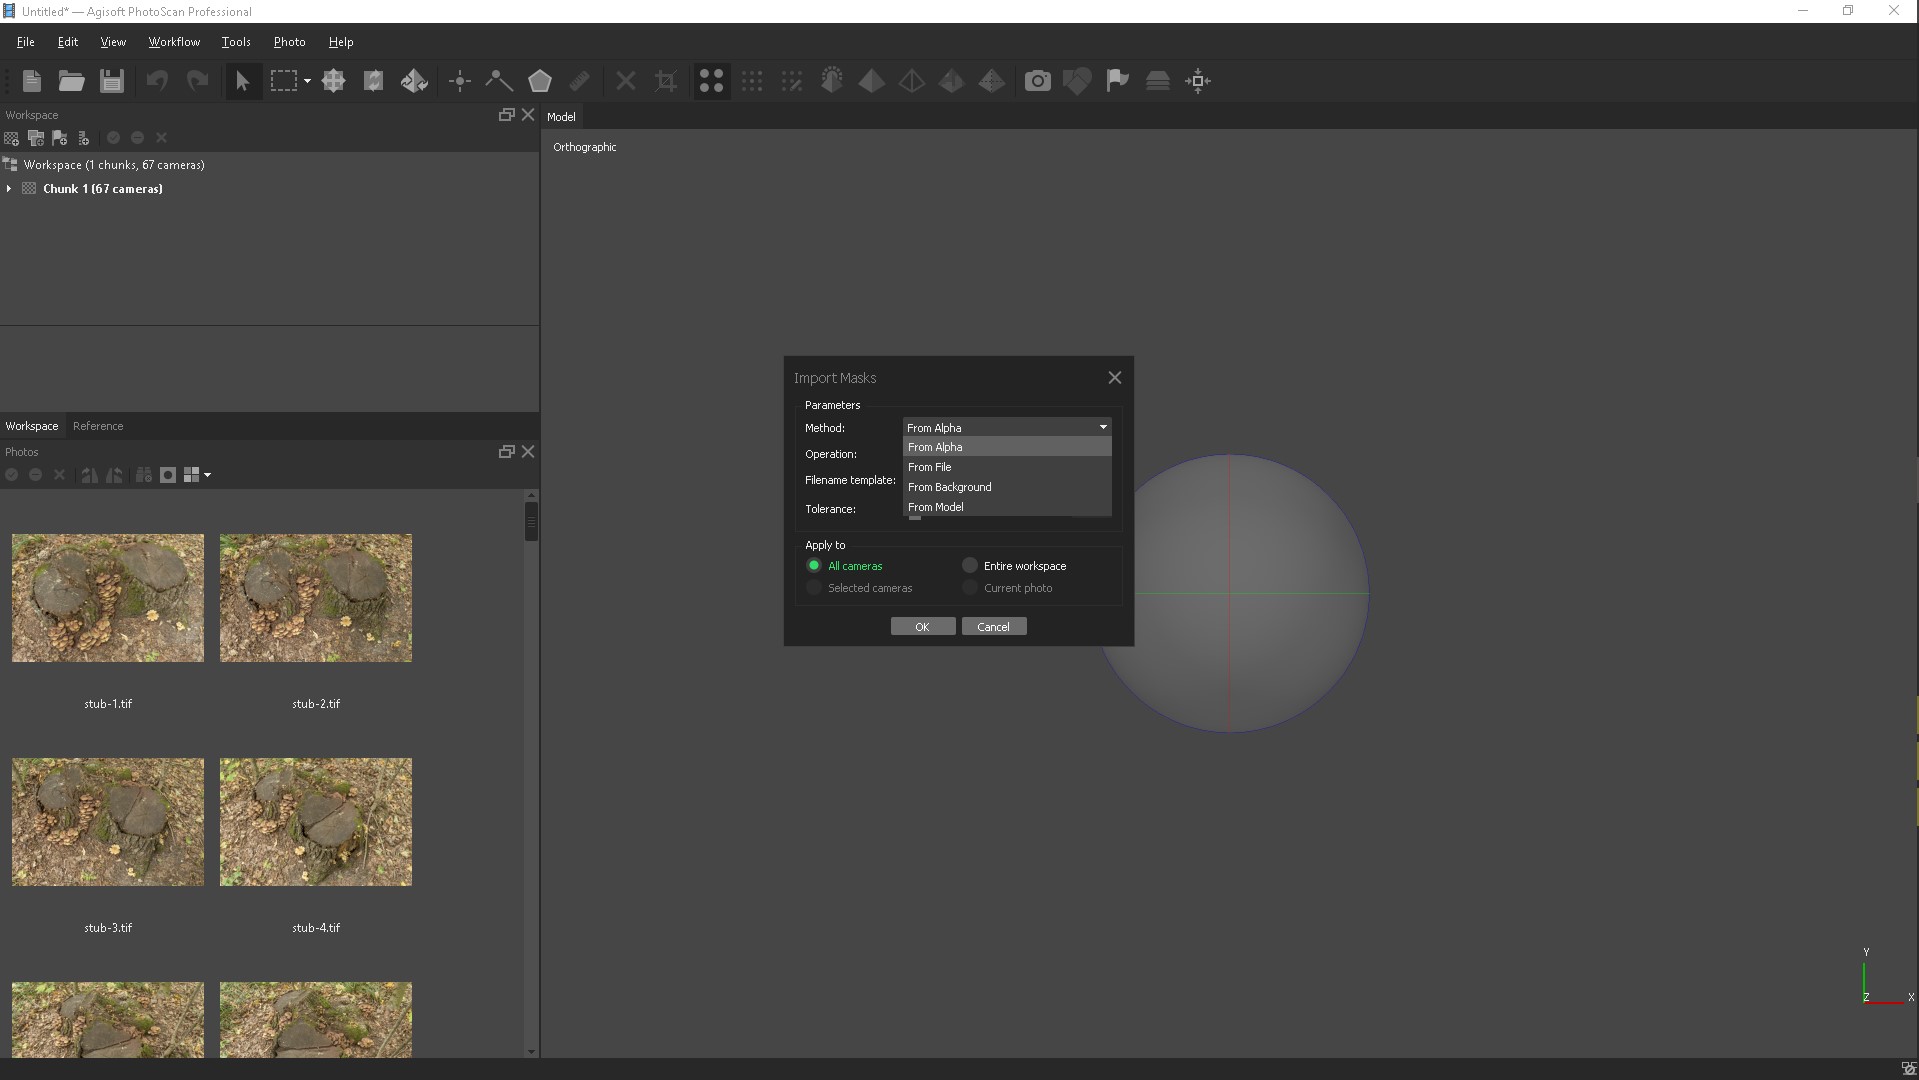
Open Agisoft PhotoScan and add our photos. For best results, you need to mask all minor objects in the original photos. Create masks around the object, you can create masks in different ways in PhotoScan Lasso and then add a selection or in the Photoshop as the Lasso tool, but also create Actions to skip the routine process of creating a mask, adding it to the channel and saving the file. If you were shooting in a studio and you had a uniform background, then you need to go to Tools / Import mask and apply the From Background method to the selected cameras. You can even do without creating masks, but this will complicate the process.
At this stage, PhotoScan determines the position of the cameras and builds a sparse cloud of points on the basis of photographs.
If we have masks, then put a tick "Consider the mask." After this step, we can evaluate the quality of our photos and select all the cameras in the window that appears.
We can filter our photos by quality, I have already done this and at the top are the worst photos, but this is not necessarily the way the quality of blurring is determined.
The image quality estimation algorithm analyzes the contrast between pixels, when there is a lot of contrast, then the image is perceived as good. The only way to make sure all your images are normal is to visually check them at 200% zoom. Awfully boring job. The worst images, those that are very blurred, can be turned off.
The next step is to select our object with the Selection tool and click Crop and so clean our object. The Space key helps us to switch between tools, for example, selection and navigation.
Correcting Box, this will not help NumPad, it allows you to switch between cameras, perspective and orthogonal projection.
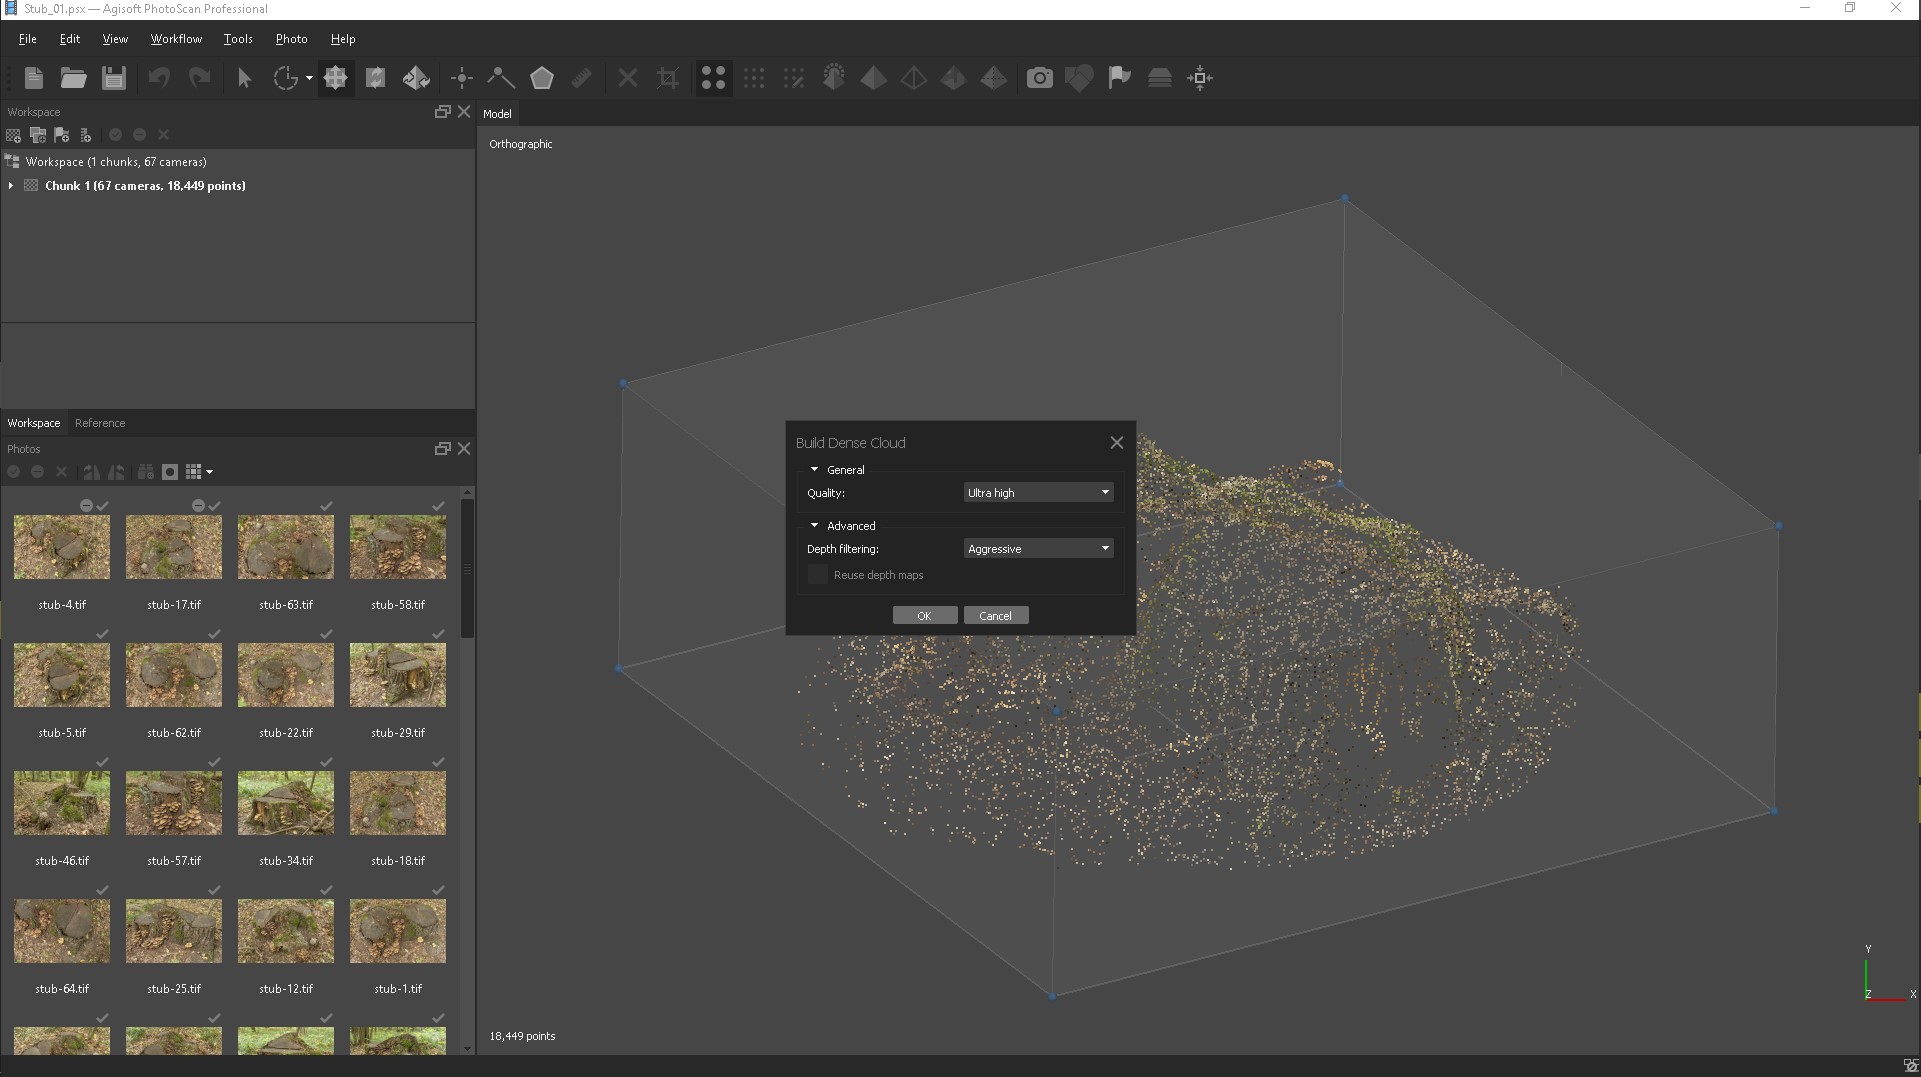
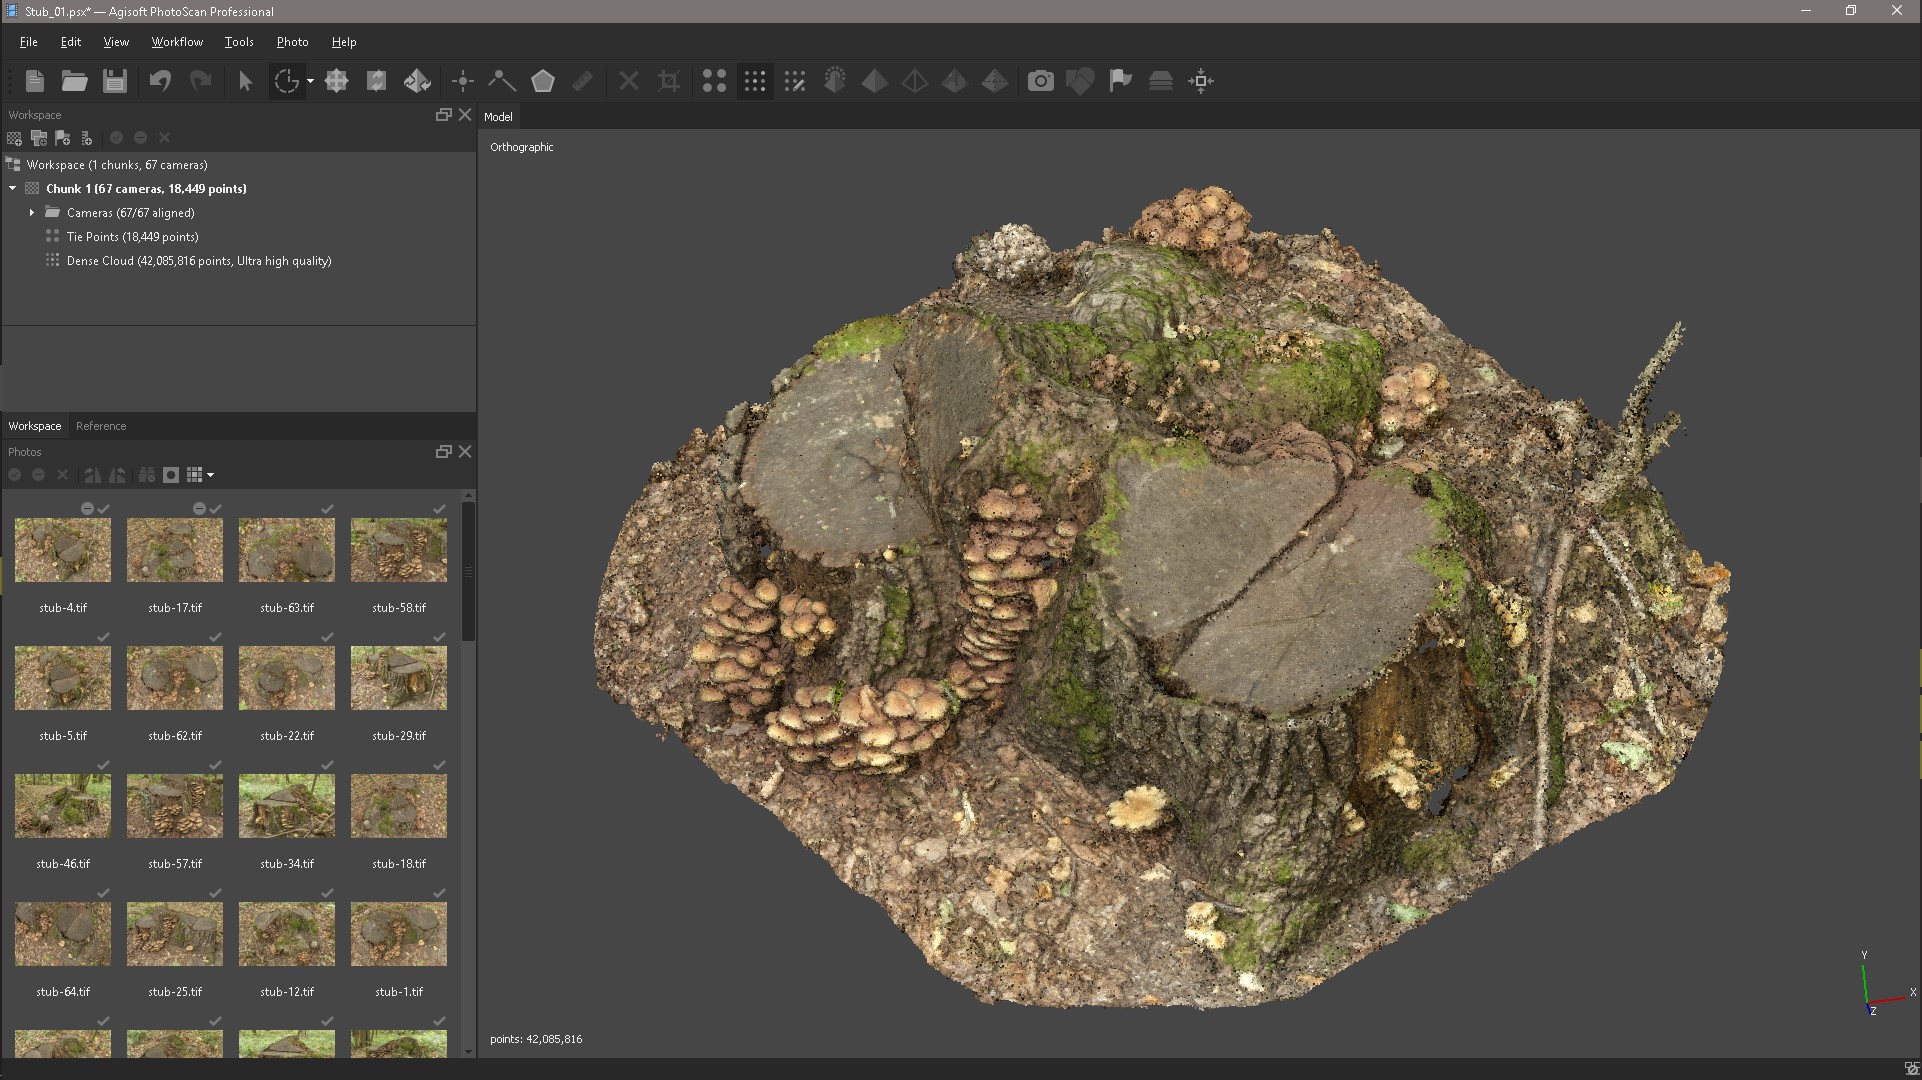
Based on the calculated positions of the cameras, the program builds a dense cloud of points. Quality: Ultra-high (the higher the desired quality, the more time and computing resources will be required to complete the stage).
Aggressive (if the reconstructed scene has a complex geometry with numerous fine details or non-textured surfaces, such as the roofs of buildings, it is recommended to set the Soft parameter value).
That's what we did.

After a little cleaning of the object with the selection tools, we get this result.
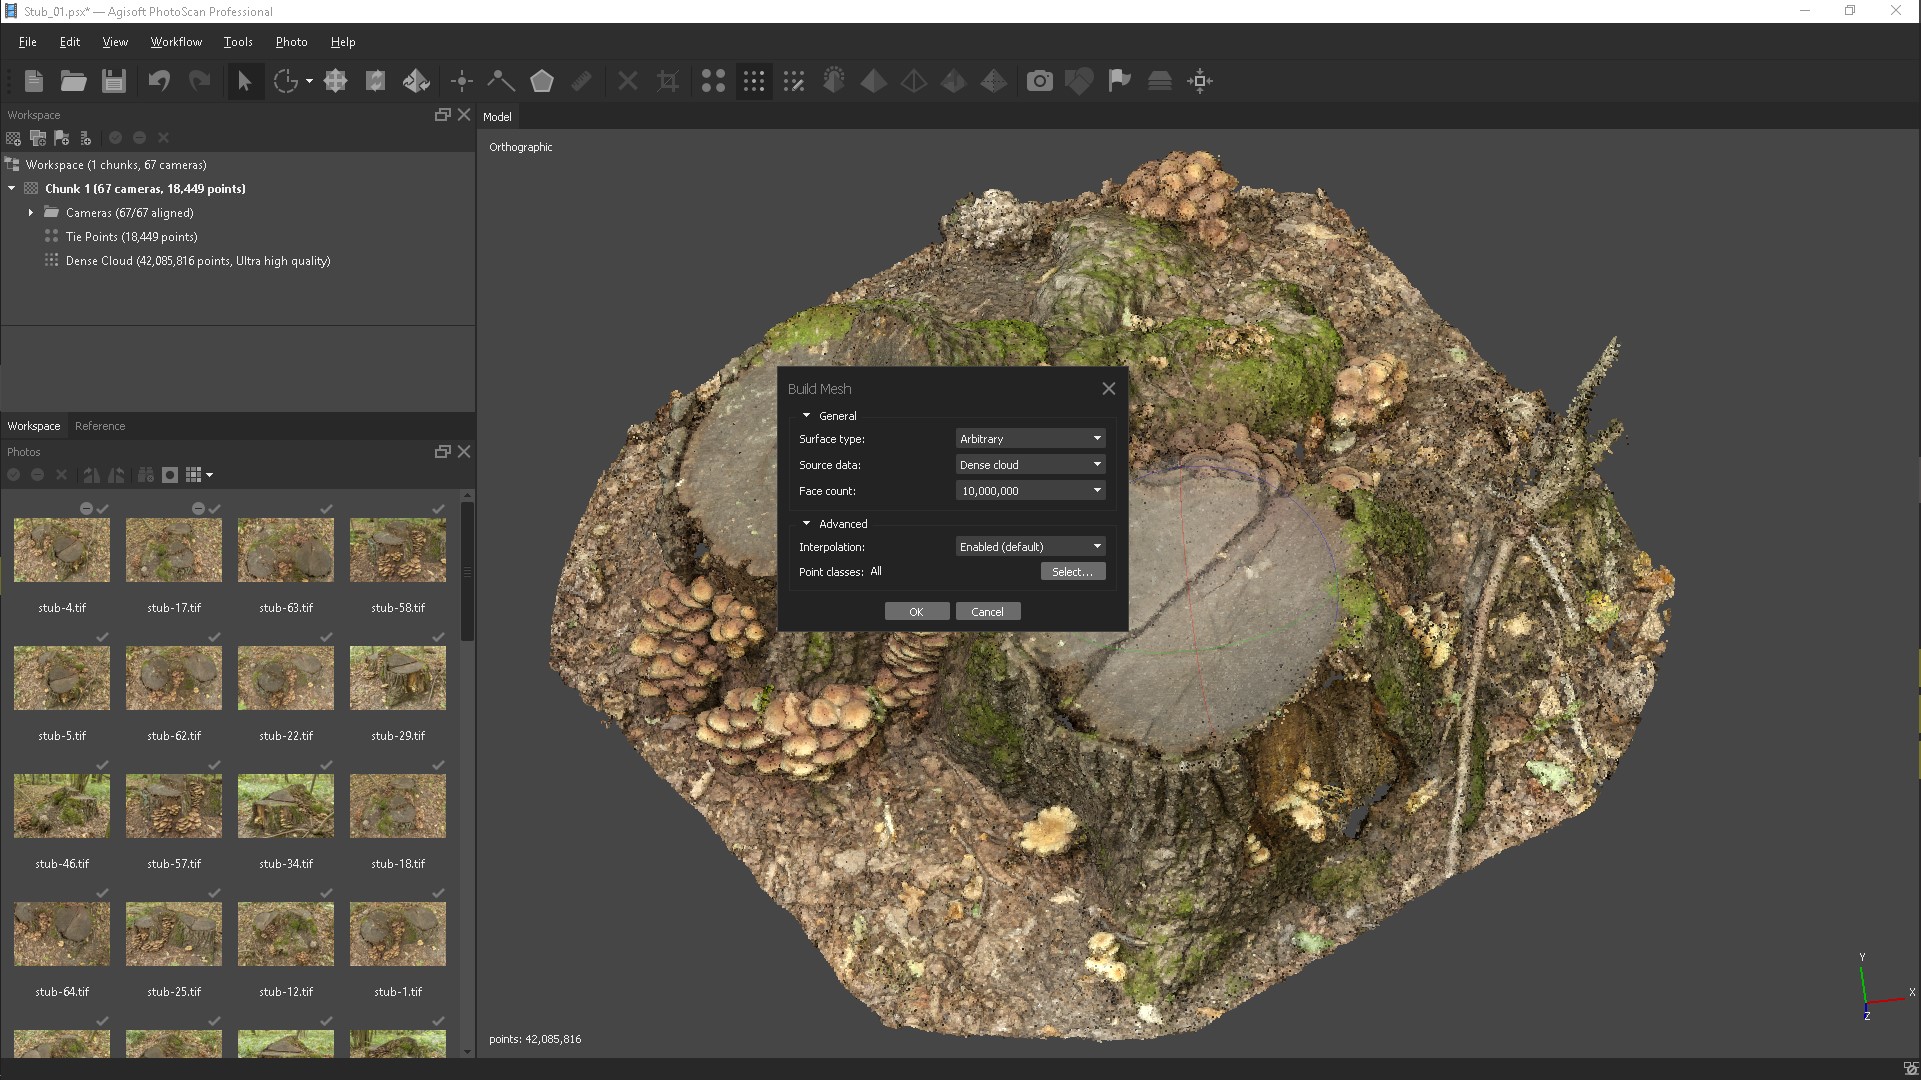
Now, based on the obtained dense point cloud, you can build a three-dimensional polygonal model.
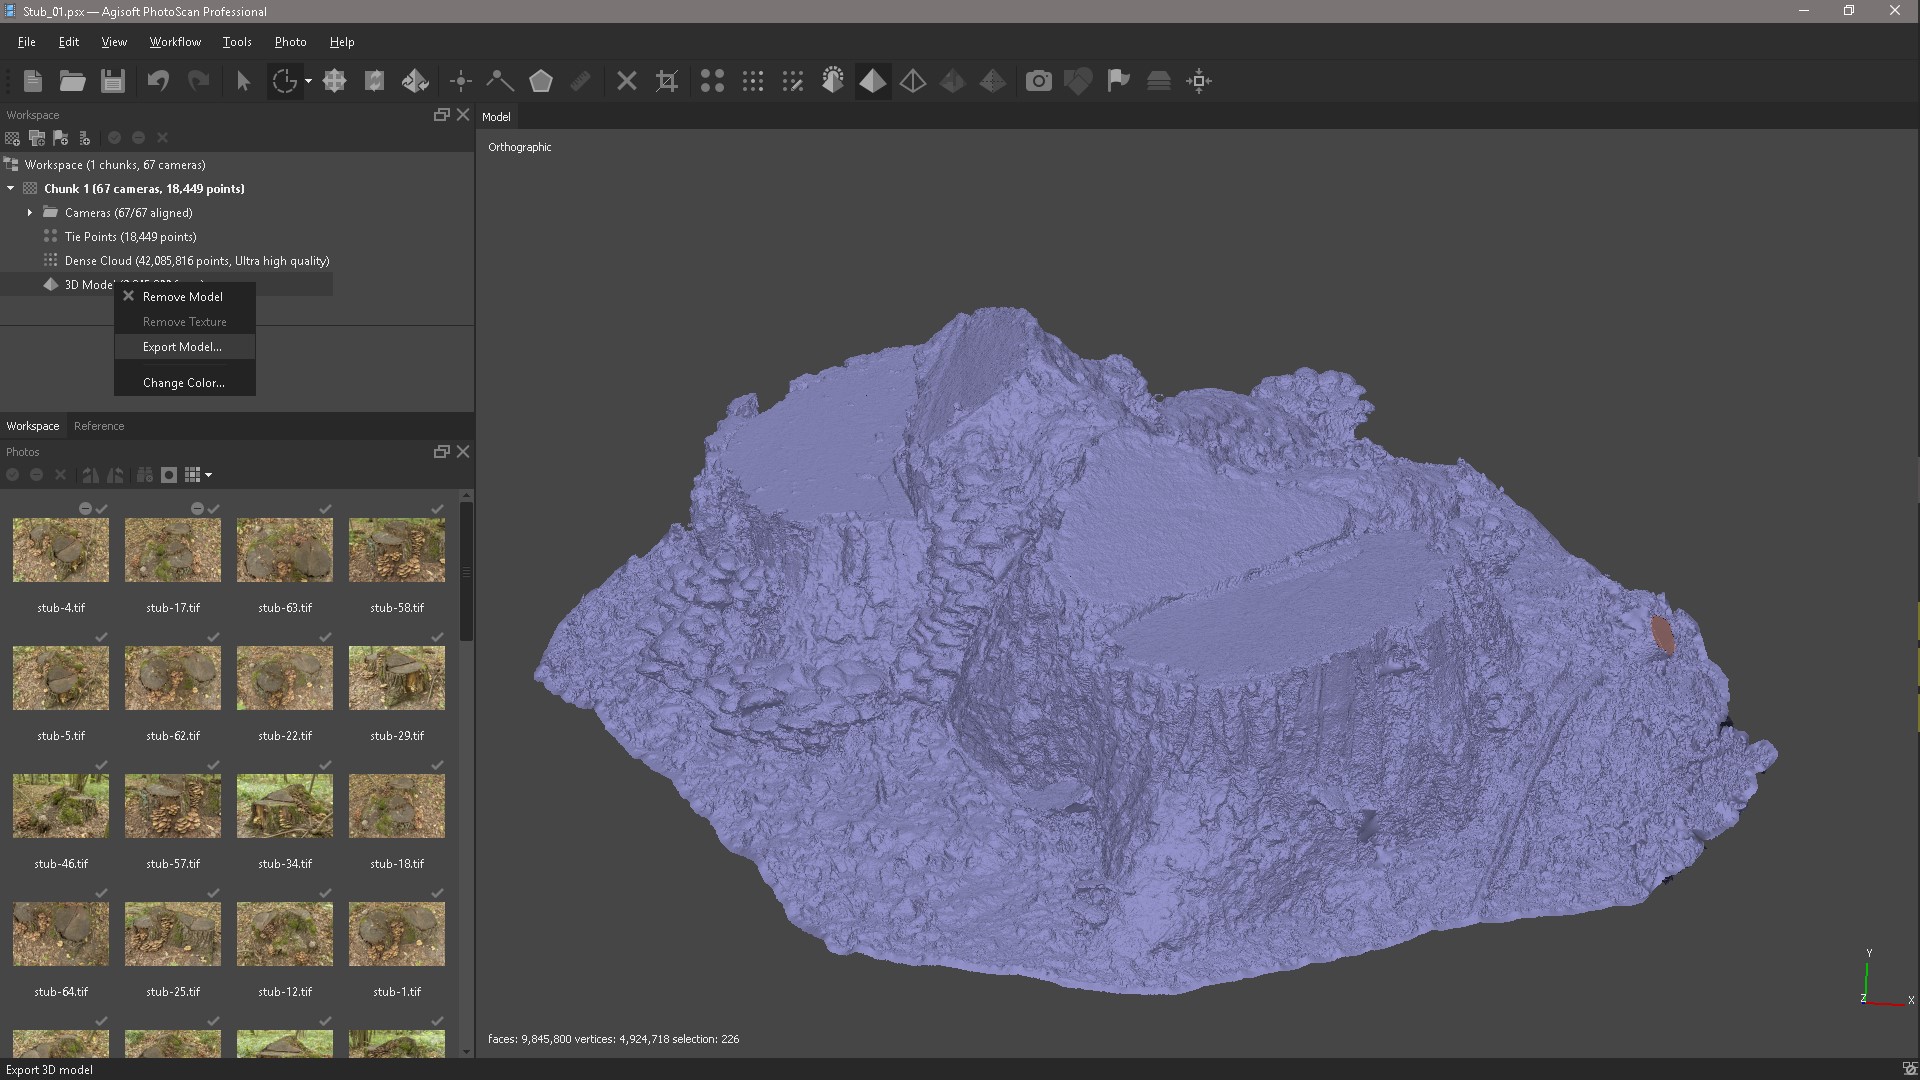
Select Edit and click Gradual Selection to highlight in red all the individual pieces of geometry that we need to remove.

After that we need to close all the holes in our object, for this we select Tools, Mesh, Close Holes.

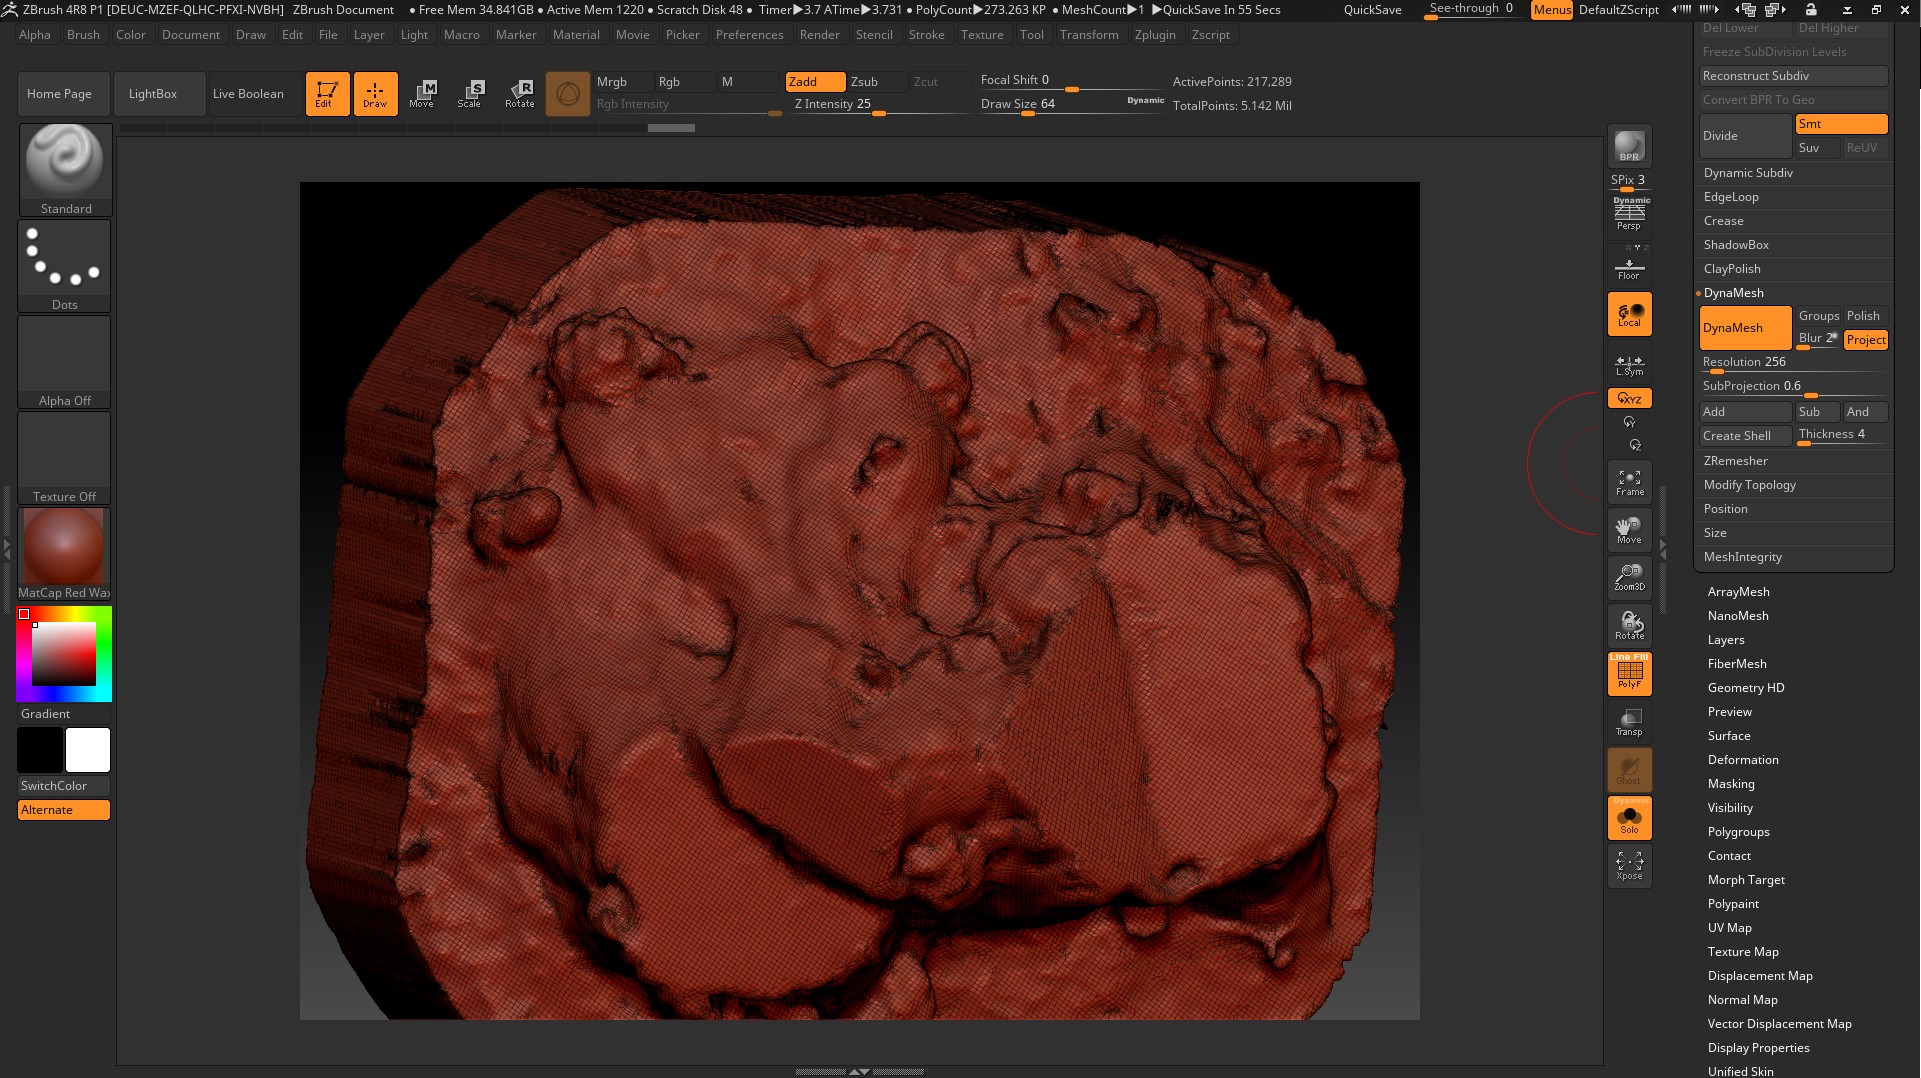
Now we export our model to Zbrush for further editing.
Import the model into Zbrush and duplicate,
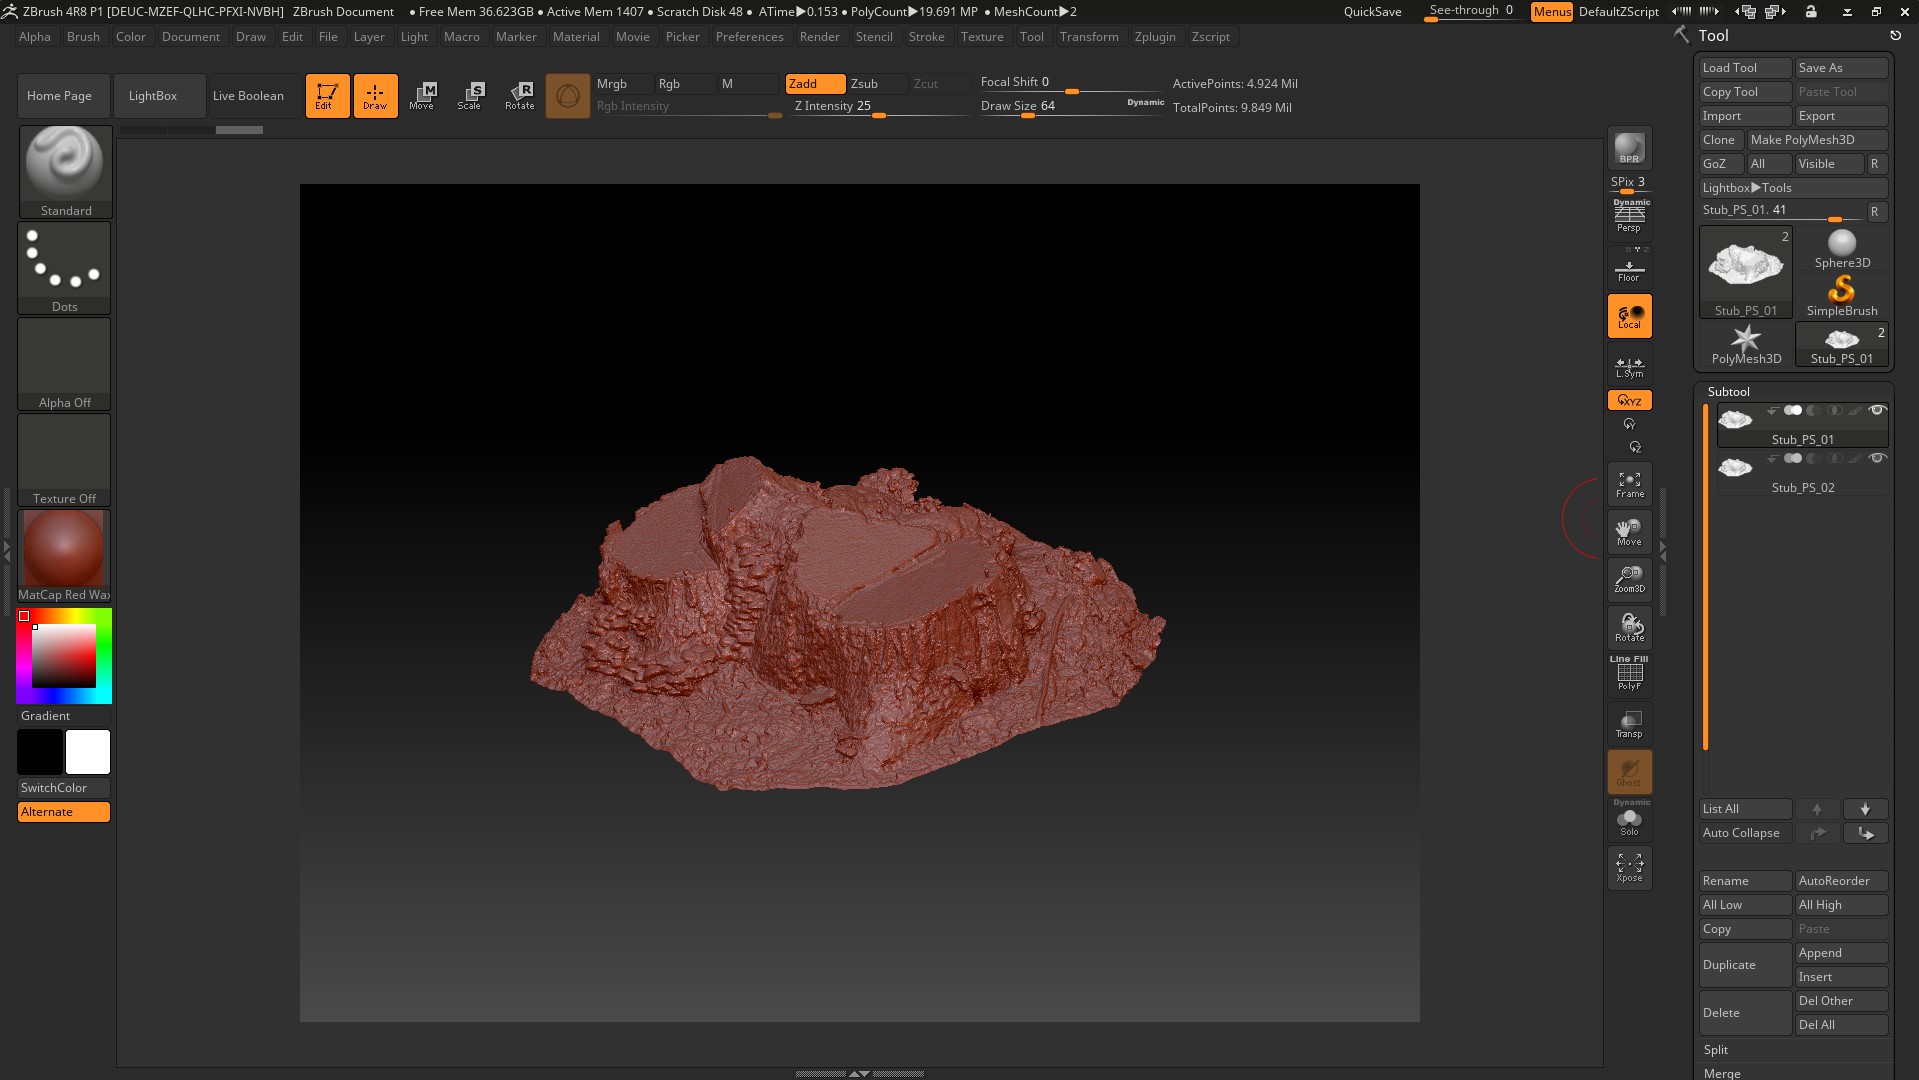
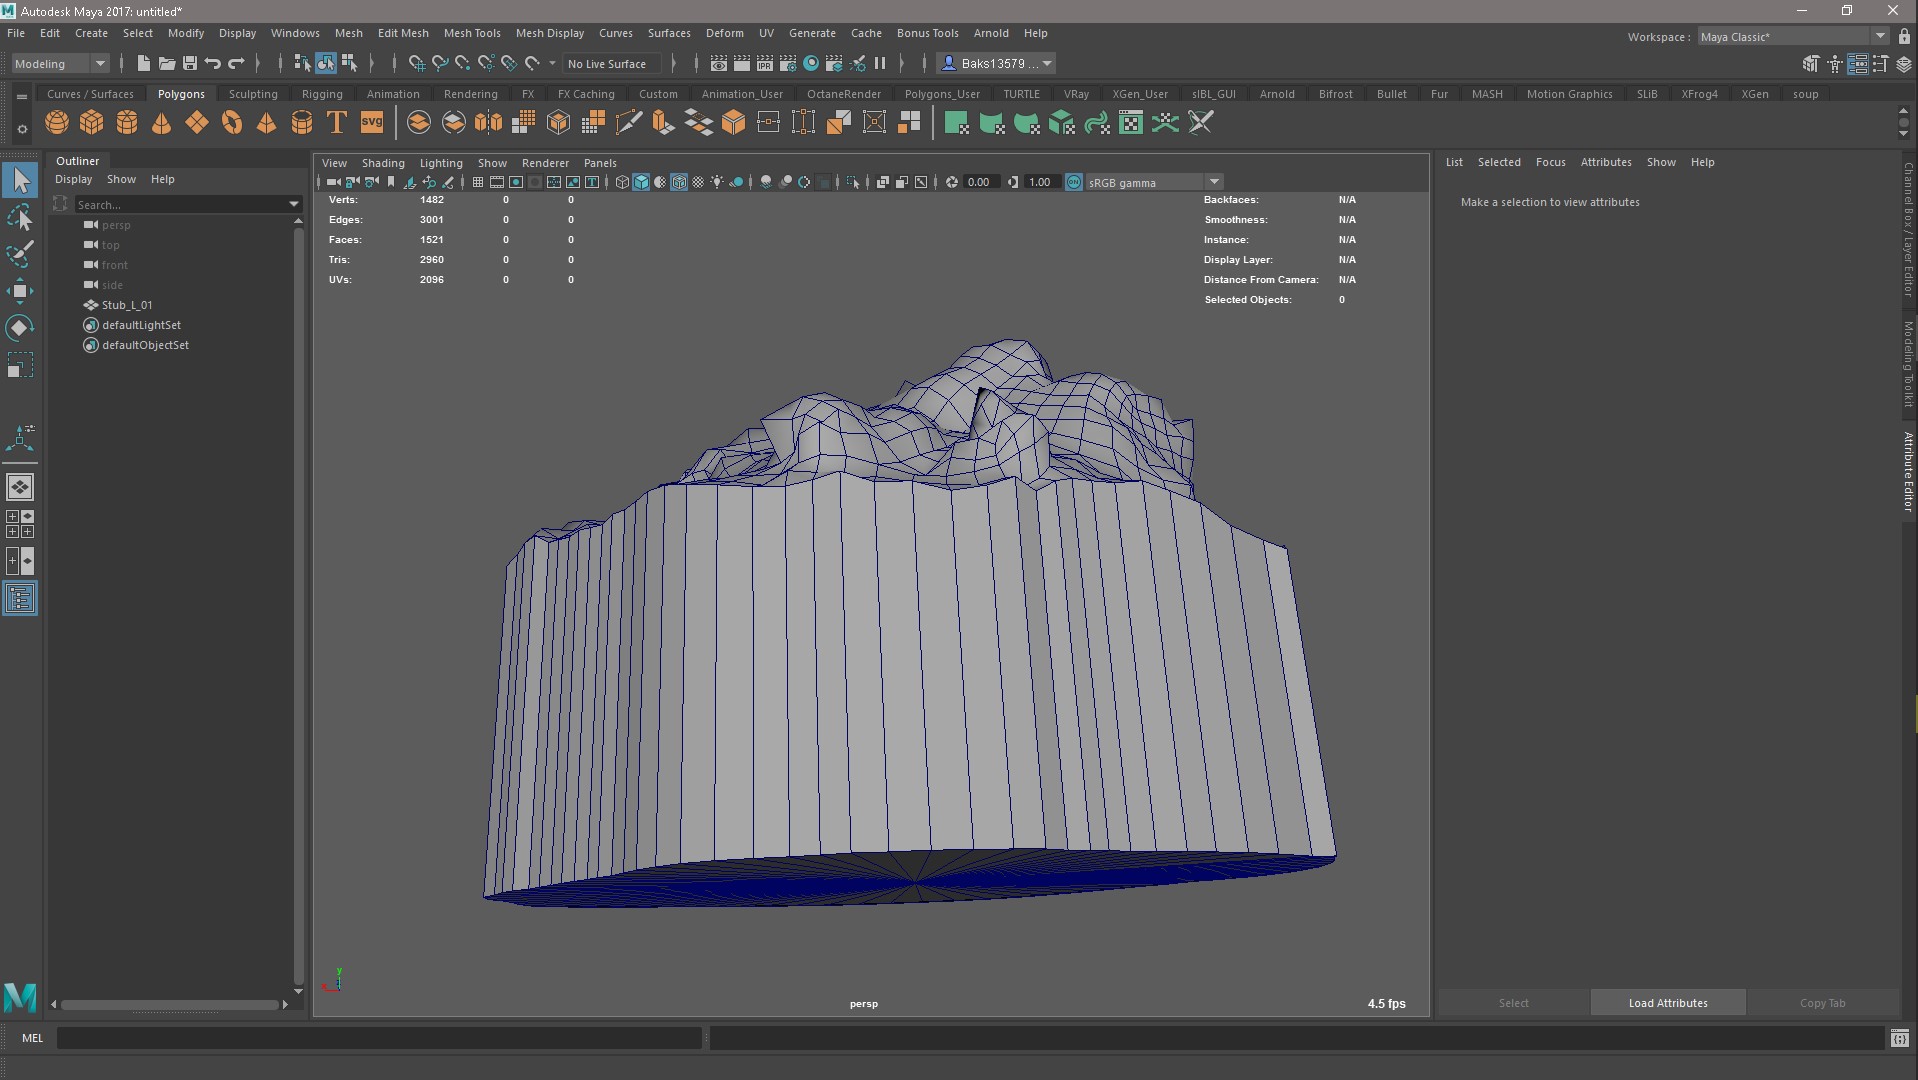
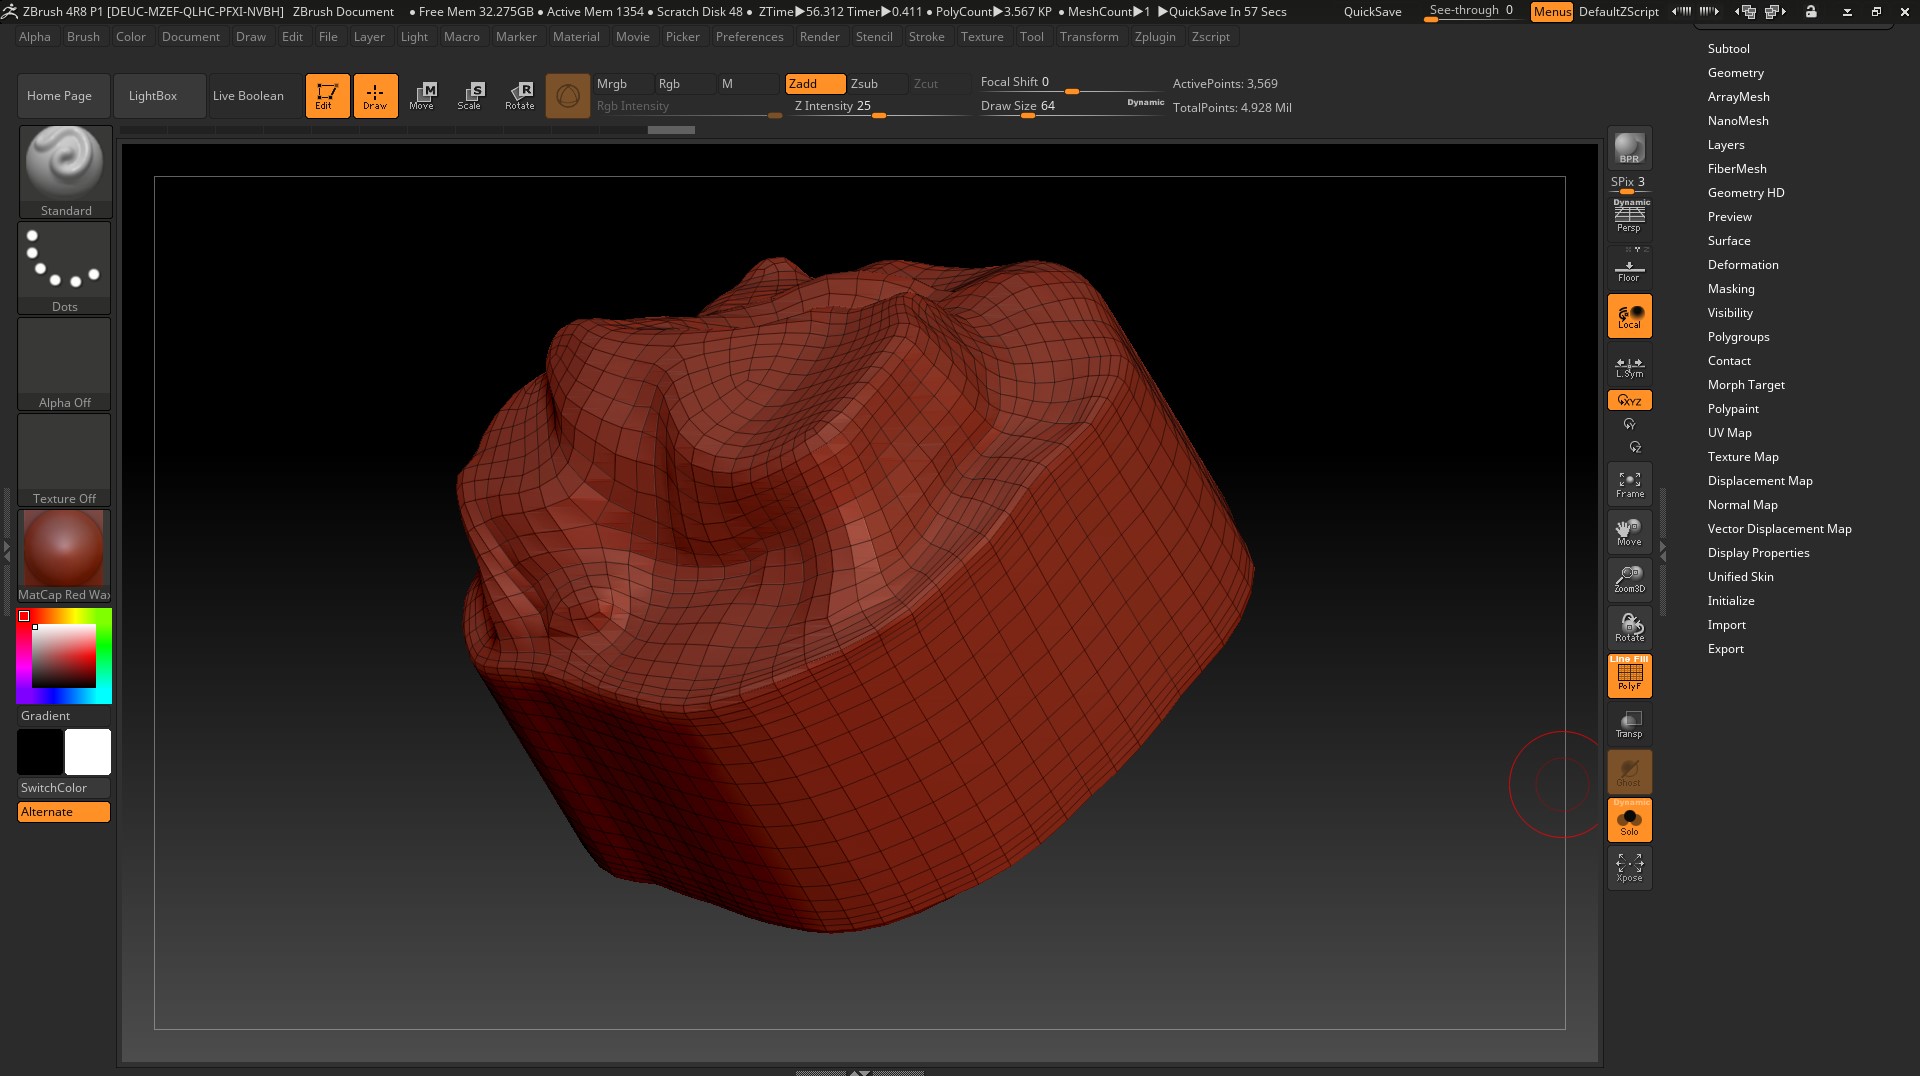
use the Zremesher command and export to Maya.

Import the model into Maya, perform the Extrude operation and export it back to Zbrush.
In Zbrush, we use the operation DynaMesh and Zremesher,
export to Maya and delete unnecessary polygons. Of course, you can still adjust the low-poly grid with pens and cut even polygons, but now I will not do this. If you have a desire, you can try and write about the result, I will attach all the files to the article.

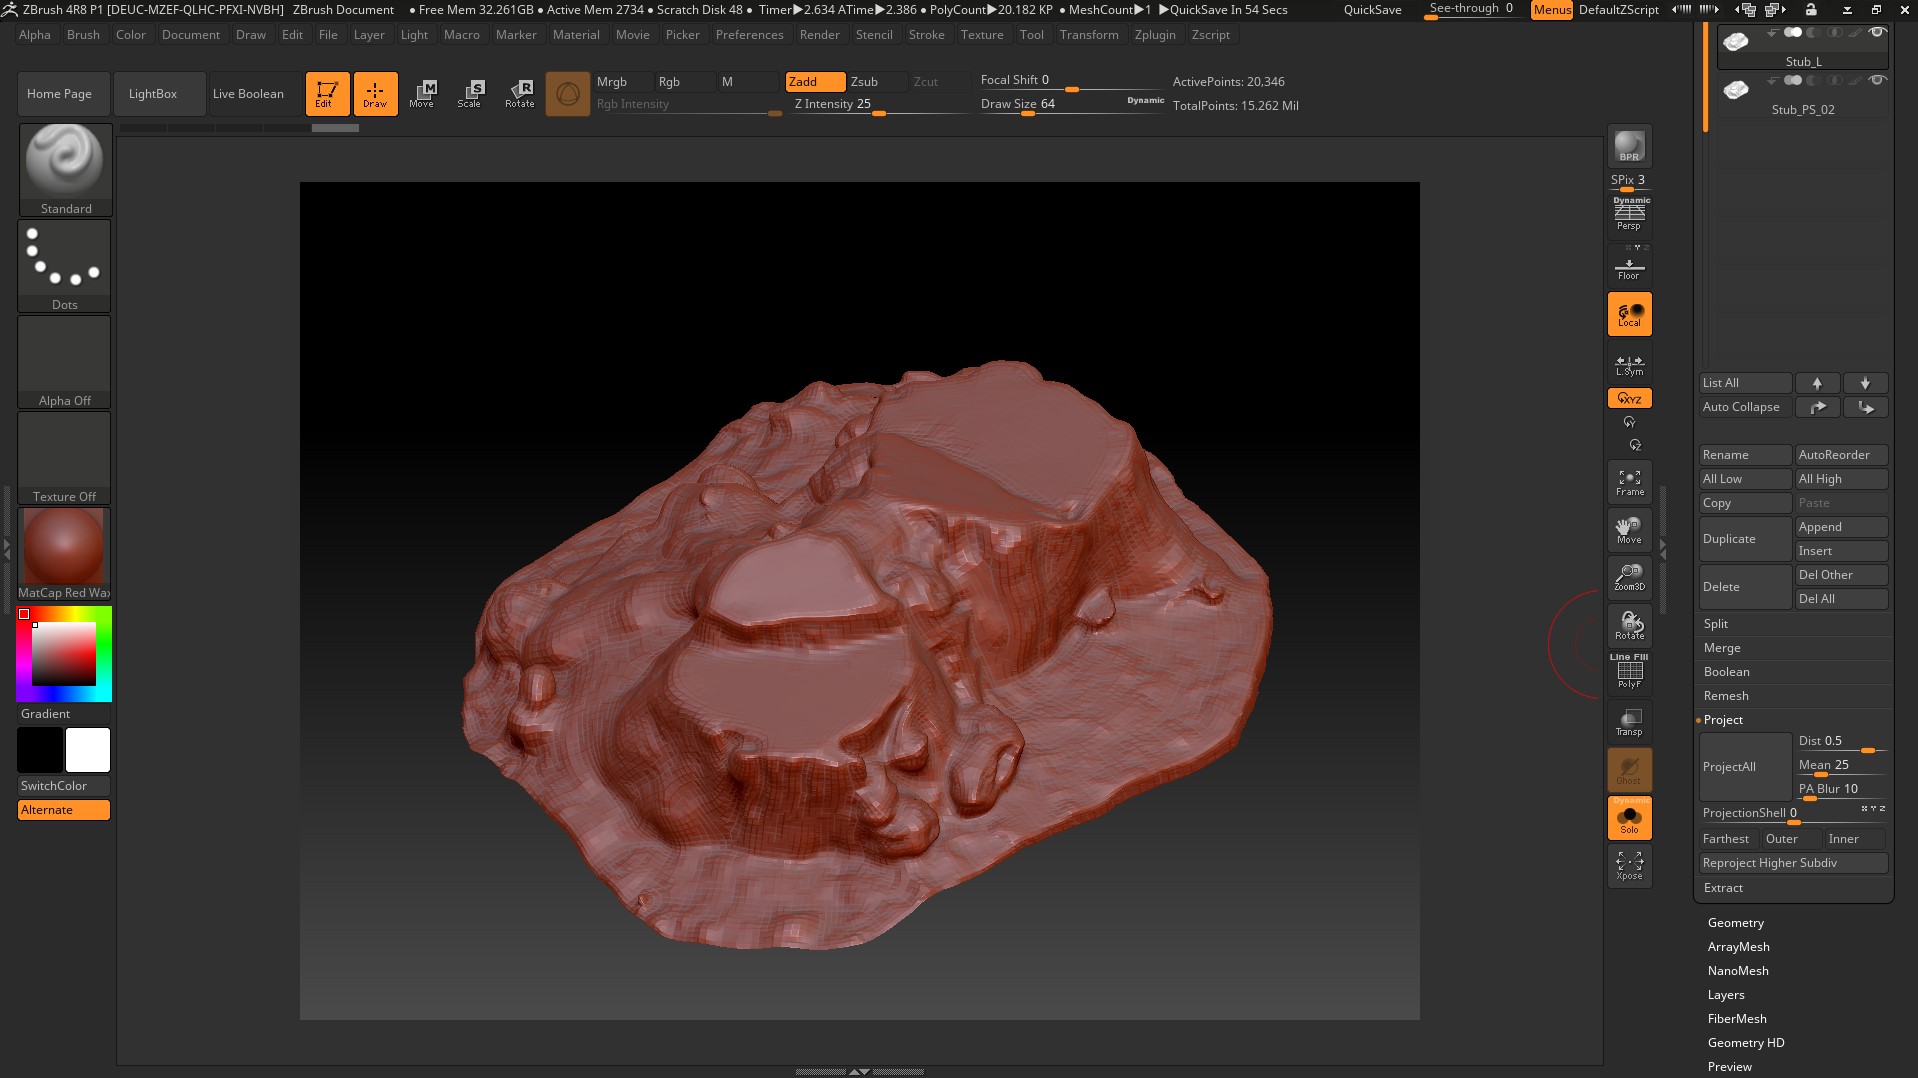
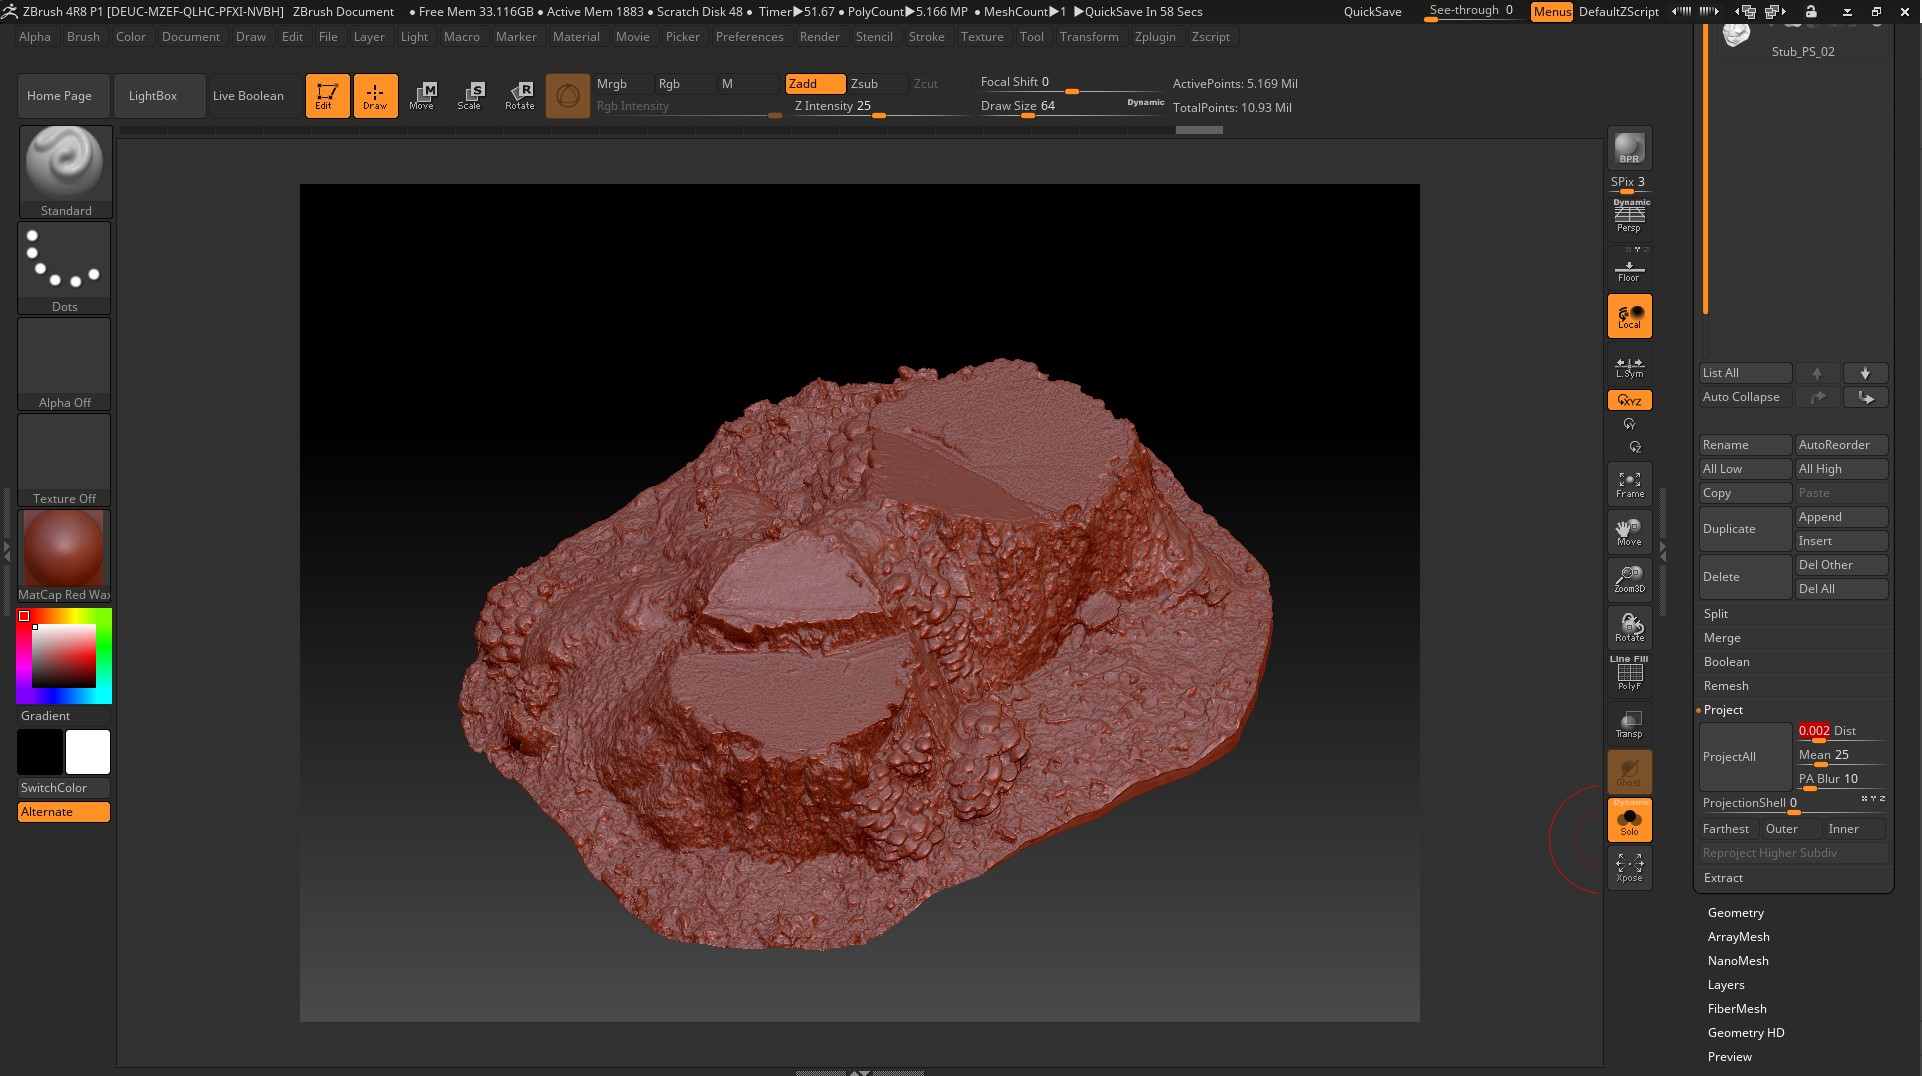
We export to UVLayout and create a UV scan.
We import the low-poly with the finished UV scan into Zbrush and execute the ProjectAll, dist. you need to raise and lower each time so that there are no artifacts, right here in the Zbrush bake Displacement map. We export obtained after Project High-poly.
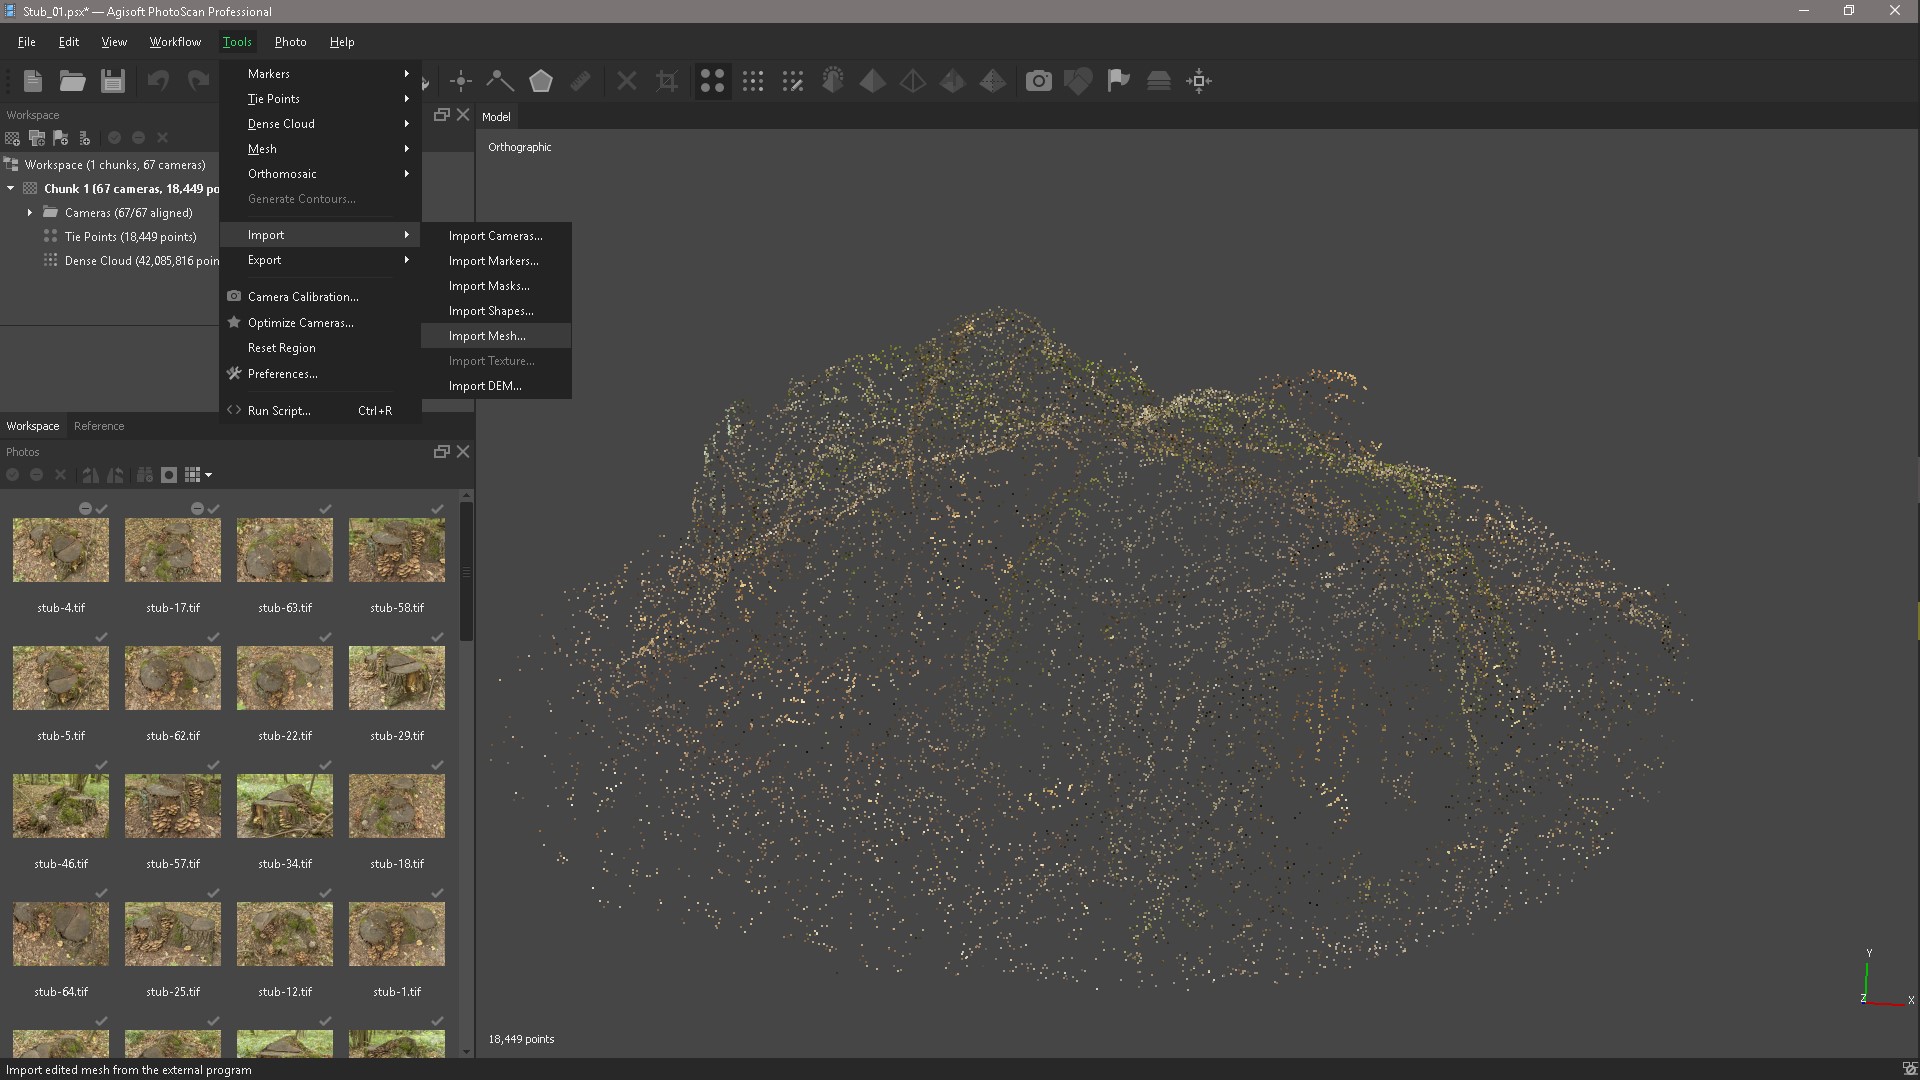
Open PhotoScan and delete the model in its place through the Tools menu, import the resulting High-poly model.

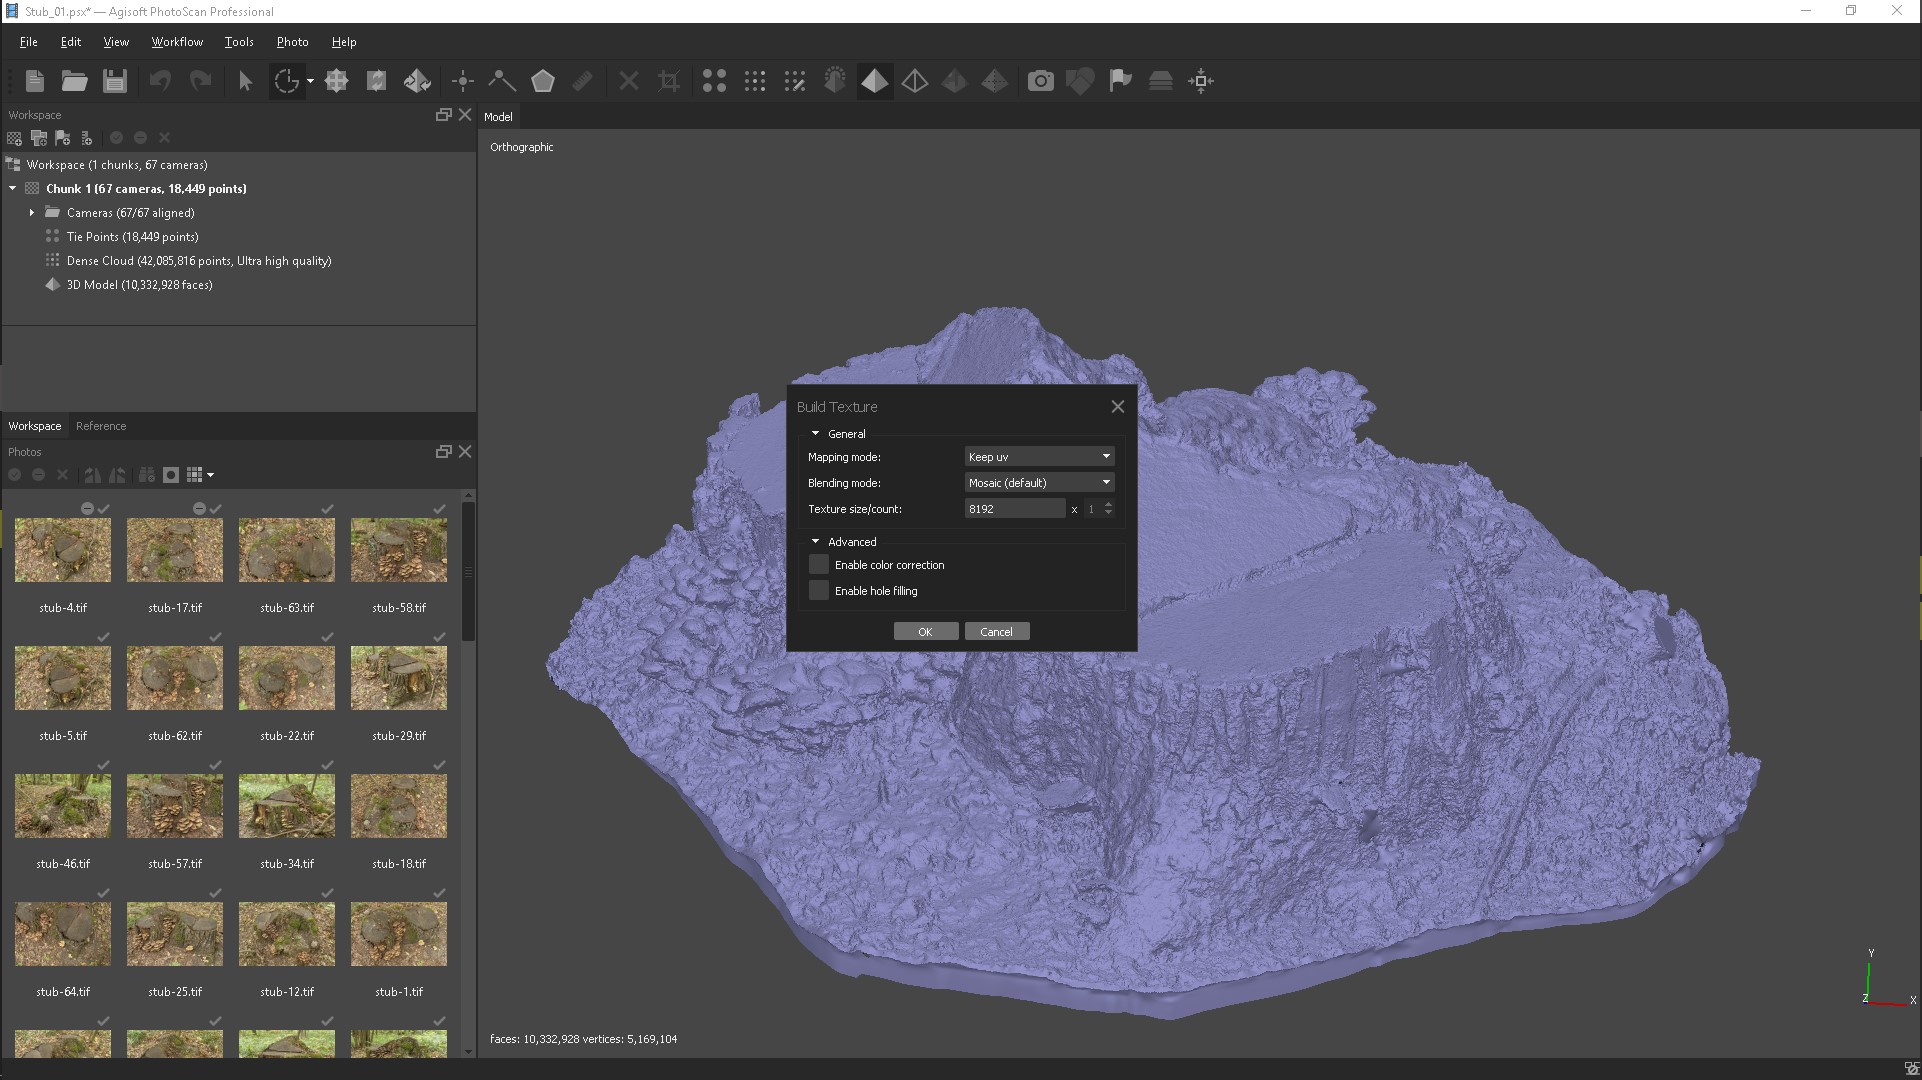
After importing the model, create a texture in Tif format and export it.
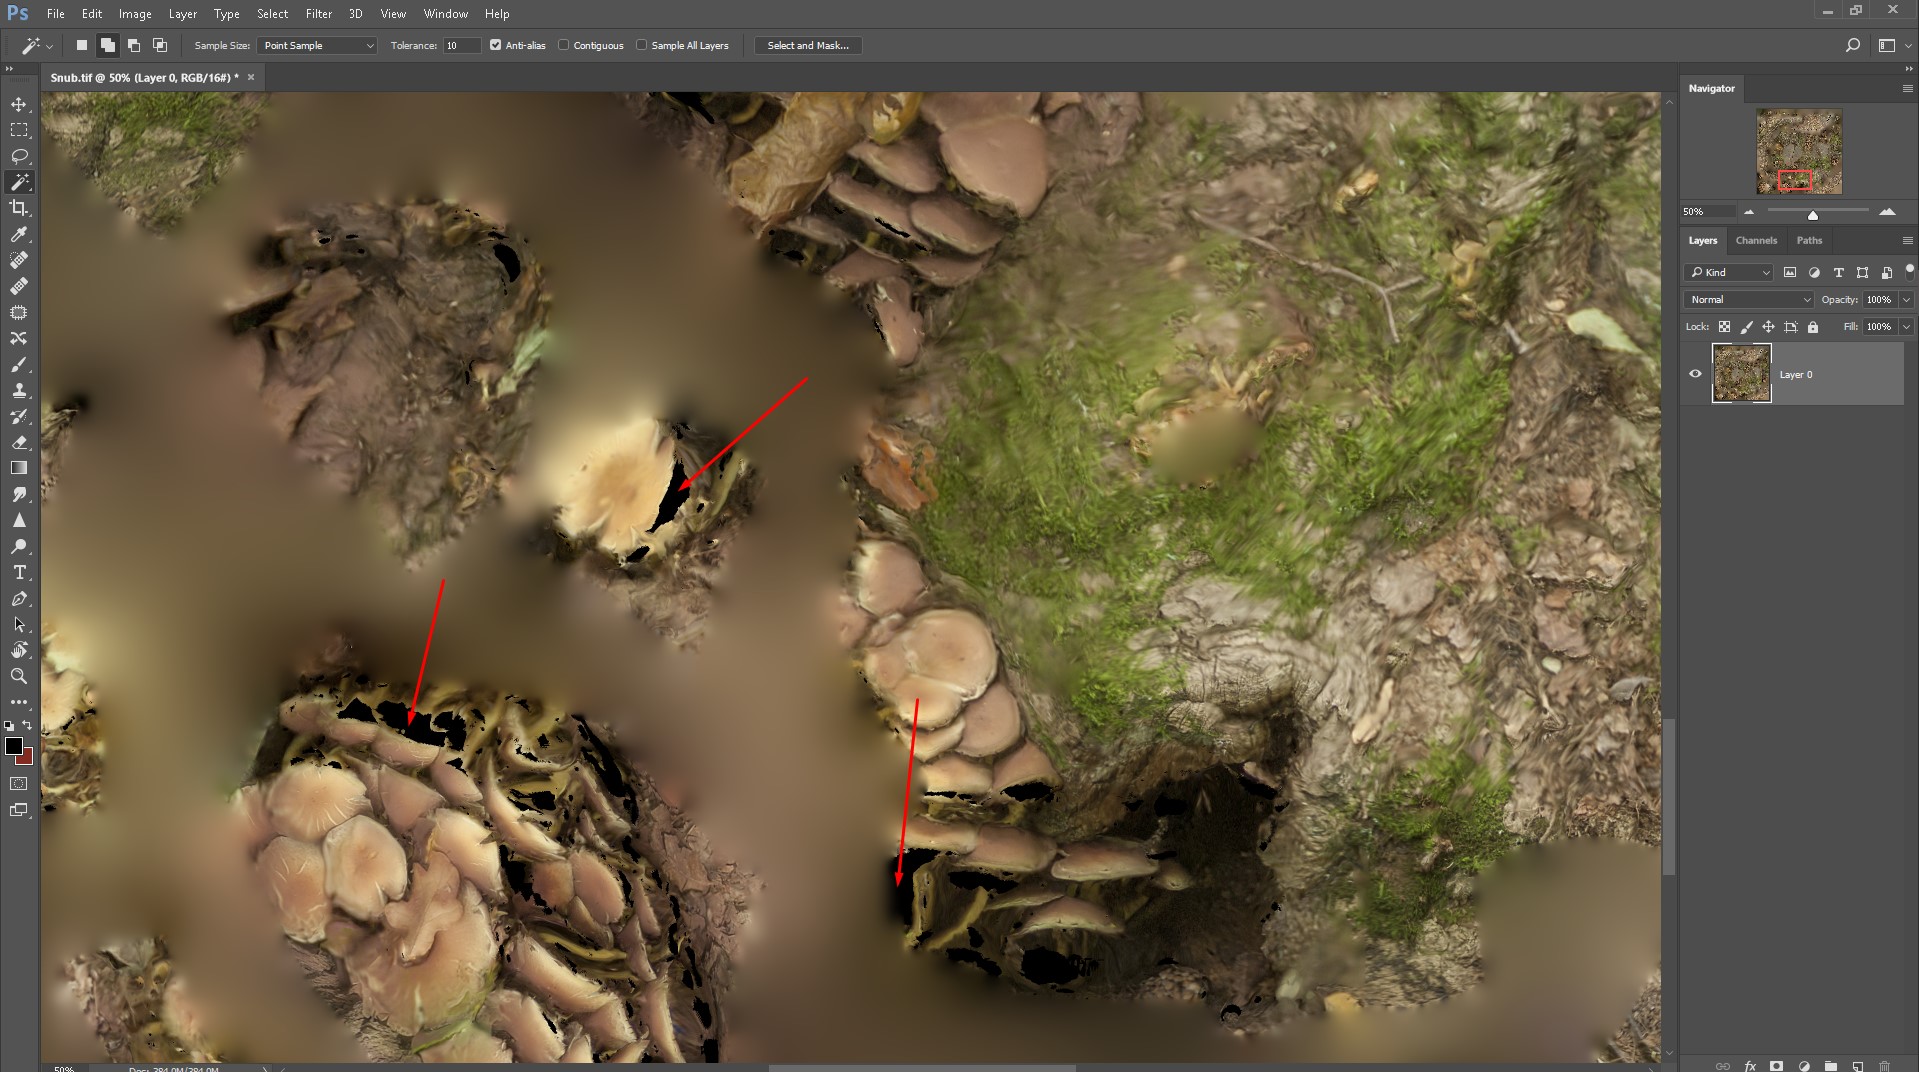
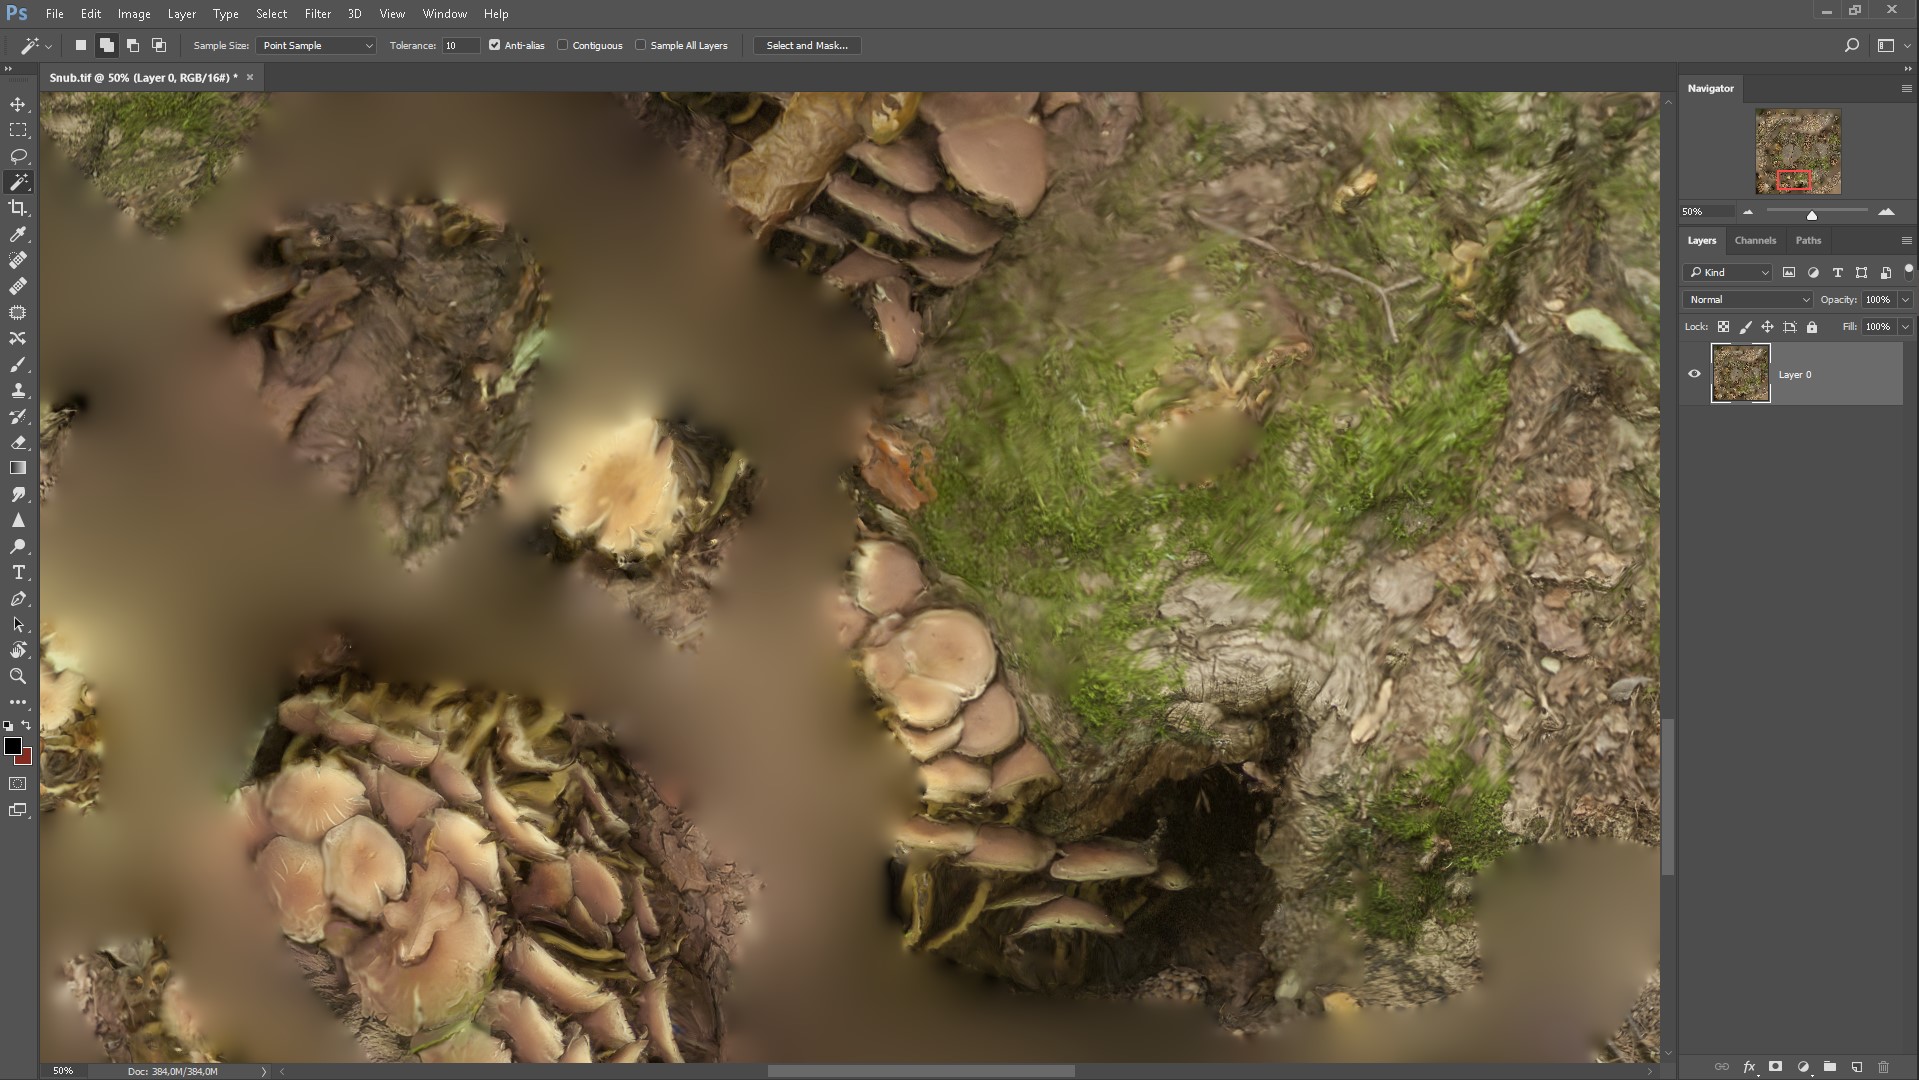
Open the texture in Photoshop and the Magic wand Tool, click on the area where there is no texture and a black spot at this point.
Select the Lasso tool and in the Edit menu select the Fill command, a fill based on the content (Content-Aware Fill).
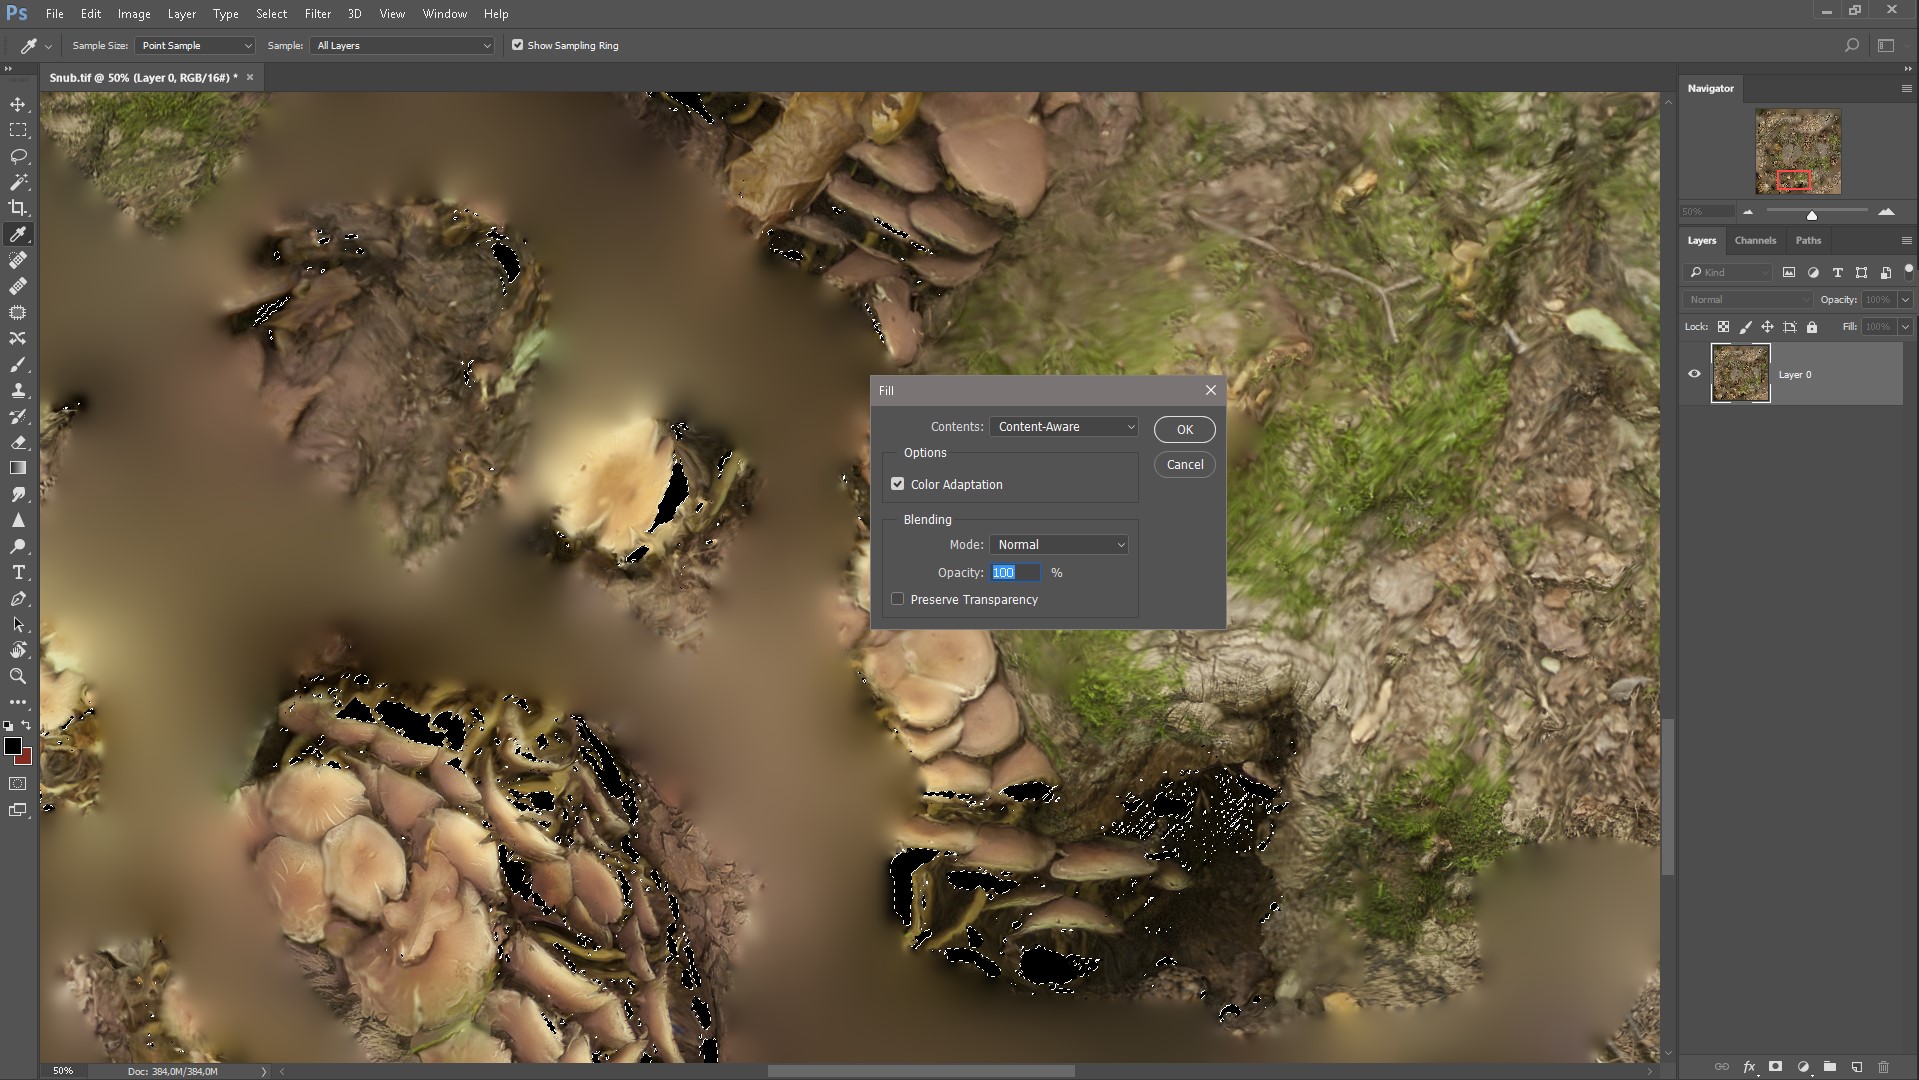
That's what we got, just a few seconds and the texture is ready.
Of course, you can go in other ways, for example, Stamp and handles to fill all spaces. It is also possible with the help of other programs, for example, 3D - Coat, to import High-poly and color textures in the Stamp tool and paint the right places on the texture, the same manipulations can be repeated in the Substance Painter, it is also possible in the Zbrush tool DraqRect, but it's all long and possible in some situation, and this is exactly what will need to be taken in one of these ways.
1. Run the Substance Painter, create a new project, load the low-poly with the finished UV scan, after creating the project, go to the TextureSet Settings menu and click Bake textures. In the baking window, we remove the cards we don’t need, load High-poly from PhotoScan. Baked cards will be automatically inserted into the appropriate slots in the TextureSet settings.

2. The next step is to replace our low-poly model with High-poly. in order to generate additional textures such as specular, roughness, etc., we can clearly view the texture we need.
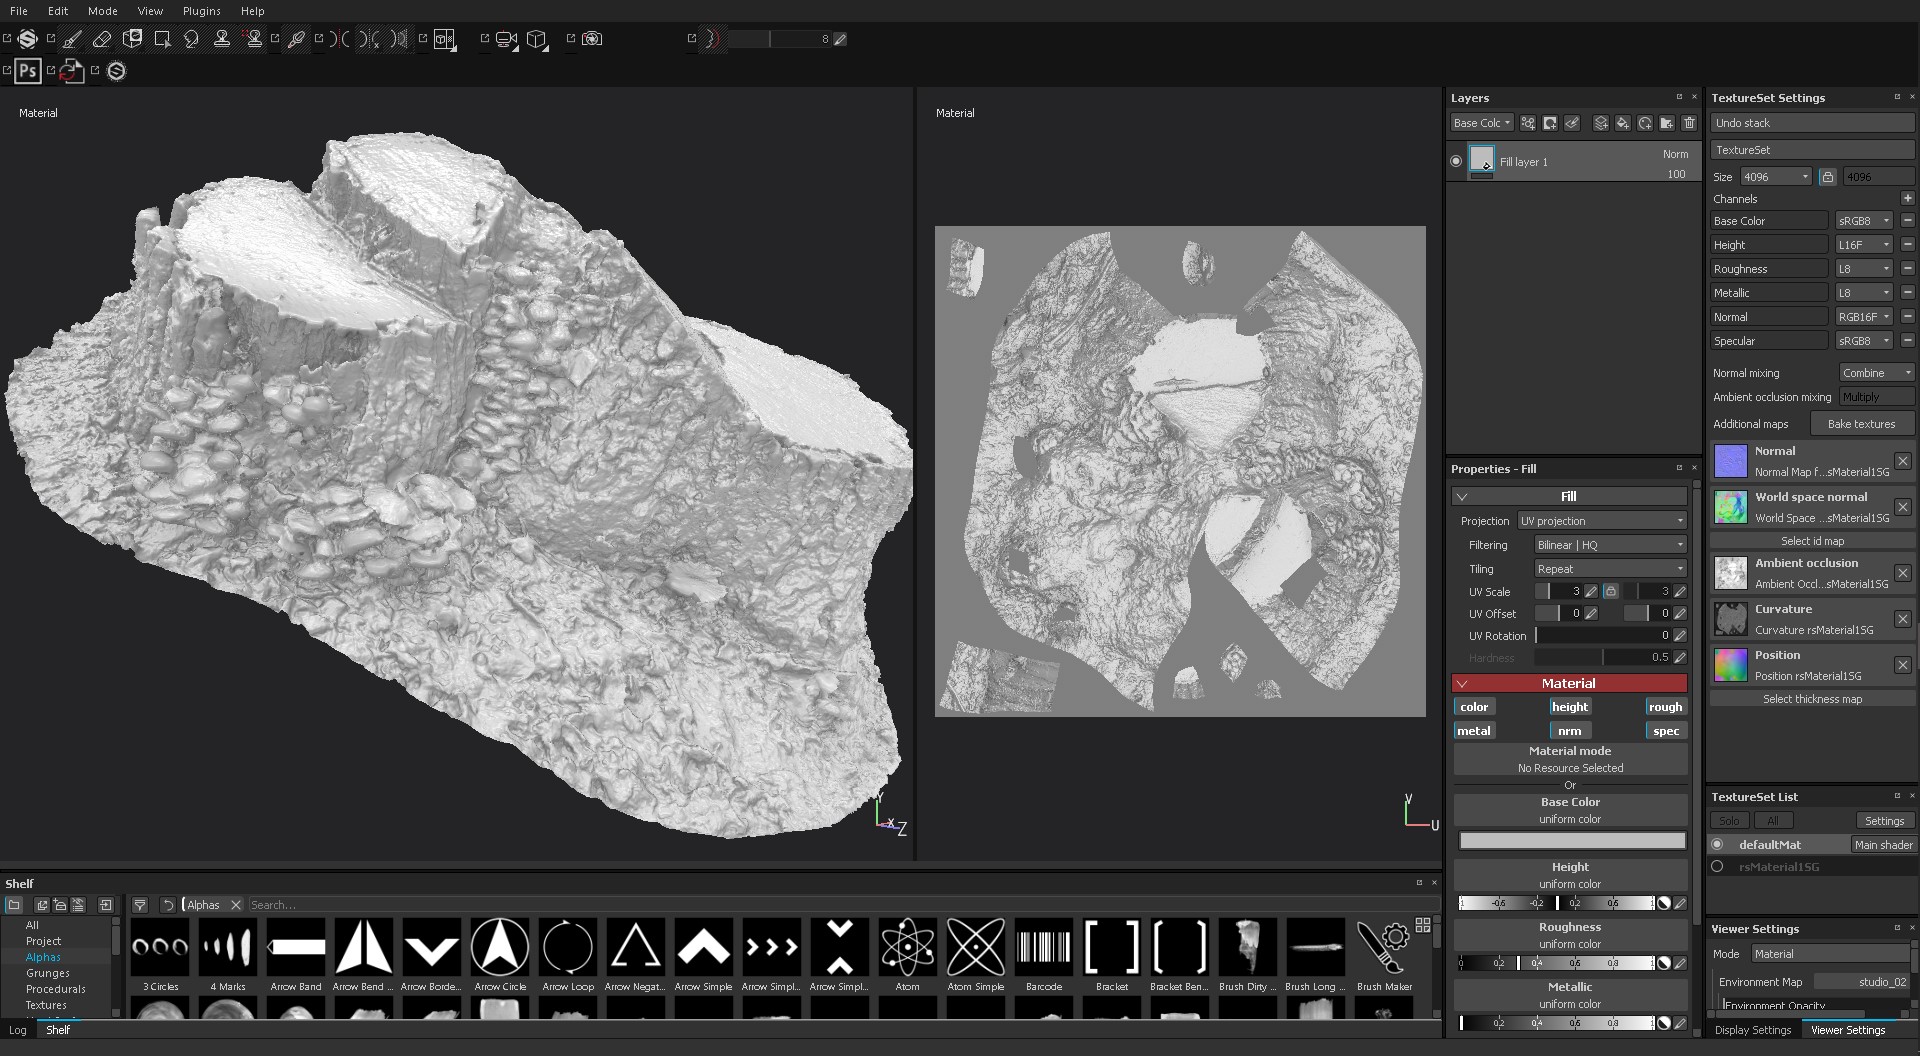
3. We generate the maps we need, because texturing through channels is a very exciting experience, along with various filters and very flexible generators, which will help us greatly in this and will speed up the entire workflow of obtaining the necessary textures. For example, create a fill layer (Add fill layers), fill it with the desired color or texture, turn off all unnecessary channels, connect a black or white mask to the fill layer, generators, filters, in general, you can handle.
4. After obtaining the desired result, we can create Smart materials in order not to repeat the same actions in the future, because we strive to facilitate and speed up the workflow, since time is a resource that cannot be returned or bought.
5. When we are completely satisfied with the result, we can export all the textures we need into various renders / engines for further visualization. In the Export document there is a Config which will help us choose the settings for exporting textures for further use.
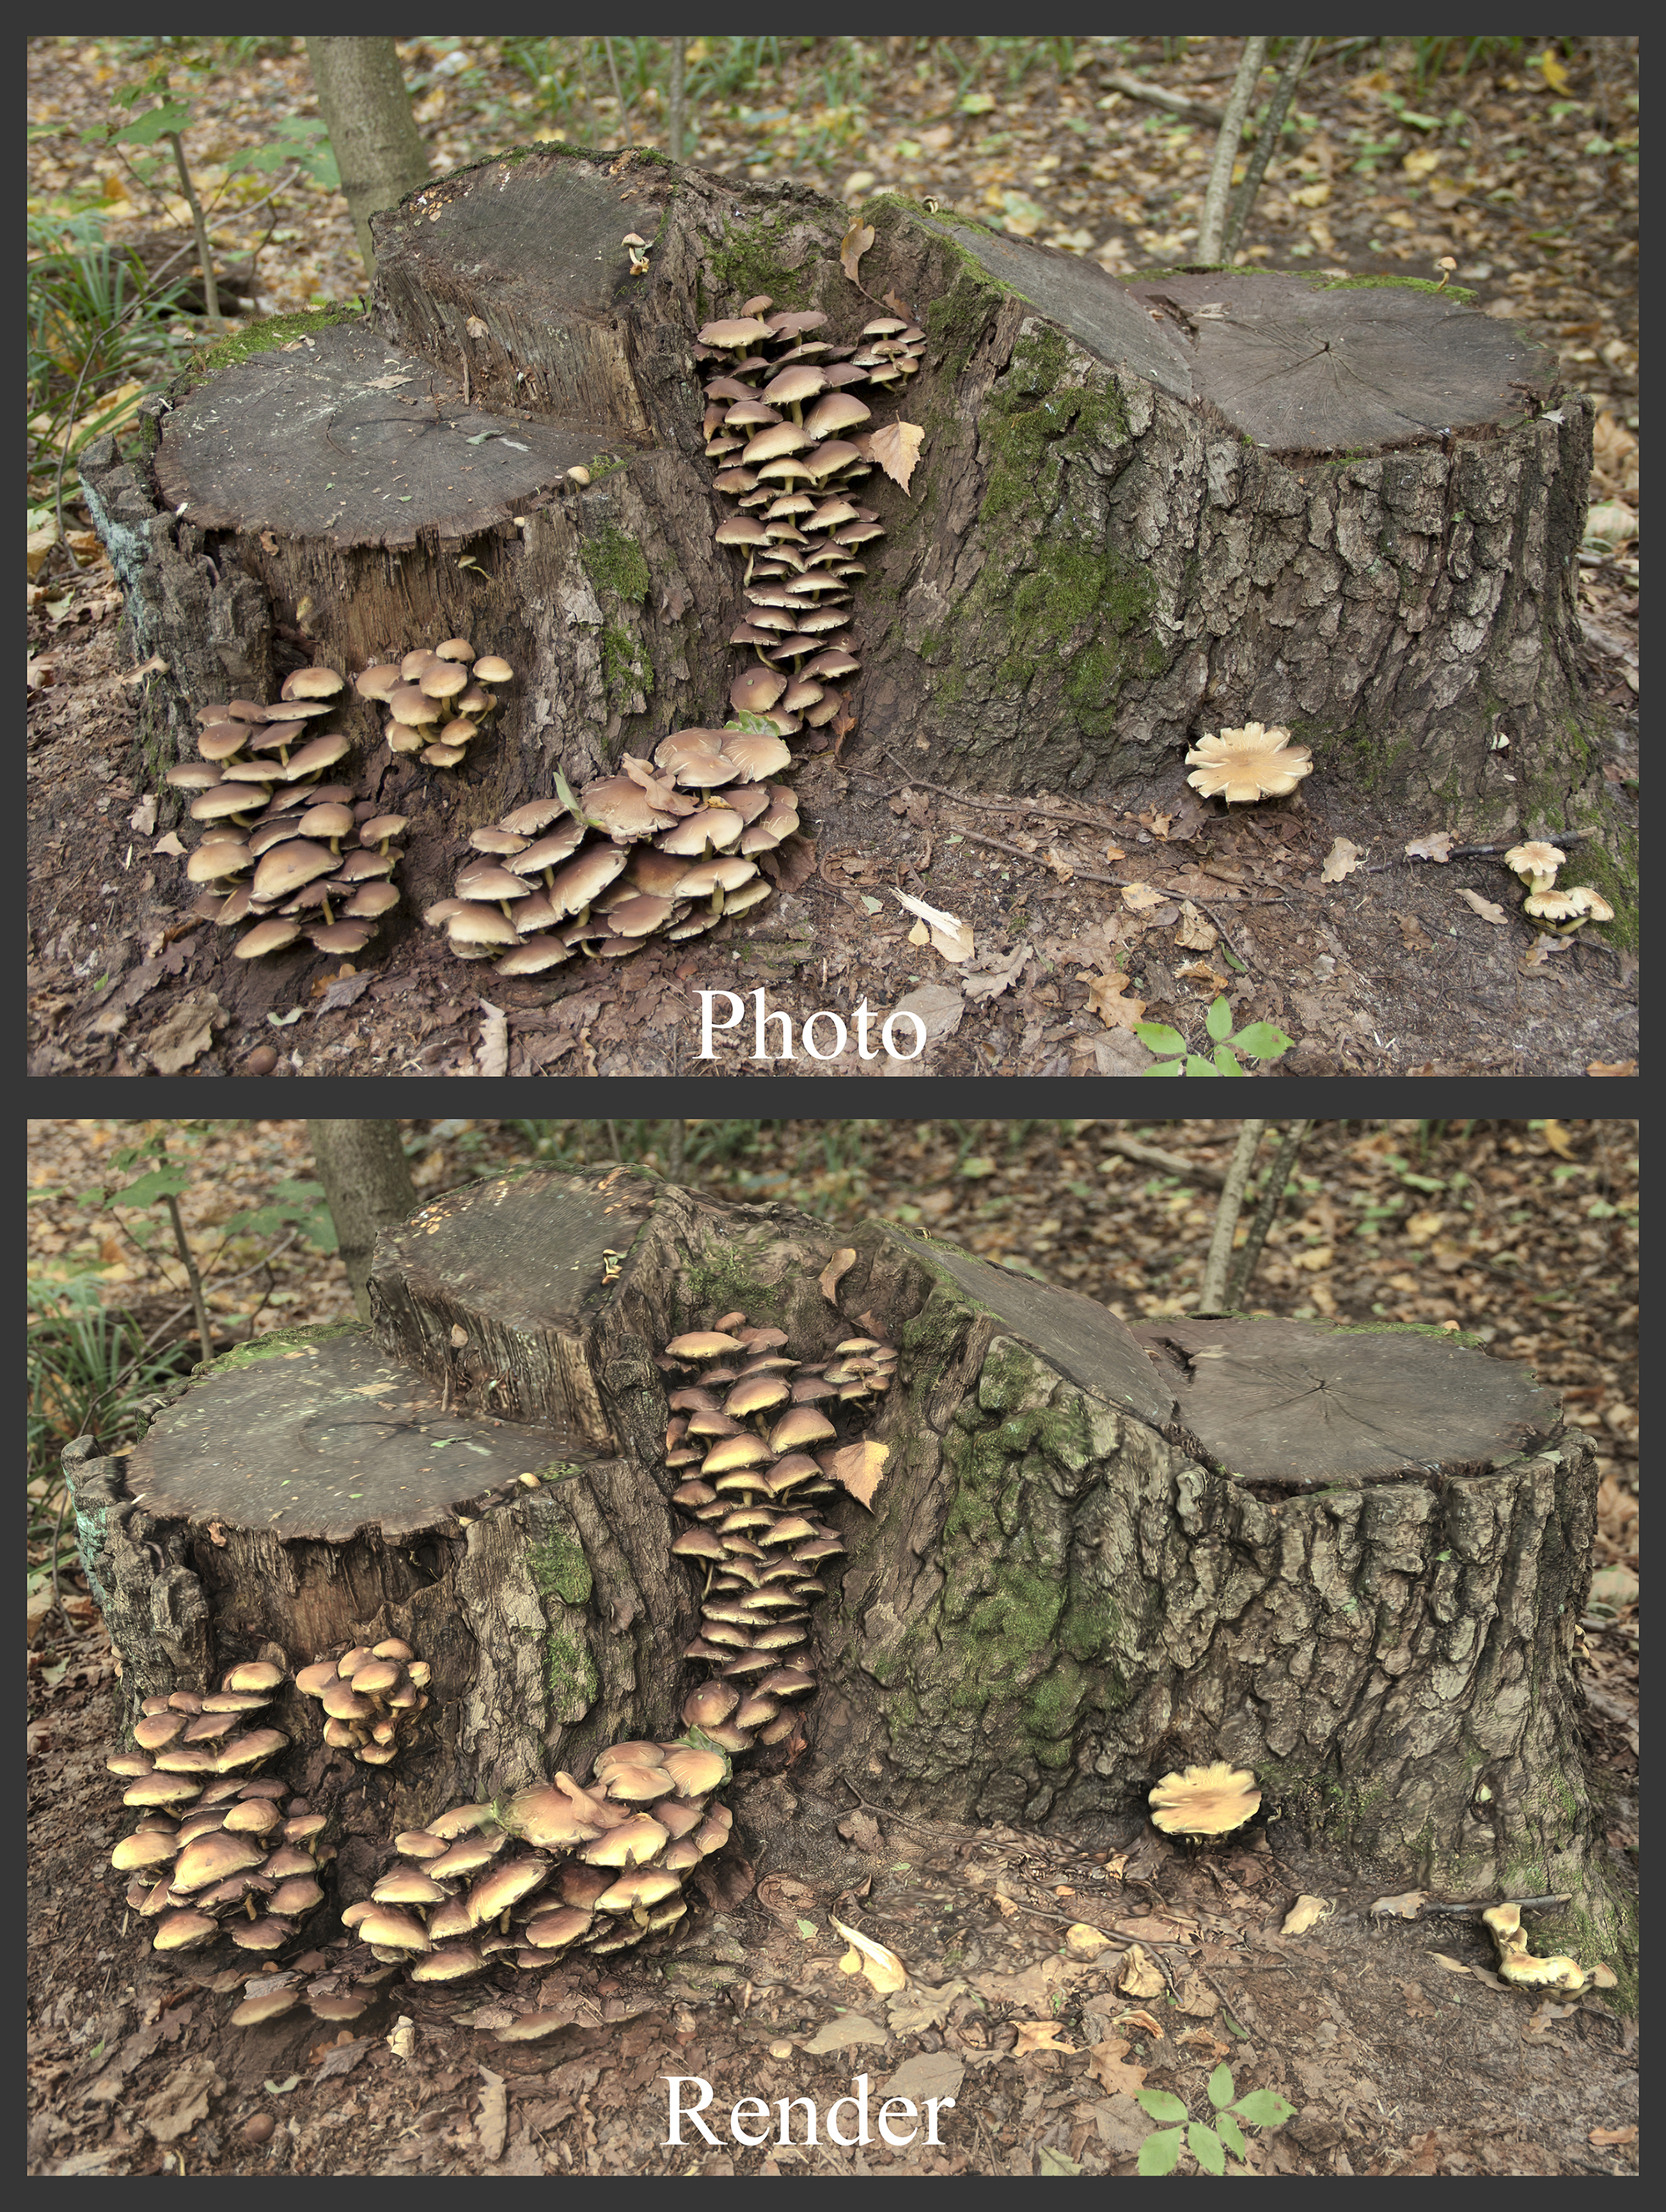
That's what we had and this is what we quickly and effortlessly received.
And so to summarize, such discipline as Photogrammetry is very interesting, necessary and can help speed up the workflow, in creating objects around (trees, plants, stones, etc.), interior items (microphone, music speaker, chair, etc.) etc.), organic (human, turtle, etc.), landscape and buildings, etc. The use of photogrammetry is very wide!
Well, that, friends process is complete. Open to your questions in a personal and communication in the experience of work.
Best wishes, Evgeny A.
Materials
So, let's start from the very beginning: after reading and reviewing a certain amount of information on this topic, I chose the Agisoft PhotoScan program, which helps to get 3d models that are textured based on the original images. Having adopted the instruction from Agisoft PhotoScan - on proper photography, the rules of which must be followed in order to get the best result. It is known that there are many programs on this subject: Photoscan (Agisoft), 123D Catch (Autodesk), ReCap360 (Autodesk), Arch3D (Epoch project), Bundler / PMVS2, Apero / MicMac, 3DF Zephyr (3DFlow), Photomodeller scanner (EOS systems), Smart3D (Acute3D).
The next stage of work includes the settings of the camera, camera, images and the preparation of the necessary equipment for shooting.
- Lens. My experience and instruction advises giving preference to lenses with fixed focal length: 35mm, 50mm, 85mm. When using lenses with a variable focal length, set the zoom to one of the extreme positions (minimum or maximum). Otherwise, each zoom lens will require separate calibration. I recommend minimizing the variability of camera / lens models and focal length values.
- Camera setup: It is preferable to use RAW format images converted to uncompressed TIFF format, since converting to JPG format makes images more noisy, reducing their quality. I recommend shooting with the maximum possible resolution. The ISO value is recommended to be reduced to the minimum to reduce noise. To achieve a sufficient depth of field, I recommend reducing the aperture value, F-Stop 11+. It is important that all parts of the subject are clear, not blurred. The shutter speed should be high enough to prevent blurring caused by possible movements, preferably 1/125 +.
- Images: PhotoScan handles source images. Do not deform photos, that is, do not scale, crop, rotate or otherwise modify the original images.
- What else can be useful to us: a tripod, a monopod, a remote control for a camera, a polarizing filter, you can still take a small hromakey (monochrome background) with a blue color better, suddenly we want to photograph small objects, and to separate them we need a background, so that later it is easy to make a mask for these photos.
Stage shooting
After the necessary preparation and choosing an auspicious day, cloudy weather is best; it is the most favorable for photography, we need neutral lighting, because with further actions we will get a 3d model with a texture and set it in the right lighting, of course, you can also shoot an object in sunny weather - if you need, only a 3d model and in this case the texture can be corrected in Photoshop, but this is an additional manipulation, I will write more about this method.
')
We go to the forest park or to the place where the object we need is located. So, having arrived at the scene, I tried to find more interesting objects with a pronounced texture. Nature creates, in its beauty and form, such instances with a unique color, the pattern from which it is impossible to tear off a look, our task is to borrow all this magnificence and transfer it to our 3d world. Let's start taking pictures.
For the implementation of the photographing process, it is necessary, taking each subsequent frame, to provide an overlap between frames of approximately 60%, these 60% will form our model with a texture. It is desirable maximum resolution, which can allow your camera, you need to bypass the object completely, i.e. take a 360% round and take about 36 shots on 1 lap; there may be several shooting circles. Again, in no case need to zoom in, if you need to fix some details, then you need to come closer, sit down or lie down to take the desired picture. If the object has concavities and bumps, and the shooting is done only by standing and the object is not removed from below, then in some places that look “normal” to the ground and do not fall into the frame, in these areas there will be holes on the 3d model and therefore no texture , we will fix such moments further in the programs, but it is better to avoid this from the very beginning. I have to replace another important point, strive to avoid sprigs and grass in the frame that are near the roots and at the base of the objects we need, because later on these objects will be printed on our texture and we will clean it, which in some cases is inevitable . I found this interesting stump.
So, after making the necessary number of pictures of all the objects that we liked, the next stage began.
Photo processing and 3d model creation
Many people know that there are some programs for editing Raw formats, CameraRaw and Lightroom, I stopped at Lightroom.
Next, import all our Raw images into Lightroom and make the following settings. Highlights lower, and Shadows increase, remove chromatic aberration and lens distortion. Based on the settings of one photo, we create a Preset to further speed up the processing of photos, there may be a different number from several tens to several thousand, depending on what your task is and how many objects you are shooting.
We create the Preset we apply to the remaining photos and export them to TIFF format in the appropriate folder for each object separately and the library of this category, it’s best to organize the workflow, from the very beginning, to avoid subsequent chaos and loss of the necessary files, Raw files are deleted.
Add photos
Open Agisoft PhotoScan and add our photos. For best results, you need to mask all minor objects in the original photos. Create masks around the object, you can create masks in different ways in PhotoScan Lasso and then add a selection or in the Photoshop as the Lasso tool, but also create Actions to skip the routine process of creating a mask, adding it to the channel and saving the file. If you were shooting in a studio and you had a uniform background, then you need to go to Tools / Import mask and apply the From Background method to the selected cameras. You can even do without creating masks, but this will complicate the process.
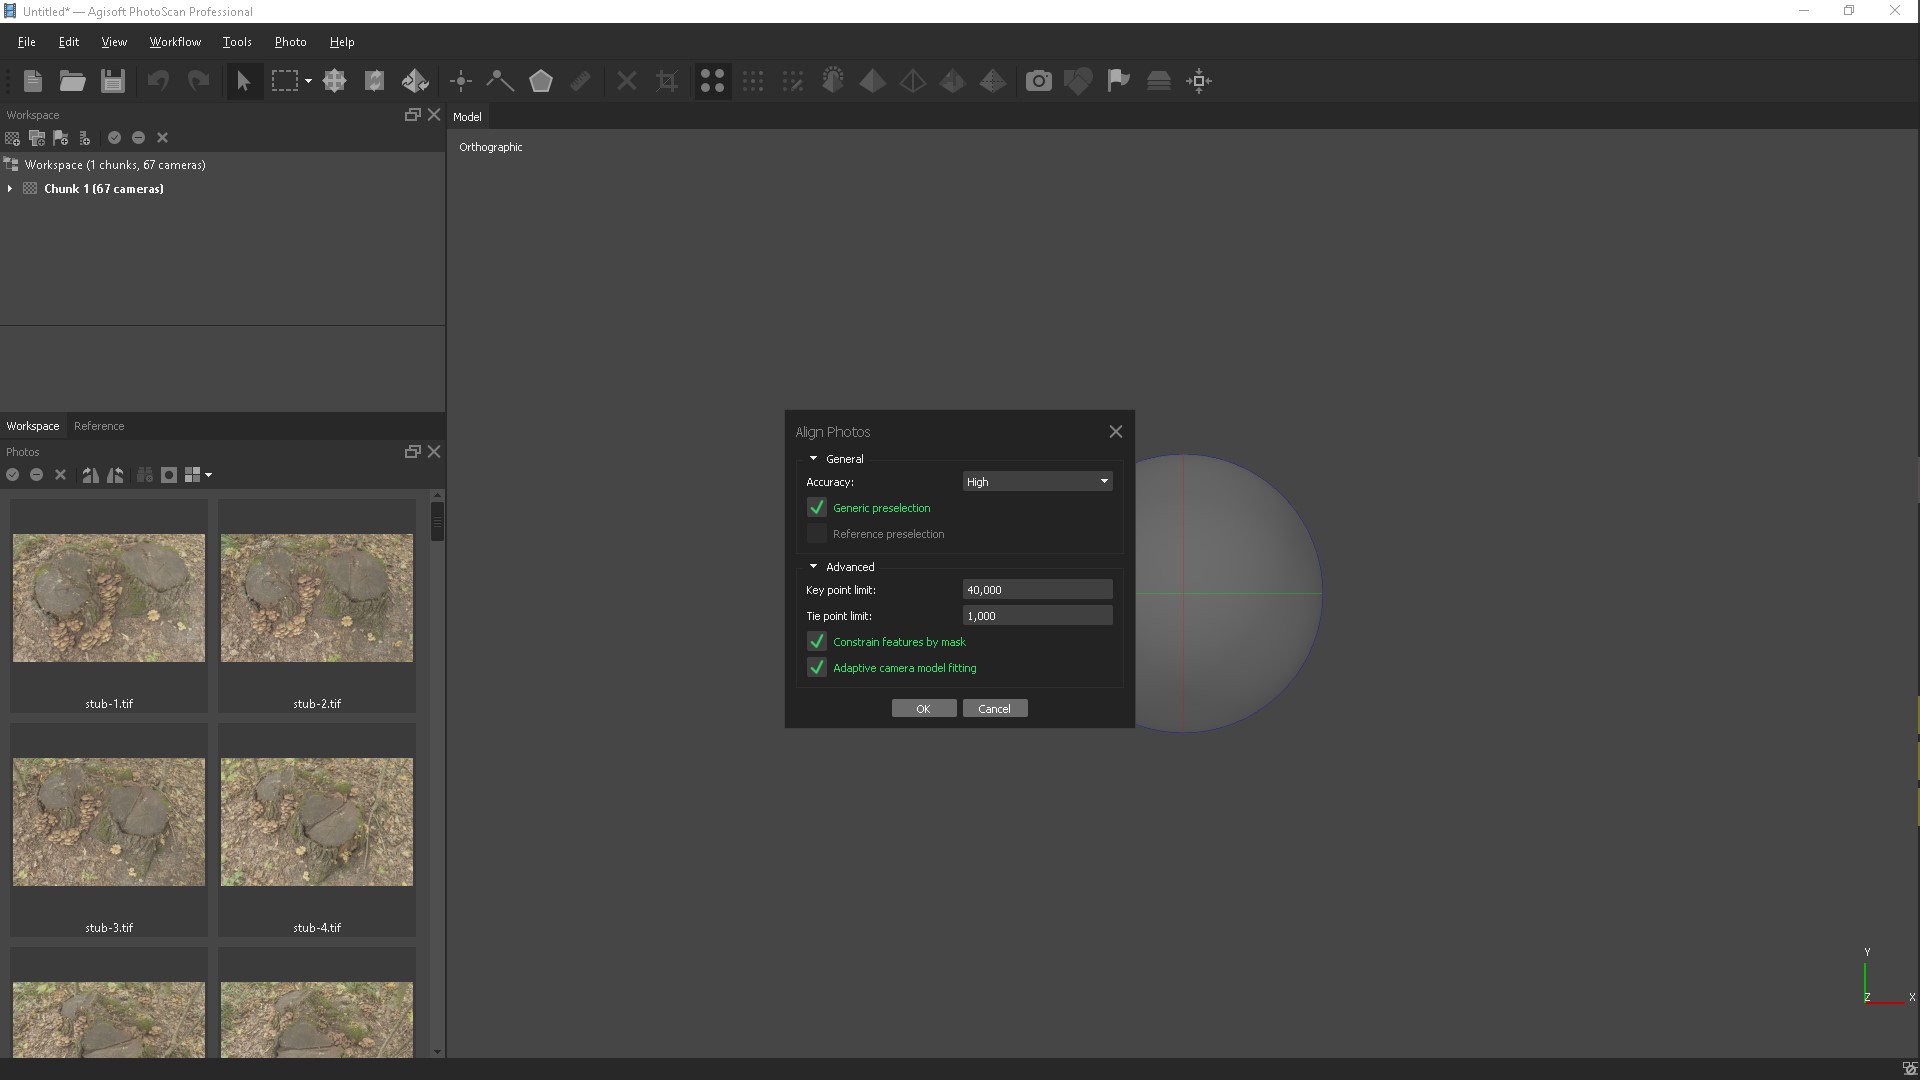
Align photos
At this stage, PhotoScan determines the position of the cameras and builds a sparse cloud of points on the basis of photographs.
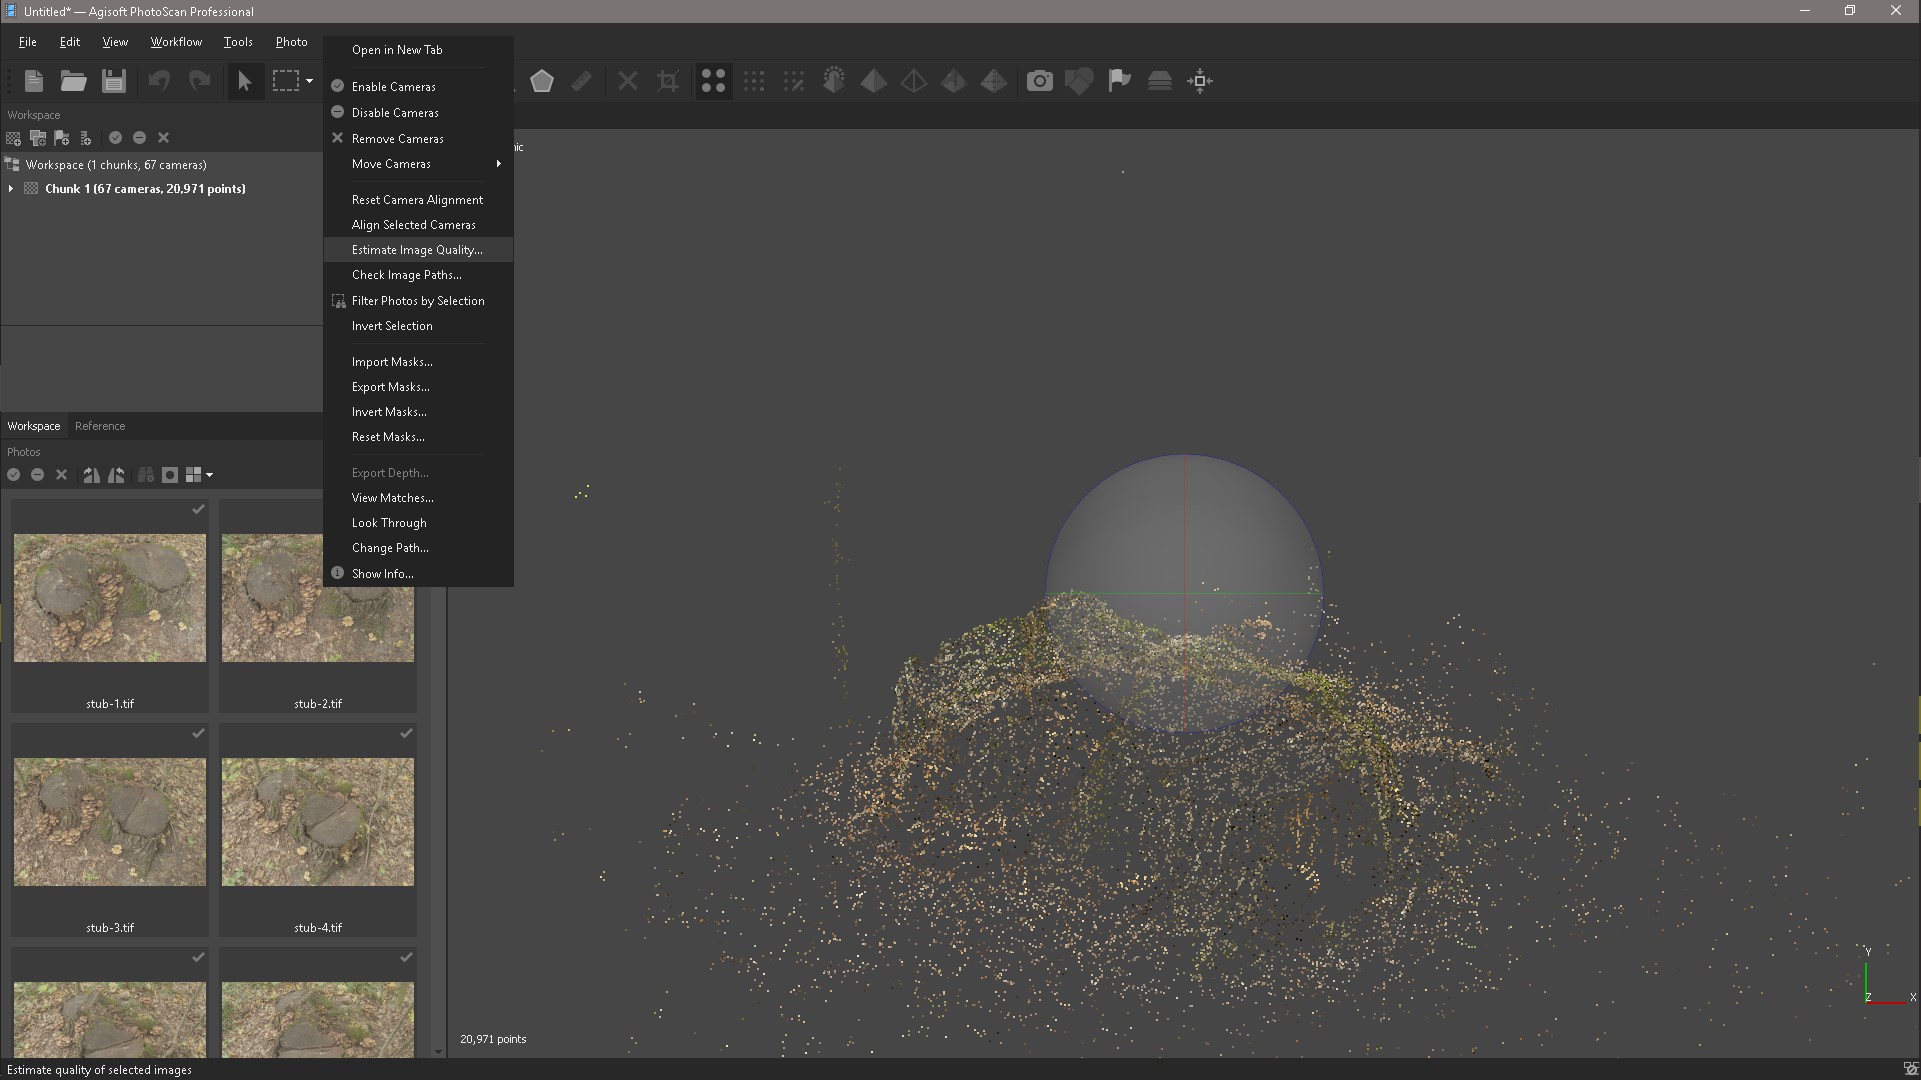
If we have masks, then put a tick "Consider the mask." After this step, we can evaluate the quality of our photos and select all the cameras in the window that appears.
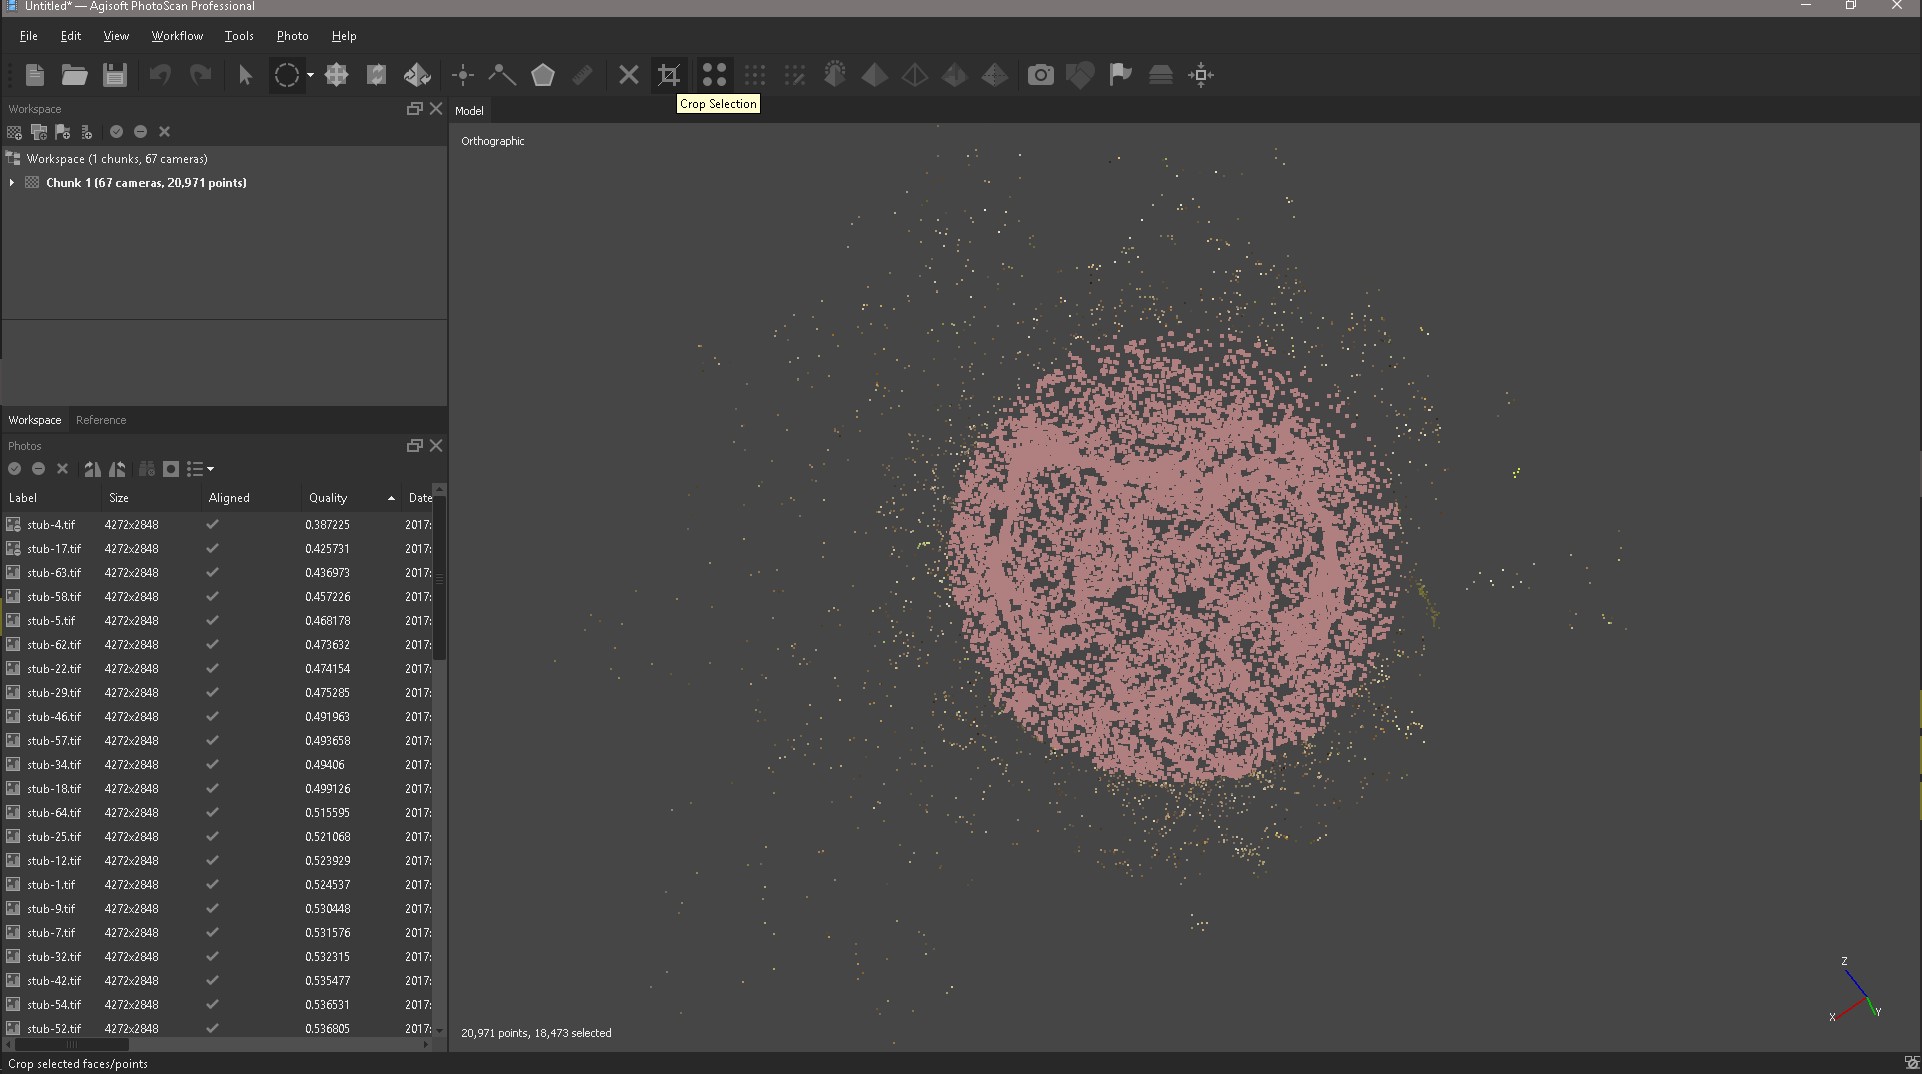
We can filter our photos by quality, I have already done this and at the top are the worst photos, but this is not necessarily the way the quality of blurring is determined.
The image quality estimation algorithm analyzes the contrast between pixels, when there is a lot of contrast, then the image is perceived as good. The only way to make sure all your images are normal is to visually check them at 200% zoom. Awfully boring job. The worst images, those that are very blurred, can be turned off.
The next step is to select our object with the Selection tool and click Crop and so clean our object. The Space key helps us to switch between tools, for example, selection and navigation.
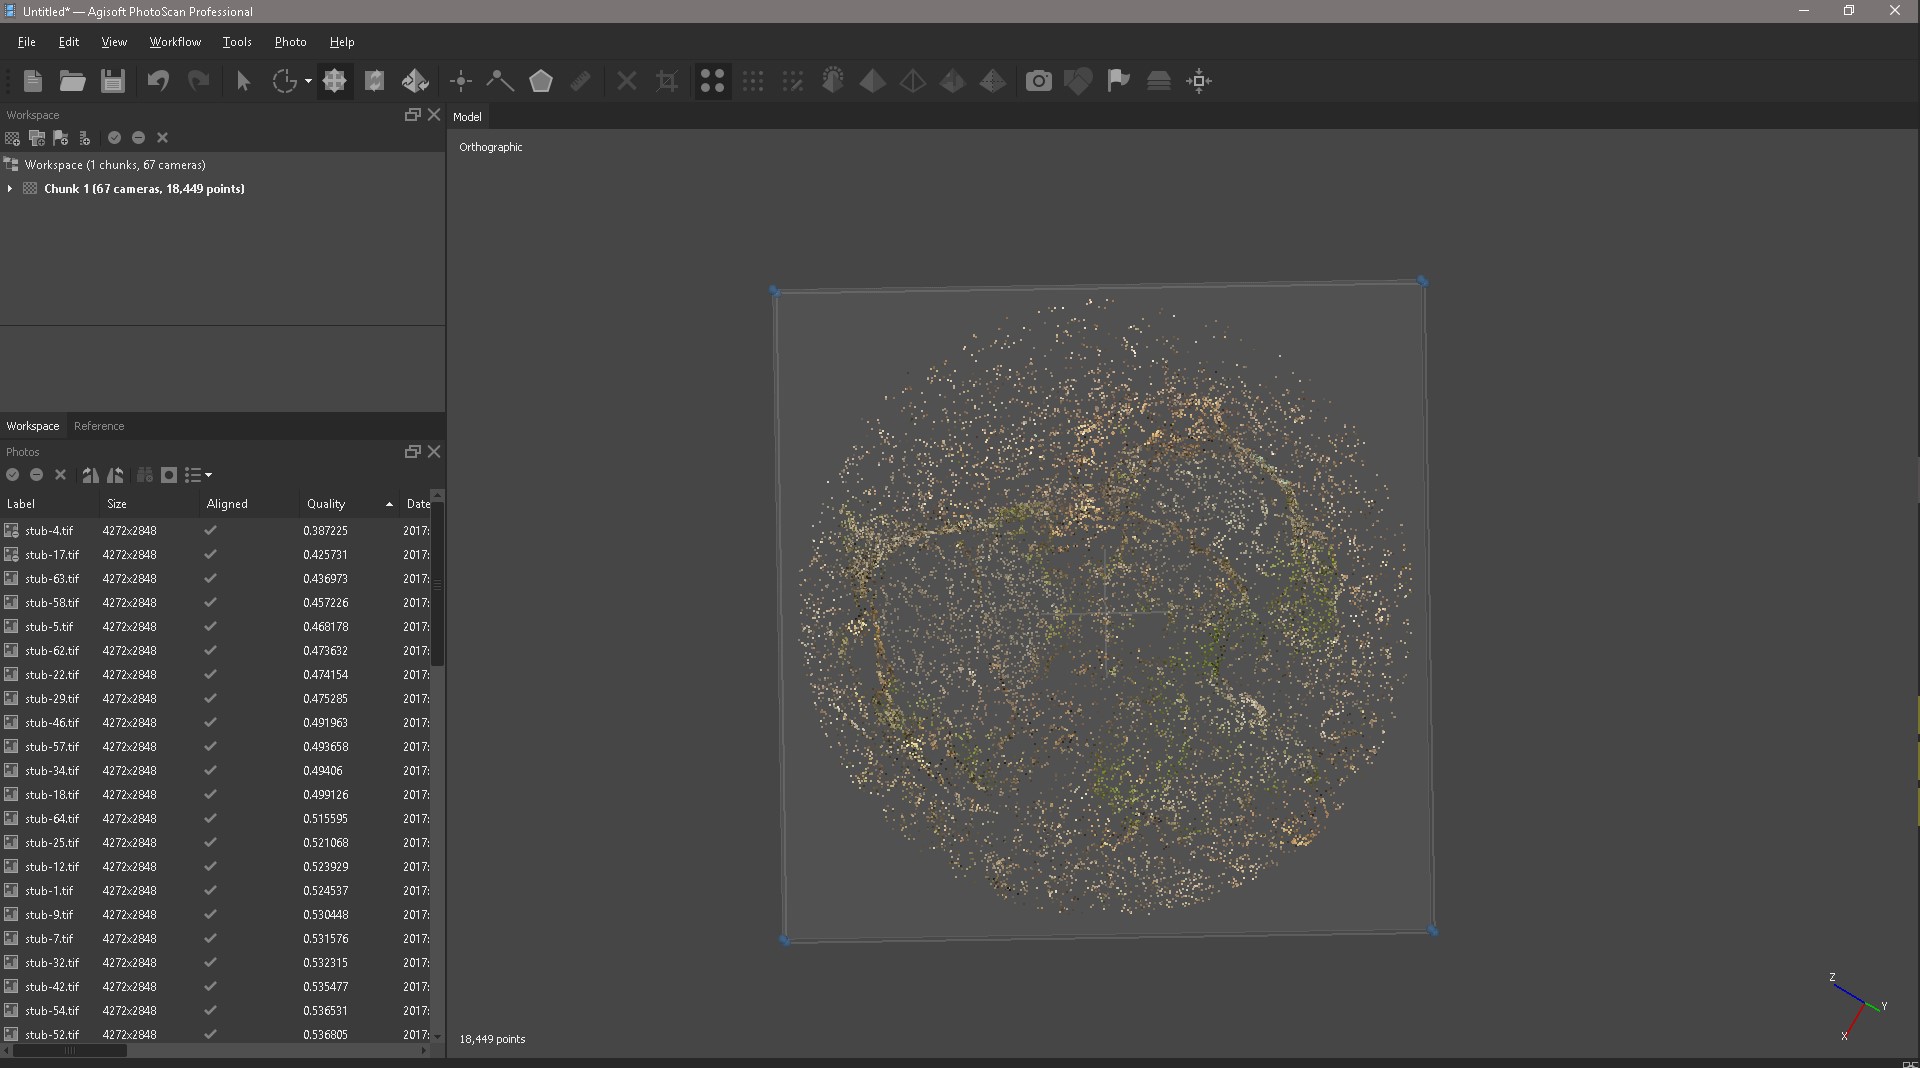
Define a build area
Correcting Box, this will not help NumPad, it allows you to switch between cameras, perspective and orthogonal projection.
Building a dense point cloud
Based on the calculated positions of the cameras, the program builds a dense cloud of points. Quality: Ultra-high (the higher the desired quality, the more time and computing resources will be required to complete the stage).
Aggressive (if the reconstructed scene has a complex geometry with numerous fine details or non-textured surfaces, such as the roofs of buildings, it is recommended to set the Soft parameter value).
That's what we did.
After a little cleaning of the object with the selection tools, we get this result.
Building a polygonal model
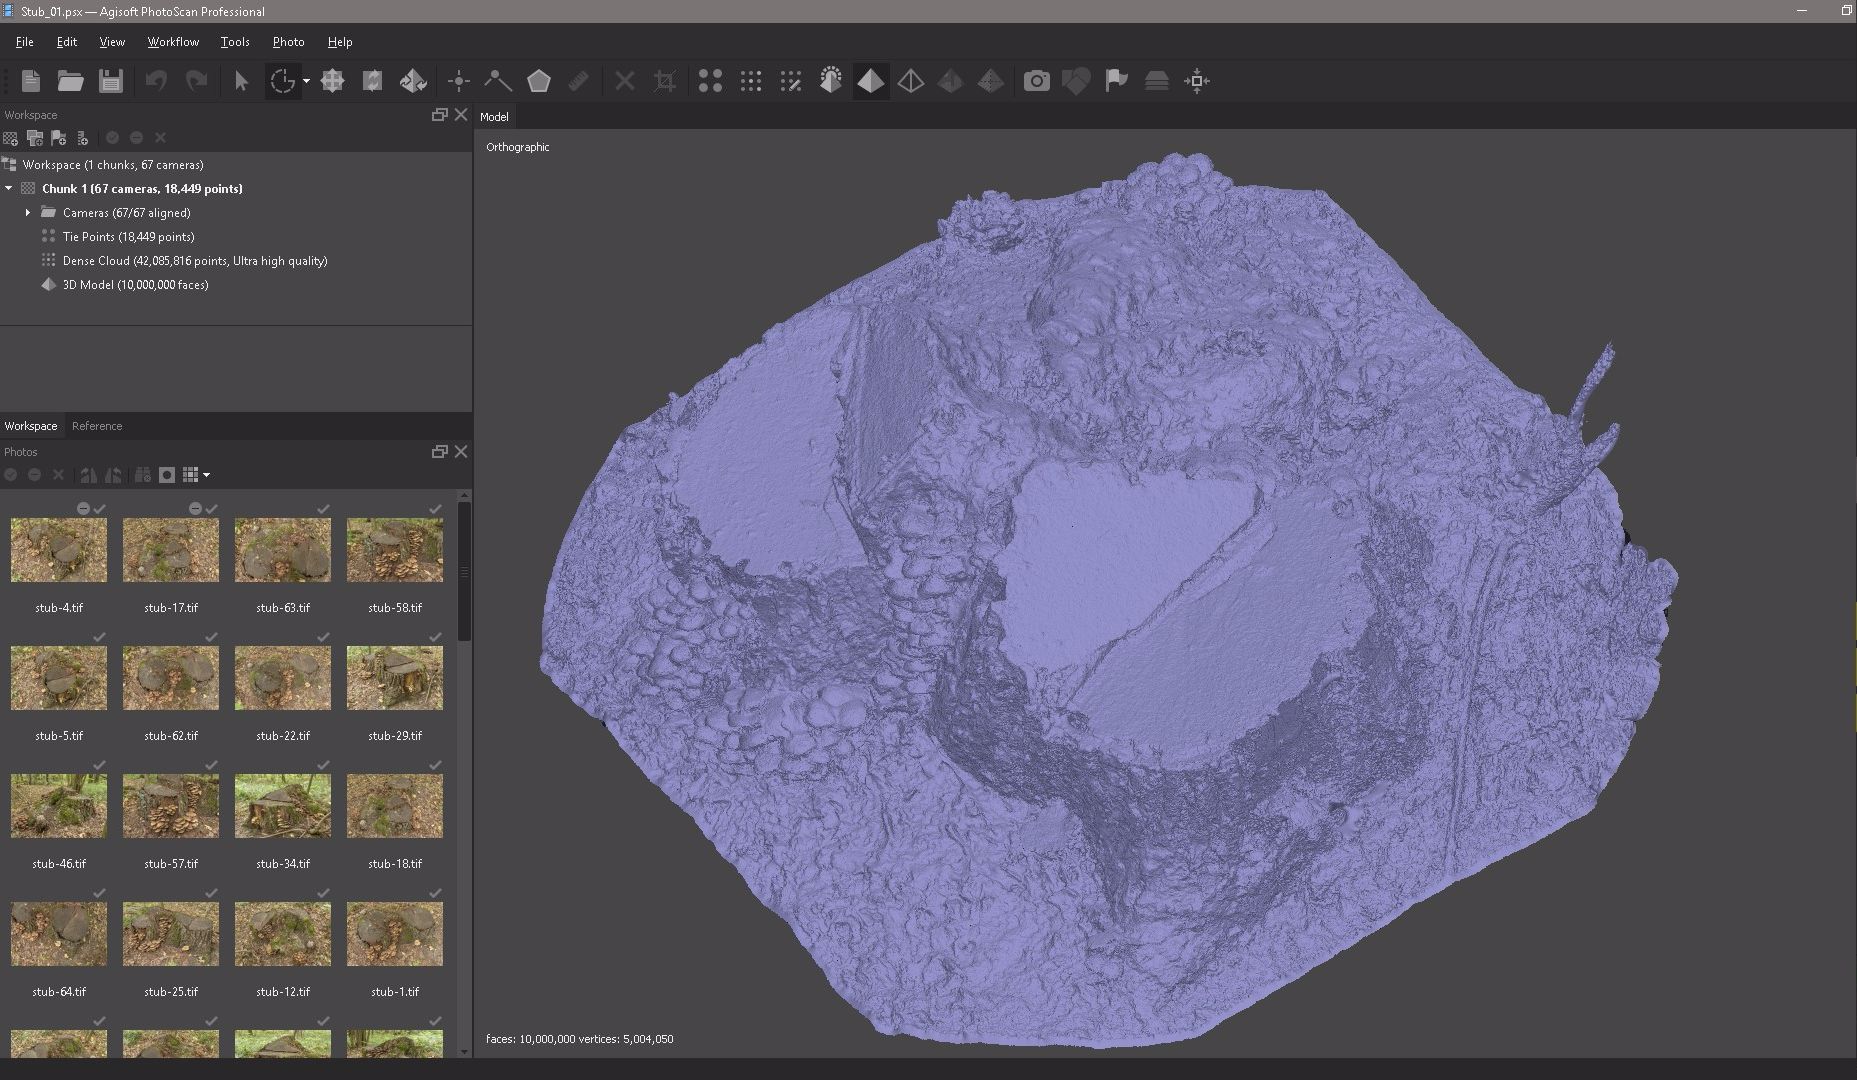
Now, based on the obtained dense point cloud, you can build a three-dimensional polygonal model.
Surface type: elevation map.Here is our result 3d models
Baseline: A dense cloud.
Number of polygons: High (in brackets next to the parameter value
The maximum number of polygons in the model to be constructed is specified.
The values suggested by the program are calculated based on the data.
about the number of points in a dense cloud).
Interpolation: Enabled (default).
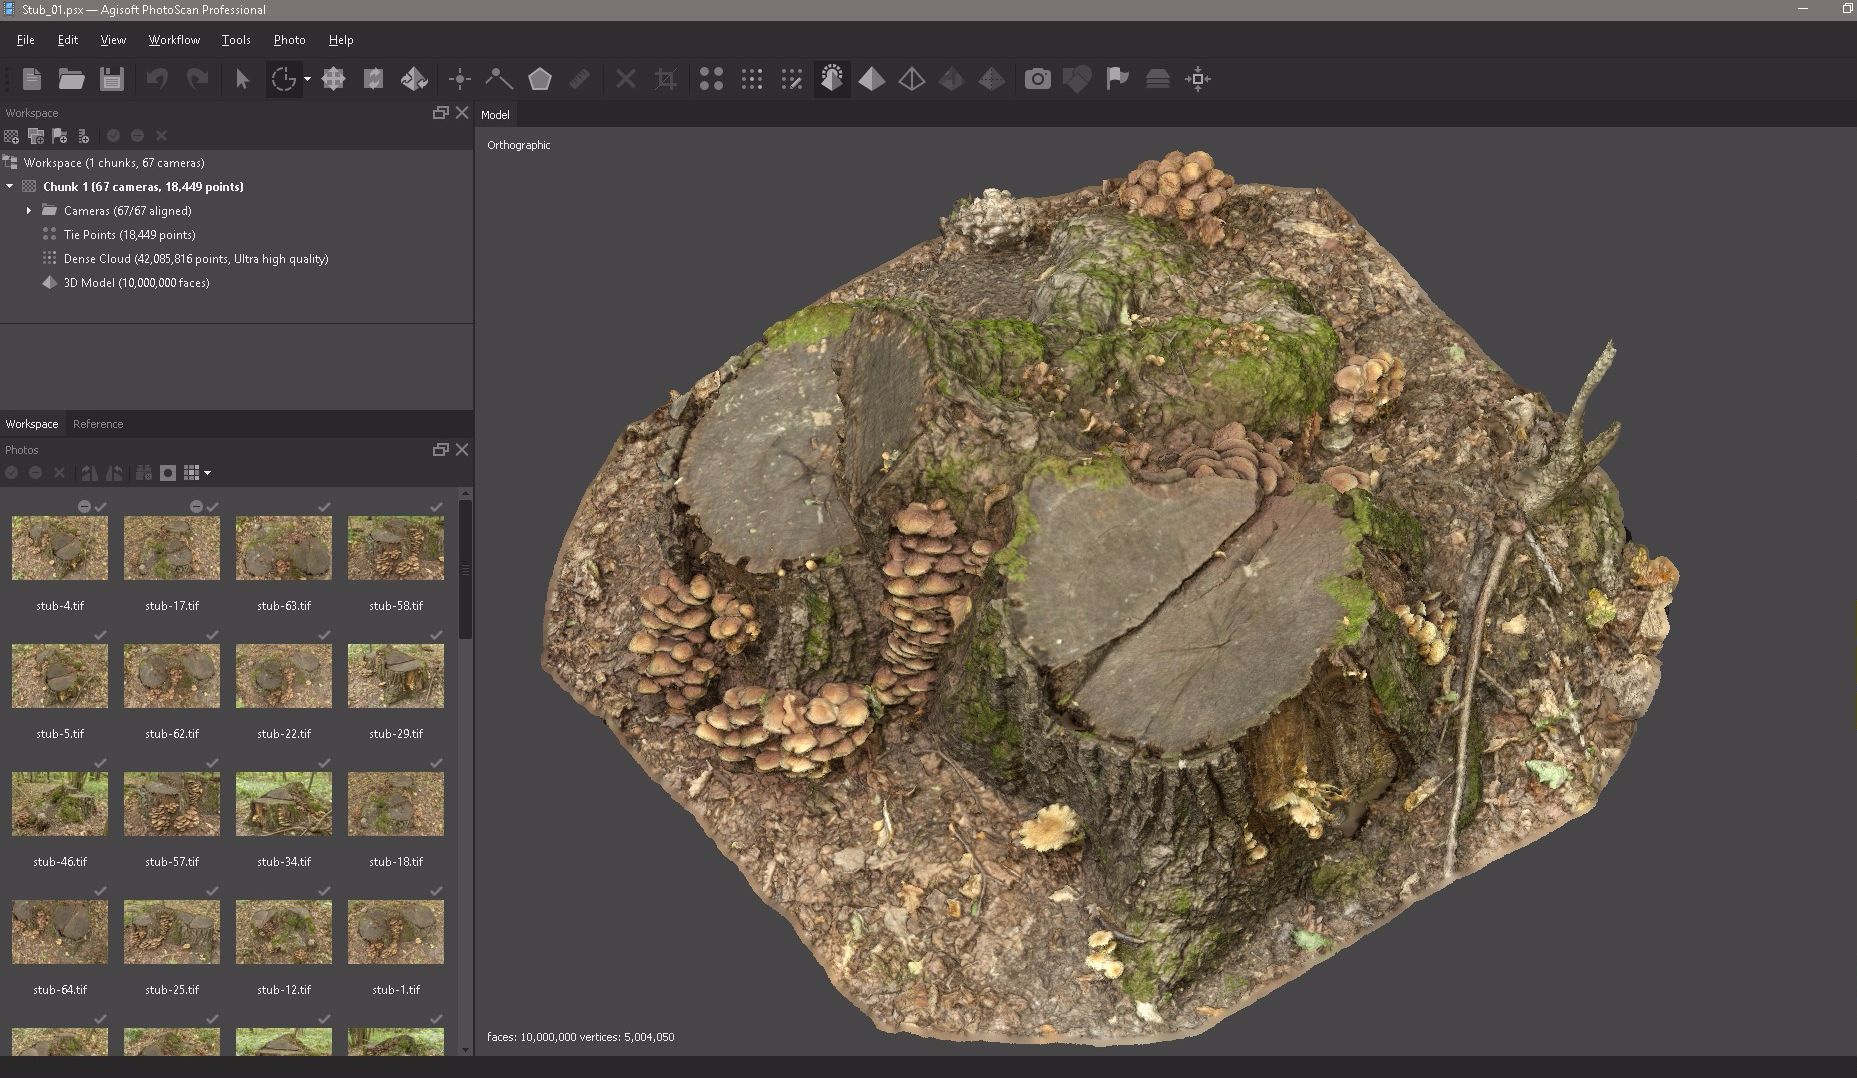
Editing the resulting geometry
Select Edit and click Gradual Selection to highlight in red all the individual pieces of geometry that we need to remove.
After that we need to close all the holes in our object, for this we select Tools, Mesh, Close Holes.
Export Model
Now we export our model to Zbrush for further editing.
Create a low poly model
Import the model into Zbrush and duplicate,
use the Zremesher command and export to Maya.
Import the model into Maya, perform the Extrude operation and export it back to Zbrush.
In Zbrush, we use the operation DynaMesh and Zremesher,
export to Maya and delete unnecessary polygons. Of course, you can still adjust the low-poly grid with pens and cut even polygons, but now I will not do this. If you have a desire, you can try and write about the result, I will attach all the files to the article.
We export to UVLayout and create a UV scan.
Create a color texture
We import the low-poly with the finished UV scan into Zbrush and execute the ProjectAll, dist. you need to raise and lower each time so that there are no artifacts, right here in the Zbrush bake Displacement map. We export obtained after Project High-poly.
Open PhotoScan and delete the model in its place through the Tools menu, import the resulting High-poly model.
After importing the model, create a texture in Tif format and export it.
Open the texture in Photoshop and the Magic wand Tool, click on the area where there is no texture and a black spot at this point.
Select the Lasso tool and in the Edit menu select the Fill command, a fill based on the content (Content-Aware Fill).
That's what we got, just a few seconds and the texture is ready.
Of course, you can go in other ways, for example, Stamp and handles to fill all spaces. It is also possible with the help of other programs, for example, 3D - Coat, to import High-poly and color textures in the Stamp tool and paint the right places on the texture, the same manipulations can be repeated in the Substance Painter, it is also possible in the Zbrush tool DraqRect, but it's all long and possible in some situation, and this is exactly what will need to be taken in one of these ways.
Baking and texture making
1. Run the Substance Painter, create a new project, load the low-poly with the finished UV scan, after creating the project, go to the TextureSet Settings menu and click Bake textures. In the baking window, we remove the cards we don’t need, load High-poly from PhotoScan. Baked cards will be automatically inserted into the appropriate slots in the TextureSet settings.
2. The next step is to replace our low-poly model with High-poly. in order to generate additional textures such as specular, roughness, etc., we can clearly view the texture we need.
3. We generate the maps we need, because texturing through channels is a very exciting experience, along with various filters and very flexible generators, which will help us greatly in this and will speed up the entire workflow of obtaining the necessary textures. For example, create a fill layer (Add fill layers), fill it with the desired color or texture, turn off all unnecessary channels, connect a black or white mask to the fill layer, generators, filters, in general, you can handle.
4. After obtaining the desired result, we can create Smart materials in order not to repeat the same actions in the future, because we strive to facilitate and speed up the workflow, since time is a resource that cannot be returned or bought.
5. When we are completely satisfied with the result, we can export all the textures we need into various renders / engines for further visualization. In the Export document there is a Config which will help us choose the settings for exporting textures for further use.
That's what we had and this is what we quickly and effortlessly received.
And so to summarize, such discipline as Photogrammetry is very interesting, necessary and can help speed up the workflow, in creating objects around (trees, plants, stones, etc.), interior items (microphone, music speaker, chair, etc.) etc.), organic (human, turtle, etc.), landscape and buildings, etc. The use of photogrammetry is very wide!
Well, that, friends process is complete. Open to your questions in a personal and communication in the experience of work.
Best wishes, Evgeny A.
Materials
Source: https://habr.com/ru/post/339464/
All Articles