Jenkins Task Management

Jenkins is now used, perhaps, in almost any company where there is a need for automatic deployment of applications and infrastructure, as well as for convenient management of various tasks.
There are many other tools on the market now (both paid and free) that allow building the process of continuous integration as comfortably as possible.
Jenkins is a free tool with huge capabilities in the form of thousands of plug-ins that are constantly being added and updated.
')
The basic approach to managing tasks is offered to us through the Jenkins web interface, where we can configure anything, but maintaining it with a large number of tasks and their heterogeneity becomes more difficult.
Below we look at how to simplify and speed up the creation of tasks in Jenkins.
Tools to use
Jenkins job builder
This is a python utility that allows you to describe tasks in YAML or JSON formats that are uploaded to the server through the HTTP API. To work, it is enough to install it on the local machine, write the configuration with the connection and describe the required tasks.
Current project documentation
DSL Plugin
This is a Jenkins plugin with which we can describe tasks in a special language (DSL, Domain Specific Language) and create them based on these descriptions. It works locally on the Jenkins server itself.
Plugin page
Jenkins Pipeline
This is a type of task in Jenkins, with the help of which we can describe the process of deployment or assembly of the application we need in stages. We will describe the pipeline in a special Jenkinsfile, which will be stored in the project repository.
Gitlab and Gitlab CI
The most popular and developing now selfhosted project, which is also used in many companies. It includes a community version and an enterprise solution.
Inside we have our own CI, written on Go, which through special plug-in agents (runners) allows us to carry out various stages of assembly and deployment.
To start using it is enough to create a .gitlab-ci.yml file in the project repository, in which to describe the sequence we need. For work, you can perfectly use Docker.
So, let's begin
To begin, we put the necessary tools. In our case, Jenkins-job-builder needs to be installed both on the local machine and on the machine where the gitlab agent will work. You can do with a local gitlab machine.
Locally on linux and mac install the latest available version:
pip install jenkins-job-builder brew install jenkins-job-builder Locally, to describe our seed job, we will be able to test its performance.
I will add that the seed job in the terminology of the DSL Plugin is a task of the type Free-style project, which creates the remaining tasks from DSL scripts.
On a gitlab server, the installation will be no different from a local installation on a linux machine:
pip install jenkins-job-builder Just in case, run the utility and check that it works:
➜ ~ jenkins-jobs usage: jenkins-jobs [-h] [--conf CONF] [-l LOG_LEVEL] [--ignore-cache] [--flush-cache] [--version] [--allow-empty-variables] [--user USER] [--password PASSWORD] {update,test,delete,delete-all} ... Plug-in installation
Now install the plugin in Jenkins. For installation, you can use either the classic UpdateCenter in the Manage Jenkins → Manage Plugins → Available section, or using the installation using curl / wget by downloading the plugin from the official page of the plugin:
- Gitlab version 9.4.4-ce.0
- Version gitlab-ci-multi-runner - 9.4.2
Creating a repository
Create a repository for the code with a description of the tasks.
To begin with, we will prepare our seed job - this is the name of the task that generates all the others from it. The repository will consist of the following files:
jenkins.ini
[job_builder] ignore_cache=True keep_descriptions=False include_path=. recursive=False allow_duplicates=False [jenkins] user=username password=secret-pass url=http://example-ci.org job-generator.yml
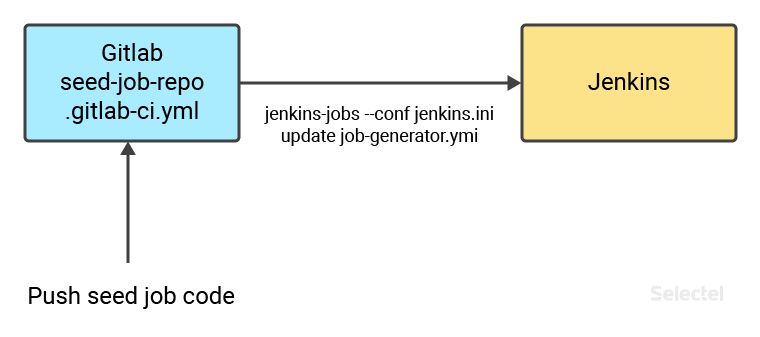
--- - job: name: job-generator description: 'Do not edit this job through the web!' scm: - git: url: git@gitlab-selfhosted.org:group/repo-dsl.git branches: - origin/master credentials-id: some-credentials-id timeout: 20 basedir: dsl triggers: - gitlab: trigger-push: true trigger-merge-request: false trigger-open-merge-request-push: both ci-skip: false set-build-description: false add-note-merge-request: false add-vote-merge-request: false add-ci-message: true allow-all-branches: true branch-filter-type: RegexBasedFilter target-branch-regex: '.*master*.' builders: - dsl: target: "dsl/*.groovy" ignore-existing: "false" removed-job-action: "DISABLE" removed-view-action: "DELETE" lookup-strategy: "SEED_JOB" .gitlab-ci.yml
job: script: 'jenkins-jobs --conf jenkins.ini update job-generator.yml' Let's connect gitlab-runner to our project. Since the gitlab interface often changes recently, we recommend that you refer to the official documentation .
Once connected, it will look something like this:
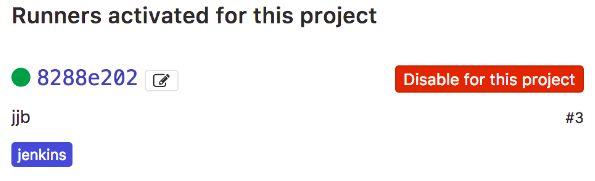
Now let's commit the changes and in the Jobs section of our project we will see the following:

The whole scheme is as follows:
Prepare a repository with a description of the tasks. Create it with the name repo-dsl and a flat structure. All files are located as is.
Put the file with our pipeline in it:
pipelineJob('testpipeline-build') { description('Build test docker image, test and push it to local registry') definition { cpsScm { scm { git { branch('origin/master') remote { url('git@gitlab-selfhosted.org:test-group/sample-project.git') credentials('gitlab-creds') } } } scriptPath('Jenkinsfile') } } } And set up a webhook to launch the seed-job that we created earlier.
In this version, gitlab webhooks are located in the project under Settings → Integrations.
Create a webhook on push (http: // gitlab: pass@ci.org/project/job-generator). Schematically, it looks like this:

Now in our Jenkins there are two tasks:
- Task seed-job generator
- A pipeline task called testpipeline-build.
In the test pipeline, we will build a docker image, which will then be loaded into the local docker registry. The image file will be taken from another project.
In a project called sample-project, create a Jenkinsfile with the following content:
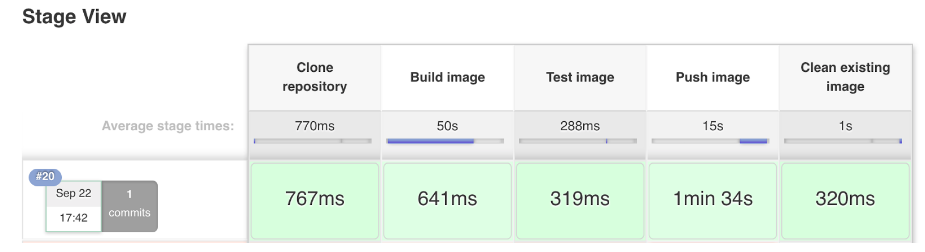
node { def app stage('Clone repository') { checkout([$class: 'GitSCM', branches: [[name: '*/master']], doGenerateSubmoduleConfigurations: false, extensions: [], submoduleCfg: [], userRemoteConfigs: [[credentialsId: 'gitlab-repo-creds', url: 'git@gitlab-selfhosted.org:test-group/docker-image-file.git']]]) } stage('Build image') { app = docker.build("docker-image") } stage('Test image') { sh ''' if ! docker inspect docker-image &> /dev/null; then echo 'docker-image does not exist!' exit 1 fi ''' } stage('Push image') { echo 'Push image' docker.withRegistry('https://local-registry:9666', 'registry-creds') { app.push("${env.BUILD_NUMBER}") app.push("latest") } } stage('Clean existing image') { sh "docker rmi docker-image" } } As a result, the finished pipeline will look like this in the blueocean interface in Jenkins:

Or so in the classic interface:
To start this task automatically, we can add a webhook in the project with docker-image, where after sending the changes to the repository this task will be launched.
In conclusion, we note that this article describes only one of the many approaches to managing tasks in jenkins. Due to the flexibility and functionality you can use different approaches that allow you to manage tasks as simply and conveniently as possible based on your requirements and infrastructure requirements.
Source: https://habr.com/ru/post/339390/
All Articles