Manage Windows Server (Core) using Microsoft's Project Honolulu web interface
Most recently, Microsoft released WebUI to manage Windows Server. We set it up and want to share our impressions.
In this article, we told and showed:
In the cloud, servers should work as efficiently as possible to reduce IT infrastructure costs. Windows Server with a graphical interface was created at a time when a single server was required to perform all possible operations, even if this functionality was not required at the moment.
')
Later, roles were added to the Windows Server, allowing you to install only the required functionality. At the same time, a graphical interface and numerous services were installed that are not required to solve a business problem. This generated computational overhead and increased the attack surface, making the server less secure.
In order to further optimize the server OS, Microsoft added Server Core mode — a minimalist, more efficient and more secure edition of Windows Server with the default command line mode. In this OS, the overhead costs for everything that is not related to the execution of your task are minimized.
Most recently, Microsoft introduced Windows Server 1709, the OS recommended for modern cloud applications and services. This OS does not contain a graphical interface, receives significant updates every six months, developing continuously and comes only in the form of Server Core and Nano Server.
If you have previously put off learning and using Server Core, the time has come. Traditional Windows Server management using the Windows graphical interface is gradually becoming a thing of the past. Microsoft left IT administrators not only with Powershell, but also introduced a new modern server management tool using a web interface - Project Honolulu . It should be noted that while this is not a release, but a technical preview. There were no questions to the stability of the available opportunities during the use, but it is obvious that in the future there will be much more opportunities.

Project Honolulu can be used not only with Windows Server Core, but also with servers with a graphical interface (2012, 2012R2, 2016), having a convenient way to manage IT infrastructure on Windows.
Project Honolulu can be installed not only on the server, but also on the IT administrator’s computer with Windows 10. However, it’s more convenient to install management tools directly to the server in the cloud (even if you have only one virtual machine there) and manage the servers through a convenient web interface with any devices from anywhere in the world (or where company security policies are allowed from). If you have a Site-To-Site VPN connection from your office, you can work on a secure connection without even providing access to servers from the Internet.
If you want to try to do everything that is described in the article further on, set up Project Honolulu in the cloud and look at its capabilities yourself, no problem.
Fill out an application for free testing, select the Azure Pack Infrastructure platform, in the "Comment" field specify "With Habra, I want to test Honolulu".
A cloud infrastructure for 2 weeks will be pre-created for you, where you can try the new Honolulu web-based management interface, and at the same time test the highly available Azure Pack Infrastructure cloud from InfoboxCloud .
In the portal.infoboxcloud.com control panel, we will create (if not already created) a network and a server with Windows Server 2016 Core (at the time of publication, Windows Server 1709 is being prepared for release and will be available from the end of October 2017).
Now you need to forward port 3389 for access via RDP.
Connect to the server via RDP using the given ip – address when setting the forwarding rule.
Run

To use with Windows Server 2012 and 2012 R2, you must first install the Windows Management Framework 5 .
Download Project Honolulu by running the commands:
A current link to the latest version can be obtained by registering here , it is recommended to substitute it in the -Source parameter.
Run the installation with a self-signed certificate:
where HonoluluTechnicalPreview1709-20016.msi is the name of the downloaded version of Honolulu.
or with the indication of the THUMBPRINT certificate, if you have one and installed it:
where HonoluluTechnicalPreview1709-20016.msi is the name of the downloaded version of Honolulu.
Now in the network settings in portal.infoboxcloud.ru, forward port 6516 to the server.

We can access the server via the web interface:
where ip – server address is the IP address of the server to which the connection is made. The browser can warn you that a self-signed certificate is being used. You should continue to enter the page.
The login and password are the access data for the account on the server (the same with which you connect via RDP).
Great, Honolunu installation is complete.

The current server has already been added.
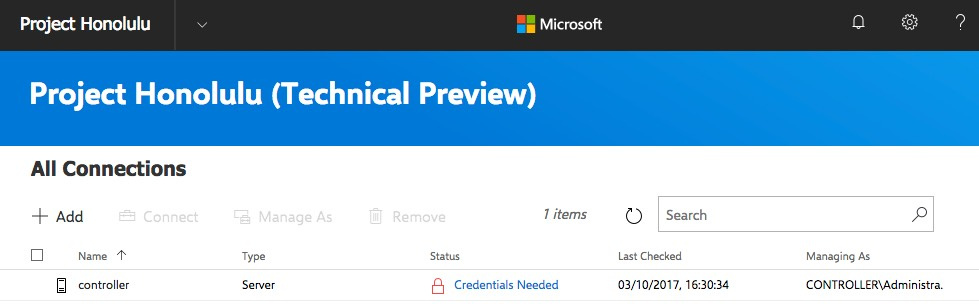
You need to click on "Credentials Needed" and specify the administrator information for this server:
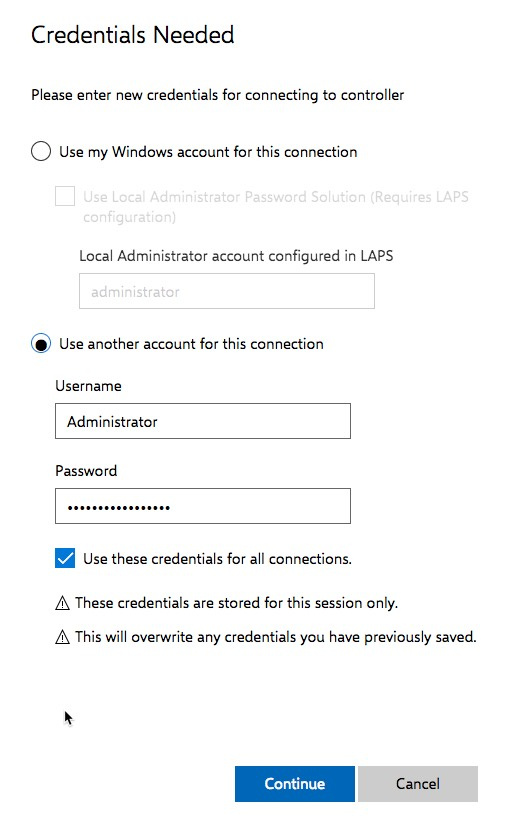
The server is available for management.

Create another server in the Azure Pack Infrastructure control panel and forward access to it via RDP in the network settings.
Connect to the new server .
Run:
Configure the WinRM remote connection. To do this, enter
then press "y" and Enter.
Allow access to WinRM in the firewall:
To do this, enter the command:
In the terminal, enter the command to add the managed server to Trusted Hosts using its internal IP:
where containers is the name of the managed server.
If you need to add more servers in the future, all of them need to be added to Trusted Hosts, for example:
Now in the Honolulu web interface add the server:

Specify the internal IP (you can see in the network settings in the Azure Pack Infrastructure control panel), login and password and click "Submit".

Is done. The server can be managed from a single Honolulu panel.

If you use Active Directory in Trusted Hosts, you do not need to add each other, as well as constantly enter data to access servers in Honolulu. Also, when adding, you can use names from DNS. In this case, they will be displayed not by IP, but by server name, which is convenient.
The goal of the project is to replace the GUI server management tools (RSAT) and make management access to admin groups more convenient from anywhere in the world. The goal is noble, customer infrastructure becomes more heterogeneous, and RSAT is platform dependent. Now it’s not very important what kind of OS the IT administrator has - managing from alternative OS is just as convenient as managing from Windows by alternative platforms (using Linux Subsystem for Windows).
To manage a specific server, click on it:

In this section you can:
The ability to view and download certificates allows you to know in time about the need to renew certificates.
You can view detailed information about the virtual hardware and the drivers used.
If necessary, you can turn off the device.
The ability to view and export system logs and application logs. Allows you to quickly notice and fix the problem.
Web Explorer interface. Allows you to download, upload files to the server, rename and change their properties.

Convenient web interface for managing Windows Server Firewall.

Everything is obvious - the ability to add and edit users and groups, as well as change passwords.
The ability to view and change the settings of network adapters.


Statistics on running processes, resource consumption, the ability to kill the process and collect a dump for analysis.


A full registry editor with a Web-based interface for Windows with the ability to import and export registry branches.
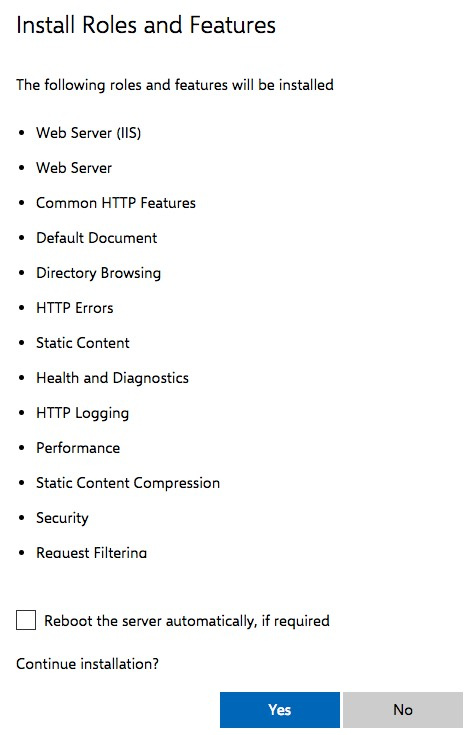
Ability to view the installed roles and capabilities of the OS, installing and configuring new ones.
Mark the desired to install and click "Install". The installation process is familiar and understandable.

Ability to turn on or turn off the Windows service manually and configure autorun rules.
Features disk layout, partition management and file balls.

Also present is the Storage Replica section, which requires pre-configuration of the SR Namespace.
Ability to view and install available server updates.
Project Honolulu - workable technical preview. Of course, there is a lack of the ability to configure roles and functions directly from the web interface (and not just installation and removal), the built-in RDP panel, the ability to execute Powershell commands on servers from the same web interface, and send notifications to email and / or pushover.
The possibility of remote control from anywhere via Powershell will be discussed in one of the following articles.
Nevertheless, Project Honolulu is already a powerful Windows Server fleet management tool in the cloud and on the customer’s local network (or better in a single hybrid network), which will greatly simplify work with Windows Server Core for beginners and prepare them for a new and wonderful world of “headless”. Windows Server.
Successes.
In this article, we told and showed:
- how to deploy Honolulu on Windows Server Core and make available server management through a browser;
- how to connect other servers for management (even without AD) over the virtual local area network of the cloud (in the same way, you can connect servers in the local network of your enterprise to the control center in the cloud, connecting it via Site-To-Site VPN);
- what Honolulu features are available now and relevant when used in the cloud.
Why does a windows server web management interface?
In the cloud, servers should work as efficiently as possible to reduce IT infrastructure costs. Windows Server with a graphical interface was created at a time when a single server was required to perform all possible operations, even if this functionality was not required at the moment.
')
Later, roles were added to the Windows Server, allowing you to install only the required functionality. At the same time, a graphical interface and numerous services were installed that are not required to solve a business problem. This generated computational overhead and increased the attack surface, making the server less secure.
In order to further optimize the server OS, Microsoft added Server Core mode — a minimalist, more efficient and more secure edition of Windows Server with the default command line mode. In this OS, the overhead costs for everything that is not related to the execution of your task are minimized.
Most recently, Microsoft introduced Windows Server 1709, the OS recommended for modern cloud applications and services. This OS does not contain a graphical interface, receives significant updates every six months, developing continuously and comes only in the form of Server Core and Nano Server.
If you have previously put off learning and using Server Core, the time has come. Traditional Windows Server management using the Windows graphical interface is gradually becoming a thing of the past. Microsoft left IT administrators not only with Powershell, but also introduced a new modern server management tool using a web interface - Project Honolulu . It should be noted that while this is not a release, but a technical preview. There were no questions to the stability of the available opportunities during the use, but it is obvious that in the future there will be much more opportunities.
Project Honolulu can be used not only with Windows Server Core, but also with servers with a graphical interface (2012, 2012R2, 2016), having a convenient way to manage IT infrastructure on Windows.
Installing Project Honolulu on the server
Project Honolulu can be installed not only on the server, but also on the IT administrator’s computer with Windows 10. However, it’s more convenient to install management tools directly to the server in the cloud (even if you have only one virtual machine there) and manage the servers through a convenient web interface with any devices from anywhere in the world (or where company security policies are allowed from). If you have a Site-To-Site VPN connection from your office, you can work on a secure connection without even providing access to servers from the Internet.
Where to try Honolulu?
If you want to try to do everything that is described in the article further on, set up Project Honolulu in the cloud and look at its capabilities yourself, no problem.
Fill out an application for free testing, select the Azure Pack Infrastructure platform, in the "Comment" field specify "With Habra, I want to test Honolulu".
A cloud infrastructure for 2 weeks will be pre-created for you, where you can try the new Honolulu web-based management interface, and at the same time test the highly available Azure Pack Infrastructure cloud from InfoboxCloud .
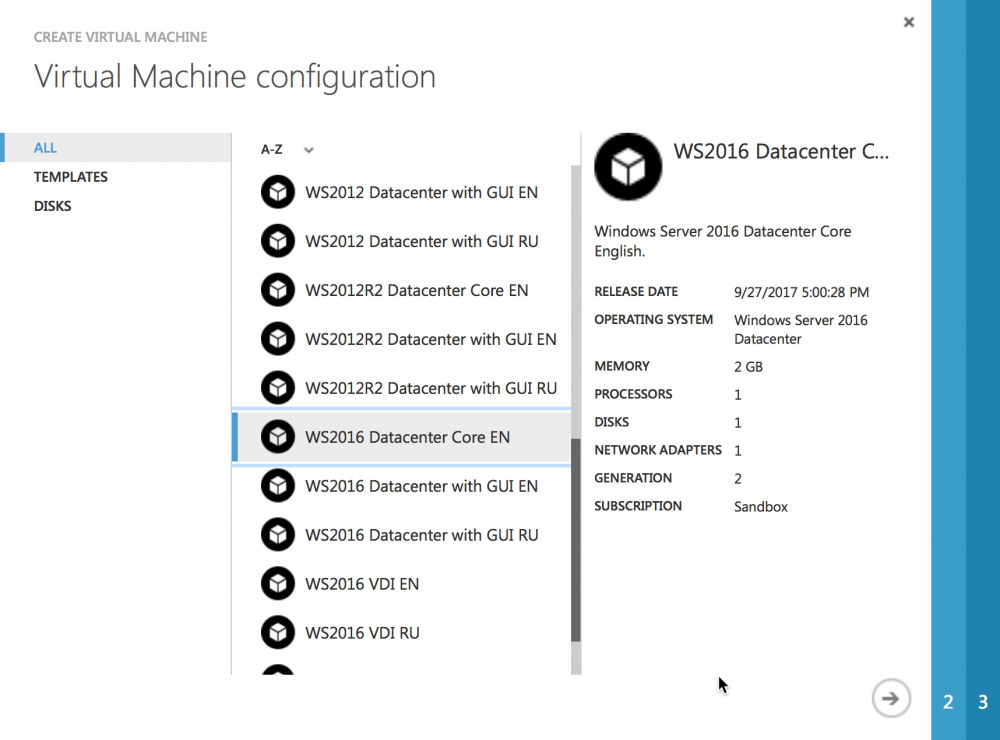
Creating a server to install Honolulu (and not only)
In the portal.infoboxcloud.com control panel, we will create (if not already created) a network and a server with Windows Server 2016 Core (at the time of publication, Windows Server 1709 is being prepared for release and will be available from the end of October 2017).
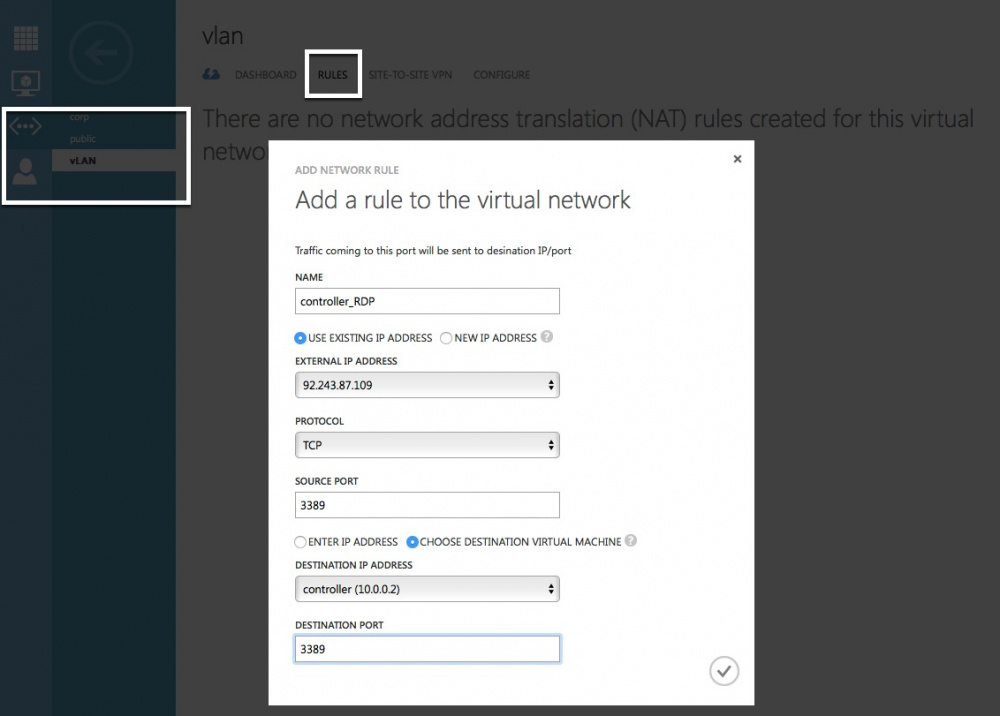
Now you need to forward port 3389 for access via RDP.
Connect to the server via RDP using the given ip – address when setting the forwarding rule.
Run
powershell Installation Project Honolulu
To use with Windows Server 2012 and 2012 R2, you must first install the Windows Management Framework 5 .
Download Project Honolulu by running the commands:
Import-Module BitsTransfer Start-BitsTransfer -Source http://download.microsoft.com/download/E/8/A/E8A26016-25A4-49EE-8200-E4BCBF292C4A/HonoluluTechnicalPreview1709-20016.msi -Destination . A current link to the latest version can be obtained by registering here , it is recommended to substitute it in the -Source parameter.
Run the installation with a self-signed certificate:
msiexec /i HonoluluTechnicalPreview1709-20016.msi /qn /L*v log.txt SME_PORT=6516 SSL_CERTIFICATE_OPTION=generate where HonoluluTechnicalPreview1709-20016.msi is the name of the downloaded version of Honolulu.
or with the indication of the THUMBPRINT certificate, if you have one and installed it:
msiexec /i HonoluluTechnicalPreview1709-20016.msi /qn /L*v log.txt SME_PORT=6516 SME_THUMBPRINT=<thumbprint> SSL_CERTIFICATE_OPTION=installed where HonoluluTechnicalPreview1709-20016.msi is the name of the downloaded version of Honolulu.
Now in the network settings in portal.infoboxcloud.ru, forward port 6516 to the server.
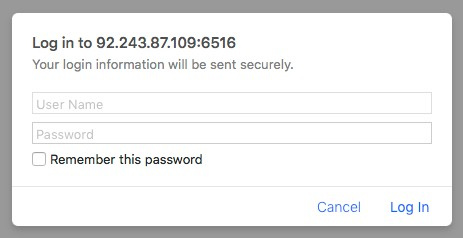
We can access the server via the web interface:
https://ip–-:6516 where ip – server address is the IP address of the server to which the connection is made. The browser can warn you that a self-signed certificate is being used. You should continue to enter the page.
The login and password are the access data for the account on the server (the same with which you connect via RDP).
Great, Honolunu installation is complete.
The current server has already been added.
You need to click on "Credentials Needed" and specify the administrator information for this server:
The server is available for management.
Connection of additional servers
Create another server in the Azure Pack Infrastructure control panel and forward access to it via RDP in the network settings.
Connect to the new server .
On a new server
Run:
powershell Configure the WinRM remote connection. To do this, enter
winrm quickconfig then press "y" and Enter.
Allow access to WinRM in the firewall:
To do this, enter the command:
netsh advfirewall firewall add rule name="Open Port Remote Management (5985)" dir=in action=allow protocol=TCP localport=5985 netsh advfirewall firewall add rule name="Open Port Remote Management (5986)" dir=in action=allow protocol=TCP localport=5986 On the server where Honolulu is installed
In the terminal, enter the command to add the managed server to Trusted Hosts using its internal IP:
winrm s winrm/config/client '@{TrustedHosts="10.0.0.5,containers"}' where containers is the name of the managed server.
If you need to add more servers in the future, all of them need to be added to Trusted Hosts, for example:
winrm s winrm/config/client '@{TrustedHosts="10.0.0.5,containers,10.0.0.3,web"}' Now in the Honolulu web interface add the server:
Specify the internal IP (you can see in the network settings in the Azure Pack Infrastructure control panel), login and password and click "Submit".
Is done. The server can be managed from a single Honolulu panel.
If you use Active Directory in Trusted Hosts, you do not need to add each other, as well as constantly enter data to access servers in Honolulu. Also, when adding, you can use names from DNS. In this case, they will be displayed not by IP, but by server name, which is convenient.
Project Honolulu features
The goal of the project is to replace the GUI server management tools (RSAT) and make management access to admin groups more convenient from anywhere in the world. The goal is noble, customer infrastructure becomes more heterogeneous, and RSAT is platform dependent. Now it’s not very important what kind of OS the IT administrator has - managing from alternative OS is just as convenient as managing from Windows by alternative platforms (using Linux Subsystem for Windows).
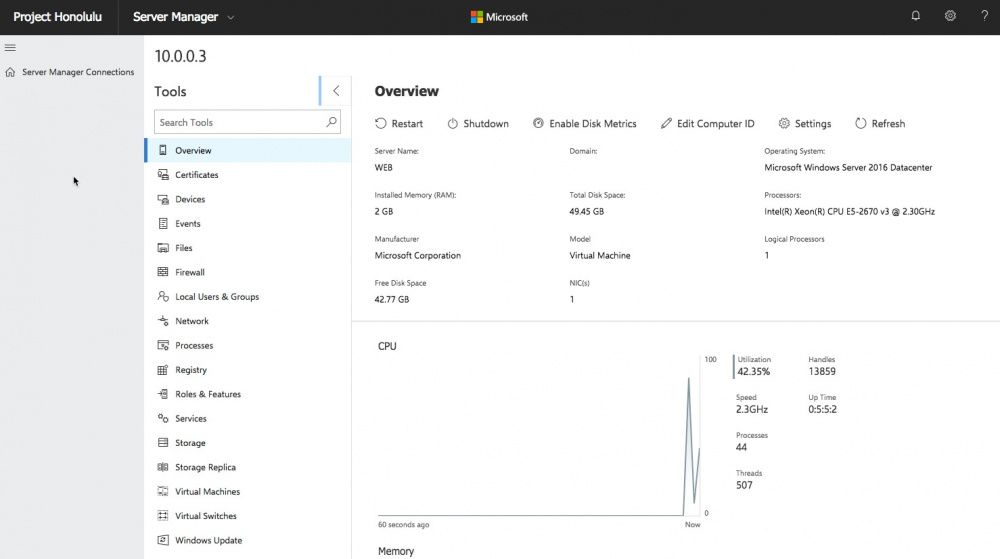
To manage a specific server, click on it:
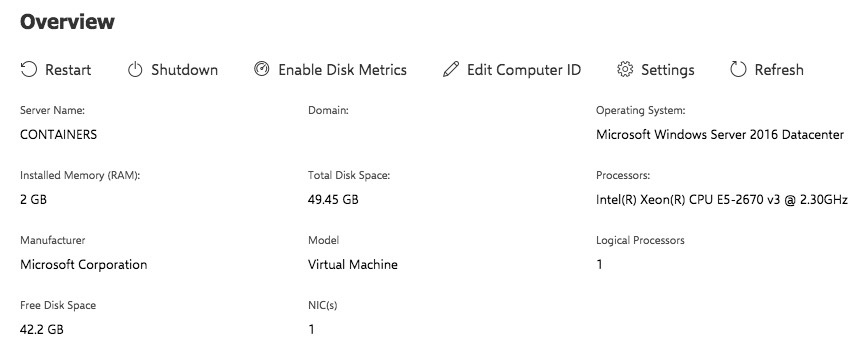
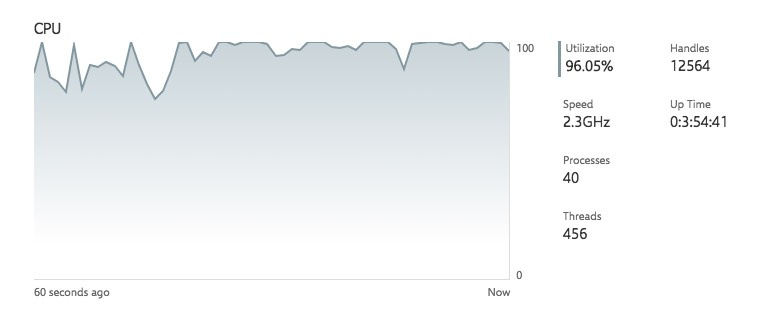
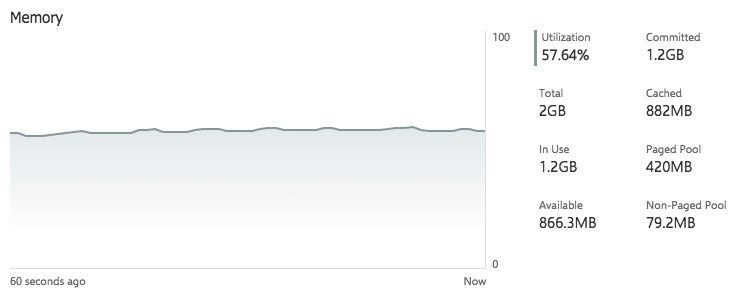
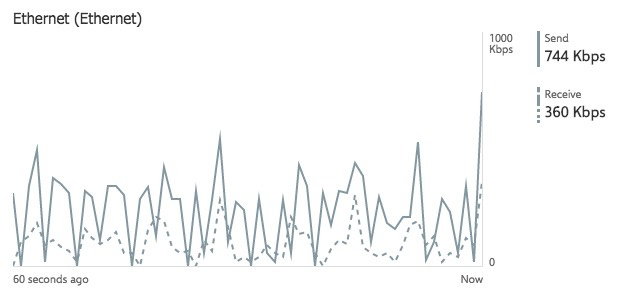
Server Overview (Overview)
In this section you can:
- Online to receive information about server and network load
- edit computer name,
- enter it into the domain
- manage user and system environment variables
- enable and disable access via RDP
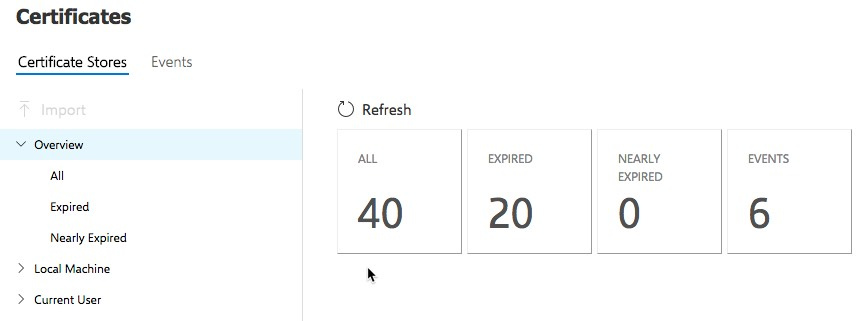
Certificates
The ability to view and download certificates allows you to know in time about the need to renew certificates.
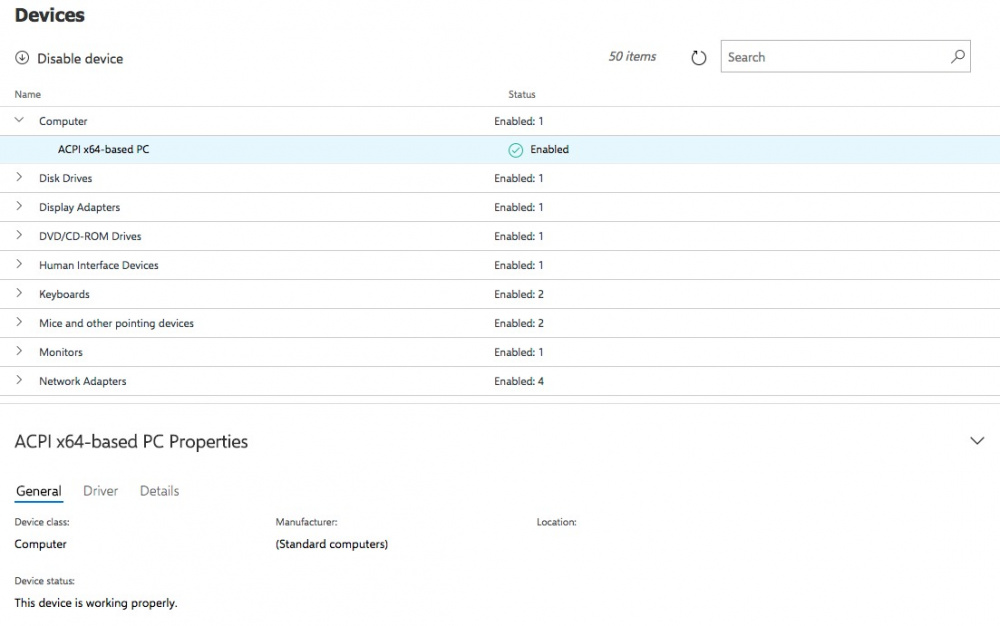
Devices
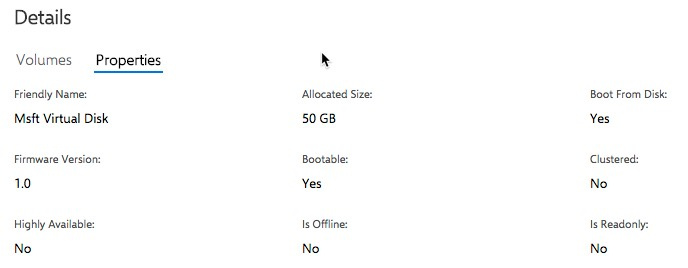
You can view detailed information about the virtual hardware and the drivers used.
If necessary, you can turn off the device.
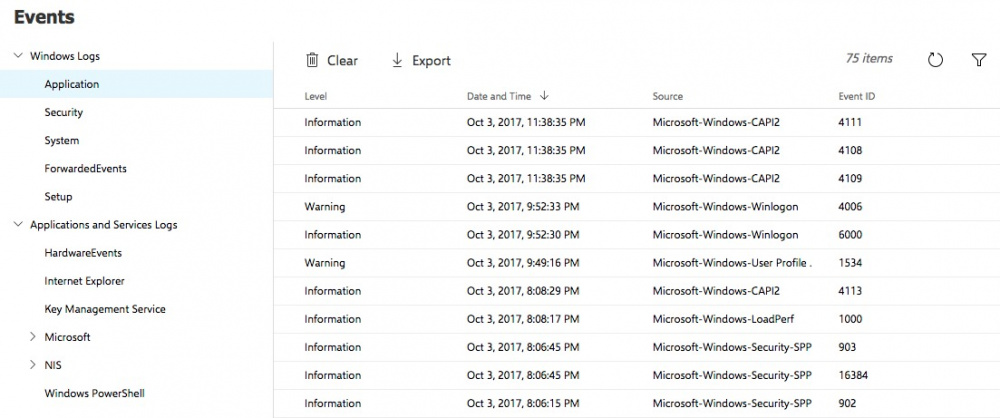
Events
The ability to view and export system logs and application logs. Allows you to quickly notice and fix the problem.
Files
Web Explorer interface. Allows you to download, upload files to the server, rename and change their properties.
Firewall
Convenient web interface for managing Windows Server Firewall.
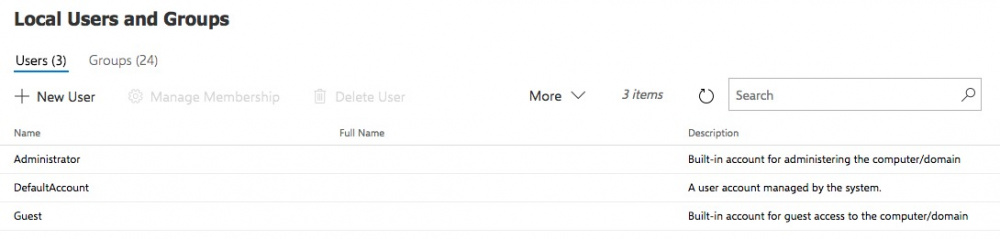
Local Users and Groups (Local Users & Groups)
Everything is obvious - the ability to add and edit users and groups, as well as change passwords.
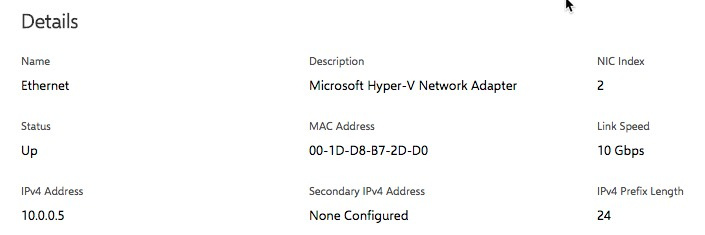
Network
The ability to view and change the settings of network adapters.
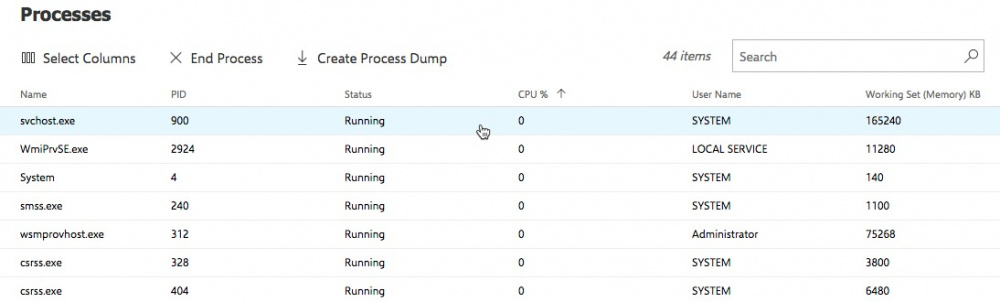
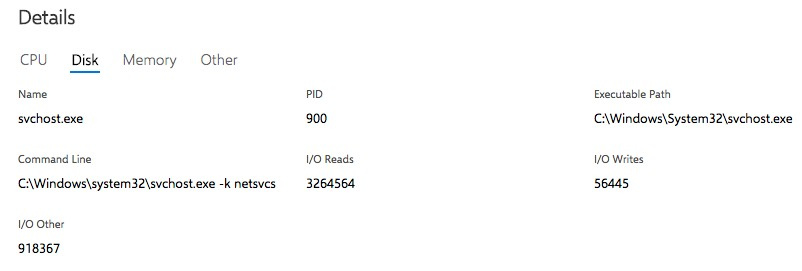
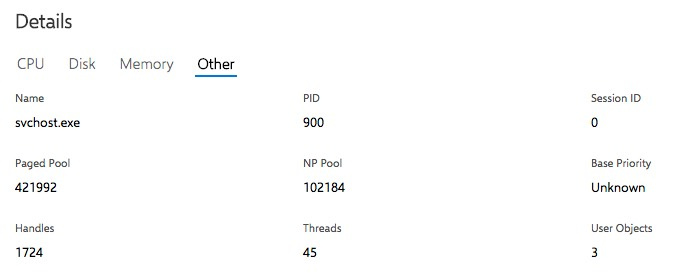
Processes (Processes)
Statistics on running processes, resource consumption, the ability to kill the process and collect a dump for analysis.
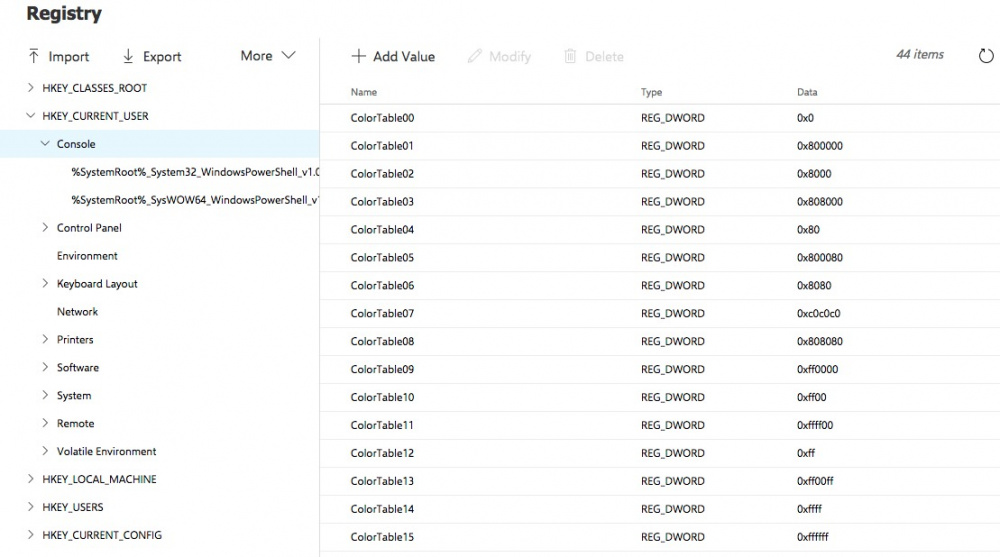
Registry (Registry)
A full registry editor with a Web-based interface for Windows with the ability to import and export registry branches.
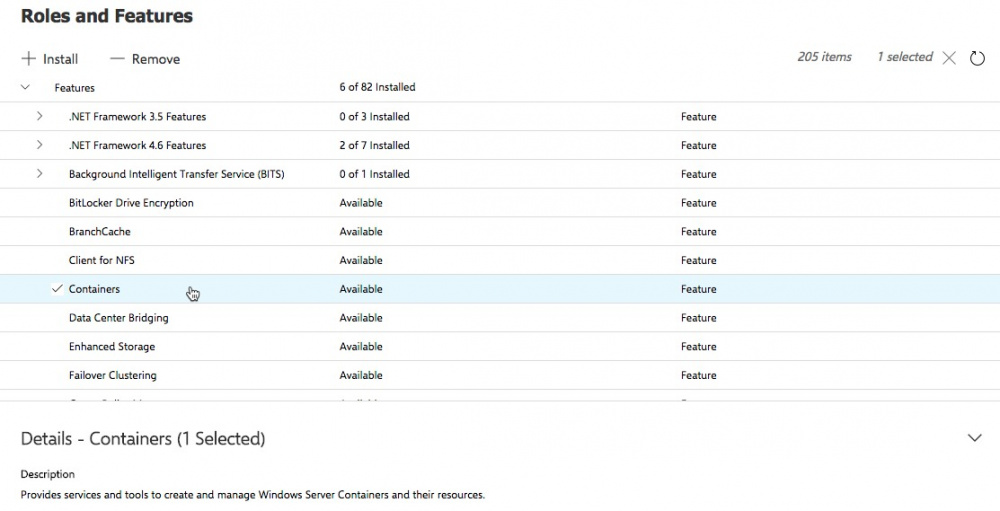
Roles and Features
Ability to view the installed roles and capabilities of the OS, installing and configuring new ones.
Mark the desired to install and click "Install". The installation process is familiar and understandable.
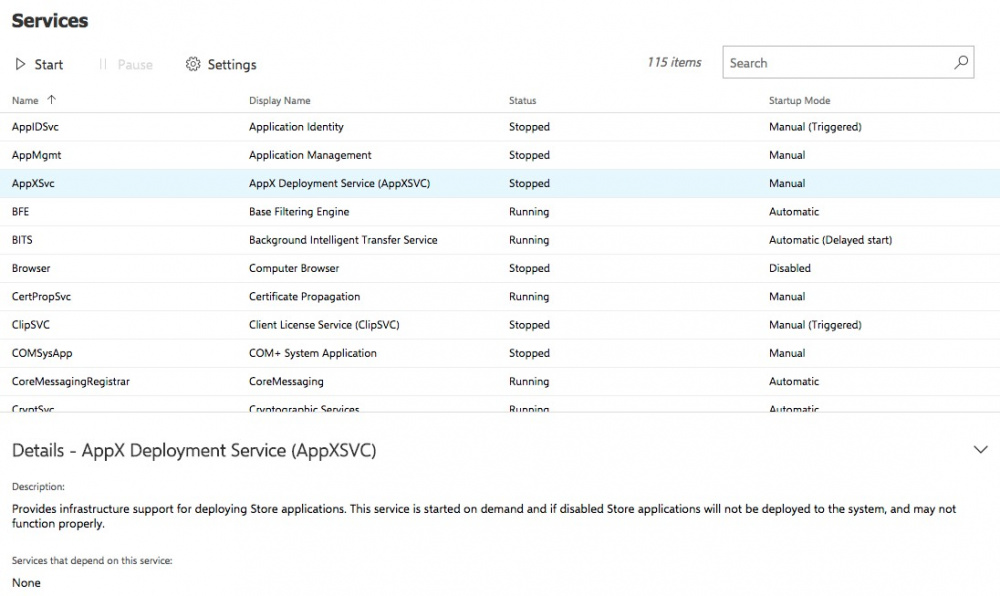
Services
Ability to turn on or turn off the Windows service manually and configure autorun rules.
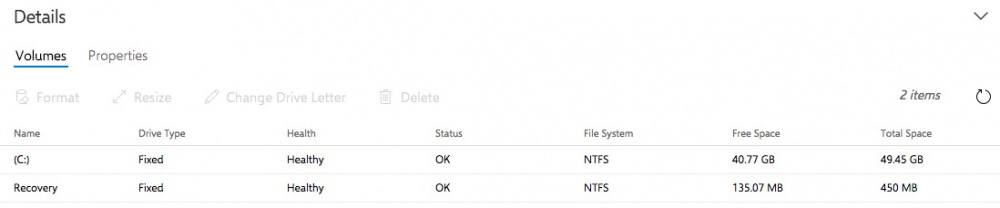
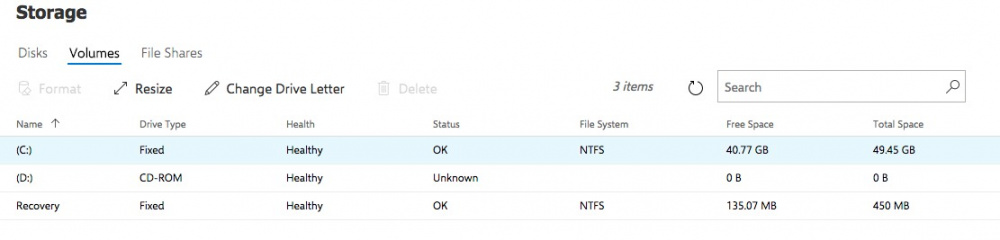
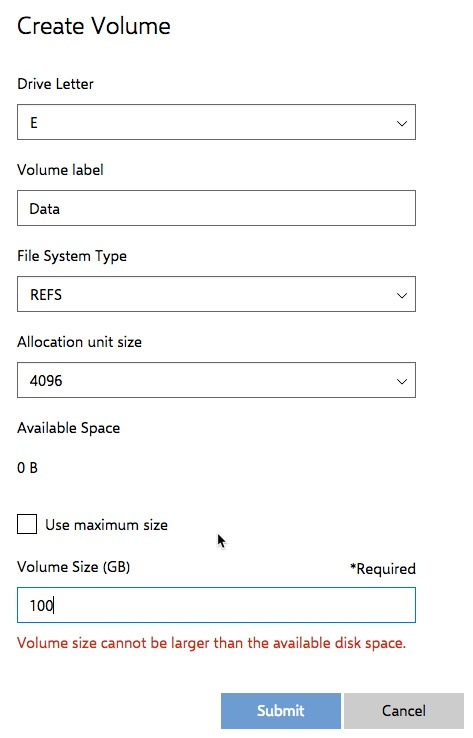
Storage
Features disk layout, partition management and file balls.
Also present is the Storage Replica section, which requires pre-configuration of the SR Namespace.
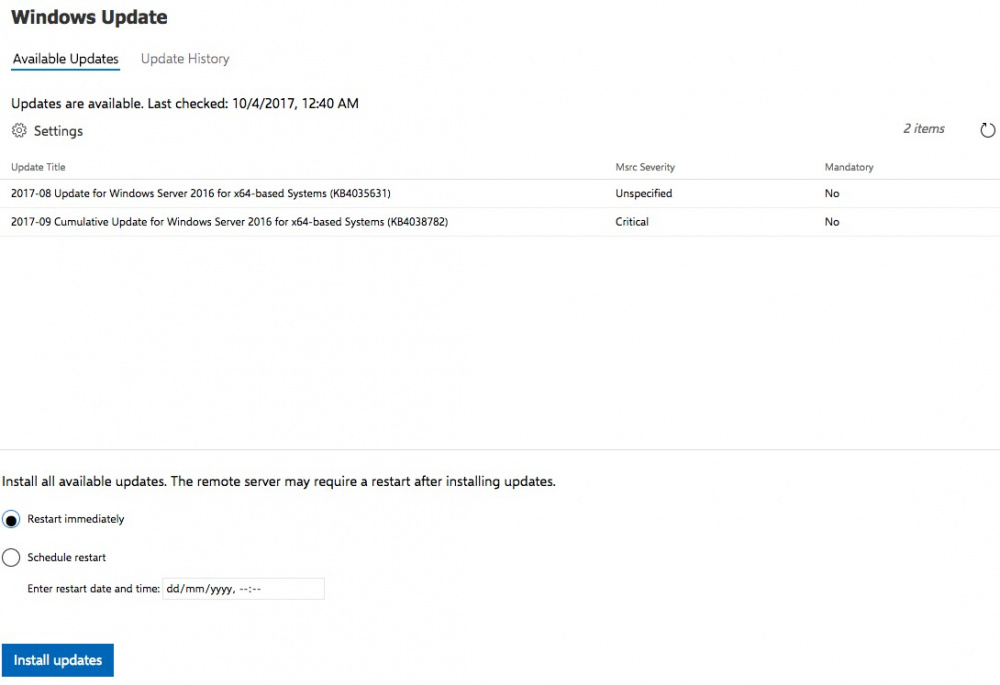
Windows update
Ability to view and install available server updates.
Conclusion
Project Honolulu - workable technical preview. Of course, there is a lack of the ability to configure roles and functions directly from the web interface (and not just installation and removal), the built-in RDP panel, the ability to execute Powershell commands on servers from the same web interface, and send notifications to email and / or pushover.
The possibility of remote control from anywhere via Powershell will be discussed in one of the following articles.
Nevertheless, Project Honolulu is already a powerful Windows Server fleet management tool in the cloud and on the customer’s local network (or better in a single hybrid network), which will greatly simplify work with Windows Server Core for beginners and prepare them for a new and wonderful world of “headless”. Windows Server.
Successes.
Source: https://habr.com/ru/post/339372/
All Articles