Squeeze all the juice from Chromium to Linux
In this article we will look at how to squeeze all the juices from Chromium and speed it up as much as possible, or another browser on its engine (Chromium, Google Chrome, Opera, Vivaldi, Yandex, etc.). Due to the inclusion of many experimental opportunities to carry out calculations from the processor to the video card and to include the use of software algorithms that are under development. Due to this, our favorite chromium will work faster, may stop braking or blinking the screen .
Go!
How to make a backup of your entire browser profile (settings, history, bookmarks, etc.) is written at the end of the article.
Go to the address
')
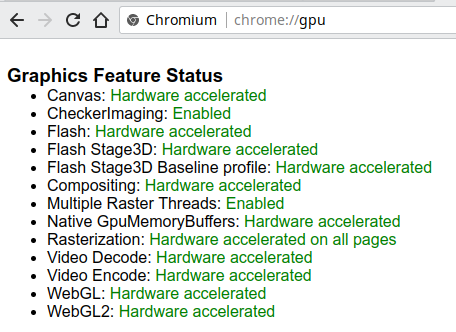
As you can see, I have a green “Hardware accelerated” everywhere, which says that this function uses hardware acceleration due to the removal of calculations on the video card, and “Enabled” says that the software algorithm is enabled.
Now go to
In the screenshot, red rectangles selected

Now we have both
Canvas - hardware acceleration of canvas rendering
In
Disables by enabling the option
CheckerImaging - the point is that the rasterization of the image is removed from the dependence on the rasterization of the rest of the area with which the image is connected, which allows the web page to be drawn without waiting for the end of the image processing, something like that. It is said that the Yulmart site starts to draw much faster.
This is the command line option
Flash, Flash Stage3D, Flash Stage3D, Flash Stage3D Baseline profile - hardware accelerated flash content decoding
Also
Compositing - hardware acceleration overlay layers
Most likely, also
Multiple Raster Threads - paralleling the rasterization process of vector elements of a web page into several threads
Enabling this option can also help if your screen blinks when browsing websites , incl. VKontakte, and video.
Native GpuMemoryBuffers - the additional buffer is excluded when copying elements between the CPU and the GPU, disabled by default, why - it is written in detail by reference.
This is the command line option
Rasterization - using a rasterization video card
Video Decode - hardware accelerated video decoding (decoded when viewing video)
Video Encode - similar to encoding
Included in
WebGL, WebGL2 - support for rendering on the video card the set of OpenGL instructions included in the WebGL standard; automatically turns off if the video card driver does not support them.
Included in
There is also the option “
Now about the Chromium and Google Chrome command line options . Theoretically, any othershare of browsers on the Chromium engine should support them, but there is no guarantee.
Close all open copies of Chromium, open the terminal and execute the following command:
In

True unixoids can copy

Depending on the DE, you may need to re-bring the shortcut to the desktop and / or panels.
UPD 05/10/2018.
Here is a complete list of flags for Chromium, which can be written directly to Exec in the Desktop file, so that you do not need to turn them all on manually:
How to measure the speed of the browser , to understand which options on your combination of hardware and video driver speed up the work, and which ones slow down?
To do this, run the online benchmark web.basemark.com with various combinations of settings and compare the number of points scoredparrots .
In
Open the

Now Google gives all video in the VP9 codec of its own design, but on quite a few old video cards only H.264 hardware decoding is possible; The h264ify extension will force the browser to report that it does not support VP8 and VP9 codecs, which will force Youtube to give out video in H.264. See youtube.com/html5
The default is:
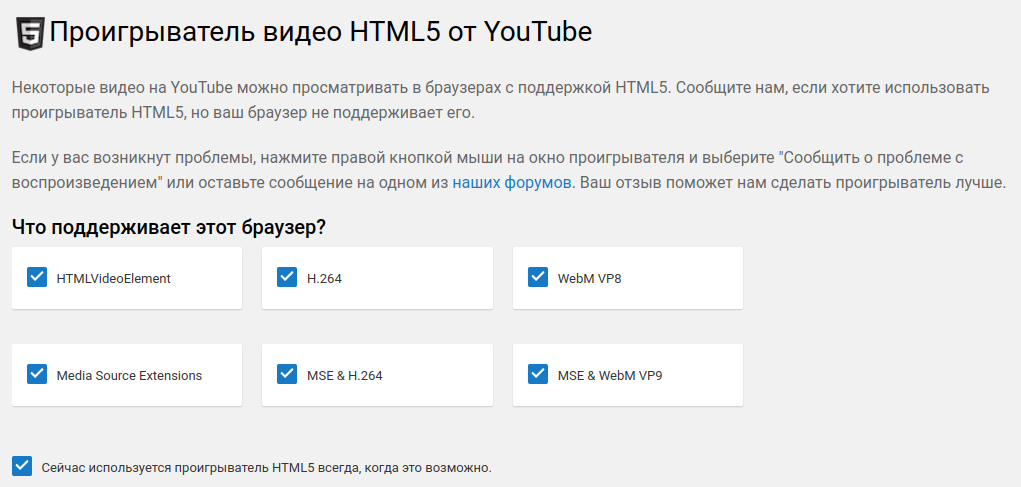
With h264ify enabled on its standard settings:

In general, there is no single normal list of which drivers support hardware decoding and on which video cards, but the Chromium 62 will have a full VA-API (API for hardware accelerated video encoding and decoding), which was before, but only on ChromeOS, for example , here , Chromium was compiled and assembled with a patch that includes it on Linux. We recommend the latest version of libva; if you have, for example, Ubuntu 16.04, then you can update the entire graphics stack from here , which is recommended for users of modern and not very Intel and AMD video cards, since these days, the open-end graphics stack is developing very quickly, and we used a lot of video card functions in the article. The developers of Ubuntu 17.10 have been working to improve the work of the VA-API out of the box. In general, I have never encountered problems with playing video on Linux, everything works fine out of the box. For Firefox, there was an addition that allowed the YouTube movie to play in the external mpv player, which on very old machines could significantly reduce the load on the processor.
- Pamagite !!! The browser stopped running !!!
- This happens very rarely, but still sometimes happens when the settings for working with a video card are twisted so that the browser does not work with it. Open the
Our profile is stored in it. You can simply rename the folder, for example, to chromium.old, and the next time you run it, chromium will create it again and start from scratch. As a backup (backup), I recommend to archive this folder (and store it as the eyeball of the eye) before all manipulations. If you broke something, and you do not want to start with a clean profile, then try opening the terminal inside
where, instead of ignore-gpu-blacklist, substitute the name of the option that you think is causing the problem. In response, the grep command will display the file path and line number where there is a chance to correct the setting. Perhaps some of the settings are stored in the SQLite database, and then you need some program to work with SQLite-DB and search them. Honestly, I have never tried to do that.

For this I leave, thank you for your attention, waiting for feedback and questions in the comments.
Go!
How to make a backup of your entire browser profile (settings, history, bookmarks, etc.) is written at the end of the article.
Go to the address
chrome://gpu (yes, just type in the address bar or copy-paste)!')
As you can see, I have a green “Hardware accelerated” everywhere, which says that this function uses hardware acceleration due to the removal of calculations on the video card, and “Enabled” says that the software algorithm is enabled.
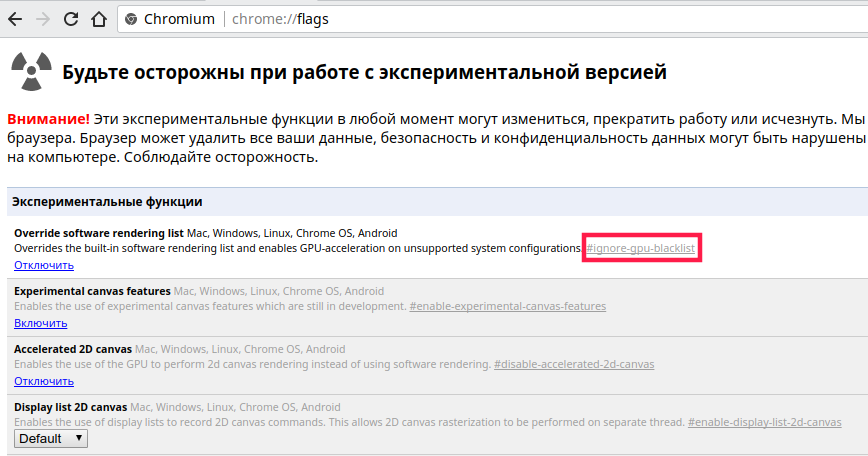
Now go to
chrome://flags . Here and we will make most of the settings.In the screenshot, red rectangles selected
#ignore-gpu-blacklist . Then all the options from this list will be called just like that. You can press Ctrl + F and find the setting by its copied name.Now we have both
chrome://gpu and chrome://flags open. We look at what parameters are in chrome://gpu , and if the parameter is not green, but yellow or red, in the chrome://flags change the corresponding setting. Beware, some settings may make the browser unstable, depending on the hardware.Canvas - hardware acceleration of canvas rendering
In
chrome://flags this is #ignore-gpu-blacklistDisables by enabling the option
#disable-accelerated-2d-canvasCheckerImaging - the point is that the rasterization of the image is removed from the dependence on the rasterization of the rest of the area with which the image is connected, which allows the web page to be drawn without waiting for the end of the image processing, something like that. It is said that the Yulmart site starts to draw much faster.
This is the command line option
--enable-features="CheckerImaging" , more details below.Flash, Flash Stage3D, Flash Stage3D, Flash Stage3D Baseline profile - hardware accelerated flash content decoding
Also
#ignore-gpu-blacklistCompositing - hardware acceleration overlay layers
Most likely, also
#ignore-gpu-blacklist , I did not see that it was not working (it was not green) out of the box.Multiple Raster Threads - paralleling the rasterization process of vector elements of a web page into several threads
#enable-gpu-rasterization -> Force-enabled for all layers / Forces for all layers.Enabling this option can also help if your screen blinks when browsing websites , incl. VKontakte, and video.
Native GpuMemoryBuffers - the additional buffer is excluded when copying elements between the CPU and the GPU, disabled by default, why - it is written in detail by reference.
This is the command line option
--enable-native-gpu-memory-buffers , more details below.Rasterization - using a rasterization video card
#enable-gpu-rasterizationVideo Decode - hardware accelerated video decoding (decoded when viewing video)
Video Encode - similar to encoding
Included in
#ignore-gpu-blacklistWebGL, WebGL2 - support for rendering on the video card the set of OpenGL instructions included in the WebGL standard; automatically turns off if the video card driver does not support them.
Included in
#ignore-gpu-blacklistThere is also the option “
#enable-zero-copy , the above is a link to an article by Intel engineers who developed this function (judging by the screenshots and the introduction to the article, the development takes place on Ubuntu, but is commercially beneficial primarily because of Chrome OS). There is a suspicion that her work will be very specific for a particular iron.#enable-tcp-fast-open - TCP Fast Open , speeds up the network stack, feature of the Linux kernel, on Windows and MacOS is not available, Windows ***** unwittingly enjoying the inferiority of their operating system, Apple employees are not far behind them ( do not take to heart, this is a joke).#expensive-background-timer-throttling - limits the maximum processor load to background tabs (i.e. not the tab you are currently working with) to a maximum of 1%. Not always appropriate. Suddenly you have a trading on the exchange in the background tab.#v8-cache-options - for example, in the “Cache V8 compiler data” mode, the V8 will be better to cache javascript and not compile them again. Yet again. on some complex web applications in theory can cause problems. V8 is a processing engine (including compilations) of javascript in Chromium, and javascript compilation creates the main load on the processor when the browser is running.#v8-cache-strategies-for-cache-storage - you can enable aggressive V8 cache, talking about the cache in the previous paragraph, the possible consequences are the same.#shared-array-buffer - experimental memory functions in javascript, a detailed explanation is here .#enable-simple-cache-backend -> Enabled / Enabled - instead of implementing your file system similarity in a block cache file, we work with files directly inside the file system, placing most of the work on the operating system and reducing the load on disk I / O including reduce the number of context switches, which should speed up the work.Now about the Chromium and Google Chrome command line options . Theoretically, any other
Close all open copies of Chromium, open the terminal and execute the following command:
$ chromium-browser - enable-native-gpu-memory-buffers - enable-features = "CheckerImaging"
In
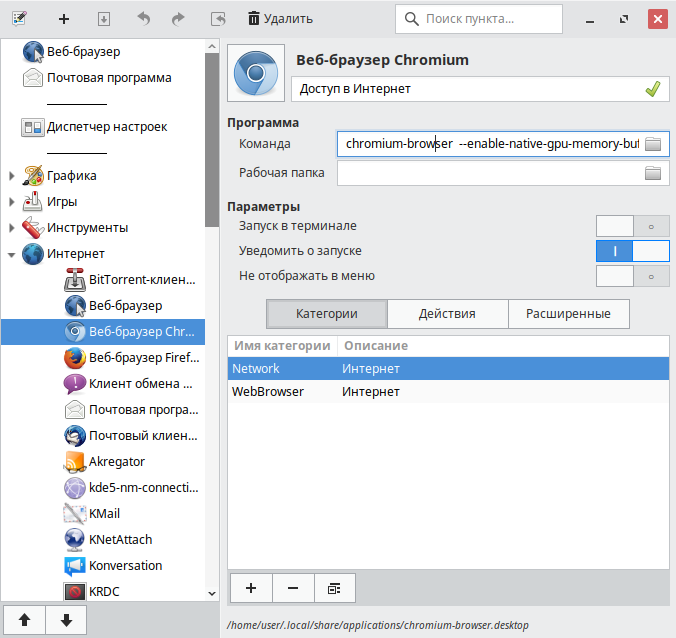
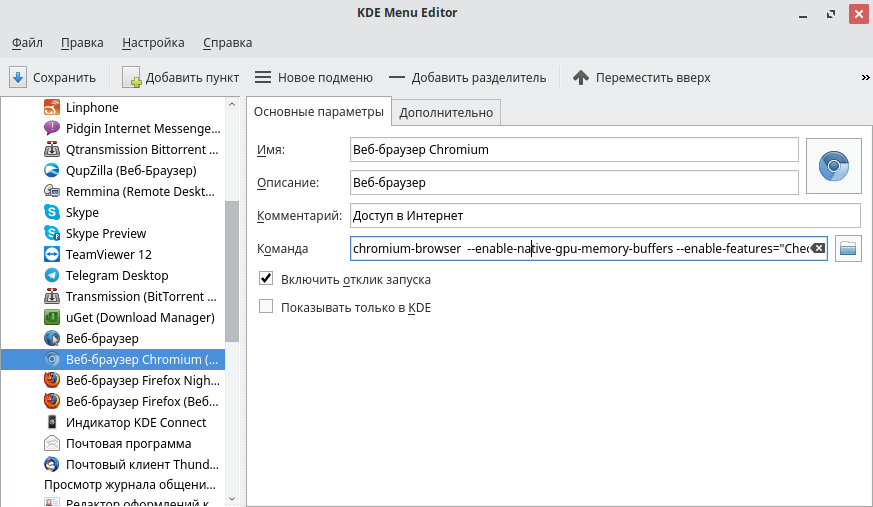
chrome://gpu can see CheckerImaging and Native GpuMemoryBuffers items turned green (or the browser didn’t start at all :)) But it’s inconvenient to launch the browser through the terminal each time, so we open the graphical editor of the desktop files and in it we add to the browser launch command we need the parameters (note that there is a %U at the end, it is replaced with a link or path to the file that needs to be opened, so you don’t need to delete it. In KDE, this is kmenuedit (call either via the terminal with the kmenuedit command, or move the cursor to button to call the application menu and click on the right to mouse button 1 time, then left 1 click on the "Menu Editor" in the list that appears), on the rest of the DE (XFCE, GNOME, Budgie, LXDE, LXQt, etc.) this is menulibre .True unixoids can copy
/usr/share/applications/chromium-browser.desktop to ~/.local/share/applications/chromium-browser.desktop and edit the Exec parameter, you ~/.local/share/applications/chromium-browser.desktop get the same:Depending on the DE, you may need to re-bring the shortcut to the desktop and / or panels.
UPD 05/10/2018.
Here is a complete list of flags for Chromium, which can be written directly to Exec in the Desktop file, so that you do not need to turn them all on manually:
chromium-browser --ignore-gpu-blacklist --enable-experimental-canvas-features --enable-accelerated-2d-canvas - canvas-msaa-sample-count = 2 - force-display-list-2d-canvas --force-gpu-rasterization --enable-fast-unload --enable-accelerated-vpx-decode = 3 --enable-tcp-fastopen --javascript-harmony --enable-checker-imaging --v8-cache- options = code --v8-cache-strategies-for-cache-storage = aggressive -enable-zero-copy --ui-enable-zero-copy --enable-native-gpu-memory-buffers --enable-webgl -image-chromium --enable-accelerated-video --enable-gpu-rasterization
How to measure the speed of the browser , to understand which options on your combination of hardware and video driver speed up the work, and which ones slow down?
To do this, run the online benchmark web.basemark.com with various combinations of settings and compare the number of points scored
In
chrome://gpu browser can mom swear that hardware acceleration of video decoding is enabled. But not every video will be decoded by hardware!Open the
chrome://media-internals/ , in parallel, start playing any video from Youtube and see what codec it is decoded.Now Google gives all video in the VP9 codec of its own design, but on quite a few old video cards only H.264 hardware decoding is possible; The h264ify extension will force the browser to report that it does not support VP8 and VP9 codecs, which will force Youtube to give out video in H.264. See youtube.com/html5
The default is:
With h264ify enabled on its standard settings:
In general, there is no single normal list of which drivers support hardware decoding and on which video cards, but the Chromium 62 will have a full VA-API (API for hardware accelerated video encoding and decoding), which was before, but only on ChromeOS, for example , here , Chromium was compiled and assembled with a patch that includes it on Linux. We recommend the latest version of libva; if you have, for example, Ubuntu 16.04, then you can update the entire graphics stack from here , which is recommended for users of modern and not very Intel and AMD video cards, since these days, the open-end graphics stack is developing very quickly, and we used a lot of video card functions in the article. The developers of Ubuntu 17.10 have been working to improve the work of the VA-API out of the box. In general, I have never encountered problems with playing video on Linux, everything works fine out of the box. For Firefox, there was an addition that allowed the YouTube movie to play in the external mpv player, which on very old machines could significantly reduce the load on the processor.
- Pamagite !!! The browser stopped running !!!
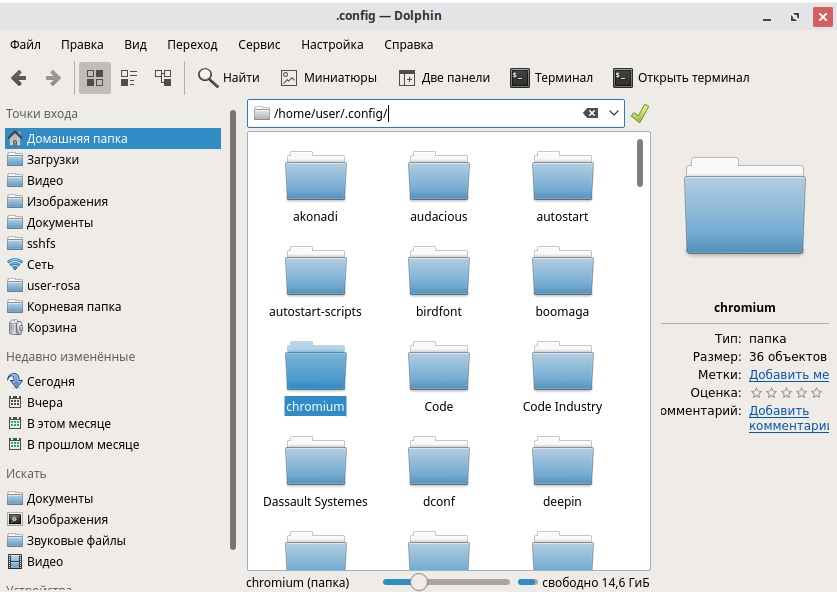
- This happens very rarely, but still sometimes happens when the settings for working with a video card are twisted so that the browser does not work with it. Open the
~/.config folder in the file manager (~ is your home folder) and find the chromium folder (for Google Chrome it is called google-chrome, Vivaldi - Vivaldi, etc.).Our profile is stored in it. You can simply rename the folder, for example, to chromium.old, and the next time you run it, chromium will create it again and start from scratch. As a backup (backup), I recommend to archive this folder (and store it as the eyeball of the eye) before all manipulations. If you broke something, and you do not want to start with a clean profile, then try opening the terminal inside
~/.config/chromium and executing the command:$ grep -inHr "ignore-gpu-blacklist"
where, instead of ignore-gpu-blacklist, substitute the name of the option that you think is causing the problem. In response, the grep command will display the file path and line number where there is a chance to correct the setting. Perhaps some of the settings are stored in the SQLite database, and then you need some program to work with SQLite-DB and search them. Honestly, I have never tried to do that.
For this I leave, thank you for your attention, waiting for feedback and questions in the comments.
Source: https://habr.com/ru/post/339238/
All Articles