How to make a web application for your own Bluetooth Low Energy device?
A few weeks ago, for the sake of entertainment, I gathered a simple robotic arm (a la manipulator) and decided to tie the control from my smartphone via Bluetooth to it. I don’t yet have experience in developing native mobile applications, I’m already familiar with Apache Cordova , but it would be interesting to use the Web Bluetooth API by spicing with Progressive Web Apps chips.
Picture to attract attention, leading under the cat
At first glance it may seem that there are enough articles on keywords: there is a Bluetooth Web specification , a detailed article on the Google Developers blog with examples , a detailed review of Bluetooth Low Energy, examples of reverse engineering of protocols for various BLE devices, and even blinking with “smart” lights and retrieving data from fitness bracelets directly from the browser - what could go wrong?
So I thought, until I tried to make my own device and communicate with it from the browser. I will not dig deep, just share my practical experience and code, I personally would be very useful for me three weeks ago :)
')
So, you assembled the device, decided to retrofit it with a Bluetooth module and access it from a browser. Hereinafter, as an example, there will be a picture of the connection of the Bluetooth module to the Arduino Uno , so let it be an Arduino-based device, although, of course, there is no fundamental difference whether you use STM , Raspberry , ESP8266 or something else. It is important that your controller will work with the Bluetooth module using the UART protocol (for more details, please visit Geektimes or Wikipedia ).
If you, like me, have already screwed the good old Bluetooth module HC-05 to your device, threw the firmware, started some of Google's examples and cannot understand why the browser does not detect your device, then I’llhurry to disappoint you: Web Bluetooth only supports “Bluetooth 4 standard”.
This is the reason for writing the article, because when you, like me, come back happy from the nearest store with the BLE module ( HM-10 , for example), you will find that it works quite differently and, most importantly, does not supports the profile of the serial port ( Serial Port Profile , SPP, more details in the Bauman library ), through which you used to carelessly drive bytes back and forth.
You may already be familiar with the concept of Bluetooth Low Energy , in particular, the Generic Attribute Profile (GATT) profile, but I will try to briefly explain what matters now for us: instead of a self-made serial protocol, your device should provide a set of application “Characteristics” that the connected device can read and / or modify.
For example, take a robotic arm: it moves in space along three coordinates (numbers X, Y, Z) and can open (0) or close (1) a claw. So, we need to configure the BLE module to read and write 4 characteristics that the connected device can learn, read and write the desired values into.
And it's great, but here's the bad luck: the usual BLE level “hobby” modules that you will meet in the “nearby store” or on Aliexpress: HM-10, JDY-08, AT-09, a certain CC41-A, which got to me, or others do not have the ability to configure any services and features.
Instead, they provide only one characteristic, which kind of emulates a serial port, and all you write to it, the module sends to your controller via TX, and it sends all that you send from the controller to the RX module to the connected device. With a limit of 20 bytes inherent in any BLE characteristic, by the way.
Thus, despite the fact that Web Bluetooth is limited to the use of a common attribute profile, we will actually have to make a serial port profile on top of it for “everyday use”.
To begin with, we will configure the BLE module, it will not take much time, if you know what and how. It so happened that I had in my hands a CC41-A module on a Texas Instruments CC2541 chip , which cost me 340 p. In the “next store”. Therefore, as an example, I will describe exactly its configuration, but the essence is common for other modules using a similar chip.
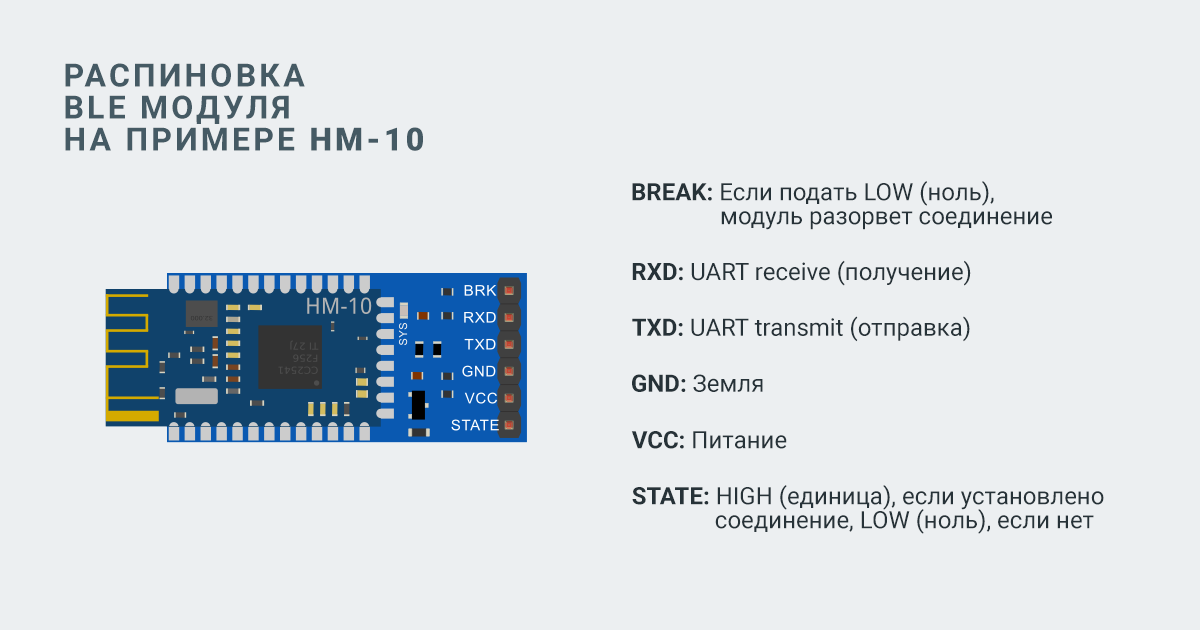
Pinout BLE module on the example of HM-10, clickable
If you have a USB-TTL converter , then it is enough to connect a BLE module to it and you will get direct access to the module from a computer via the COM port. Pay attention to the description of your module, maybe it works with 3.3V logic, so on the TX-RX and RX-TX lines you will have to use a logic level converter (voltage level shifter, taste and color on EasyElectronics ). The CC41-A module, despite the fact that “LEVEL: 3.3V” is written on it, copes remarkably well with 5V logic.

Connecting a BLE module to a USB-TTL converter, clickable
Instead of a converter, you can use your controller by implementing the simplest serial bridge with it: everything that you send to one serial port will be transferred to another, and vice versa. In the case of Arduino Uno, you will have to use the SoftwareSerial library:
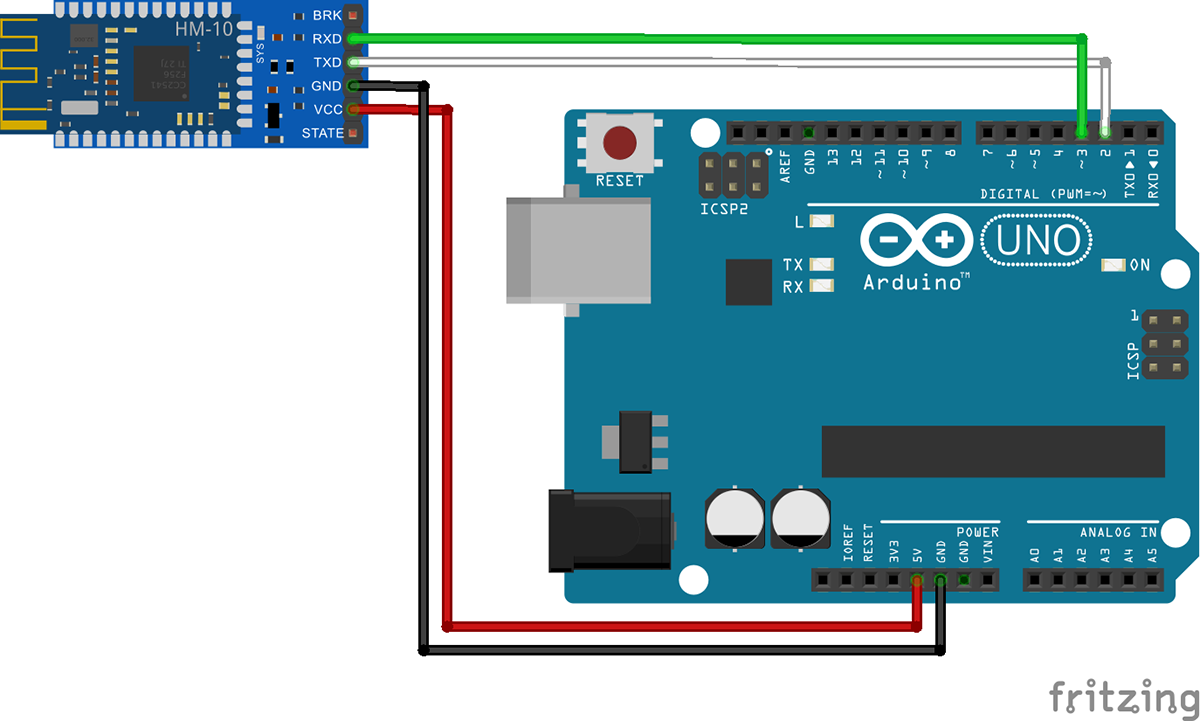
Connecting the BLE module to the Arduino Uno, clickable
Start the terminal program (you can use the Serial Monitor from the Arduino IDE, I prefer the Bray's Terminal ) and connect to the COM port on which the BLE module hangs with standard settings:
In standby mode, the module responds to AT commands ending in carriage return and line feed (

The terminal program window in the configuration process of the BLE module,
clickable
Send the “AT” command to test the connection. The module should answer "OK" - it means everything is in order. In fact, it is enough to make sure that the module operates in slave mode, waiting for the connection of the master device, the service UUID is
Now you can try to connect to the BLE module, for example, from the Characteristic Properties Sample page, specifying "0xFFE0" as a service and "0xFFE1" as a characteristic. Or even send something from the terminal to the browser on the Notifications Sample page.

Obtaining information about the characteristic and data sent from the terminal, clickable
Warm-up is over, go to the most interesting!
I propose to consider the concept of managing your device. On a regular HTML page in the browser, you create a certain UI with various controls that will implement the interaction with your device.
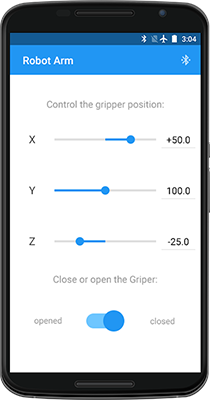
An example of a UI application for controlling a robotic arm,
clickable
If it is, for example, a robotic arm moving in three coordinates and opening and closing a claw, then it can be three numerical sliders or even a 2D surface, when pressed, which calculates X and Y values, one slider for moving along the Z axis and a button opening or closing claw. If this is a teapot, you can make the "Boil!" Button. If this is a radio-controlled machine, then you can make the buttons “forward”, “backward”, “left”, “right”, “turn on / off headlights”, “give a signal” and the like.
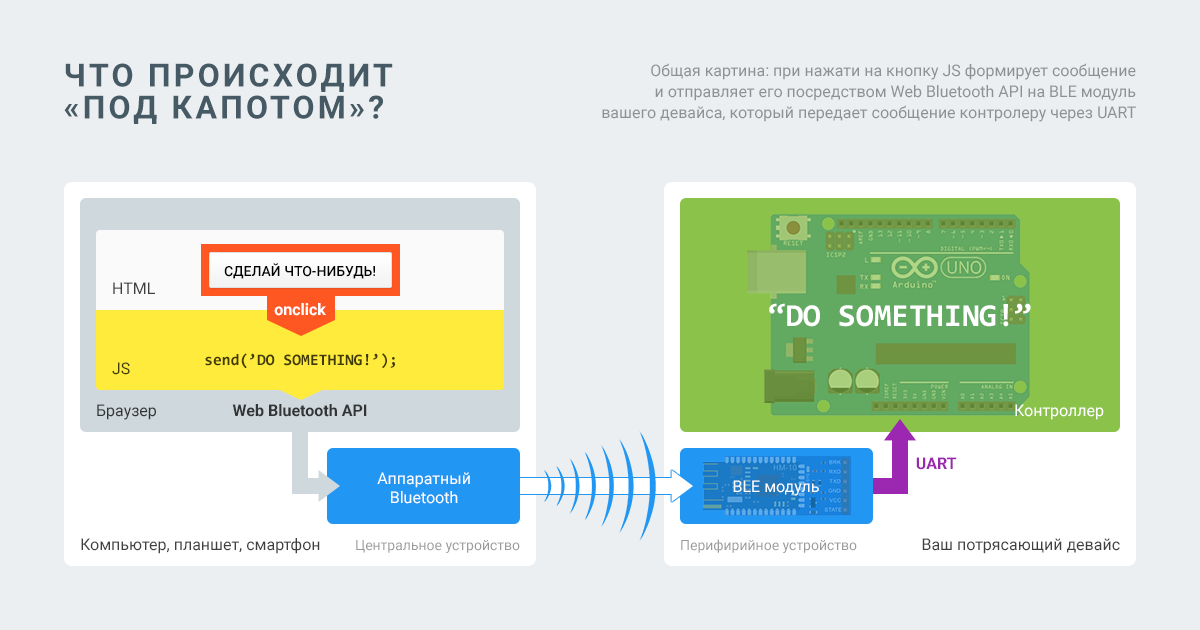
The overall picture of what is happening under the hood is clickable.
Hanging handlers for clicking or changing the states of certain UI elements in JavaScript, you create a message that you send via the Bluetooth Web API to your device. The BLE module receives the message, transmits it to the controller via the UART, the controller parses the message, takes the required actions and can send a response or error as a message back to the BLE module using the same UART, then the module will transmit it to the connected device, and you will receive a response using JS in browser.
For example, when you click on the close claw button, the
Creating an HTML page (UI) and simple work with JavaScript event handlers is not such a difficult thing, and here is enough basic knowledge of web technologies. Therefore, I propose to abstract from a specific device and create an application terminal that will connect to your device and exchange messages with it.
We also implement the logging of the process of connecting to a Bluetooth Low Energy device, reconnecting in case of loss of communication, and bypassing the BLE length limit of the characteristic to 20 bytes.
Well, at the end we will turn an ordinary HTML page into a progressive web application (about Progressive Web Apps on Google Developers , in Wikipedia - in English), which can be installed on the desktop of the smartphone and used in the absence of the Internet.
Having the opportunity to exchange messages between the HTML page and your device, a stable connection and a simple API, it will not be difficult to sharpen the application for your needs.
In addition to your favorite IDE, you will need a working “device” that we configured earlier; this will help you in real time to receive and send messages through the terminal program on your computer to test the application.
Web Bluetooth API is available by default in Chrome 56+ and Opera 43+ . The Google Developers article also mentions that you need to enable the chrome: // flags / # enable-experimental-web-platform-features flag in Linux and restart the browser.
And the last important moment: the web application should open either under HTTPS (you can use GitHub Pages ), or under http: // localhost - these are the security requirements.
The application will consist of one HTML page
Let's make a button for connecting to the device, a disconnect button, a div-container for messages and a send form consisting of a text field and the “Send” button:
In the div container we will display the connection log, incoming and outgoing messages in the following form:
In order not to guess which message is from where, let's divide them by color in styles:
As you can see, nothing special. The interface is ready :)
Further work will occur in
Get links to UI elements, hang up the handlers by clicking on the connect and disconnect buttons and send the form:
The full connection algorithm consists of several stages:
Let's make in the code:
In the
We also introduced the
In the first line of the body of the
If an error occurs at any of the stages, we output it to the terminal using the
To request a choice of a Bluetooth device, it is necessary to call the
We request all devices that provide a service with a UUID of
We perform a simple Promise chain that speaks for itself. The variable
In the
It is enough to refer to the
We are implementing the output function in the terminal to test the connection to the device right now:
Using the
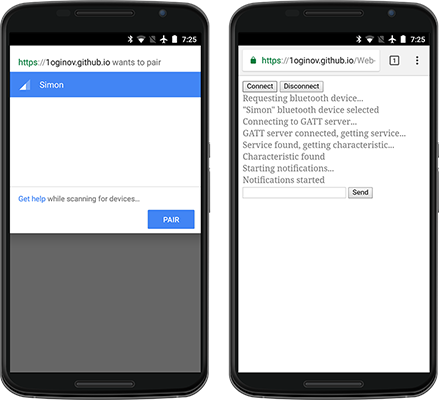
Open the page in the browser, click the "Connect" button, after which the device selection dialog will start. Connect to your device, messages about the connection process will appear in the terminal.
Device selection and connection, clickable
Then I ran into a pair of pitfalls, about which it is not written anywhere. The output of service messages helped diagnose and fix problems.
The first is that when I connected to the device from the phone to which the Mi Band is attached, also working on BLE and in close proximity, the connection was extremely rare, and if it was installed, it almost immediately fell off. This happened even in native applications. I tried to take the Mi Band to a distance - it did not help. I did not untie the bracelet, I just use another smartphone. If you have similar problems, pay attention to the devices that communicate in parallel with your smartphone.
The second stone is more likely not a stone, but a feature that usually manifests itself at the first connection: the connection may suddenly be lost for no apparent reason, and the browser does not support it, which is why we need to implement the reconnect functionality ourselves.
To track disconnection, the Bluetooth Web proposes a
Now, if you connect to the device, and then de-energize it, and the Bluetooth connection is lost, the browser one-time tries to reconnect:

Attempt to reconnect, clickable
Before shutting down, it is important not to forget to remove the assigned handler from the
You can not reset the
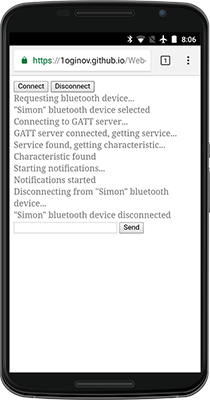
Disable, clickable
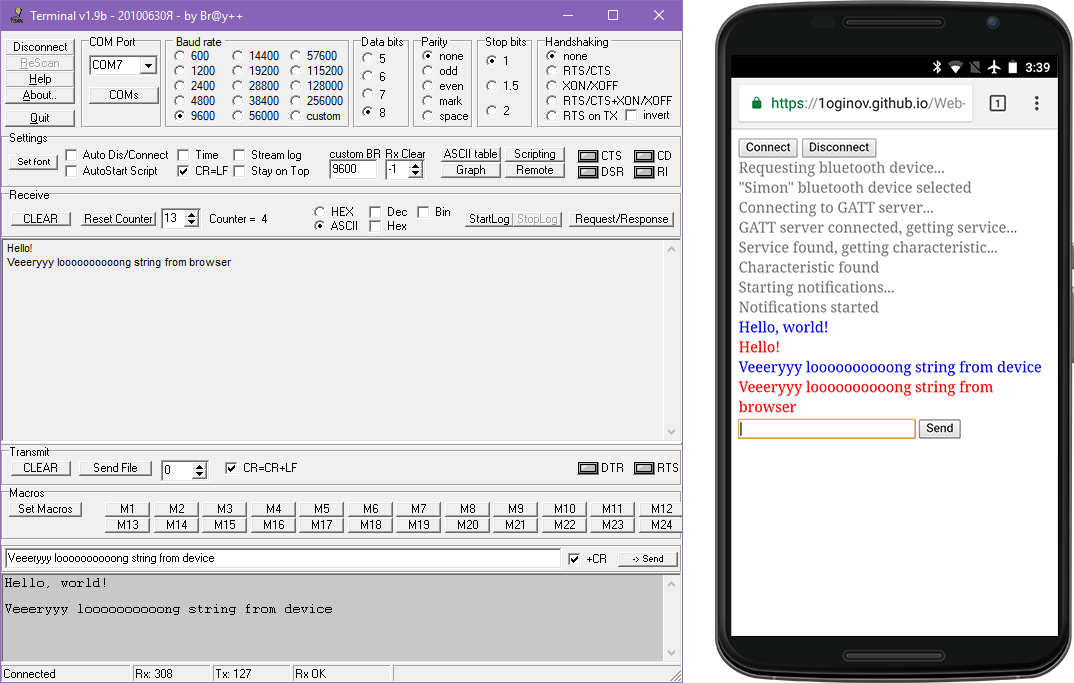
Data is received from the device asynchronously using a notification mechanism that occurs when the value of the BLE characteristic changes. We only need to subscribe to the relevant event
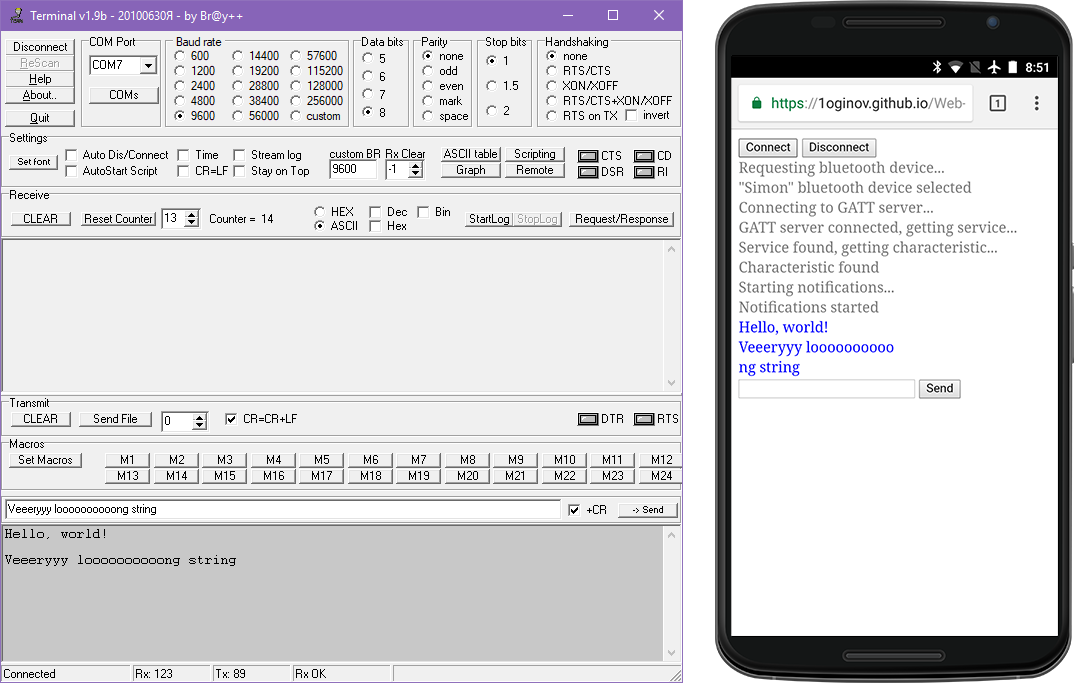
Sending data from the terminal and receiving in the browser, clickable
Testing shows that receiving messages from the device is stable, with or without the end of the string with
You may not need to support messages longer than 20 bytes, but for the sake of completeness, let's get around this limitation. The idea is simple: we will write incoming lines to the intermediate buffer before receiving the delimiter character. When receiving the delimiter character, we will call the third function, transferring data from the buffer to it, and clear the buffer for subsequent writing.
The delimiter character would be logical to feed the string (
When creating a web application specific to your device, you can change the

Sending data from the terminal and receiving in the browser after the introduction of the intermediate buffer, clickable
Sending data to the device is done by writing the value to the characteristic, and more specifically by calling the method
Just in case, we cast data to a string type using a global object
In such an implementation, a limit of 20 bytes will also apply: anything that goes beyond will simply be cut off. Therefore, if the message is longer than 20 bytes, it is worth breaking it into pieces and sending it sequentially with some delay:
, (
, (
,
Works! JS .
, - . Progressive Web Apps ( Google Developers — in English): -, . PWA - .
. realfavicongenerator.net — .
«Favicon for Android Chrome» «Assets» «Create all documented icons», Chrome , .
«Generate», «Favicon package» -.
Along with the icons, the generator kindly provided us with the preparation of the manifest -
Service Worker . Service Worker Service Worker Toolbox , sw-toolbox.js companion.js ,
Now we have not just a page, but a truly progressive web application:

Adding an application to the desktop and launching it, clickable
The final test, clickable
Bluetooth Low Energy -, .
UI , , … , , .
- : loginov-rocks.imtqy.com/Web-Bluetooth-Terminal — YouTube .
GitHub ES6 BLE , , - .
UPD: .
Picture to attract attention, leading under the cat
At first glance it may seem that there are enough articles on keywords: there is a Bluetooth Web specification , a detailed article on the Google Developers blog with examples , a detailed review of Bluetooth Low Energy, examples of reverse engineering of protocols for various BLE devices, and even blinking with “smart” lights and retrieving data from fitness bracelets directly from the browser - what could go wrong?
So I thought, until I tried to make my own device and communicate with it from the browser. I will not dig deep, just share my practical experience and code, I personally would be very useful for me three weeks ago :)
')
Table of contents
Expand Table of Contents
Problem
So, you assembled the device, decided to retrofit it with a Bluetooth module and access it from a browser. Hereinafter, as an example, there will be a picture of the connection of the Bluetooth module to the Arduino Uno , so let it be an Arduino-based device, although, of course, there is no fundamental difference whether you use STM , Raspberry , ESP8266 or something else. It is important that your controller will work with the Bluetooth module using the UART protocol (for more details, please visit Geektimes or Wikipedia ).
If you, like me, have already screwed the good old Bluetooth module HC-05 to your device, threw the firmware, started some of Google's examples and cannot understand why the browser does not detect your device, then I’ll
This is the reason for writing the article, because when you, like me, come back happy from the nearest store with the BLE module ( HM-10 , for example), you will find that it works quite differently and, most importantly, does not supports the profile of the serial port ( Serial Port Profile , SPP, more details in the Bauman library ), through which you used to carelessly drive bytes back and forth.
You may already be familiar with the concept of Bluetooth Low Energy , in particular, the Generic Attribute Profile (GATT) profile, but I will try to briefly explain what matters now for us: instead of a self-made serial protocol, your device should provide a set of application “Characteristics” that the connected device can read and / or modify.
For example, take a robotic arm: it moves in space along three coordinates (numbers X, Y, Z) and can open (0) or close (1) a claw. So, we need to configure the BLE module to read and write 4 characteristics that the connected device can learn, read and write the desired values into.
And it's great, but here's the bad luck: the usual BLE level “hobby” modules that you will meet in the “nearby store” or on Aliexpress: HM-10, JDY-08, AT-09, a certain CC41-A, which got to me, or others do not have the ability to configure any services and features.
Instead, they provide only one characteristic, which kind of emulates a serial port, and all you write to it, the module sends to your controller via TX, and it sends all that you send from the controller to the RX module to the connected device. With a limit of 20 bytes inherent in any BLE characteristic, by the way.
Thus, despite the fact that Web Bluetooth is limited to the use of a common attribute profile, we will actually have to make a serial port profile on top of it for “everyday use”.
Setting up a Bluetooth Low Energy module
To begin with, we will configure the BLE module, it will not take much time, if you know what and how. It so happened that I had in my hands a CC41-A module on a Texas Instruments CC2541 chip , which cost me 340 p. In the “next store”. Therefore, as an example, I will describe exactly its configuration, but the essence is common for other modules using a similar chip.
Pinout BLE module on the example of HM-10, clickable
If you have a USB-TTL converter , then it is enough to connect a BLE module to it and you will get direct access to the module from a computer via the COM port. Pay attention to the description of your module, maybe it works with 3.3V logic, so on the TX-RX and RX-TX lines you will have to use a logic level converter (voltage level shifter, taste and color on EasyElectronics ). The CC41-A module, despite the fact that “LEVEL: 3.3V” is written on it, copes remarkably well with 5V logic.
Connecting a BLE module to a USB-TTL converter, clickable
Instead of a converter, you can use your controller by implementing the simplest serial bridge with it: everything that you send to one serial port will be transferred to another, and vice versa. In the case of Arduino Uno, you will have to use the SoftwareSerial library:
Sketch for Arduino Uno
#include <SoftwareSerial.h> SoftwareSerial SerialBt(2, 3); void setup() { Serial.begin(9600); SerialBt.begin(9600); } void loop() { if (SerialBt.available()) { Serial.write(SerialBt.read()); } if (Serial.available()) { SerialBt.write(Serial.read()); } } Connecting the BLE module to the Arduino Uno, clickable
Start the terminal program (you can use the Serial Monitor from the Arduino IDE, I prefer the Bray's Terminal ) and connect to the COM port on which the BLE module hangs with standard settings:
- Baud rate: 9600
- Data bits: 8
- Parity: none
- Stop bits: 1
- Handshaking: none
In standby mode, the module responds to AT commands ending in carriage return and line feed (
CR+LF , “Both NL & CR” option in Serial Monitor). Some BLE modules by default work at a different speed, for example, at 38400, some modules enter configuration mode after clicking a button located on their board, some modules do not require commands to be in upper case — check the specifications of your particular module.The terminal program window in the configuration process of the BLE module,
clickable
Send the “AT” command to test the connection. The module should answer "OK" - it means everything is in order. In fact, it is enough to make sure that the module operates in slave mode, waiting for the connection of the master device, the service UUID is
0xFFE0 , and the characteristic UUID is set as 0xFFE1 — we will need this later. Some commands that work with my module:AT- performance check;AT+HELP- output all commands;AT+DEFAULT- reset to factory settings;AT+RESET- soft reboot;AT+ROLE- output mode;AT+ROLE0- setting the slave mode;AT+NAME- display the module name;AT+NAMESimon- set the module name asSimon;AT+PIN- output PIN code (password) for pairing;AT+PIN123456- set the PIN code as123456;AT+UUID- display the UUID of the service;AT+UUID0xFFE0- setting the service UUID as0xFFE0;AT+CHAR- output UUID characteristics;AT+CHAR0xFFE1- set the UUID characteristics as0xFFE1.
Now you can try to connect to the BLE module, for example, from the Characteristic Properties Sample page, specifying "0xFFE0" as a service and "0xFFE1" as a characteristic. Or even send something from the terminal to the browser on the Notifications Sample page.
Obtaining information about the characteristic and data sent from the terminal, clickable
Creating a web application
Warm-up is over, go to the most interesting!
Concept
I propose to consider the concept of managing your device. On a regular HTML page in the browser, you create a certain UI with various controls that will implement the interaction with your device.
An example of a UI application for controlling a robotic arm,
clickable
If it is, for example, a robotic arm moving in three coordinates and opening and closing a claw, then it can be three numerical sliders or even a 2D surface, when pressed, which calculates X and Y values, one slider for moving along the Z axis and a button opening or closing claw. If this is a teapot, you can make the "Boil!" Button. If this is a radio-controlled machine, then you can make the buttons “forward”, “backward”, “left”, “right”, “turn on / off headlights”, “give a signal” and the like.
The overall picture of what is happening under the hood is clickable.
Hanging handlers for clicking or changing the states of certain UI elements in JavaScript, you create a message that you send via the Bluetooth Web API to your device. The BLE module receives the message, transmits it to the controller via the UART, the controller parses the message, takes the required actions and can send a response or error as a message back to the BLE module using the same UART, then the module will transmit it to the connected device, and you will receive a response using JS in browser.
For example, when you click on the close claw button, the
onclick button handler is triggered, which sends the message GRIPPER=CLOSE . The controller receives the message, understands what is required of it, closes the claw and sends back the message GRIPPER=CLOSED . Processing this message, we in JS remember the state of the claw and change the text on the button to “Open”.Task
Creating an HTML page (UI) and simple work with JavaScript event handlers is not such a difficult thing, and here is enough basic knowledge of web technologies. Therefore, I propose to abstract from a specific device and create an application terminal that will connect to your device and exchange messages with it.
We also implement the logging of the process of connecting to a Bluetooth Low Energy device, reconnecting in case of loss of communication, and bypassing the BLE length limit of the characteristic to 20 bytes.
Well, at the end we will turn an ordinary HTML page into a progressive web application (about Progressive Web Apps on Google Developers , in Wikipedia - in English), which can be installed on the desktop of the smartphone and used in the absence of the Internet.
Having the opportunity to exchange messages between the HTML page and your device, a stable connection and a simple API, it will not be difficult to sharpen the application for your needs.
Training
In addition to your favorite IDE, you will need a working “device” that we configured earlier; this will help you in real time to receive and send messages through the terminal program on your computer to test the application.
Web Bluetooth API is available by default in Chrome 56+ and Opera 43+ . The Google Developers article also mentions that you need to enable the chrome: // flags / # enable-experimental-web-platform-features flag in Linux and restart the browser.
And the last important moment: the web application should open either under HTTPS (you can use GitHub Pages ), or under http: // localhost - these are the security requirements.
Ui
The application will consist of one HTML page
index.html , one stylesheet file styles.css and one main.js file in which all the magic will occur.Let's make a button for connecting to the device, a disconnect button, a div-container for messages and a send form consisting of a text field and the “Send” button:
index.html
<!DOCTYPE html> <html> <head> <meta charset="utf-8"> <meta name="viewport" content="width=device-width, initial-scale=1"> <link href="styles.css" rel="stylesheet"> </head> <body> <button id="connect" type="button">Connect</button> <button id="disconnect" type="button">Disconnect</button> <div id="terminal"></div> <form id="send-form"> <input id="input" type="text"> <button type="submit">Send</button> </form> <script src="main.js"></script> </body> </html> In the div container we will display the connection log, incoming and outgoing messages in the following form:
<div id="terminal"> <div> ...</div> <div class="out"> </div> <div class="in"> </div> </div> In order not to guess which message is from where, let's divide them by color in styles:
styles.css
#terminal div { color: gray; } #terminal div.out { color: red; } #terminal div.in { color: blue; } As you can see, nothing special. The interface is ready :)
Event handlers
Further work will occur in
main.jsGet links to UI elements, hang up the handlers by clicking on the connect and disconnect buttons and send the form:
// UI let connectButton = document.getElementById('connect'); let disconnectButton = document.getElementById('disconnect'); let terminalContainer = document.getElementById('terminal'); let sendForm = document.getElementById('send-form'); let inputField = document.getElementById('input'); // Connect connectButton.addEventListener('click', function() { connect(); }); // Disconnect disconnectButton.addEventListener('click', function() { disconnect(); }); // sendForm.addEventListener('submit', function(event) { event.preventDefault(); // send(inputField.value); // inputField.value = ''; // inputField.focus(); // }); // Bluetooth function connect() { // } // function disconnect() { // } // function send(data) { // } Connect to device
The full connection algorithm consists of several stages:
- Bluetooth device request: the browser launches a search and select the nearest device dialog, the user makes a selection, the application code receives the object.
- Connect to device from application code:
- connection to the server of the general attribute profile (GATT Server),
- getting the right service
- obtaining the desired characteristics.
- The inclusion of notifications about changes in characteristics - it is necessary to receive messages from your device.
Let's make in the code:
// let deviceCache = null; // Bluetooth function connect() { return (deviceCache ? Promise.resolve(deviceCache) : requestBluetoothDevice()). then(device => connectDeviceAndCacheCharacteristic(device)). then(characteristic => startNotifications(characteristic)). catch(error => log(error)); } // Bluetooth function requestBluetoothDevice() { // } // , function connectDeviceAndCacheCharacteristic(device) { // } // function startNotifications(characteristic) { // } // function log(data, type = '') { // } In the
connect() function, we implemented a Promise chain (a chain of functions returning Promise objects) corresponding to the connection stages.We also introduced the
deviceCache variable, into which we will later write down the object of the device selected by the user in order to know what to reconnect in case of disconnection.In the first line of the body of the
connect() function, the ternary operator immediately creates a completed Promise with the deviceCache object, if it is non-zero, or calls the function of requesting a Bluetooth device to select otherwise. Thus, if the user has already connected to the device, then when you next click on the “Connect” button, the device selection dialog will not appear.If an error occurs at any of the stages, we output it to the terminal using the
log() function, which we also implement later.Bluetooth device request
To request a choice of a Bluetooth device, it is necessary to call the
navigator.bluetooth.requestDevice() function with the configuration object as a required argument that describes which Bluetooth devices we are interested in. You can use the filter by service, by name, you can accept all devices, but you still need to specify the used service, otherwise the browser will not provide access to it. // Bluetooth function requestBluetoothDevice() { log('Requesting bluetooth device...'); return navigator.bluetooth.requestDevice({ filters: [{services: [0xFFE0]}], }). then(device => { log('"' + device.name + '" bluetooth device selected'); deviceCache = device; return deviceCache; }); } We request all devices that provide a service with a UUID of
0xFFE0 , which the BLE module was configured to use. After the user selects a device, the Promise runs with a device object, which we write to the above cache and return later.Connecting to the device, receiving service objects and characteristics
// let characteristicCache = null; // , function connectDeviceAndCacheCharacteristic(device) { if (device.gatt.connected && characteristicCache) { return Promise.resolve(characteristicCache); } log('Connecting to GATT server...'); return device.gatt.connect(). then(server => { log('GATT server connected, getting service...'); return server.getPrimaryService(0xFFE0); }). then(service => { log('Service found, getting characteristic...'); return service.getCharacteristic(0xFFE1); }). then(characteristic => { log('Characteristic found'); characteristicCache = characteristic; return characteristicCache; }); } We perform a simple Promise chain that speaks for itself. The variable
characteristicCache - by analogy with deviceCache - saves the resulting feature object, it will be needed to write data to it, that is, to send a message from the browser to the device.In the
getPrimaryService() and getCharacteristic() functions, the UUIDs are used as arguments, with which the BLE module is configured.Enable feature change notifications
// function startNotifications(characteristic) { log('Starting notifications...'); return characteristic.startNotifications(). then(() => { log('Notifications started'); }); } It is enough to refer to the
startNotifications() method of the characteristic object, and then hang the handler on the characteristic change event, but more on that later.Output to terminal
We are implementing the output function in the terminal to test the connection to the device right now:
// function log(data, type = '') { terminalContainer.insertAdjacentHTML('beforeend', '<div' + (type ? ' class="' + type + '"' : '') + '>' + data + '</div>'); } Using the
insertAdjacentHTML() method, we insert a div with the class specified in the type argument at the end of the terminal's div container — very simple.Testing
Open the page in the browser, click the "Connect" button, after which the device selection dialog will start. Connect to your device, messages about the connection process will appear in the terminal.
Device selection and connection, clickable
Then I ran into a pair of pitfalls, about which it is not written anywhere. The output of service messages helped diagnose and fix problems.
The first is that when I connected to the device from the phone to which the Mi Band is attached, also working on BLE and in close proximity, the connection was extremely rare, and if it was installed, it almost immediately fell off. This happened even in native applications. I tried to take the Mi Band to a distance - it did not help. I did not untie the bracelet, I just use another smartphone. If you have similar problems, pay attention to the devices that communicate in parallel with your smartphone.
The second stone is more likely not a stone, but a feature that usually manifests itself at the first connection: the connection may suddenly be lost for no apparent reason, and the browser does not support it, which is why we need to implement the reconnect functionality ourselves.
Auto reconnect
To track disconnection, the Bluetooth Web proposes a
gattserverdisconnected event whose handler should be hung onto the device object. The most logical place for this is the device selection function: // Bluetooth function requestBluetoothDevice() { log('Requesting bluetooth device...'); return navigator.bluetooth.requestDevice({ filters: [{services: [0xFFE0]}], }). then(device => { log('"' + device.name + '" bluetooth device selected'); deviceCache = device; // deviceCache.addEventListener('gattserverdisconnected', handleDisconnection); return deviceCache; }); } // function handleDisconnection(event) { let device = event.target; log('"' + device.name + '" bluetooth device disconnected, trying to reconnect...'); connectDeviceAndCacheCharacteristic(device). then(characteristic => startNotifications(characteristic)). catch(error => log(error)); } Now, if you connect to the device, and then de-energize it, and the Bluetooth connection is lost, the browser one-time tries to reconnect:
Attempt to reconnect, clickable
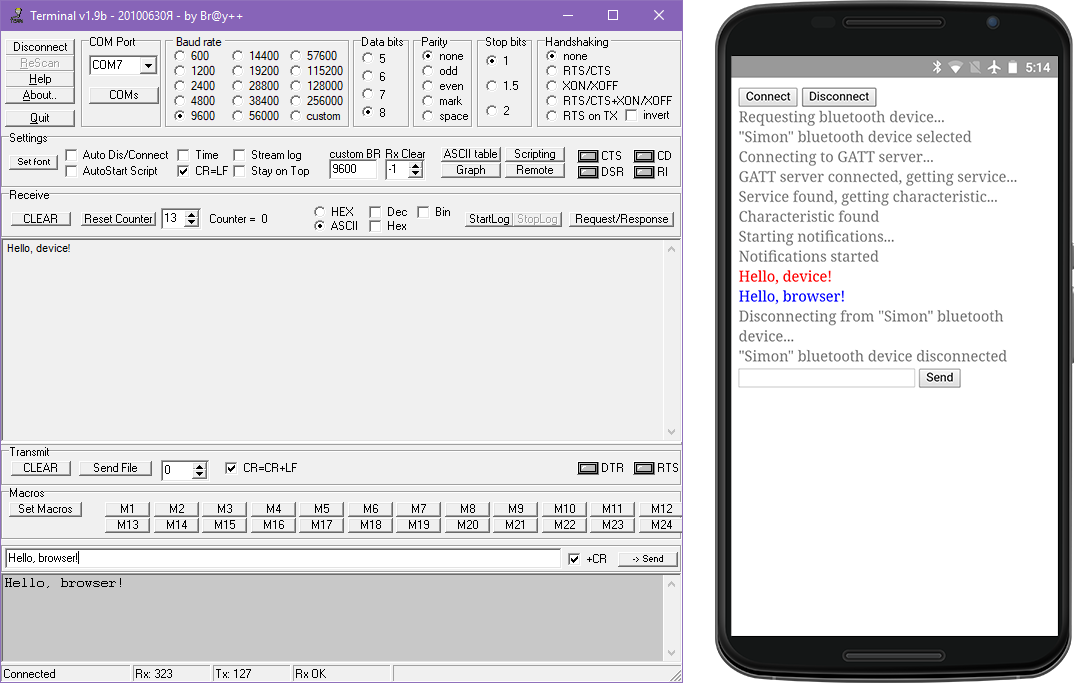
Disconnect from device
Before shutting down, it is important not to forget to remove the assigned handler from the
gattserverdisconnected event, otherwise the browser will simply reconnect: // function disconnect() { if (deviceCache) { log('Disconnecting from "' + deviceCache.name + '" bluetooth device...'); deviceCache.removeEventListener('gattserverdisconnected', handleDisconnection); if (deviceCache.gatt.connected) { deviceCache.gatt.disconnect(); log('"' + deviceCache.name + '" bluetooth device disconnected'); } else { log('"' + deviceCache.name + '" bluetooth device is already disconnected'); } } characteristicCache = null; deviceCache = null; } You can not reset the
deviceCache , then the next time you click the "Connect" button, the device selection dialog will not appear, connecting to the previous device instead.Disable, clickable
Data acquisition
Data is received from the device asynchronously using a notification mechanism that occurs when the value of the BLE characteristic changes. We only need to subscribe to the relevant event
characteristicvaluechanged . This should be done after the inclusion of notifications. It will also correctly remove the handler from the characteristic when the device is disconnected: // function startNotifications(characteristic) { log('Starting notifications...'); return characteristic.startNotifications(). then(() => { log('Notifications started'); // characteristic.addEventListener('characteristicvaluechanged', handleCharacteristicValueChanged); }); } // function disconnect() { if (deviceCache) { log('Disconnecting from "' + deviceCache.name + '" bluetooth device...'); deviceCache.removeEventListener('gattserverdisconnected', handleDisconnection); if (deviceCache.gatt.connected) { deviceCache.gatt.disconnect(); log('"' + deviceCache.name + '" bluetooth device disconnected'); } else { log('"' + deviceCache.name + '" bluetooth device is already disconnected'); } } // if (characteristicCache) { characteristicCache.removeEventListener('characteristicvaluechanged', handleCharacteristicValueChanged); characteristicCache = null; } deviceCache = null; } // function handleCharacteristicValueChanged(event) { let value = new TextDecoder().decode(event.target.value); log(value, 'in'); } event.target.value is a DataView object containing an ArrayBuffer containing the message from your device. Using TextDecoder ( MDN, in English only ), we distill the byte array into text.Sending data from the terminal and receiving in the browser, clickable
Testing shows that receiving messages from the device is stable, with or without the end of the string with
CR , LF symbols. Long messages reach completely, but are broken multiple of 20 bytes.Introduction of intermediate buffer
You may not need to support messages longer than 20 bytes, but for the sake of completeness, let's get around this limitation. The idea is simple: we will write incoming lines to the intermediate buffer before receiving the delimiter character. When receiving the delimiter character, we will call the third function, transferring data from the buffer to it, and clear the buffer for subsequent writing.
The delimiter character would be logical to feed the string (
LF , \n ). It may also be useful to remove the whitespace from the beginning and end of the message: // let readBuffer = ''; // function handleCharacteristicValueChanged(event) { let value = new TextDecoder().decode(event.target.value); for (let c of value) { if (c === '\n') { let data = readBuffer.trim(); readBuffer = ''; if (data) { receive(data); } } else { readBuffer += c; } } } // function receive(data) { log(data, 'in'); } When creating a web application specific to your device, you can change the
receive() function to your needs, being sure that you are working with a solid message from the device.Sending data from the terminal and receiving in the browser after the introduction of the intermediate buffer, clickable
Sending data
Sending data to the device is done by writing the value to the characteristic, and more specifically by calling the method
writeValue()of the characteristic object with ArrayBufferas an argument. To convert the string to the ArrayBuffereasiest to use TextEncoder( MDN, in English only ): // function send(data) { data = String(data); if (!data || !characteristicCache) { return; } writeToCharacteristic(characteristicCache, data); log(data, 'out'); } // function writeToCharacteristic(characteristic, data) { characteristic.writeValue(new TextEncoder().encode(data)); } Just in case, we cast data to a string type using a global object
String.In such an implementation, a limit of 20 bytes will also apply: anything that goes beyond will simply be cut off. Therefore, if the message is longer than 20 bytes, it is worth breaking it into pieces and sending it sequentially with some delay:
// function send(data) { data = String(data); if (!data || !characteristicCache) { return; } data += '\n'; if (data.length > 20) { let chunks = data.match(/(.|[\r\n]){1,20}/g); writeToCharacteristic(characteristicCache, chunks[0]); for (let i = 1; i < chunks.length; i++) { setTimeout(() => { writeToCharacteristic(characteristicCache, chunks[i]); }, i * 100); } } else { writeToCharacteristic(characteristicCache, data); } log(data, 'out'); } , (
\n )., (
CR , \r ) ( LF , \n ), , , 100 .,
Works! JS .
Progressive Web App
, - . Progressive Web Apps ( Google Developers — in English): -, . PWA - .
. realfavicongenerator.net — .
«Favicon for Android Chrome» «Assets» «Create all documented icons», Chrome , .
«Generate», «Favicon package» -.
<head> .Along with the icons, the generator kindly provided us with the preparation of the manifest -
manifest.json: { "name": "", "icons": [ ... ], "theme_color": "#ffffff", "background_color": "#ffffff", "display": "standalone" } name short_name , , 12 .icons , display — . standalone , - UI , — , .theme_color , background_color Splash screen . theme_color , <meta name="theme-color" content="#ffffff"> .start_url scope ./ , -, , -, - , , -.Service Worker
Service Worker . Service Worker Service Worker Toolbox , sw-toolbox.js companion.js ,
index.html <body> : <script src="companion.js" data-service-worker="sw.js"></script> sw.js index.html , : importScripts('sw-toolbox.js'); toolbox.precache([ 'companion.js', 'index.html', 'main.js', 'styles.css', ]); Now we have not just a page, but a truly progressive web application:
Adding an application to the desktop and launching it, clickable
The final test, clickable
Epilogue
Bluetooth Low Energy -, .
UI , , … , , .
index.html , styles.css , main.js sw.js .- : loginov-rocks.imtqy.com/Web-Bluetooth-Terminal — YouTube .
GitHub ES6 BLE , , - .
UPD: .
Source: https://habr.com/ru/post/339146/
All Articles