We write the generator of ip-addresses in Python with whistles, dudels and Tkinter GUI
Those who have chosen Python as one of the first general-purpose programming languages studied are often eager to write an impressive amount of small programs, like UPD clients, simple text editors, to hone skills in practice.
In this article I will describe the process of creating a simple ip-address generator. The article is aimed at beginners. The development environment is not so important - it is possible to write in IDLE, there shouldn't be any difficulties, however, I will use Eclipse with the PyDev plugin.
The representation of the computer's IPv4 address is a 32-bit number divided into four blocks for convenience of writing. We will generate such blocks. It should be noted that this form of output is convenient, since often lists of ip-addresses, proxy servers, etc. are loaded into third-party programs with a text file.
')
Definitely, the first parameter that the user must specify will be the number of addresses that need to be generated.
Since we agreed that the user determines the amount, we create the
We use the for loop, since it runs much faster while'a. Do not forget to import the random module (or rather
Well, perhaps, there is everything that we need, we will add a functional a little later, and now we will start creating a graphical interface. We will use the library Tkinter.
Detailed documentation about it in Russian can be found here .
We need to create an input field (
We use the grid wrapper, which places the elements on the principle of table layout. After compilation, the window should look like this:

Now we need to write a function that will read the number entered in the input field, when we click on the "Generate" button, and pass it to the generator. In this case, it is worthwhile to make the function display an error message in the log field if the user entered a non-number. For this, we will use the try-except construction:
Here I created separately the function
Then the description of the widget will look like this:
When adding the
When checking the correctness of the program, it became inconvenient to delete the text file manually, so why not add the “Delete file” button? We create the function
I didn’t bother with the file name, but if you want, you can implement a custom file name on the output (and delete the corresponding file). Now we write a button that will call
With the grid packer, we placed this button in the first row, the fourth column of the
When generating an ip list with 500 or more addresses, it becomes noticeable that the program takes some time to process the for loop. So that the user does not think that our program is frozen, we implement a simple progress bar.
Just want to say: Tkinter is not suitable for this purpose. We will not be able to implement the output of the progress message to the Tkinter window, since the compiler is not able to process the GUI windows during the for loop, even if we output the message not every move, but let's say after 10, even after 100 moves . Anyway, the compiler is able to output the message only for the last cycle run (in other words, Tkinter will output only 99% in this way). That is, to create a kosher progress bar in the same window, unfortunately, will not work with ordinary means. So, it is more logical to open the logs terminal (a regular console) against the background of the main interface of the program, and output the generation progress to it. Note: the console will open in its usual form only when you start the program from the explorer; when run from the compiler, messages are displayed in the compiler console.
We are finalizing the
Compile, generate a list of 500, for example, addresses. The following is displayed in the console:
Great. And how to remove excess repetitive interest? Create a small bike and save the previous value:
Done! With the progress bar, we will consider, sorted out.
And what if I want an ip-list with port 8080, for example? Add this function. Let's start with the GUI: add two
Now our GUI looks like:
Add the if-else construct to the handler
Stop, the generator function takes only one argument. Then we return to it and declare it as follows:
By adding the initialization of the
Ultimately, the source code of the program:
That's all. Of course, you can add many more interesting functions, for example, sorting, generation within a certain range of addresses, or you can do a free parser at some free proxy.ru, however, for an initial Python practice, such a simple generator will do.
In this article I will describe the process of creating a simple ip-address generator. The article is aimed at beginners. The development environment is not so important - it is possible to write in IDLE, there shouldn't be any difficulties, however, I will use Eclipse with the PyDev plugin.
What exactly will the program do?
The representation of the computer's IPv4 address is a 32-bit number divided into four blocks for convenience of writing. We will generate such blocks. It should be noted that this form of output is convenient, since often lists of ip-addresses, proxy servers, etc. are loaded into third-party programs with a text file.
')
Definitely, the first parameter that the user must specify will be the number of addresses that need to be generated.
Writing the generator () function
Since we agreed that the user determines the amount, we create the
generator() function, which is passed the amount argument: def generator(amount): for n in range(amount): # , 4 a = randint(0,255) b = randint(0,255) c = randint(0,255) d = randint(0,255) # f = open('ip-addresses.txt', 'a', encoding='utf-8') f.write(str(a)+'.'+str(b)+'.'+str(c)+'.'+str(d)+'\n') f.close() # ? print('Success!') We use the for loop, since it runs much faster while'a. Do not forget to import the random module (or rather
from random import randint , so as not to clutter up the namespace).GUI on Tkinter
Well, perhaps, there is everything that we need, we will add a functional a little later, and now we will start creating a graphical interface. We will use the library Tkinter.
Detailed documentation about it in Russian can be found here .
We need to create an input field (
Entry widget), a button ( Button widget), preferably a log output field, and add the name of the program so that it is clear at first glance what it is for: from tkinter import * # root = Tk() label1=Label(root, text=" ip-") label1.grid() # Frame, frame = Frame(root) frame.grid() label2=Label(frame, text=':') label2.grid(row=1,column=1) # entry_amount = Entry(frame, width=4, borderwidth=5) entry_amount.grid(row=1,column=2) # button1 = Button(frame, text="") button1.grid(row=1, column=3, padx=(10,0)) # output = Text(frame, bg="lightblue", font="Arial 9", width=45, height=3) output.grid(row=2, columnspan=8) root.mainloop() We use the grid wrapper, which places the elements on the principle of table layout. After compilation, the window should look like this:
We process the entered parameters
Now we need to write a function that will read the number entered in the input field, when we click on the "Generate" button, and pass it to the generator. In this case, it is worthwhile to make the function display an error message in the log field if the user entered a non-number. For this, we will use the try-except construction:
def handler(): try: # .get() amount = int(entry_amount.get()) generator(amount) except ValueError: notif(" ") # , def notif(value): output.delete("0.0","end") # output.insert("0.0",value) Here I created separately the function
def notif(value) , to which the argument-record is passed, in order to simplify the code when writing the functional, when it is necessary to display other errors. Also add to the description of the widget button1 method with the value of our function handler command=handler (without parentheses at the end).Then the description of the widget will look like this:
button1 = Button(frame, text="", command=handler) When adding the
command method, it may be necessary to set the from distutils import command into imports. That's all, in fact, the program performs its main task.We add all sorts of utility
"Delete file" button
When checking the correctness of the program, it became inconvenient to delete the text file manually, so why not add the “Delete file” button? We create the function
def delete() : def delete(): try: remove('ip-addresses.txt') inserter(" ip-addresses.txt ") except: inserter(" ") I didn’t bother with the file name, but if you want, you can implement a custom file name on the output (and delete the corresponding file). Now we write a button that will call
delete : button2 = Button(frame, text=" ", command=delete) button2.grid(row=1, column=4, padx=(10,0)) With the grid packer, we placed this button in the first row, the fourth column of the
frame field. Do not forget to add the line from os import remove to imports. Everything, with the "Delete" button sorted out.Progress Bar
When generating an ip list with 500 or more addresses, it becomes noticeable that the program takes some time to process the for loop. So that the user does not think that our program is frozen, we implement a simple progress bar.
Just want to say: Tkinter is not suitable for this purpose. We will not be able to implement the output of the progress message to the Tkinter window, since the compiler is not able to process the GUI windows during the for loop, even if we output the message not every move, but let's say after 10, even after 100 moves . Anyway, the compiler is able to output the message only for the last cycle run (in other words, Tkinter will output only 99% in this way). That is, to create a kosher progress bar in the same window, unfortunately, will not work with ordinary means. So, it is more logical to open the logs terminal (a regular console) against the background of the main interface of the program, and output the generation progress to it. Note: the console will open in its usual form only when you start the program from the explorer; when run from the compiler, messages are displayed in the compiler console.
We are finalizing the
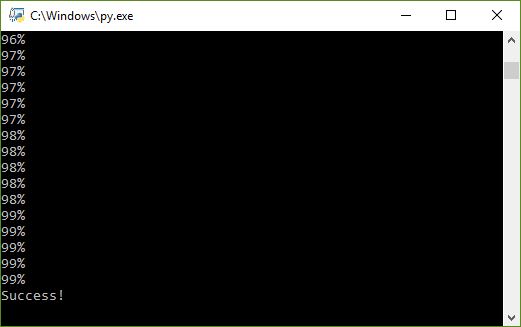
generator function: def generator(amount, port=''): for n in range(amount): a = randint(0,255) b = randint(0,255) c = randint(0,255) d = randint(0,255) f = open('ip-addresses.txt', 'a', encoding='utf-8') f.write(str(a)+'.'+str(b)+'.'+str(c)+'.'+str(d)+port+'\n') f.close() # prc , n amount , amount — 100% prc = int(n//(amount/100)) print(str(prc)+'%') print('Success!') # GUI txt- notif("IP- \nip-addresses.txt") Compile, generate a list of 500, for example, addresses. The following is displayed in the console:
Great. And how to remove excess repetitive interest? Create a small bike and save the previous value:
def generator(amount, port=''): prc_bfr=0 # for n in range(amount): a = randint(0,255) b = randint(0,255) c = randint(0,255) d = randint(0,255) f = open('ip-addresses.txt', 'a', encoding='utf-8') f.write(str(a)+'.'+str(b)+'.'+str(c)+'.'+str(d)+port+'\n') f.close() prc = int(n//(amount/100)) #, prc if(prc!=prc_bfr): print(str(prc)+'%') prc_bfr = prc print('Success!') notif("IP- \nip-addresses.txt") Done! With the progress bar, we will consider, sorted out.
Add ports to ip-addresses
And what if I want an ip-list with port 8080, for example? Add this function. Let's start with the GUI: add two
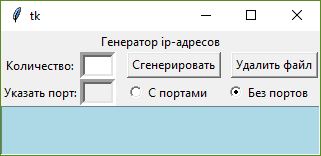
Radiobutton widgets that will define two modes: generation with ports and no ports. You should also add the Entry widget to enter the port: label2 = Label(frame, text=' :') label2.grid(row=2,column=1) entry_port = Entry(frame, width=4, borderwidth=5, state=DISABLED) entry_port.grid(row=2,column=2) # var1 radiobutton' var1 = IntVar() check_port1 = Radiobutton(frame, text=' ', variable=var1, value=1, command=lock) check_port1.grid(row=2,column=3) check_port2 = Radiobutton(frame, text=" ", variable=var1, value=0, command=lock) check_port2.grid(row=2,column=4) entry_port by default. Each check_port performs a lock() function when activated, which hides / activates the ports input field accordingly. We describe the lock function: def lock(): # check_port2: if var1.get() == 1: entry_port.configure(state=NORMAL) # check_port1: elif var1.get() == 0: entry_port.configure(state=DISABLED) Now our GUI looks like:
Add the if-else construct to the handler
handler function, which is executed depending on the generation mode (on the value of var1 ): def handler(): try: amount = int(entry_amount.get()) # if var1.get() == 1: port = ':'+str(int(entry_port.get())) # int , str, generator(amount, port) else: # — generator(amount) except ValueError: notif(" /") Stop, the generator function takes only one argument. Then we return to it and declare it as follows:
def generator(amount, port='') By adding the initialization of the
port argument directly in the function declaration, we made it optional, and it will change its value when calling the function in the generation mode with ports. We also add it when writing to a text file: f.write(str(a)+'.'+str(b)+'.'+str(c)+'.'+str(d)+port+'\n') Ultimately, the source code of the program:
import tkinter import random from tkinter import * from random import randint from os import remove from distutils import command print('Logs terminal:') def generator(amount, port=''): prc_bfr=0 for n in range(amount): a = randint(0,255) b = randint(0,255) c = randint(0,255) d = randint(0,255) f = open('ip-addresses.txt', 'a', encoding='utf-8') f.write(str(a)+'.'+str(b)+'.'+str(c)+'.'+str(d)+port+'\n') f.close() prc = int(n//(amount/100)) if(prc!=prc_bfr): print(str(prc)+'%') prc_bfr = prc print('Success!') notif("IP- \nip-addresses.txt") def notif(value): output.delete("0.0","end") output.insert("0.0",value) def handler(): try: amount = int(entry_amount.get()) if var1.get() == 1: port = ':'+str(int(entry_port.get())) generator(amount, port) else: generator(amount) except ValueError: notif(" /") def delete(): try: remove('ip-addresses.txt') notif(" ip-addresses.txt ") except: notif(" ") def lock(): if var1.get() == 1: entry_port.configure(state=NORMAL) elif var1.get() == 0: entry_port.configure(state=DISABLED) root = Tk() label1=Label(root, text=" ip-") label1.grid() frame = Frame(root) frame.grid() label2=Label(frame, text=':') label2.grid(row=1,column=1) entry_amount = Entry(frame, width=4, borderwidth=5) entry_amount.grid(row=1,column=2) button1 = Button(frame, text="", command=handler) button1.grid(row=1, column=3, padx=(10,0)) button2 = Button(frame, text=" ", command=delete) button2.grid(row=1, column=4, padx=(10,0)) label2=Label(frame, text=' :') label2.grid(row=2,column=1) entry_port = Entry(frame, width=4, borderwidth=5, state=DISABLED) entry_port.grid(row=2,column=2) var1 = IntVar() check_port1 = Radiobutton(frame, text=' ', variable = var1, value=1, command=lock) check_port1.grid(row=2,column=3) check_port2 = Radiobutton(frame, text=" ", variable = var1, value=0, command=lock) check_port2.grid(row=2,column=4) output = Text(frame, bg="lightblue", font="Arial 9", width=45, height=3) output.grid(row=3, columnspan=8) root.mainloop() That's all. Of course, you can add many more interesting functions, for example, sorting, generation within a certain range of addresses, or you can do a free parser at some free proxy.ru, however, for an initial Python practice, such a simple generator will do.
Source: https://habr.com/ru/post/339124/
All Articles