Dive into Ethereum development. Part 3: user application
In previous articles ( part 1 and part 2 ) we described how to use decentralized applications on smart contracts, if you yourself do not mind being a node. But the less a user is forced to perform additional actions, the better. To work with smart contracts, it is necessary to sign transactions with a private key, therefore, unfortunately, one cannot do without additional actions. In this article we will look at two approaches: the first is a full-fledged decentralized application (DApp) in javascript using the Web3 library and the MetaMask plugin, the second is a similar application, but using the Ruby on Rails API and the Ethereum.rb gem to access the blockchain.

To demonstrate the work of this DApp consider an application inspired by the official example . Instead of Democracy, with voting and performing arbitrary transactions, we will make a simplified Charity contract, in which anyone creates a proposal for the distribution of money (broadcast), participants vote, and after the deadline the proposal is either executed or not, depending on the result of the vote.
The logic of the smart contract in this case is not very important, our goal is to demonstrate the options for user interaction with the blockchain.
Consider what tools we will use a little more and then go directly to the application.
This is such a plugin for the Chrome browser, the developers write that they plan for Firefox, but so far only chrome. Download here . The plugin does two things:
')
Read more about how to use the plugin can be found on the official page or
Web3.js is a JavaScript library, the same one we used in Geth in the previous article . MetaMask embeds Web3.js into every open page, so you can test simple commands directly in the javascript console in Chrome Developer Tools. It is important to note that at the time of this writing, the current version of Web3.js is 0.20.1. Documentation for version 0.xx is available by reference , not to be confused with documentation for version 1.0 ( link ).
We will execute two commands, one to receive data, for example, account balance, and the second to change, for example, setting the string in the smart contract StringHolder from the previous article . Do not forget to create an account in MetaMask, connect to the desired network (in this case, Ropsten Test Network) and go to the Developer Tools console.

Do not forget when calling the contract methods to pass a callback function as the last argument. It is possible so:
Web3.js uses the BigNumber library for numeric values. In the example above, the answer is displayed without conversion.
Read commands are executed immediately, and if you want to perform a function that modifies the data in the smart contract (not marked as

After calling the setString method, a window is displayed asking you to confirm the transaction and information on the estimated costs of gas and air. Click Submit. In the console you will see the transaction hash.

After some time, check that the string has changed:
Everything works as it should.
This is a library for working with the Ruby blockchain Ethereum ( link to github ) - currently it is most actively supported.
Let's try to open a StringHolder contract from the irb console:
Note the camel case (getString) is automatically converted to snake case (get_string)
The peculiarity of calling methods here is that via
Let's try to call the
It is necessary to designate from whom the transaction is sent (the same person we have now unblocked):
Then you can call the setter instead of
We are waiting for the end, we call
We see our changes - everything works.
We formulate the problem. We must have a contract, which is a charitable organization with an account. This organization can be registered users who can act as both recipients of donations and as a vote for the proposals. We need a way to create an offer to transfer money (air) from the organization’s account to one of the registered accounts. To avoid the temptation to pick up the entire broadcast at a time, we introduce a restriction - you can offer no more than 1 ether. Next comes the vote (you can vote “for” or “against”), which cannot be completed before a certain deadline (5 minutes from the moment the proposal is created). After the deadline, the votes continue to be received, but it should be possible to complete the vote, and if it ended with more “for” than “against” - transfer the air from the organization's account to the recipient's account. If more votes are “against” - do nothing.
In general, the application scheme is as follows:
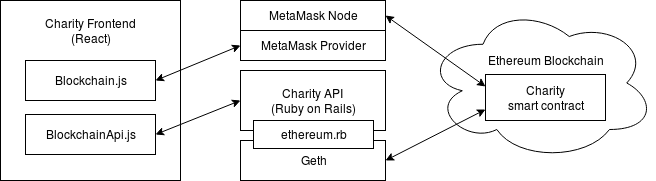
Two js modules - Blockchain.js and BlockchainApi.js - are responsible for working with the blockchain. They do the same thing, only the first one works with Web3.js and through the MetaMask node it directly accesses the blockchain, the second one makes ajax requests to the Rails API, where interaction with the blockchain via the ethereum.rb gem already occurs. The client application itself is written in React and does not depend on which js module of the two is used.
The contract is in the form of a single file, so we will not use special means for deployment, this can be done in any way, even through Mist , even using the Geth command line . You can use our code from here . In general, its scheme can be represented as:
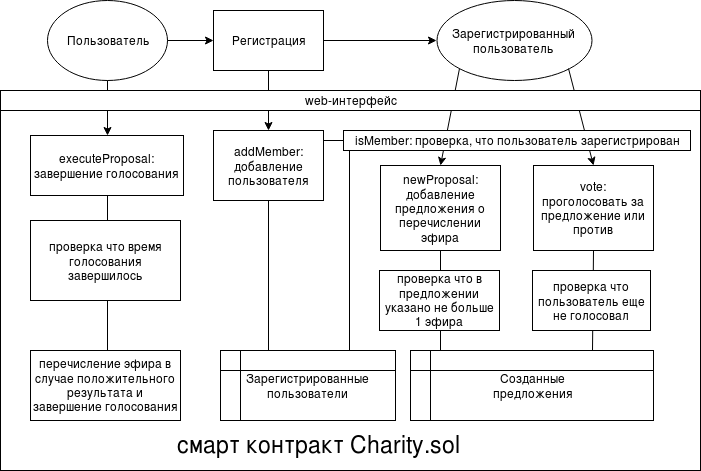
Consider the contract code Charity.sol for logical blocks. First comes the description of all the variables we need:
Mapping allows the user to get his index in the array. If a user with such an address does not exist, then the index 0 will be returned. A function will then be based on this that determines whether the user is registered with the given address. But this introduces a requirement for an array: users must be stored in an array starting at index 1. The code responsible for this logic will be discussed further. For now there is a structure for storage of the sentence.
The structure of the votes, is formed into an array for each sentence
Consider a modifier that allows us to control that the execution of the methods to which it will be added is possible only if the user is registered. The verification code, as already mentioned, is based on the fact that non-existent mapping elements give an index of
We describe the constructor of our contract, which will be executed during the deployment. All that is required is to set the time that is allocated for voting for each proposal. In addition, we increase the size of the members array, because we will add users based on the size, and the zero element remains reserved.
Function to add user:
Notice the
To be able to check whether the address is in the list of users, we use the following function:
The next function - to create a proposal, takes the address of the recipient of the donation, the amount of air in wei and a string with a description. The onlyMembers modifier is applied to this function, which means that before the execution of the whole code, it will be verified that the calling account is registered. Here you will see such conversions as
Notice here the
Despite the fact that the
And this is a helper function that searches for how a particular user has voted for a particular proposal. Returns will be:
Voting: for a proposal with a specific number, give a vote true (for) or false (against).
And the last function
At the end there is an empty function with the payable modifier.
This is necessary so that the broadcast can be sent to the address of the contract. In general, an empty function is a function that receives and processes all messages that are not a function call. All we need is to make it payable, then the shipped gas will simply be credited to the contract without any additional actions. But note that there is no other modifier on this function, so in our case you cannot send air, for example, with a call to
The main application script:
Application demo is available by the link - MetaMask version.
The source code is here .
Once again we draw your attention to the fact that the current version of Web3.js is 0.20.1. But version 1.0 is already preparing for release, in which the changes are quite substantial. As we said above, MetaMask embeds web3 into a page, and you can immediately use it. But given that the library is actively developing, and we need to ensure that the application works for the user, you need to use your locked version, and redefine the web3 object that MetaMask embeds. We do this here in the following method:
This should be done after the
One unobvious problem that is solved in this code is that if you simply make
Even in MetaMask, as already mentioned, you can select a network from the list. We use the addresses of contracts in the network Ropsten, if you try to connect to these addresses in other networks - the result will be unpredictable. Therefore, before providing access to the application, you need to check whether the user is in the network. You can get the network ID using the command:
We do this check here and compare the result with the id for the Ropsten network - this is 3.
A list of all network id's can be seen for example here in the description of net_version.
All the logic of working with the blockchain is in the file blockchain.js .
There are two types of functions - functions for getting data from the blockchain and functions that change data in the blockchain. Most of the methods from web3.js are executed asynchronously and take a callback as the last parameter. Since it is often necessary to call several methods to get data, and calling some of them depends on the result of the work of others — it is convenient to use promises. In version 1.0 of web3.js, asynchronous methods return promises by default.
Let's give one example of getting information from the blockchain:
The
We now consider the function of changing data in the blockchain, for example, the function of adding an organization member.
As you can see, the syntax is no different from the previous example, only the execution of this function will result in the creation of a transaction to change the data in the blockchain.
When calling any function of the smart contract, as a result of which a transaction is created, MetaMask prompts the user to confirm this transaction or reject it. If the user confirms the transaction, the function returns the transaction hash.
One non-obvious point is how to know if the transaction was successful or not.
Determine the status of the transaction can be based on the amount of gas that was used. If the maximum available amount of gas is used, then either an error occurred during execution, or there was not enough gas to complete the transaction. We check the status as follows.
When creating a new transaction, we add it to localStorage and periodically poll its status until we know that it has completed successfully or not. The transaction monitoring logic is in the file - transactions-storage.js .
- , . , . , , , . - , . . , web3.js, , . Ruby on Rails, ethereum.rb, , web3.js.
Demonstration of the application is available by reference - Rails API version.
The source code is here .
To demonstrate the work with ethereum.rb, we made a similar set of functions described in blockchain.js. The code for working with the blockchain can be viewed here , and we will describe the main points and, possibly, the differences.
The first is that now we do not have access to the user account, so we need to do some authorization process and create an account for each user in the blockchain. The authorization process in this example is simplified as much as possible; we simply generate a token that is stored in the browser's LocalStorage, and which is used to authorize requests to the API.
In general, the account management scheme is as follows:
As in the js version, there are two types of methods - those that take data from the blockchain, and those that change them. The first ones are quite simple and how they work is clear from the example.
Methods that change the data in the blockchain - create a transaction that must be signed with a private key. For working with private keys, heme Eth is used . Below is the process of creating a new account for the blockchain and signing the transaction with a private key.
Consider the method
In the database, the key is stored in a binary form, from which the key object is created using the heme Eth. Next, this key is assigned to the field of the
For an example of use,
The method returns the transaction hash. The logic of checking the status of a transaction is similar to the one we used in the js version.
.
- , —
, . Ruby MetaMask . , , , javascript ruby. .
. !
Ethereum:
1:
Part 2: Web3.js and gas
To demonstrate the work of this DApp consider an application inspired by the official example . Instead of Democracy, with voting and performing arbitrary transactions, we will make a simplified Charity contract, in which anyone creates a proposal for the distribution of money (broadcast), participants vote, and after the deadline the proposal is either executed or not, depending on the result of the vote.
The logic of the smart contract in this case is not very important, our goal is to demonstrate the options for user interaction with the blockchain.
Consider what tools we will use a little more and then go directly to the application.
Means used
1. MetaMask
This is such a plugin for the Chrome browser, the developers write that they plan for Firefox, but so far only chrome. Download here . The plugin does two things:
')
- It provides a connection to the desired Ethereum network through its remote node, thanks to which the user does not need to deploy the node at himself.
- Allows you to create new or import existing accounts to work with the blockchain. This makes it possible to sign transactions with a private key that is stored locally with the user.
Read more about how to use the plugin can be found on the official page or
under the spoiler
In the plugin, you can connect to the real and test networks by clicking on the name of the network above.

If necessary, you can import an existing key, but it is more convenient to simply create a new one.

If you want to import a key created in Geth or Mist, select the JSON File when importing and find the file with the desired address in the ~ / .ethereum / <network> / keystore directories. It should be noted that at least on Ubuntu at the time of publication of the article there is a bug with the opening of the JSON file: after selecting the file, the MetaMask window closes and no key is imported. In this case, try opening MetaMask in a separate tab using the chrome-extension extension address: //nkbihfbeogaeaoehlefnkodbefgpgknn/popup.html
By the way, by selecting the test network and pressing BUY, you can get links to resources that distribute the test broadcast. Even for Ropsten (just press request 1 ether from faucet):

If necessary, you can import an existing key, but it is more convenient to simply create a new one.
If you want to import a key created in Geth or Mist, select the JSON File when importing and find the file with the desired address in the ~ / .ethereum / <network> / keystore directories. It should be noted that at least on Ubuntu at the time of publication of the article there is a bug with the opening of the JSON file: after selecting the file, the MetaMask window closes and no key is imported. In this case, try opening MetaMask in a separate tab using the chrome-extension extension address: //nkbihfbeogaeaoehlefnkodbefgpgknn/popup.html
By the way, by selecting the test network and pressing BUY, you can get links to resources that distribute the test broadcast. Even for Ropsten (just press request 1 ether from faucet):
2. Using the Web3.js library with the MetaMask plugin
Web3.js is a JavaScript library, the same one we used in Geth in the previous article . MetaMask embeds Web3.js into every open page, so you can test simple commands directly in the javascript console in Chrome Developer Tools. It is important to note that at the time of this writing, the current version of Web3.js is 0.20.1. Documentation for version 0.xx is available by reference , not to be confused with documentation for version 1.0 ( link ).
We will execute two commands, one to receive data, for example, account balance, and the second to change, for example, setting the string in the smart contract StringHolder from the previous article . Do not forget to create an account in MetaMask, connect to the desired network (in this case, Ropsten Test Network) and go to the Developer Tools console.
> web3.eth.getBalance(web3.eth.accounts[0], function(error, result) { console.log(web3.fromWei(result.toNumber())); } ) Do not forget when calling the contract methods to pass a callback function as the last argument. It is possible so:
> web3.eth.getBalance(web3.eth.accounts[0], console.log) null e {s: 1, e: 18, c: Array(2)} c:(2) [78950, 84540000000000] e:18 s:1 __proto__:Object Web3.js uses the BigNumber library for numeric values. In the example above, the answer is displayed without conversion.
Read commands are executed immediately, and if you want to perform a function that modifies the data in the smart contract (not marked as
constant ), MetaMask will display a transaction signature window. Let us demonstrate this by opening the StringHolder contract from the previous article and invoking the string setting method in it: > var address = "0x65cA73D13a2cc1dB6B92fd04eb4EBE4cEB70c5eC"; > var abi = [ { "constant": false, "inputs": [ { "name": "newString", "type": "string" } ], "name": "setString", "outputs": [], "payable": false, "type": "function" }, { "constant": true, "inputs": [], "name": "getString", "outputs": [ { "name": "", "type": "string", "value": "Hello World!" } ], "payable": false, "type": "function" } ]; > var contract = web3.eth.contract(abi); > var stringHolder = contract.at(address) > stringHolder.getString(console.log) null "Hello Dolly!!! 22" > stringHolder.setString("Hello from the other side!", console.log) After calling the setString method, a window is displayed asking you to confirm the transaction and information on the estimated costs of gas and air. Click Submit. In the console you will see the transaction hash.
After some time, check that the string has changed:
> stringHolder.setString("Hello from the other side!", console.log) "0x4252c00ff25b690846ec8ad3b4266047a75a1708153bcac24066da9cb01e6db5" > stringHolder.getString(console.log) null "Hello from the other side!" Everything works as it should.
3. Ethereum.rb
This is a library for working with the Ruby blockchain Ethereum ( link to github ) - currently it is most actively supported.
Let's try to open a StringHolder contract from the irb console:
> require “ethereum.rb” > abi = '[ { "constant": false, "inputs": [ { "name": "newString", "type": "string" } ], "name": "setString", "outputs": [], "payable": false, "type": "function" }, { "constant": true, "inputs": [], "name": "getString", "outputs": [ { "name": "", "type": "string", "value": "Hello World!" } ], "payable": false, "type": "function" } ]' > address = "0x65cA73D13a2cc1dB6B92fd04eb4EBE4cEB70c5eC" > contract = Ethereum::Contract.create(name: "StringHolder", address: address, abi: abi) > contract.call.get_string() “Hello from the other side!” Note the camel case (getString) is automatically converted to snake case (get_string)
The peculiarity of calling methods here is that via
call , only getters are called, where you just need to get data. To perform transactions, you will need transact_and_wait for a synchronous call or transact for an asynchronous call.Let's try to call the
set_string function for which the transaction will be created. There are two ways: unlockAccount (deprecated) and sign transaction (more on that later). > Ethereum::IpcClient.new.personal_unlock_account(Ethereum::IpcClient.new.eth_coinbase["result"], "<>") It is necessary to designate from whom the transaction is sent (the same person we have now unblocked):
> contract.sender = Ethereum::IpcClient.new.eth_coinbase["result"] Then you can call the setter instead of
call substituting either transact_and_wait or transact : > contract.transact_and_wait.set_string(“Hello darkness, my old friend”) We are waiting for the end, we call
> contract.call.get_string() We see our changes - everything works.
What should our DApp do
We formulate the problem. We must have a contract, which is a charitable organization with an account. This organization can be registered users who can act as both recipients of donations and as a vote for the proposals. We need a way to create an offer to transfer money (air) from the organization’s account to one of the registered accounts. To avoid the temptation to pick up the entire broadcast at a time, we introduce a restriction - you can offer no more than 1 ether. Next comes the vote (you can vote “for” or “against”), which cannot be completed before a certain deadline (5 minutes from the moment the proposal is created). After the deadline, the votes continue to be received, but it should be possible to complete the vote, and if it ended with more “for” than “against” - transfer the air from the organization's account to the recipient's account. If more votes are “against” - do nothing.
In general, the application scheme is as follows:
Two js modules - Blockchain.js and BlockchainApi.js - are responsible for working with the blockchain. They do the same thing, only the first one works with Web3.js and through the MetaMask node it directly accesses the blockchain, the second one makes ajax requests to the Rails API, where interaction with the blockchain via the ethereum.rb gem already occurs. The client application itself is written in React and does not depend on which js module of the two is used.
Main Charity Contract
The contract is in the form of a single file, so we will not use special means for deployment, this can be done in any way, even through Mist , even using the Geth command line . You can use our code from here . In general, its scheme can be represented as:
Consider the contract code Charity.sol for logical blocks. First comes the description of all the variables we need:
uint public debatingPeriodInMinutes; // Proposal[] public proposals; // , uint public numProposals; // proposals uint public numMembers; // members mapping (address => uint) public memberId; // members address[] public members; // Mapping allows the user to get his index in the array. If a user with such an address does not exist, then the index 0 will be returned. A function will then be based on this that determines whether the user is registered with the given address. But this introduces a requirement for an array: users must be stored in an array starting at index 1. The code responsible for this logic will be discussed further. For now there is a structure for storage of the sentence.
struct Proposal { address recipient; // uint amount; // string description; // uint votingDeadline; // bool executed; // , bool proposalPassed; // , uint numberOfVotes; // int currentResult; // , ““ = +1, “” = -1 Vote[] votes; // , mapping (address => bool) voted; // , - } The structure of the votes, is formed into an array for each sentence
struct Vote { bool inSupport; // address voter; // } Consider a modifier that allows us to control that the execution of the methods to which it will be added is possible only if the user is registered. The verification code, as already mentioned, is based on the fact that non-existent mapping elements give an index of
0 , and we will keep users from index 1 : modifier onlyMembers { require (memberId[msg.sender] != 0); // _; // } msg is a structure by which you can get information about the caller. In this case, msg.sender is the address of the account that called the method with this modifier.We describe the constructor of our contract, which will be executed during the deployment. All that is required is to set the time that is allocated for voting for each proposal. In addition, we increase the size of the members array, because we will add users based on the size, and the zero element remains reserved.
function Charity( uint _minutesForDebate ) payable { // payable , , debatingPeriodInMinutes = _minutesForDebate; members.length++; } Function to add user:
function addMember(address _targetMember) { if (memberId[_targetMember] == 0) { // 0 , uint id; memberId[_targetMember] = members.length; // , id = members.length++; // members[id] = _targetMember; // } } Notice the
require function - it replaced the throw in older versions of solidity. The require is true or false , if it is false , then a similar throw handler is triggered — the entire transaction is rolled back.To be able to check whether the address is in the list of users, we use the following function:
function isMember( address _targetMember ) constant returns ( bool ) { return ( memberId[_targetMember] != 0 ); } The next function - to create a proposal, takes the address of the recipient of the donation, the amount of air in wei and a string with a description. The onlyMembers modifier is applied to this function, which means that before the execution of the whole code, it will be verified that the calling account is registered. Here you will see such conversions as
1 ether and 1 minutes . A full list of such suffixes can be found here , they are made for convenience and can only be applied to values, but not to variables. But to apply to a variable, simply add 1 to the suffix, which is done in our case for conversion to seconds. function newProposal( address _beneficiary, // uint _weiAmount, // wei string _description // ) onlyMembers returns (uint proposalID) { require( _weiAmount <= (1 ether) ); // 1 proposalID = proposals.length++; // 1 Proposal storage p = proposals[proposalID]; // p.recipient = _beneficiary; p.amount = _weiAmount; p.description = _description; p.votingDeadline = now + debatingPeriodInMinutes * 1 minutes; // p.executed = false; // p.proposalPassed = false; p.numberOfVotes = 0; numProposals = proposalID + 1; // return proposalID; } Notice here the
now keyword is the current time, not at the time the transaction was called, but at the time the block was created. Therefore, the deadline will be counted from the moment when the offer is already created on the blockchain.Despite the fact that the
proposals are public , we can only receive in this way the simplest fields as an array. That is, by calling the method, for example, proposals(1) in the contract, we will receive a proposal with index 1 as an array { recipient, amount, description, votingDeadline, executed, proposalPassed, numberOfVotes, currentResult } , and the votes and voted arrays within the structure will not return. But we need information about whether the user has voted for a specific proposal in order to display his vote or give an opportunity to vote. And it is desirable to do this in one call, so we get this information when we read the structure of Proposal for display in our application using the special function getProposal , which accepts an account for which you need voice status and offer identifier. function getProposal( address _member, uint _proposalNumber ) constant returns ( address, // uint, string, uint, bool, bool, uint, int, int ) { Proposal memory proposal = proposals[ _proposalNumber ]; // int vote = getVoted( _member, _proposalNumber ); // ( ) return ( proposal.recipient, proposal.amount, proposal.description, proposal.votingDeadline, proposal.executed, proposal.proposalPassed, proposal.numberOfVotes, proposal.currentResult, vote ); // } And this is a helper function that searches for how a particular user has voted for a particular proposal. Returns will be:
0 - if the user has not voted, 1 - if the user has voted “for”, -1 - if he has voted “against”. function getVoted(address _member, uint _proposalNumber) constant returns(int) { Proposal storage p = proposals[_proposalNumber]; int result = 0; int true_int = 1; int false_int = -1; // for (uint i = 0; i < p.numberOfVotes; i++) { if (p.votes[i].voter == _member) // { result = p.votes[i].inSupport ? true_int : false_int; break; // } } return result; } Voting: for a proposal with a specific number, give a vote true (for) or false (against).
function vote( uint _proposalNumber, // , bool _supportsProposal // ) onlyMembers returns (uint voteID) { Proposal storage p = proposals[_proposalNumber]; // require (p.voted[msg.sender] != true); // p.voted[msg.sender] = true; // p.numberOfVotes++; // if (_supportsProposal) { // “” p.currentResult++; // 1 } else { // p.currentResult--; // 1 } voteID = p.votes.length++; // p.votes[voteID] = Vote({inSupport: _supportsProposal, voter: msg.sender}); // return p.numberOfVotes; } And the last function
executeProposal serves to complete the vote and send (or not send) the air to the recipient's address. function executeProposal(uint _proposalNumber) { // Proposal storage p = proposals[_proposalNumber]; require ( !(now < p.votingDeadline || p.executed) ); // 1) , 2) p.executed = true; // if (p.currentResult > 0) { // “” require ( p.recipient.send(p.amount) ); // p.proposalPassed = true; // , } else { // “” p.proposalPassed = false; // , } } At the end there is an empty function with the payable modifier.
function () payable {} This is necessary so that the broadcast can be sent to the address of the contract. In general, an empty function is a function that receives and processes all messages that are not a function call. All we need is to make it payable, then the shipped gas will simply be credited to the contract without any additional actions. But note that there is no other modifier on this function, so in our case you cannot send air, for example, with a call to
addMember .Application variation using Web3.js
The main application script:
- User connects to Ropsten network via MetaMask
- If there is no air on your account, then no transaction will be possible. We have added the function of receiving the air, which becomes available when the account balance is less than 0.1 air. This is implemented through a third-party service to which an ajax request is made with the address to which you want to broadcast.
- Basic actions with a smart contract are available only after the user becomes a member of the organization. To do this, call the addMember method in the smart contract.
- A member of the organization can create a proposal to transfer funds (hereinafter referred to as Proposal), or vote for an existing one.
- When the time for Proposal expires (creation time + 5 minutes), it is possible to complete it, as a result of which, depending on the distribution of votes, the broadcast will be transferred to the specified address or not.
Application demo is available by the link - MetaMask version.
The source code is here .
Once again we draw your attention to the fact that the current version of Web3.js is 0.20.1. But version 1.0 is already preparing for release, in which the changes are quite substantial. As we said above, MetaMask embeds web3 into a page, and you can immediately use it. But given that the library is actively developing, and we need to ensure that the application works for the user, you need to use your locked version, and redefine the web3 object that MetaMask embeds. We do this here in the following method:
initializeWeb3() { if (typeof web3 !== 'undefined') { // MetaMask const defaultAccount = web3.eth.defaultAccount; // window.web3 = new Web3(web3.currentProvider); // window.web3.eth.defaultAccount = defaultAccount; // } } This should be done after the
window.onload event.One unobvious problem that is solved in this code is that if you simply make
window.web3 = new Web3(web3.currentProvider) as suggested in the official documentation, then the default account is not picked up.Even in MetaMask, as already mentioned, you can select a network from the list. We use the addresses of contracts in the network Ropsten, if you try to connect to these addresses in other networks - the result will be unpredictable. Therefore, before providing access to the application, you need to check whether the user is in the network. You can get the network ID using the command:
web3.version.getNetwork(function (err, netId) {}); We do this check here and compare the result with the id for the Ropsten network - this is 3.
A list of all network id's can be seen for example here in the description of net_version.
All the logic of working with the blockchain is in the file blockchain.js .
There are two types of functions - functions for getting data from the blockchain and functions that change data in the blockchain. Most of the methods from web3.js are executed asynchronously and take a callback as the last parameter. Since it is often necessary to call several methods to get data, and calling some of them depends on the result of the work of others — it is convenient to use promises. In version 1.0 of web3.js, asynchronous methods return promises by default.
Let's give one example of getting information from the blockchain:
The
getCurrentAccountInfo function returns the address of the current account, the balance and the flag of whether this account is a member of the organization. Blockchain.prototype.getCurrentAccountInfo = function() { const address = this.address; if (address == undefined) { return Promise.resolve({}); } const balancePromise = new Promise(function(resolve, reject) { web3.eth.getBalance(address, function(err, res) { err ? reject(err) : resolve(web3.fromWei(res).toNumber()); }); }); const authorizedPromise = new Promise(function(resolve, reject) { this.contractInstance.isMember(address, function(err, res) { err ? reject(err) : resolve(res); }); }.bind(this)); return new Promise(function(resolve, reject) { Promise.all([balancePromise, authorizedPromise]).then(function(data) { resolve({ address: address, balance: data[0], isMember: data[1] }); }); }); }; We now consider the function of changing data in the blockchain, for example, the function of adding an organization member.
Blockchain.prototype.becomeMember = function() { return new Promise(function(resolve, reject) { this.contractInstance.addMember(this.address, function(err, res) { err ? reject(err) : resolve(res); }); }.bind(this)); }; As you can see, the syntax is no different from the previous example, only the execution of this function will result in the creation of a transaction to change the data in the blockchain.
When calling any function of the smart contract, as a result of which a transaction is created, MetaMask prompts the user to confirm this transaction or reject it. If the user confirms the transaction, the function returns the transaction hash.
One non-obvious point is how to know if the transaction was successful or not.
Determine the status of the transaction can be based on the amount of gas that was used. If the maximum available amount of gas is used, then either an error occurred during execution, or there was not enough gas to complete the transaction. We check the status as follows.
Blockchain.prototype.checkTransaction = function(transaction) { const txPromise = new Promise(function(resolve, reject) { web3.eth.getTransaction(transaction.transactionHash, function(err, res) { err ? reject(err) : resolve(res); }); }); const txReceiptPromise = new Promise(function(resolve, reject) { web3.eth.getTransactionReceipt(transaction.transactionHash, function(err, res) { err ? reject(err) : resolve(res); }); }); return new Promise(function(resolve, reject) { Promise.all([txPromise, txReceiptPromise]).then(function(res) { const tx = res[0]; const txReceipt = res[1]; const succeeded = txReceipt && txReceipt.blockNumber && txReceipt.gasUsed < tx.gas; const failed = txReceipt && txReceipt.blockNumber && txReceipt.gasUsed == tx.gas; let state = transactionStates.STATE_PENDING; if (succeeded) { state = transactionStates.STATE_SUCCEEDED; } else if (failed) { state = transactionStates.STATE_FAILED; } resolve(state); }); }); }; When creating a new transaction, we add it to localStorage and periodically poll its status until we know that it has completed successfully or not. The transaction monitoring logic is in the file - transactions-storage.js .
Application variant using Ruby on Rails and ethereum.rb heme
- , . , . , , , . - , . . , web3.js, , . Ruby on Rails, ethereum.rb, , web3.js.
Demonstration of the application is available by reference - Rails API version.
The source code is here .
To demonstrate the work with ethereum.rb, we made a similar set of functions described in blockchain.js. The code for working with the blockchain can be viewed here , and we will describe the main points and, possibly, the differences.
The first is that now we do not have access to the user account, so we need to do some authorization process and create an account for each user in the blockchain. The authorization process in this example is simplified as much as possible; we simply generate a token that is stored in the browser's LocalStorage, and which is used to authorize requests to the API.
In general, the account management scheme is as follows:
- The user clicks the Create Account button, a user with a unique token for authorization is created on the server in the database, an account is created for connecting to the blockchain and a private key for the account is stored in the database, the token is returned to the user for further authorization.
- The user makes requests to the API using auth token for authorization.
- The user's private key from the database is used to sign transactions.
As in the js version, there are two types of methods - those that take data from the blockchain, and those that change them. The first ones are quite simple and how they work is clear from the example.
def proposals(address=nil) count = @contract_instance.call.num_proposals to = count - 1 from = count > PROPOSALS_LIMIT ? count - PROPOSALS_LIMIT : 0 res = (from..to).map do |idx| proposal = if address @contract_instance.call.get_proposal(address, idx) else @contract_instance.call.proposals(idx) end Proposal.new(proposal, idx) end res.sort_by(&:index).reverse end Methods that change the data in the blockchain - create a transaction that must be signed with a private key. For working with private keys, heme Eth is used . Below is the process of creating a new account for the blockchain and signing the transaction with a private key.
def self.new_account new_key = Eth::Key.new return new_key.address.downcase, new_key.private_hex end def signed_transactions(private_key_hex) key = Eth::Key.new priv: private_key_hex # @contract_instance.key = key # res = yield(@contract_instance) # @contract_instance.key = nil # res end Consider the method
signed_transactions- it takes a private key and a block of code that we want to execute using this key.In the database, the key is stored in a binary form, from which the key object is created using the heme Eth. Next, this key is assigned to the field of the
keycontract instance. The signature of transactions occurs automatically in the ethereum.rb geme if the keykey is specified in the contract field . After calling the desired method, or several methods, reset the key in order not to accidentally send more transactions from the same account.For an example of use,
signed_transactionsconsider the completion method Proposal, which calls the method executeProposalin the smart contract: def finish_proposal(proposal_index, options={}) tx = signed_transactions(options[:private_key]) do |contract_instance| contract_instance.transact.execute_proposal(proposal_index) end tx.id end The method returns the transaction hash. The logic of checking the status of a transaction is similar to the one we used in the js version.
def transaction_status(tx_hash) tx = @client.eth_get_transaction_by_hash(tx_hash)['result'] tx_receipt = @client.eth_get_transaction_receipt(tx_hash)['result'] if tx_receipt block_number = tx_receipt['blockNumber'] gas_used = tx_receipt['gasUsed'].to_i(16) gas = tx['gas'].to_i(16) { succeeded: block_number && gas_used < gas, failed: block_number && gas_used == gas } end end See how it works
.
- , —
0xe79d8738f0769ec69f09cef4cd497c9cc477733e — Ropsten.What is the result?
, . Ruby MetaMask . , , , javascript ruby. .
. !
Ethereum:
1:
Part 2: Web3.js and gas
Source: https://habr.com/ru/post/339080/
All Articles