DevOps coming to our home? Home Minecraft server in Azure using modern DevOps practices
This article is NOT about minecraft. This article is about Azure and about modern approaches to delivery software.
If you just want to deploy a minecraft server - ask Google “minecraft server hosting” - it will be both easier and cheaper.
But if you want to look at the real case of using Infrastructure as Code approaches, Configuration as Code in relation to non-adapted to Azure software using minecraft as an example, then welcome
Azure Stack is huge and I want to poke in different parts of it, so this article will not be every one.
')
The outline of the articles is as follows:
But of course the process of the emergence of new articles can be stopped by the absence of your interest)
So.
The task is not synthetic. The server was asked to deploy children and it will actually be used. The last thing I want is to constantly repair and repair it. Even less, I want to lose data during updates. Therefore, the requirements for it is quite a prod-like)
All points will be explained along the way.
As a server, I took the official server minecraft.net/en-us/download/server . A cursory study revealed that:
Let's apply the most basic scheme:
One Resource Group c:
The data will be stored separately from the virtual machine on a separate managed disk and linked to the World daddy next to the jar using Symlink (I wrote above that the location of the world daddy is not configured and should always be next to the jar).
This will make it possible to start the server both with a linked disk, and without (for tests) - in this case, the world folder will be created with an empty card.
We will configure the server based on:
I promised higher there to follow some of the requirements of configuration management - this is the first:
That is why we and the distribution and configuration will be pre-assembled from artifacts on the Internet and republished in Blob Storage.
Thus, the algorithm for the deployment procedure is as follows:
implementation is trivial, just calls to cli
Download the server and the map, take jre from the current computer and pack everything in zip
Distribution structure:
DSC configuration is a single ps1 file (about its structure - later), which will run on the server and configure it.
But the scripts in the ps1 file have dependencies on external modules that will not be automatically installed on the server.
Therefore, the configuration must be transferred to the server not just as a ps1 file, but as an archive with:
Dependent modules can be simply downloaded by curl as a nuget package from the powershell gallery repository and unzipped to the right place.
You can also use the powershell Save-Module command - which includes these two steps.
Please note that the versions of the dependent modules in the ps1 file and in the archive generation scripts with the configuration are indicated and match.
And here we again follow the requirements of the next configuration management rule:
the implementation is trivial, just cli calls:
Here, probably the most interesting place. The server is configured based on the DSC configuration that was previously loaded using the DSC extension for vm.
DSC extension feeds the config in which the URL to the archive with the configuration and parameter values is specified
Well, this is some add-on powershell, which allows declaratively describe the desired state of the computer.
The DSC configuration is analyzed on the target machine, a differential is built relative to the current configuration of this machine, and then the configuration is brought to the desired one. The closest analogue of powershell DSC in the "opensource" world is Ansible .
Structurally, the configuration consists of a set of steps that are performed in a specific order (taking into account dependencies). Run through all:
He declares that the computer should have a zip with the server distribution along the DestinationPath, if it does not lie there - it will be downloaded to the Uri address:
He declares that on the computer in the Destination folder there must be an unzipped archive with the server distribution kit if it does not lie there (or if the composition of the files differs from what is in the archive) - they will be added:
Declares that the path of the DestinationPath should be the files with the server config and license. If not, they are created with the contents of Contents:
Here we declare that a managed disk with data should be initialized in the OS and the letter F should be assigned to it:
We declare that there should be a world directory on the disk F (with the world). If it is not there - we consider what is happening for the first time and we need to create this folder using the map from the initial_world distribution as a basis:
This is a custom step - we check that we have the World folder in the folder with the server. If it does not exist, we link it from the F disk. Script works as follows — if TestScript returns false, SetScript is called. Otherwise, it is not called:
Another custom step. We check that the java process is running with the server). If not running, run:
And the last steps - open port 25565.
The article turned out and so long, it is necessary to round out. The issues of debugging this DSC (very interesting in themselves) were left out - I’ll cover them in the next one.
Thank you all for your attention.
If you just want to deploy a minecraft server - ask Google “minecraft server hosting” - it will be both easier and cheaper.
But if you want to look at the real case of using Infrastructure as Code approaches, Configuration as Code in relation to non-adapted to Azure software using minecraft as an example, then welcome
Roadmap
Azure Stack is huge and I want to poke in different parts of it, so this article will not be every one.
')
The outline of the articles is as follows:
- Automated deployment and server configuration using Azure CLI 2 and Powershell DSC
- Support for server configuration in a consistent state using Azure Automation
- Automated server update for the new version
- Get minecraft logs, analyze and display using Azure Stream Analytics and Power BI
- Organizing an active / passive cluster with management through Azure Automation
- ...
But of course the process of the emergence of new articles can be stopped by the absence of your interest)
Disclaimer
- I am not an engineer, not a devops engineer, not a minecraft player. Therefore, if you are fumbling and it seems to you that I am not doing everything correctly - then most likely it’s the way it is - write in the comments as it should.
- All examples for the article are 100% working, but are supplied “as is”. If something does not work for you, fix it yourself or hammer it.
So.
Automated deployment and server configuration using Azure CLI 2 and Powershell DSC
About the task
The task is not synthetic. The server was asked to deploy children and it will actually be used. The last thing I want is to constantly repair and repair it. Even less, I want to lose data during updates. Therefore, the requirements for it is quite a prod-like)
General approach
- 100% automation.
- Treat scripts like code
- We follow the basic configuration management requirements for the delivery process to the prod environment
All points will be explained along the way.
About software
As a server, I took the official server minecraft.net/en-us/download/server . A cursory study revealed that:
- The server is a jar file and requires java to run.
- It needs to run next to a file eula.txt with a specific content.
- The server is configured using the server.properties file, which should also be near
- Server listens on TCP port 25565
- The data (card) is stored by the server in the World daddy next to it (and this will be a bit of a problem)
- The server is able to upgrade data, if they are created by the previous version (and this will greatly simplify life when upgrading)
- Logs are stored in the daddy logs near
Infrastructure
Let's apply the most basic scheme:
One Resource Group c:
- Network Security Group (ports 25565 (minecraft) and 3389 (rdp) will be opened)
- VNET c 1 subnet
- NIC and static public IP with DNS name
- 1 VM under Windows Server 2016 core + 2 Managed Disk (OS + Data)
- Storage account and 1 container for Blob storage
The data will be stored separately from the virtual machine on a separate managed disk and linked to the World daddy next to the jar using Symlink (I wrote above that the location of the world daddy is not configured and should always be next to the jar).
This will make it possible to start the server both with a linked disk, and without (for tests) - in this case, the world folder will be created with an empty card.
We will configure the server based on:
- Distribution (jar with server + jre + initial data), which will be preloaded into Blob storage
- Configurations (Powershell DSC), which will also be preloaded into Blob storage
I promised higher there to follow some of the requirements of configuration management - this is the first:
all artifacts that are required to deploy the application should be published in a controlled stack with high availability.
That is why we and the distribution and configuration will be pre-assembled from artifacts on the Internet and republished in Blob Storage.
Thus, the algorithm for the deployment procedure is as follows:
- Create a new Resource Group, Storage Account and Storage Container
- Build a distribution kit (jar with server + jre + initial data) and upload it to Blob Storage
- Create the rest of the infrastructure in the Resource Group
- Create a DSC configuration and upload it to Blob Storage
- Configure server based on configuration and distribution
Sources
- Store on github
- Observe any intelligible strategy of bransling and release cycle (well, for example, gitflow and release each article :))
- We use azure cli 2 and bash where it is possible (by the way, in this article we managed to completely avoid using powershell api. But in the next one it will not work)
Deployment steps
1. Create a new Resource Group, Storage Account and Storage Container
implementation is trivial, just calls to cli
initial_preparation.sh
az configure --defaults location=$LOCATION group=$GROUP echo "create new group" az group create -n $GROUP echo "create storage account" az storage account create -n $STORAGE_ACCOUNT --sku Standard_LRS STORAGE_CS=$(az storage account show-connection-string -n $STORAGE_ACCOUNT) export AZURE_STORAGE_CONNECTION_STRING="$STORAGE_CS" echo "create storage container" az storage container create -n $STORAGE_CONTAINER --public-access blob 2. Build a distribution kit (jar with server + jre + initial data) and upload it to Blob Storage
Download the server and the map, take jre from the current computer and pack everything in zip
Distribution structure:
- .jar
- jre
- initial_world - folder with initial map
prepare_distr.sh
mkdir $DISTR_DIR cd $DISTR_DIR echo "download minecraft server from official site" curl -Os https://s3.amazonaws.com/Minecraft.Download/versions/1.12.2/minecraft_server.$MVERSION.jar echo "copy jre from this machine" cp -r "$JRE" ./jre echo "create ititial world folder" mkdir initial_world cd initial_world echo "download initial map" curl -Os https://dl01.mcworldmap.com/user/1821/world2.zip unzip -q world2.zip cp -r StarWars/* . rm -r -f StarWars rm world2.zip cd ../ echo "create archive (zip utility -> https://ranxing.wordpress.com/2016/12/13/add-zip-into-git-bash-on-windows/)" cd ../ zip -r -q $DISTR_ZIP $DISTR_DIR rm -r -f $DISTR_DIR 3. Build a DSC configuration and upload it to Blob Storage
DSC configuration is a single ps1 file (about its structure - later), which will run on the server and configure it.
But the scripts in the ps1 file have dependencies on external modules that will not be automatically installed on the server.
Therefore, the configuration must be transferred to the server not just as a ps1 file, but as an archive with:
- ps1 file
- All dependent modules, folded in the same daddies next to the ps1 file
Dependent modules can be simply downloaded by curl as a nuget package from the powershell gallery repository and unzipped to the right place.
You can also use the powershell Save-Module command - which includes these two steps.
Please note that the versions of the dependent modules in the ps1 file and in the archive generation scripts with the configuration are indicated and match.
And here we again follow the requirements of the next configuration management rule:
All dependencies must be accurately identified and resolved always uniquely.
prepare_config.sh
echo "prepare server configuration" curl -s -L -o configuration/xPSDesiredStateConfiguration.zip "https://www.powershellgallery.com/api/v2/package/xPSDesiredStateConfiguration/7.0.0.0" curl -s -L -o configuration/xNetworking.zip "https://www.powershellgallery.com/api/v2/package/xNetworking/5.1.0.0" curl -s -L -o configuration/xStorage.zip "https://www.powershellgallery.com/api/v2/package/xStorage/3.2.0.0" cd configuration unzip -q xPSDesiredStateConfiguration.zip -d xPSDesiredStateConfiguration rm -r xPSDesiredStateConfiguration.zip unzip -q xNetworking.zip -d xNetworking rm -r xNetworking.zip unzip -q xStorage.zip -d xStorage rm -r xStorage.zip zip -r -q ../$CONFIG_ZIP . * rm -r -f xPSDesiredStateConfiguration rm -r -f xNetworking rm -r -f xStorage cd ../ 4. Create the rest of the infrastructure in the Resource Group
the implementation is trivial, just cli calls:
iaas_preparation.sh
echo "create network security group and rules" az network nsg create -n $NSG az network nsg rule create --nsg-name $NSG -n AllowMinecraft --destination-port-ranges 25556 --protocol Tcp --priority 100 az network nsg rule create --nsg-name $NSG -n AllowRDP --destination-port-ranges 3389 --protocol Tcp --priority 110 echo "create vnet, nic and pip" NIC_NAME=minesrvnic PIP_NAME=minepip SUBNET_NAME=servers az network vnet create -n $VNET --subnet-name $SUBNET_NAME az network public-ip create -n $PIP_NAME --dns-name $DNS --allocation-method Static az network nic create --vnet-name $VNET --subnet $SUBNET_NAME --public-ip-address $PIP_NAME -n $NIC_NAME echo "create data disk" DISK_NAME=minedata az disk create -n $DISK_NAME --size-gb 10 --sku Standard_LRS echo "create server vm" az vm create -n $VM_NAME --size $VM_SIZE --image $VM_IMAGE \ --nics $NIC_NAME \ --admin-username $VM_ADMIN_LOGIN --admin-password $VM_ADMIN_PASSWORD \ --os-disk-name ${VM_NAME}disk --attach-data-disk $DISK_NAME 5. Configure the server based on the configuration and distribution
Here, probably the most interesting place. The server is configured based on the DSC configuration that was previously loaded using the DSC extension for vm.
DSC extension feeds the config in which the URL to the archive with the configuration and parameter values is specified
server_configuration.sh
echo "prepare dsc extension settings" cat MinecraftServerDSCSettings.json | envsubst > ThisMinecraftServerDSCSettings.json echo "configure vm" az vm extension set \ --name DSC \ --publisher Microsoft.Powershell \ --version 2.7 \ --vm-name $VM_NAME \ --resource-group $GROUP \ --settings ThisMinecraftServerDSCSettings.json rm -f ThisMinecraftServerDSCSettings.json About Powershell DSC
Well, this is some add-on powershell, which allows declaratively describe the desired state of the computer.
The DSC configuration is analyzed on the target machine, a differential is built relative to the current configuration of this machine, and then the configuration is brought to the desired one. The closest analogue of powershell DSC in the "opensource" world is Ansible .
Implement MinecraftServer DSC Configuration
Structurally, the configuration consists of a set of steps that are performed in a specific order (taking into account dependencies). Run through all:
xRemoteFile DistrCopy { Uri = "https://$accountName.blob.core.windows.net/$containerName/mineserver.$minecraftVersion.zip" DestinationPath = "$mineHome.zip" MatchSource = $true } He declares that the computer should have a zip with the server distribution along the DestinationPath, if it does not lie there - it will be downloaded to the Uri address:
Archive UnzipServer { Ensure = "Present" Path = "$mineHome.zip" Destination = $mineHomeRoot DependsOn = "[xRemoteFile]DistrCopy" Validate = $true Force = $true } He declares that on the computer in the Destination folder there must be an unzipped archive with the server distribution kit if it does not lie there (or if the composition of the files differs from what is in the archive) - they will be added:
File CheckProperties { DestinationPath = "$mineHome\server.properties" Type = "File" Ensure = "Present" Force = $true Contents = "....." } File CheckEULA { DestinationPath = "$mineHome\eula.txt" Type = "File" Ensure = "Present" Force = $true Contents = "..." DependsOn = "[File]CheckProperties" } Declares that the path of the DestinationPath should be the files with the server config and license. If not, they are created with the contents of Contents:
xWaitForDisk WaitWorldDisk { DiskIdType = "Number" DiskId = "2" RetryIntervalSec = 60 RetryCount = 5 DependsOn = "[File]CheckEULA" } xDisk PrepareWorldDisk { DependsOn = "[xWaitForDisk]WaitWorldDisk" DiskIdType = "Number" DiskId = "2" DriveLetter = "F" AllowDestructive = $false } xWaitForVolume WaitForF { DriveLetter = 'F' RetryIntervalSec = 5 RetryCount = 10 DependsOn = "[xDisk]PrepareWorldDisk" } Here we declare that a managed disk with data should be initialized in the OS and the letter F should be assigned to it:
File WorldDirectoryExists { Ensure = "Present" Type = "Directory" Recurse = $true DestinationPath = "F:\world" SourcePath = "$mineHome\initial_world" MatchSource = $false DependsOn = "[xWaitForVolume]WaitForF" } We declare that there should be a world directory on the disk F (with the world). If it is not there - we consider what is happening for the first time and we need to create this folder using the map from the initial_world distribution as a basis:
Script LinkWorldDirectory { DependsOn="[File]WorldDirectoryExists" GetScript= { @{ Result = (Test-Path "$using:mineHome\World") } } SetScript= { New-Item -ItemType SymbolicLink -Path "$using:mineHome\World" -Confirm -Force -Value "F:\world" } TestScript= { return (Test-Path "$using:mineHome\World") } } This is a custom step - we check that we have the World folder in the folder with the server. If it does not exist, we link it from the F disk. Script works as follows — if TestScript returns false, SetScript is called. Otherwise, it is not called:
Script EnsureServerStart { DependsOn="[Script]LinkWorldDirectory" GetScript= { @{ Result = (Get-Process -Name java -ErrorAction SilentlyContinue) } } SetScript= { Start-Process -FilePath "$using:mineHome\jre\bin\java" -WorkingDirectory "$using:mineHome" -ArgumentList "-Xms512M -Xmx512M -jar `"$using:mineHome\minecraft_server.$using:minecraftVersion.jar`" nogui" } TestScript= { return (Get-Process -Name java -ErrorAction SilentlyContinue) -ne $null } } Another custom step. We check that the java process is running with the server). If not running, run:
xFirewall FirewallIn { Name = "Minecraft-in" Action = "Allow" LocalPort = ('25565') Protocol = 'TCP' Direction = 'Inbound' } xFirewall FirewallOut { Name = "Minecraft-out" Action = "Allow" LocalPort = ('25565') Protocol = 'TCP' Direction = 'Outbound' } And the last steps - open port 25565.
Epilogue
The article turned out and so long, it is necessary to round out. The issues of debugging this DSC (very interesting in themselves) were left out - I’ll cover them in the next one.
Thank you all for your attention.
How to start all this from Windows
We will need
Starting the rollout procedure
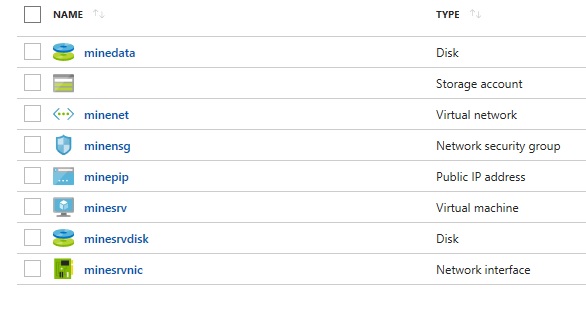
Result:

Starting the rollout procedure
git clone https://github.com/AndreyPoturaev/minecraft-in-azure cd minecraft-in-azure git checkout v1.0.0 export MINESERVER_PASSWORD=<place your password here> export MINESERVER_DNS=<place unique name here. Server url will be $MINESERVER_DNS.westeurope.cloudapp.azure.com> export MINESERVER_STORAGE_ACCOUNT=<place unique name here> az login . rollout.sh Result:
Source: https://habr.com/ru/post/339034/
All Articles