Time management for kinesthetics
Time is the most valuable resource we have. To use it as productively as possible, there are all kinds of time management techniques. If we talk about time management on a working day scale, then one of the most popular techniques is called Pomodoro . But this article is not about GTD, but about the code (and a little about iron ^^).
So, for the Pomodoro equipment, there is a Tomighty tool and it has open source code in C #, which encourages the modification of this code itself in order to add new features and integrate with all sorts of things.
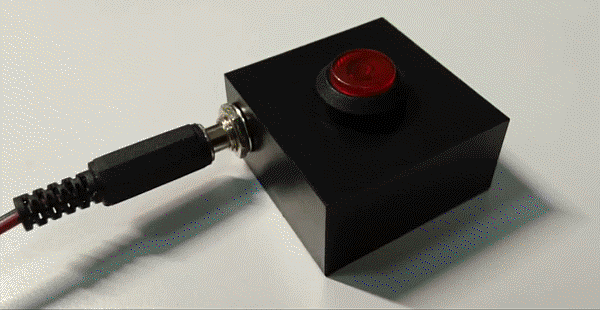
Today we will integrate the Tomighty client with the “ Big Red Button ” device. For this we will need:
- Big Red Button (with LED). I was not very big , but very red.
- ESP8266 is one of the most optimal microcontrollers in terms of convenience / price ratio. It's not even a microcontroller at all, but as a microcontroller it is absolutely beautiful!
- MicroPython . I do not know the language more conveniently than Python, and you? Is that Ruby, but it seems to be not ported to ESP8266.
- MQTT protocol for communication between the computer and the device.
- Visual Studio .
- Optional extension CodeRush for Roslyn . It greatly simplifies working with both your own and unfamiliar code.
What for? To get experience with someone else's code. In connection with the upcoming Hacktoberfest , this skill will be extremely relevant.
Welcome!
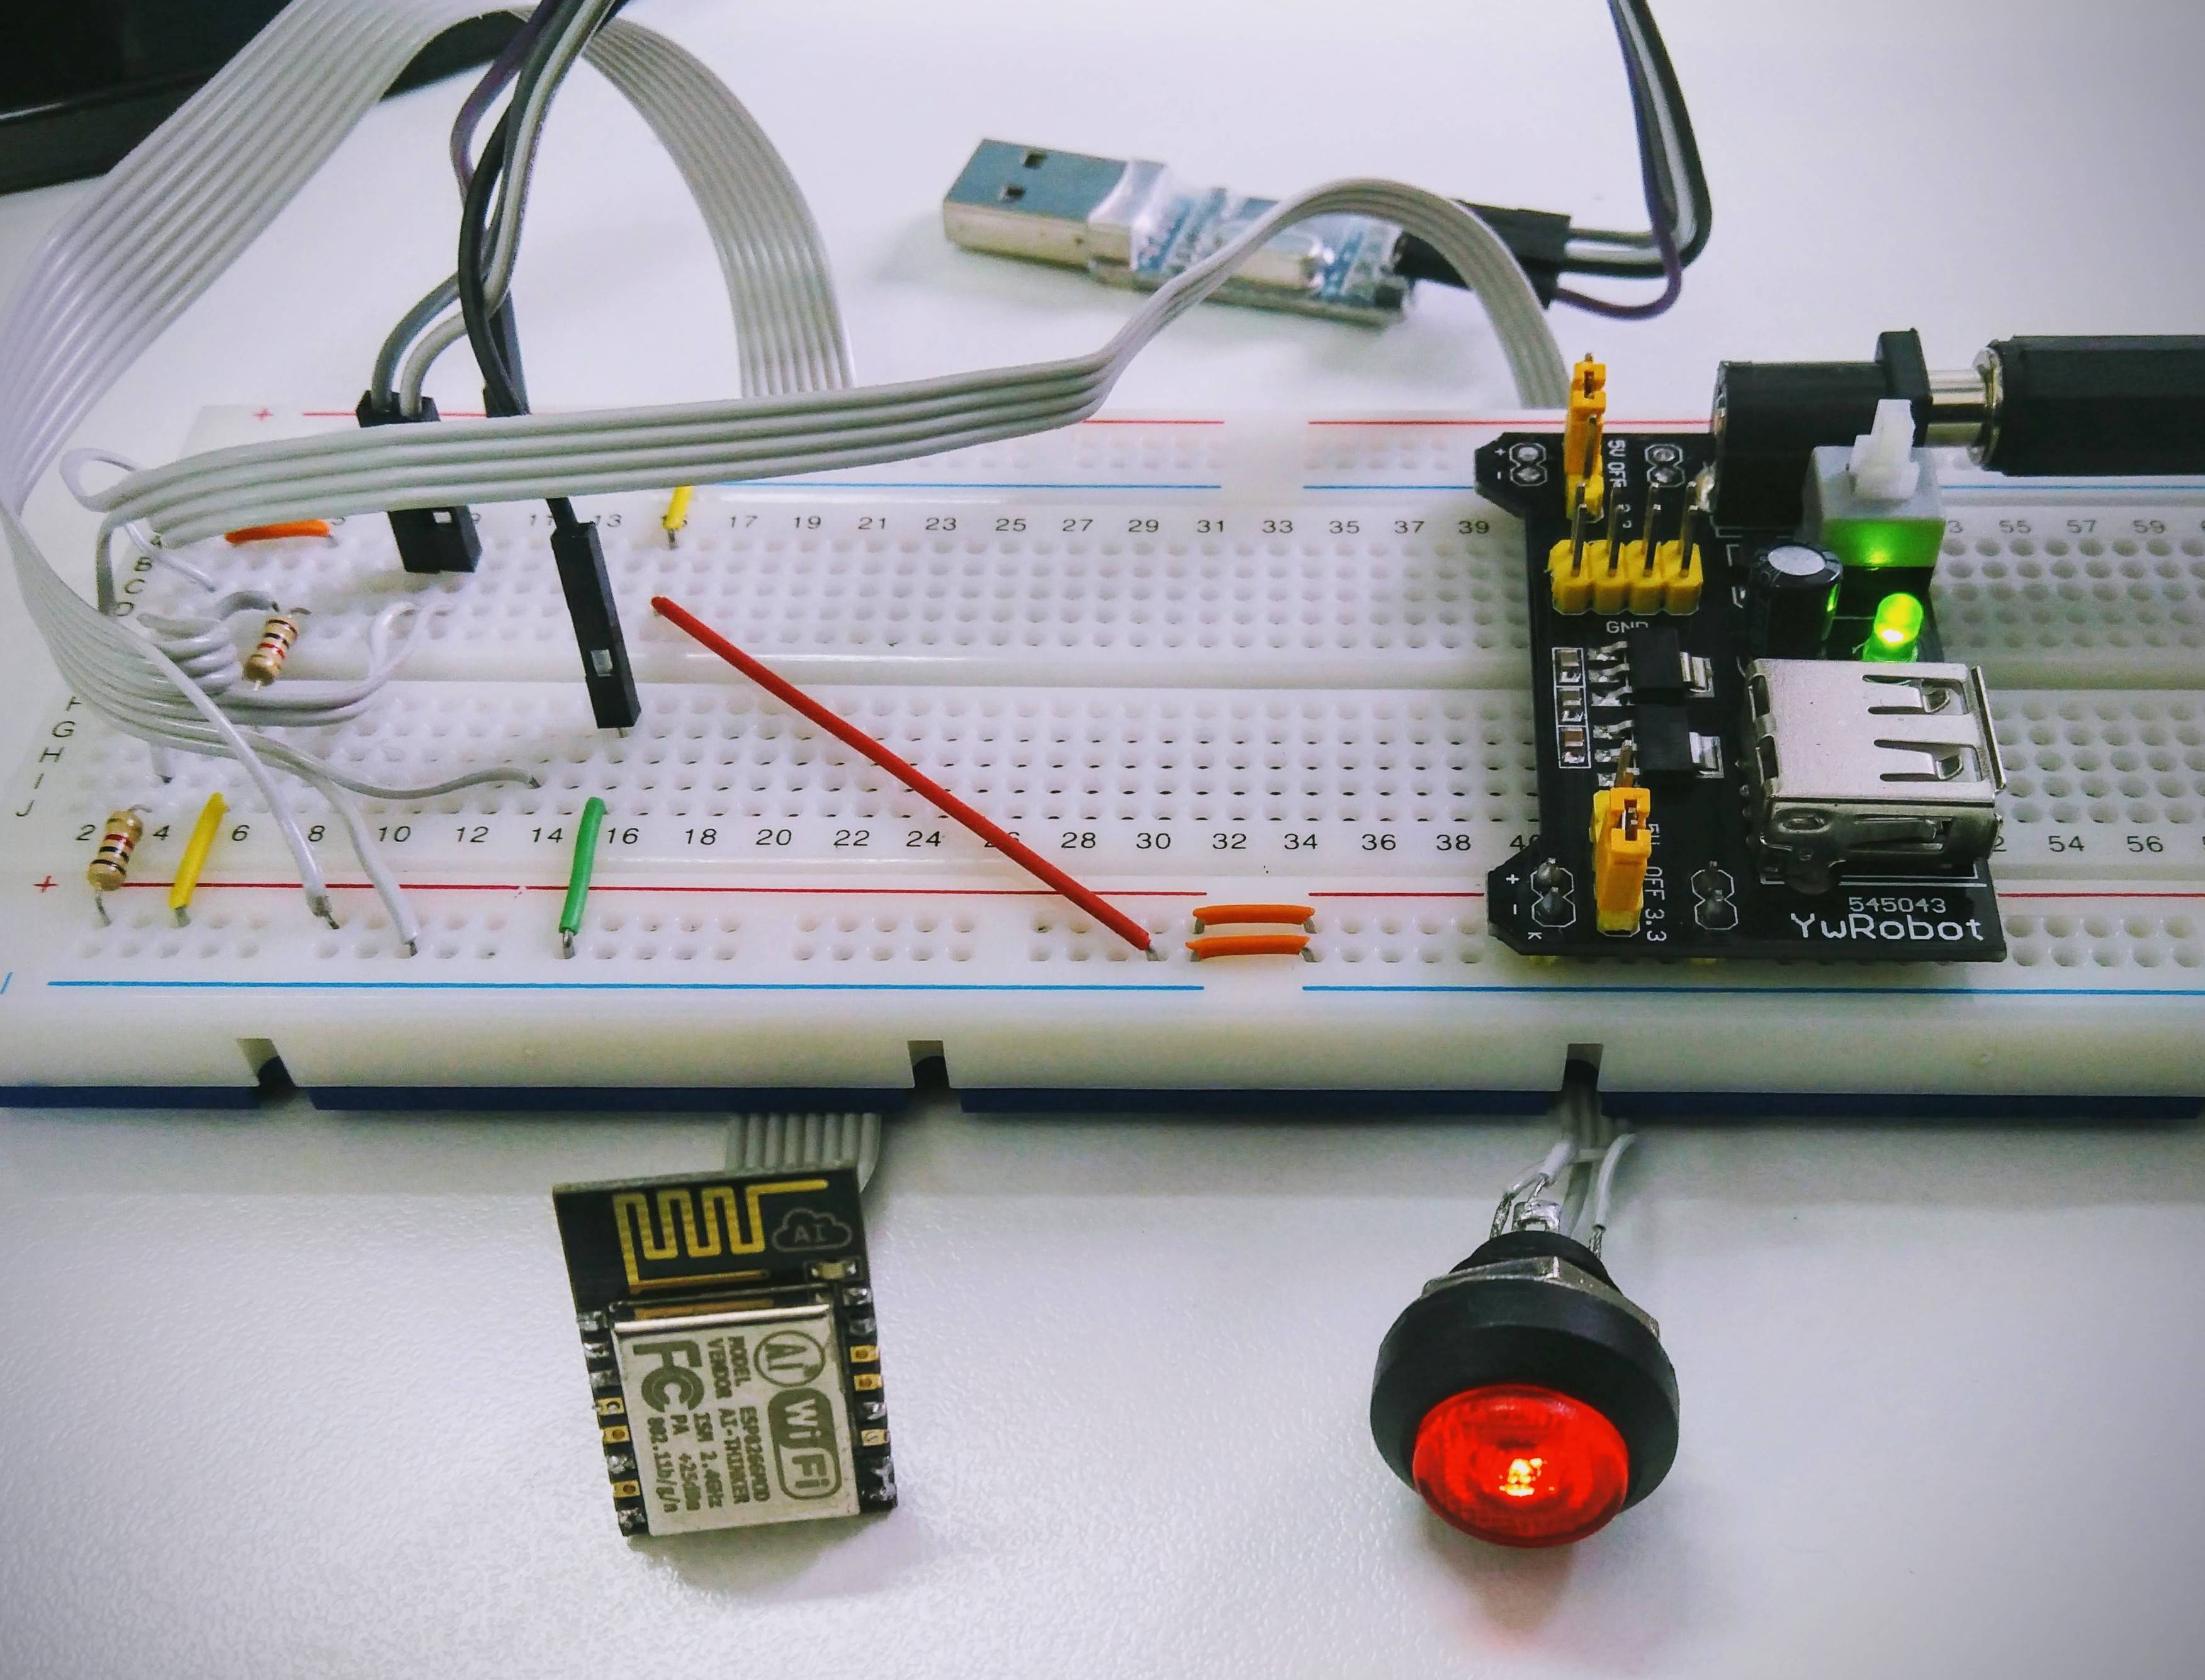
Big Red Button
On the hardware side, there is nothing supernatural, therefore I will not describe every step in detail, everything should work, and the code itself is quite understandable.
- Take the ESP8266. I have ESP-12-Q , but any module with 1MB or more memory will do.
- We flash MicroPython according to the instructions .
- Swing the official implementation of MQTT and save it as
mqtt.pyOn ESP via WebREPL . - Find a free MQTT-broker on the Internet, or raise the local Mosquitto . I used CloudMQTT , but this is not the only option.
- We study and improve the code for ESP8266 , and then fill in the board under the name
main.py - We connect the luminous button from the nearest electronics store.
- Reboot
- Debug via Serial Port.
Refine Tomighty Client
Let's start with the repository cloning. You can official , you can fork (where everything is already done in the corresponding branch). We open the solution in the studio.
In order to build the Tomighty.Windows project, you need to install the UWPDesktop package into it via NuGet . This is a completely unobvious action, which my colleagues and I tried for a relatively long time to think of and a little less long to googling. Perhaps this is trivial for those who dealt with old-fashioned WinForms applications calling the newfangled UWP API, but for those who have not done this - not so much.
Thus, at this stage, I managed to build and run the application (I hope, you too), so I began to search for places that can be implemented with your crutches . With CodeRush for Roslyn, this turned out to be a snap.
Tasks are as follows:
- Add the menu item "Connect to the Red Button" to the tray icon
- Run a notification (their Toast with an icon) upon successful connection with the MQTT broker or unsuccessful attempt
- Run a Pomodoro period when receiving a message on the MQTT
- Send a message on the MQTT at the actual start of the Pomodoro period and another message at the start of the interrupts
First, let's find out how to start the Pomodoro period, most likely this path will lead us to the main architectural elements of the application the fastest. The test run showed that it seems that the main source of control here is the button in the tray, so let's try to find the entry point somewhere in the Tomighty.Windows\Tray\ folder. Indeed, in the ITrayMenu interface ITrayMenu is a method similar to the truth, let's see where it is used.

There was a very meaty TrayMenuController.cs TrayMenuController.cs , and in it was the right method.
private void OnStartPomodoroClick(object sender, EventArgs e) => StartTimer(IntervalType.Pomodoro); // ... private void StartTimer(IntervalType intervalType) { Task.Run(() => pomodoroEngine.StartTimer(intervalType)); } Okay, this means that the pomodoroEngine object is responsible for the basic operations of the start-up period type. We need it.
The name (and the content) of this class TrayMenuController hint that it is one of the interfaces between the program and the person. Most likely we need to create something similar to add support for our own interface in the form of a red button. We use the same Jump to menu to find where the object of this class is created.

Great, we found an entry point. She looks something like this:
internal class TomightyApplication : ApplicationContext { public TomightyApplication() { var eventHub = new SynchronousEventHub(); var timer = new Tomighty.Timer(eventHub); var userPreferences = new UserPreferences(); var pomodoroEngine = new PomodoroEngine(timer, userPreferences, eventHub); var trayMenu = new TrayMenu() as ITrayMenu; var trayIcon = CreateTrayIcon(trayMenu); var timerWindowPresenter = new TimerWindowPresenter(pomodoroEngine, timer, eventHub); new TrayIconController(trayIcon, timerWindowPresenter, eventHub); new TrayMenuController(trayMenu, this, pomodoroEngine, eventHub); // ... new StartupEvents(eventHub); } // ... } Time to make a small intervention: create another object of a non-existent class, and then use the Declare Class feature to add the class itself.

I immediately passed on the eventHub , because I noticed that through TrayMenuController through it, you can subscribe to the start and end events of the timer. It will be useful.
You can immediately make two fields from the automatically generated parameters of the feature constructor of the Declare Field with Initializer :

Well, now we can subscribe to events and manage timers. Let's try to add a menu item to the tray that will call the RedButtonController.Connect() method.
Pretty quickly it came to the realization that it is better to save the instance of our controller and transfer it to TrayMenuController so that it can easily call Connect() directly without any events or complications.
var redButton = new RedButtonController(eventHub); // ... new TrayMenuController(trayMenu, this, pomodoroEngine, eventHub, redButton); In order for the menu item to appear in the list, you need to create a TrayMenu.redButtonConnectItem and TrayMenu.redButtonConnectItem it everywhere by analogy with the ones next to it. Tab to Next Reference will help you in searching for such places: You can simply put the cursor on any reference, press Tab and go to the next one, while all references in the field of view are highlighted.

No pitfalls were noticed, it all worked pretty quickly. redButtonConnectItem calls RedButtonController.Connect() via the TrayMenuController.OnRedButtonConnect() handler

(the left sidebar saves vertical space and is cooler than the bottom sidebar)
And now, let's try to call Toast (these are such newfangled notifications). When I first launched the application, one of these flew in with an offer to tune in after the first launch. Let's try to find it. I think we should start with the new StartupEvents(eventHub) at the end of the TomightyApplication constructor. A couple of clicks on F12 (go to the declaration) lead to the Tomighty.Windows\Events.cs with two empty events:
namespace Tomighty.Windows.Events { public class FirstRun { } public class AppUpdated { } } Well, none of these do not suit us, and even the format of an empty event does not quite fit, I would like to pass on the degree of success of the attempt to connect. Create a new event, declare a field in it and use the Smart Constructor to add a constructor with an automatic initialization of the field.

Next, I had to go through all the places where something happened to the FirstRun event and add similar actions for our RedButtonConnectionChanged event.

Along the way, I had to add an XML document with the content of the notification and set the path to it to the resources. But, again, it all started without a bryaki. That's what good architecture means!

Connection to MQTT
Ok, we have pomodoroEngine , eventHub , menu item and notifications, everything seems to be needed, you can connect with MQTT and try to communicate with the button. For MQTT, we will use the most guarded client M2Mqtt :
PM> Install-Package M2Mqtt I already had a simple class for M2Mqtt, so I just hooked it up and enjoyed the very-very simple API:
public void Connect() { mqtt = new MQTTClient("m10.cloudmqtt.com", 13633); mqtt.Connect("%LOGIN%", "%PASSWORD%"); if (!mqtt.client.IsConnected) { eventHub.Publish(new RedButtonConnectionChanged(false)); return; } eventHub.Publish(new RedButtonConnectionChanged(true)); mqtt.client.MqttMsgPublishReceived += onMsgReceived; mqtt.Subscribe("esp"); } You can add a handler using the Declare Method :

It remains to subscribe to TimerStarted and TimerStopped , and you can write logic. And the logic in my first approximation was as follows:

Here you can refine a lot of things, for example, to adequately handle the situation when the button is pressed during the break, but these are trifles. But the case has already been purchased, and most likely it will be, it remains to perforate and switch. An additional feature of the resulting device is that it tells colleagues when you can be distracted, and when it is impossible. And the rest, pretty useless thing :)
- Repository with ready code
- Buy ESP8266 cheap
- Buy ESP8266 Fast
- Channel CNLhor , which does unrealistically cool stuff on ESP8266. There was even an article with one of his videos.
- CodeRush for Roslyn , free trial for 30 days.
UPD:
Powered by LM1117.
')
Source: https://habr.com/ru/post/338948/
All Articles