We attack DHCP part 2. DHCP + WiFi = MiTM

In this article I will talk about another way to implement MiTM on a WiFi network , which is not the easiest, but it works. Before reading this article, I strongly recommend that you familiarize yourself with the first part , in which I tried to explain how DHCP works and how to use it to attack clients and the server.
As always, for the implementation of this attack there are a couple of restrictions:
- We must be connected to the attacked access point.
- We should be able to listen to broadcast traffic on the network.
And so how does this work? The attack is divided into several stages:
- We make attack of DHCP Starvation;
- We send WiFi DeAuth packages;
- We intercept ARP requests from clients, respond to them in order to create an IP address conflict and force the client to send a DHCPDECLINE;
- We intercept DHCPDISCOVER and DHCPREQUEST requests, we answer them;
- Profit!
We will understand this scheme in more detail.
DHCP Starvation
We connect to the attacked WiFi network and perform a DHCP Starvation attack in order to overflow the pool of free IP addresses.
How it works:
We form and send a broadcast DHCPDISCOVER request, while introducing ourselves as the DHCP relay agent. In the field giaddr (Relay agent IP) we specify our IP address 192.168.1.172 , in the field chaddr (Client MAC address) - random MAC 00: 01: 96: E5: 26: FC , while at the data link layer in SRC MAC we set our MAC address: 84: 16: F9: 1B: CF: F0 .
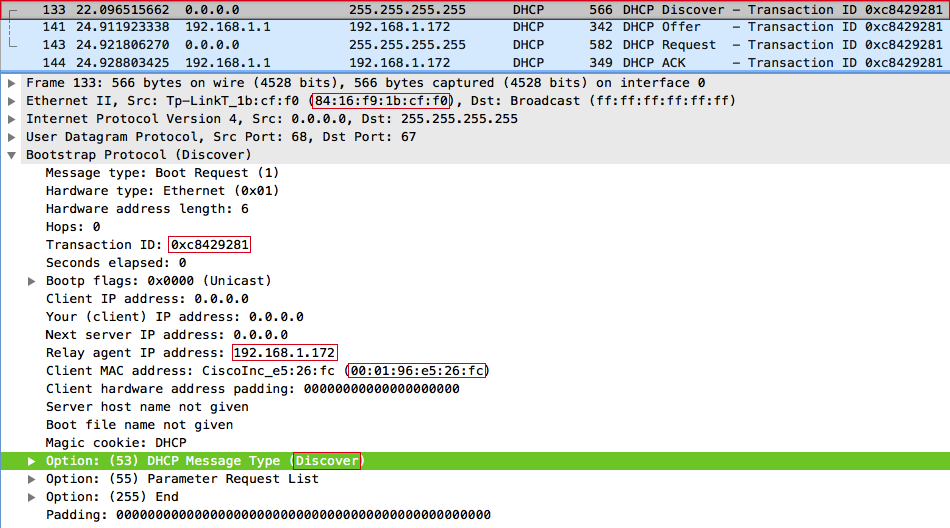
The server responds with a DHCPOFFER message to the relay agent (us), and offers the client with the MAC address 00: 01: 96: E5: 26: FC the IP address 192.168.1.156
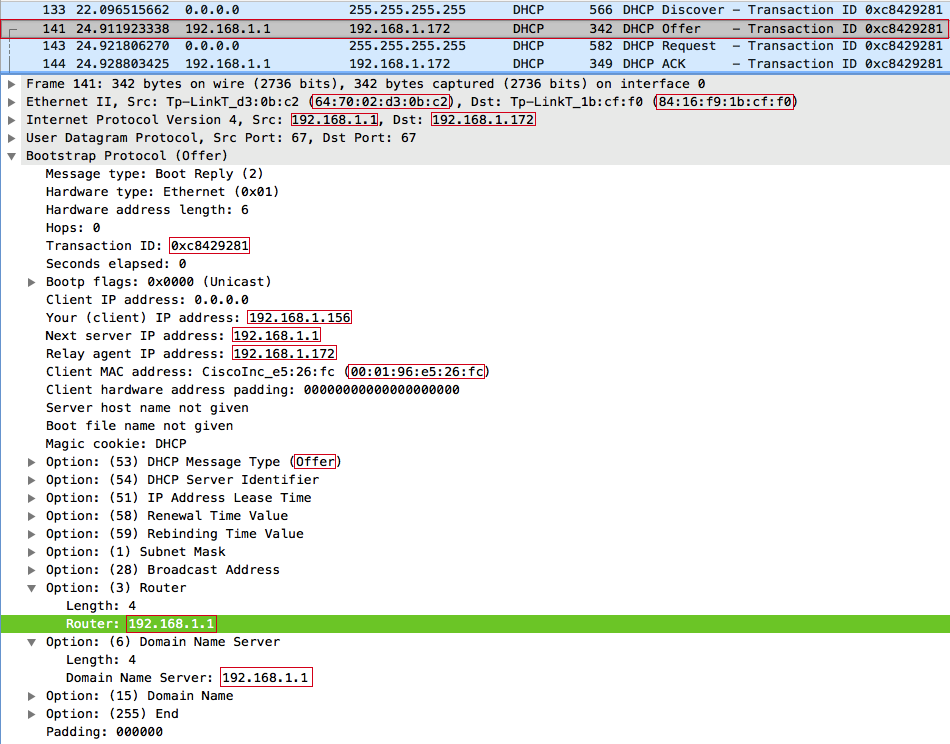
After receiving the DHCPOFFER, we send a broadcast DHCPREQUEST request, while in the DHCP option with code 50 ( Requested IP address ) we set up offers to the client the IP address 192.168.1.156 , in the option with code 12 ( Host Name Option ) - a random string dBDXnOnJ . Important: the xid (Transaction ID) and chaddr (Client MAC address) fields in DHCPREQUEST and DHCPDISCOVER must be the same, otherwise the server will reject the request, because it will look like another transaction from the same client, or another client with the same transaction.
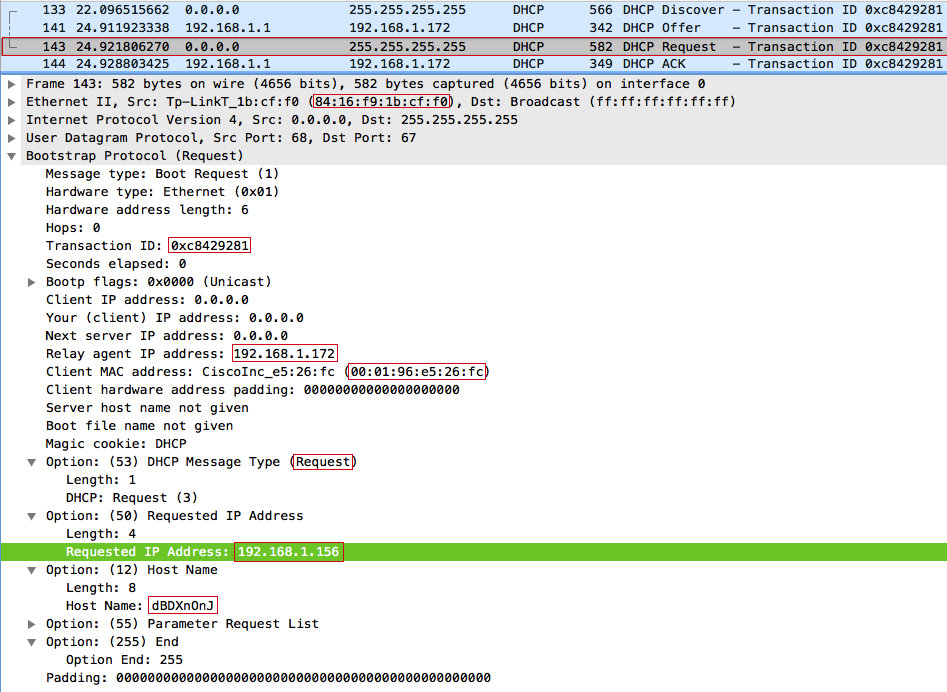
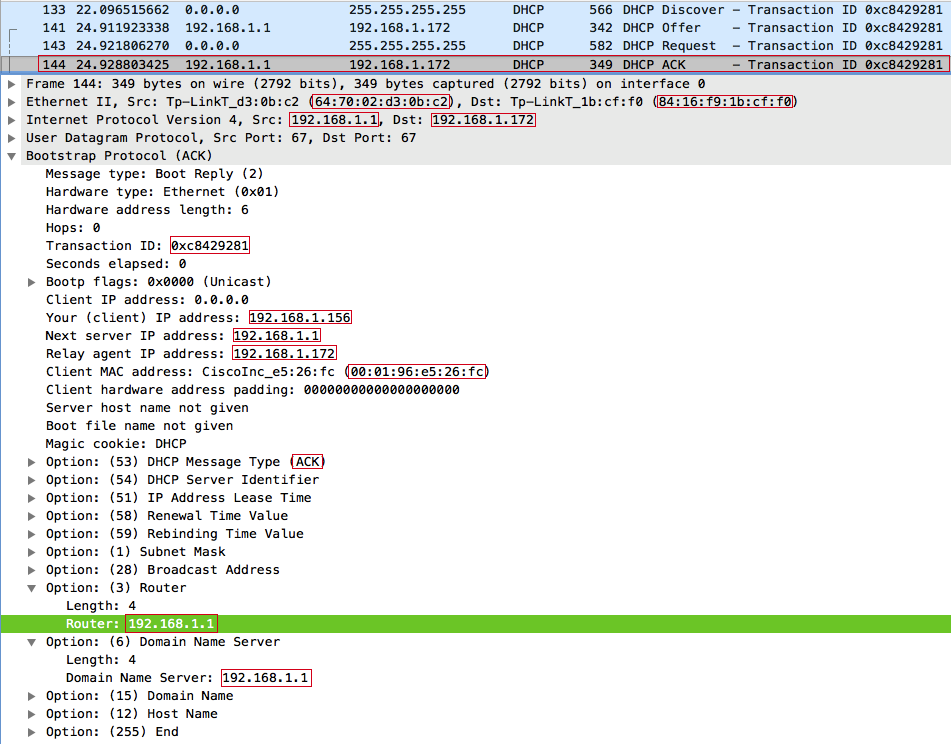
- The server sends a DHCPACK message to the relay agent. From this point on, the IP address 192.168.1.156 is considered reserved for the client with the MAC address 00: 01: 96: E5: 26: FC for 12 hours (the default lease time).

WiFi DeAuth
The next step is to make Wi-Fi Deauth. This scheme works like this:

We transfer the free wireless interface to the monitoring mode:
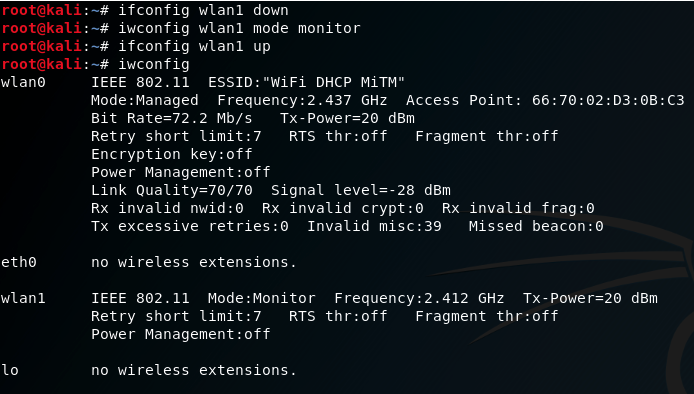
We send deauth packets in order to disconnect the attacked client 84: 16: F9: 19: AD: 14 WiFi networks ESSID: WiFi DHCP MiTM :

DHCPDECLINE
After the client 84: 16: F9: 19: AD: 14 has disconnected from the access point, most likely, he will try again to connect to the WiFi WiFi network MiTM WiFi and get the IP address via DHCP. Since he had previously connected this network, only broadcast DHCPREQUEST will poison.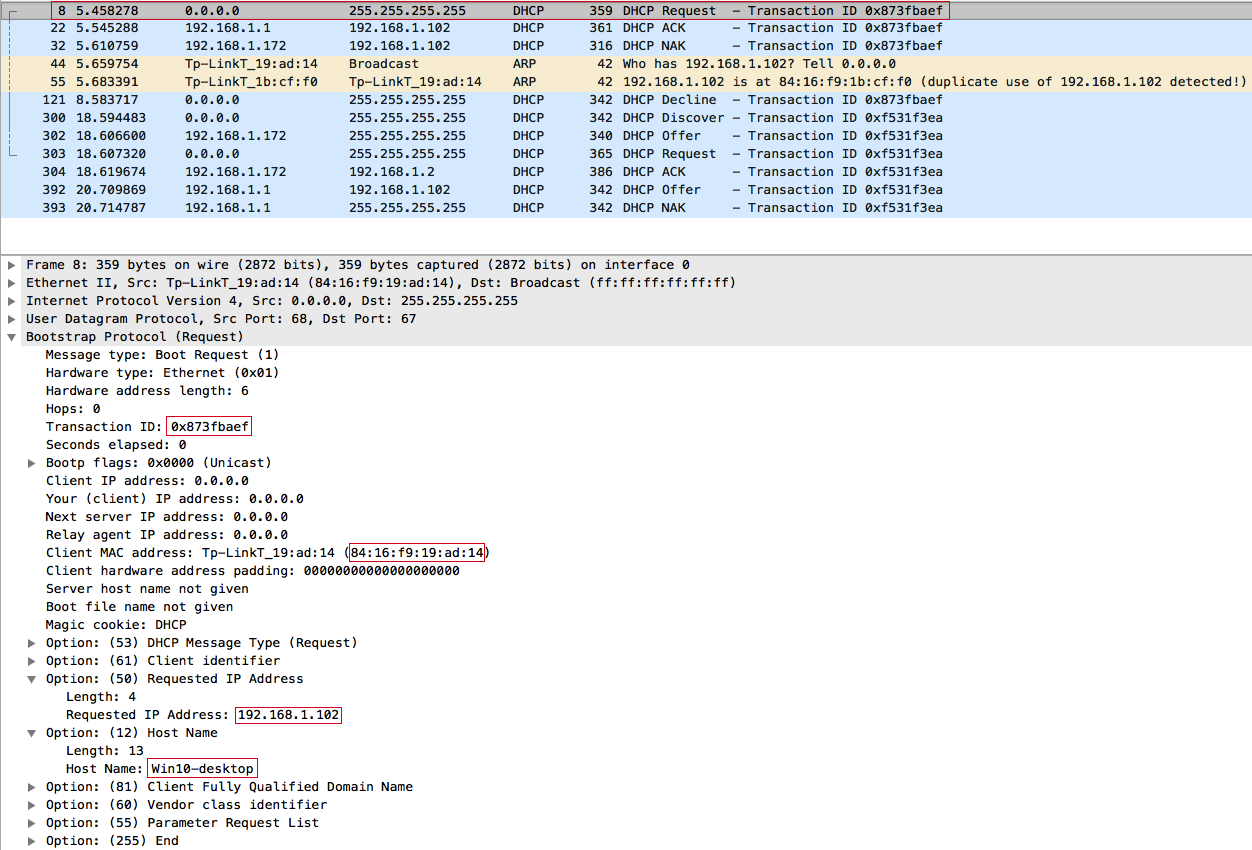
We intercept the client's request, but we will not have time to respond faster than the access point. Therefore, the client receives the IP address from the DHCP server obtained earlier: 192.168.1.102 . The client then uses the ARP protocol to try to detect IP address conflicts on the network :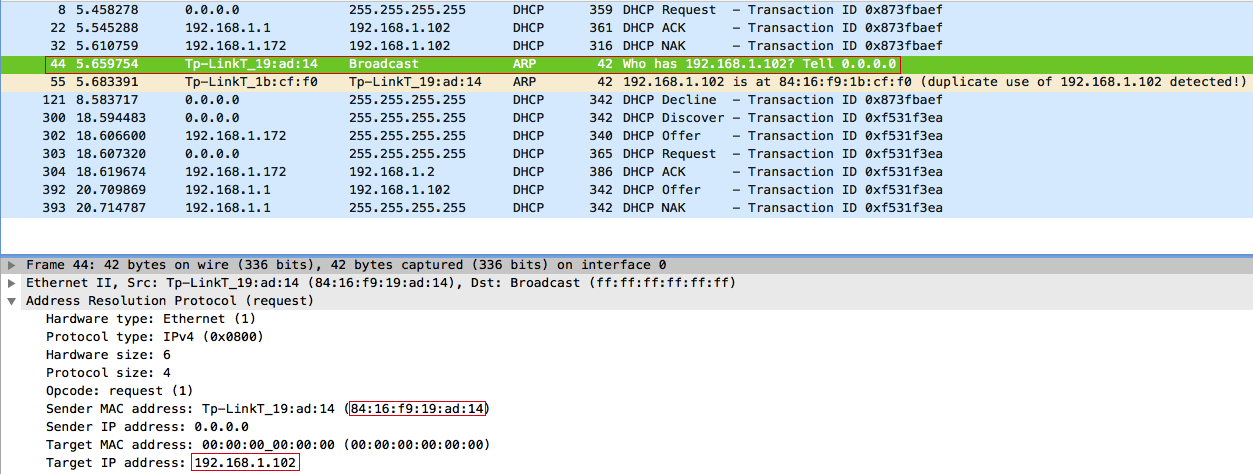
Naturally, such a request is broadcast, so we can intercept and respond to it: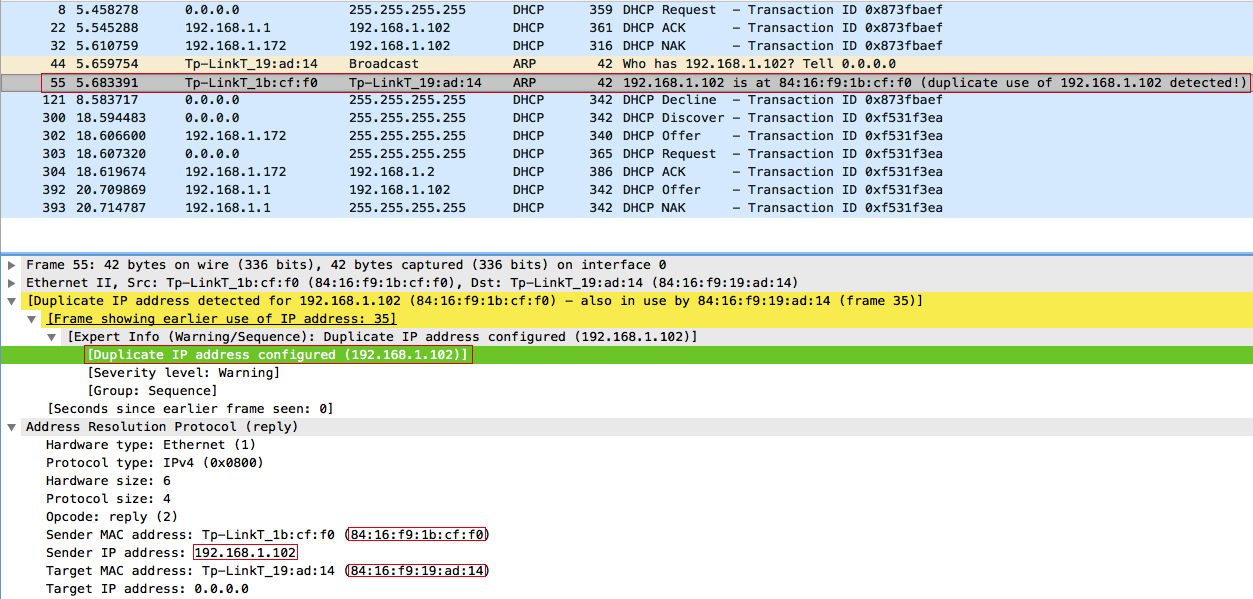
The client then fixes the IP address conflict and sends a DHCP reject broadcast message - DHCPDECLINE :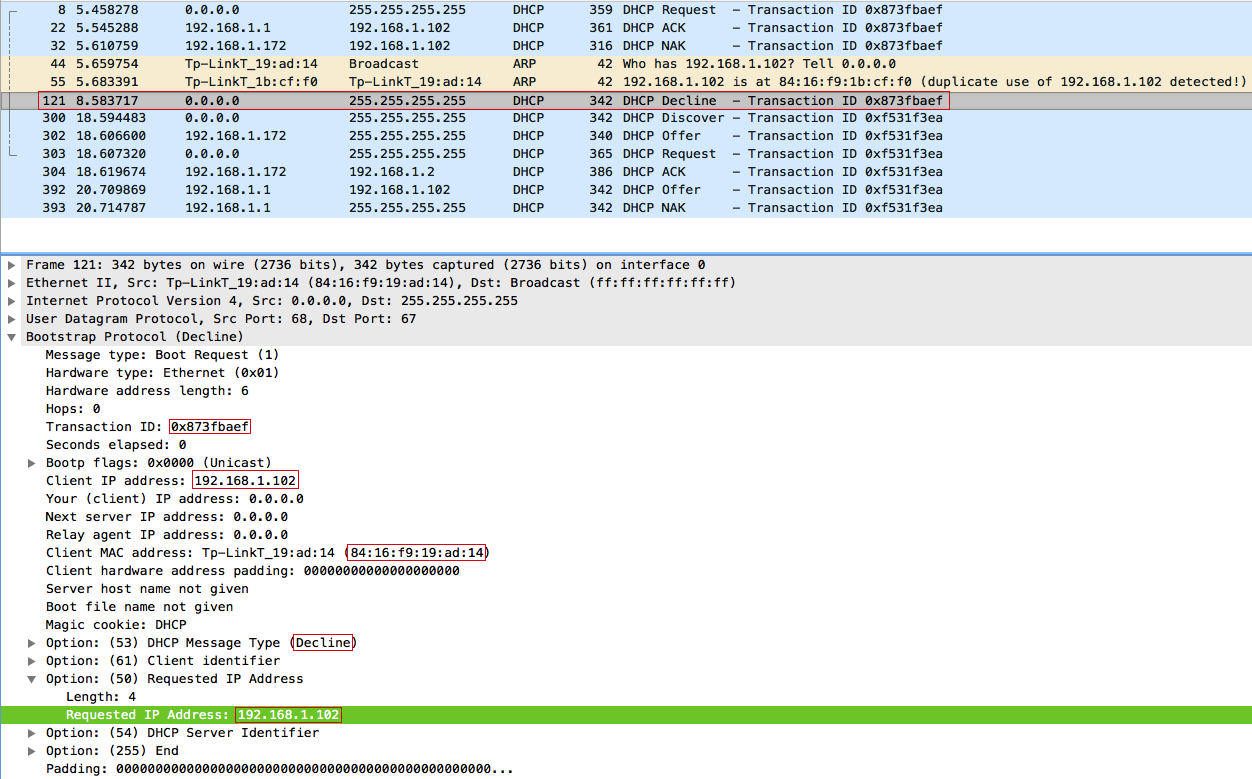
DHCPDISCOVER
And so, the last stage of the attack. After sending a DHCPDECLINE, the client goes through the procedure of obtaining an IP address from the very beginning, namely, it sends a broadcast DHCPDISCOVER . The legitimate DHCP server cannot respond to this request, since the free IP address pool is full after the DHCP starvation attack and therefore slows down noticeably, but we can respond to the DHCPDISCOVER - 192.168.1.172 .
Client 84: 16: F9: 19: AD: 14 (Win10-desktop) sends a broadcast DHCPDISCOVER :
We respond DHCPOFFER :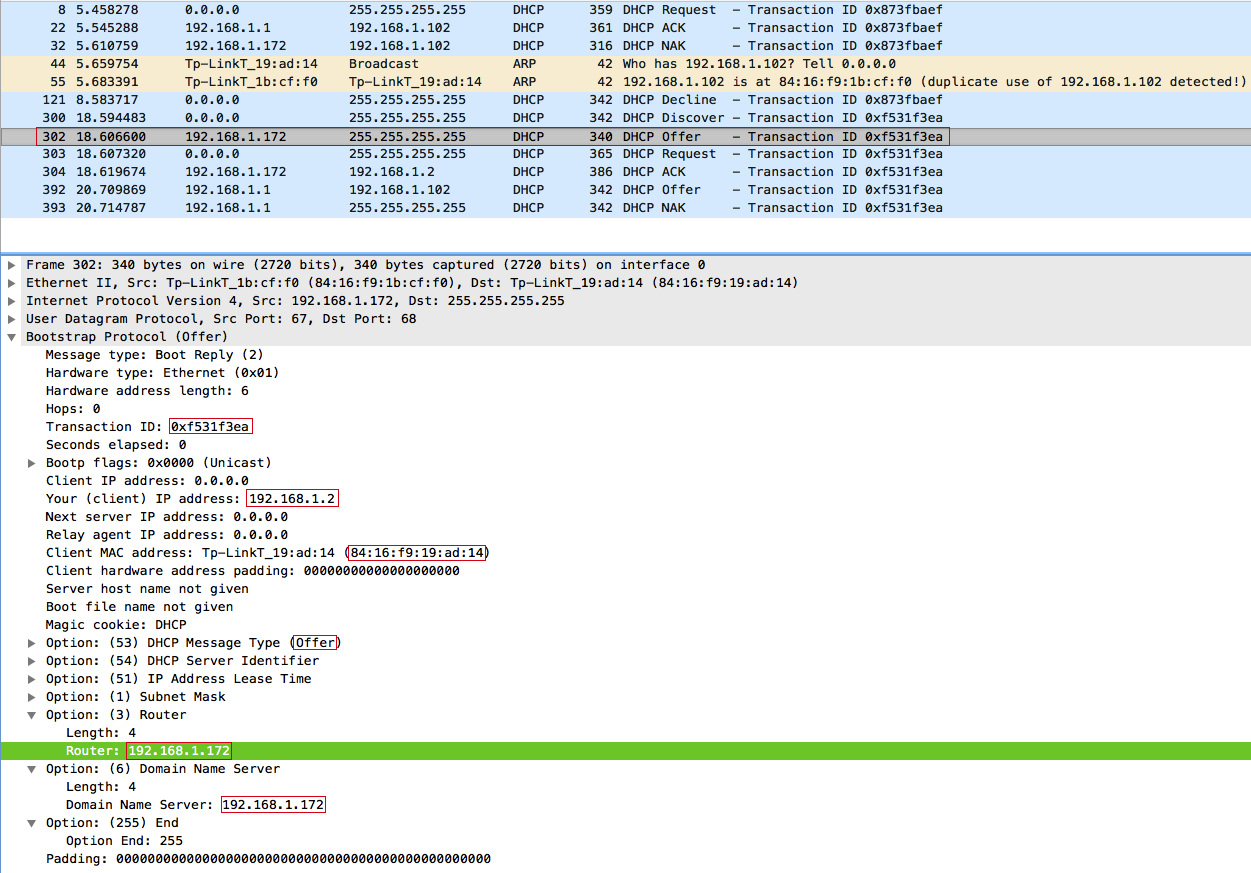
In DHCPOFFER, we offered the client an IP address of 192.168.1.2 . The client receiving this offer only sends a DHCPREQUEST from us, setting the value of the requested ip to 192.168.1.2 .
Client 84: 16: F9: 19: AD: 14 (Win10-desktop) sends a broadcast DHCPREQUEST :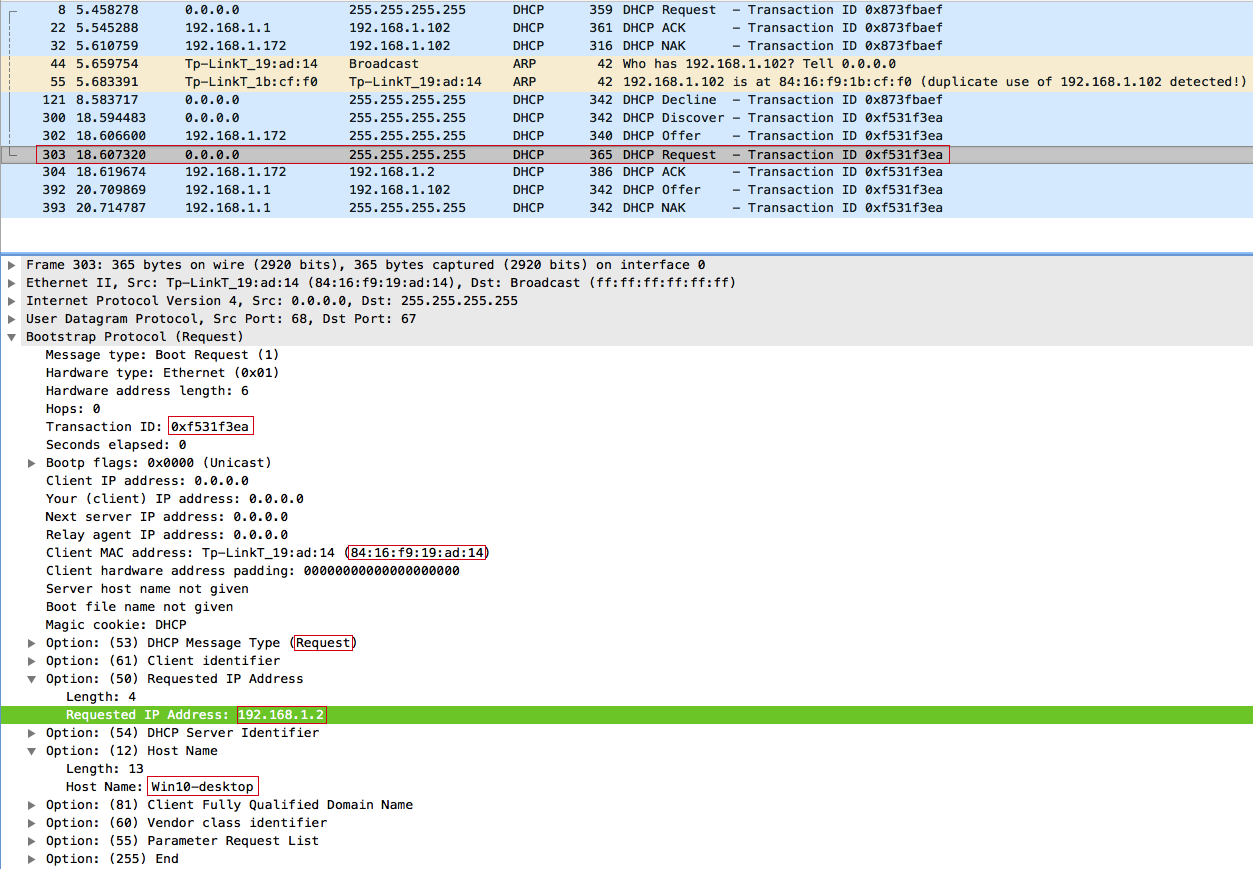
DHCPACK Answer: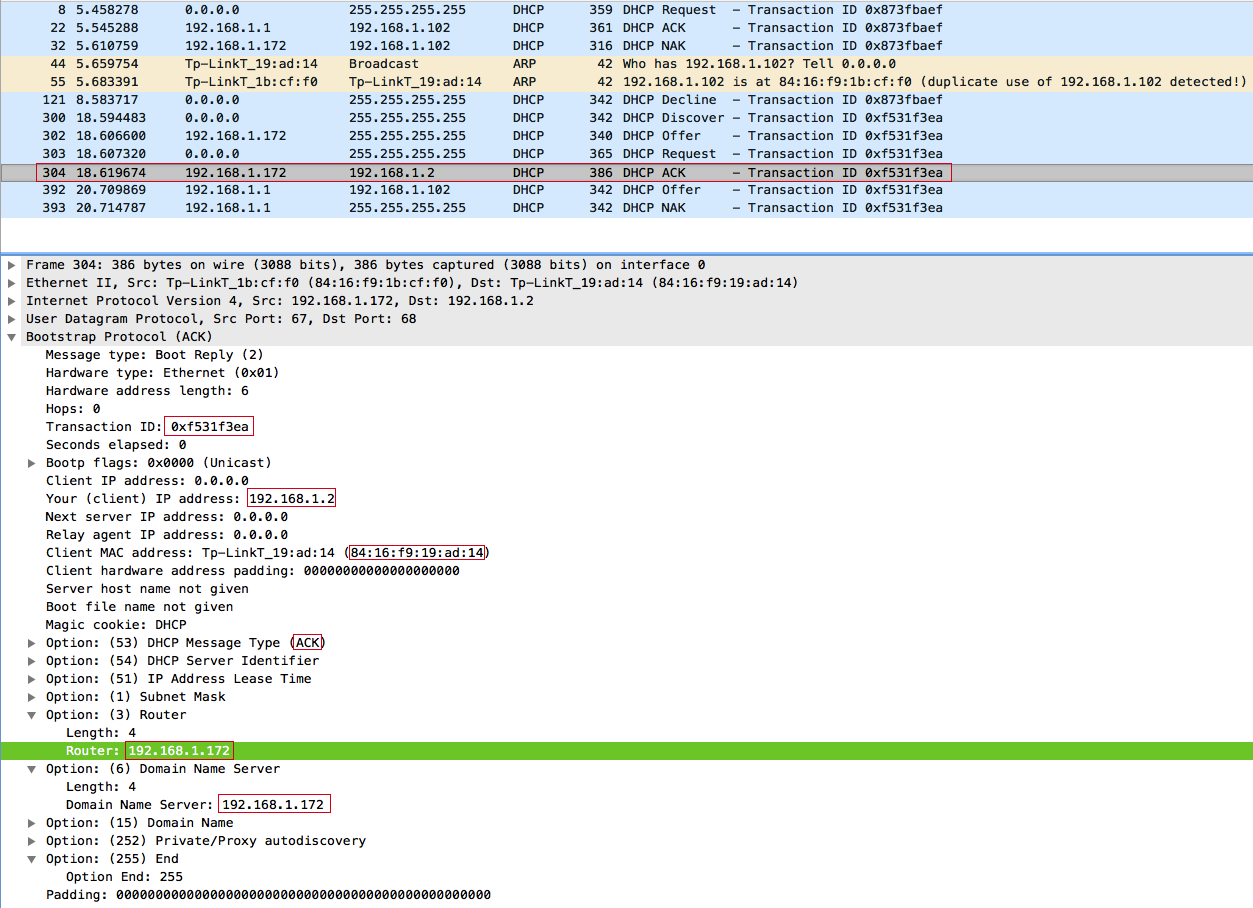
The client accepts our DHCPACK and sets our IP address as the default gateway and DNS server : 192.168.1.172 , and simply ignores the DHCPNAK from the access point sent 2 seconds later.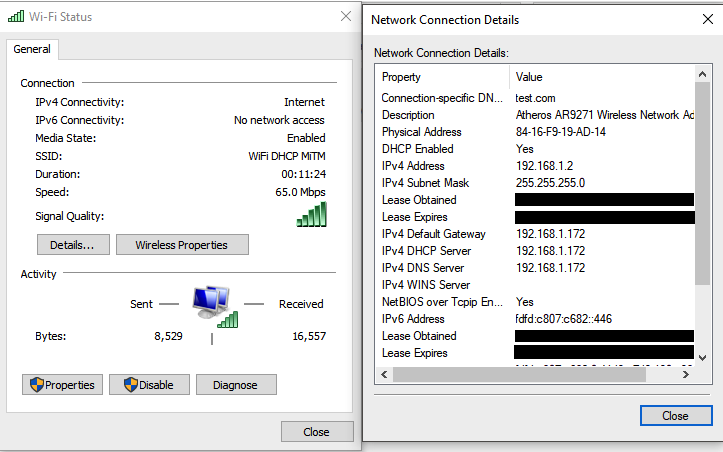
Question: Why did the access point send a DHCPOFFER and DHCPNAK for 2 seconds later , and even offered the same IP address 192.168.1.102 , because the client refused it?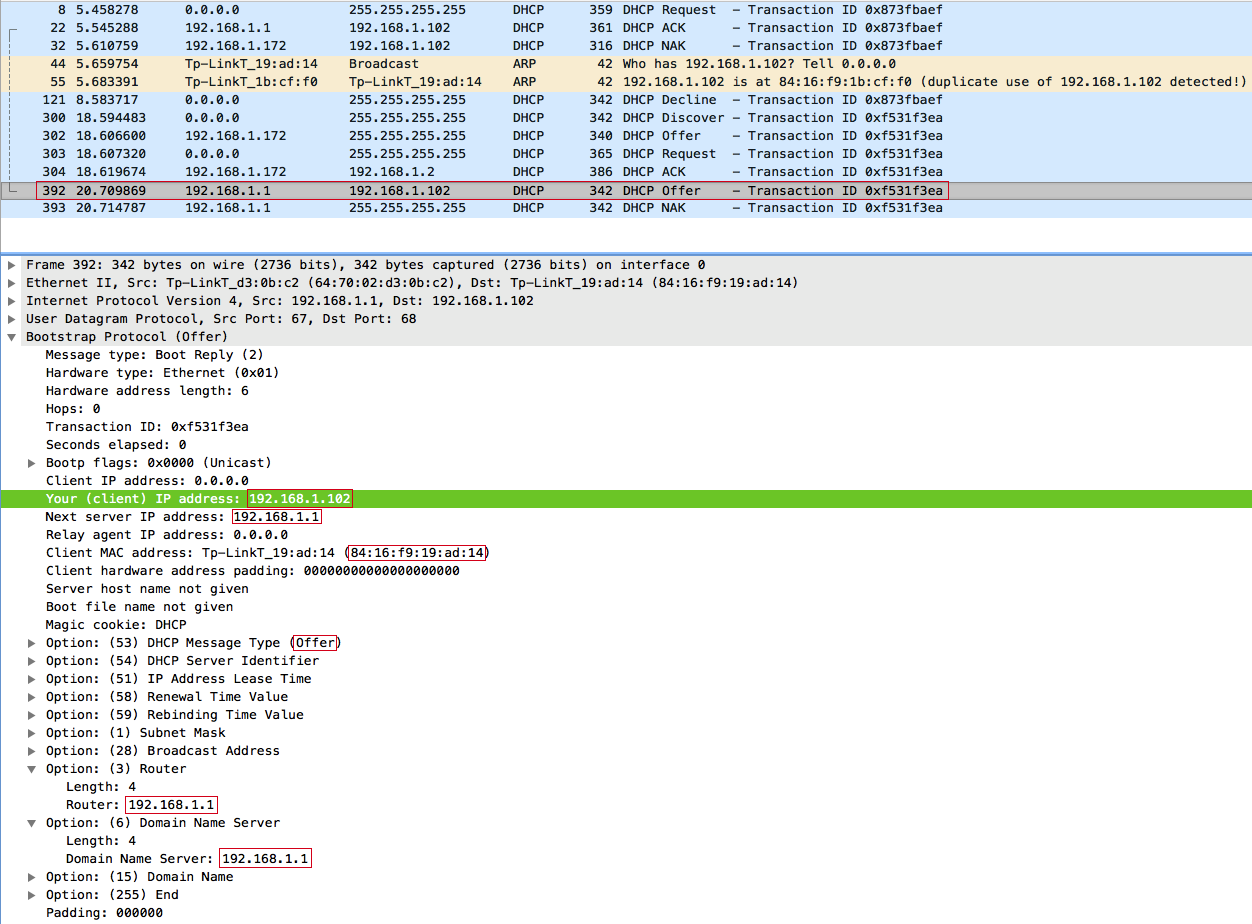
To answer this question, we will slightly change the filter in WireShark and see the ARP requests from the access point: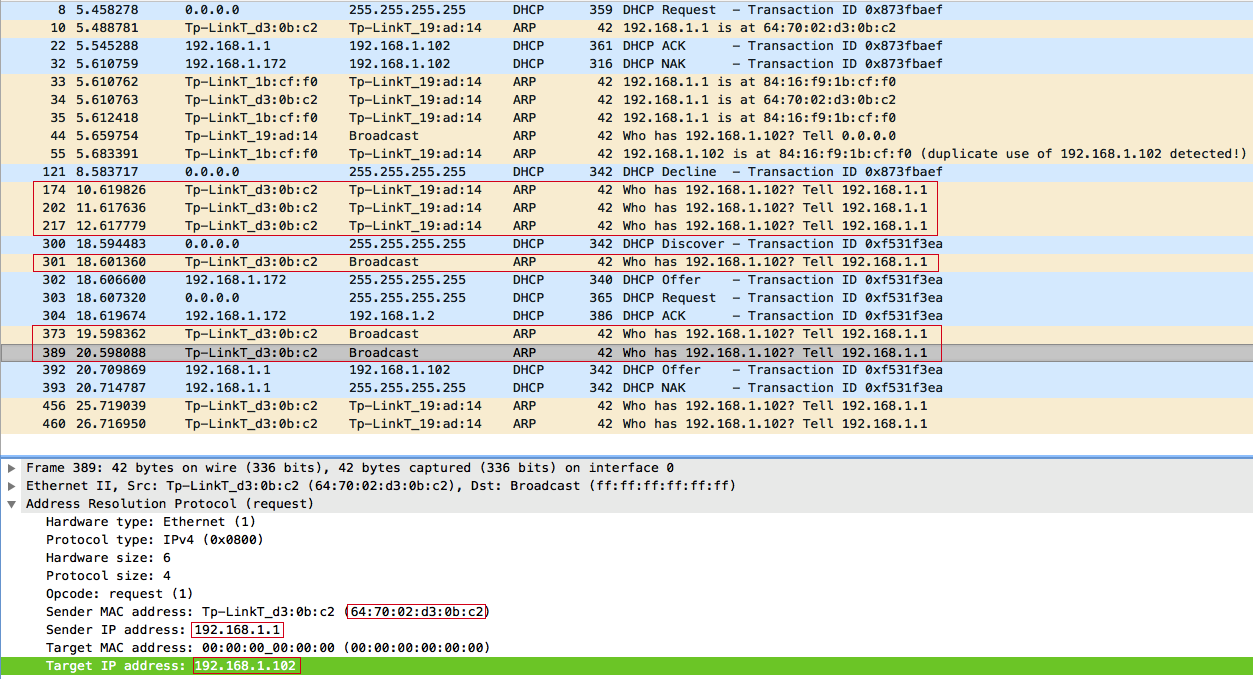
Answer: After the DHCP Starvation attack, the DHCP server did not have free IP addresses, besides, one of the clients refused: 192.168.1.102 . Therefore, upon receiving a DHCPDISCOVER request, the DHCP server sends three ARP requests within 2 seconds to find out who is using the IP address: 192.168.1.102 , and after the server has made sure that this IP address is free, because no one did not answer, gives it to the client. But it was too late for the attacker to respond quickly.
Results:
Thus, we can set any network parameters, namely: default gateway, DNS server and others - to any connected or new client in the attacked WiFi network, provided that we are already connected to it and can listen to broadcast traffic.
Video of the attack on MacOS Siera and Windows 10:
And of course PoC .
')
Source: https://habr.com/ru/post/338860/
All Articles