MVVM: Complete Understanding (+ WPF) Part 1
This article involved my experience of bringing a certain number of students to a complete and final understanding of the MVVM pattern and its implementation in WPF . The pattern is described with examples of increasing complexity. First, the theoretical part, which can be used regardless of a specific language, then the practical part, which shows several options for implementing communication between layers using WPF and, a little bit, Prism.
Why do I need to use the MVVM pattern? This is an extra code! Write the same can be much clearer and more straightforward.
The answer is: in small projects, the rectilinear approach works. But as soon as it becomes a bit more, the program's logic is smeared in the interface so that the whole project turns into a monolithic tangle, which is easier to rewrite again than trying to unravel. For clarity, you can look at two pictures:
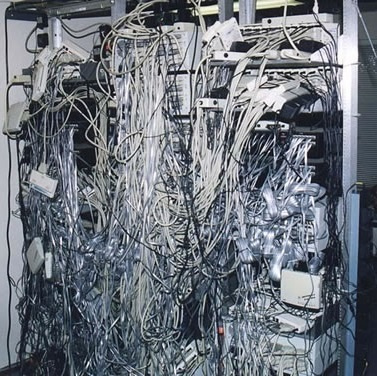
Image 1: code without MVVM.
')

Image 2: MVVM code.
In the first case, the programmer, with the words “I just need to connect this port and this one, why do I need all these clamps and labels?” Simply connects a couple of slots with a patchcord. In the second case, it uses some kind of template approach.
Method:
The method of writing a program using the approach "ModelFirst".
So, our task is to write a program to add two numbers with the result output. We carry out the first point: we write model. A model is a place in a program that may require some creative effort or the backing of its creative abilities.
However, creativity is a rather resource-consuming thought process, and excessive use of it should be avoided. Firstly - in order not to overstrain. Secondly - so that your programming fellow (and you yourself, in a couple of weeks), looking into your code, would not be forced to, at times too exciting, to follow the creative flight of thought. All the places where you suddenly managed to apply creativity, you need to provide a detailed commentary. By the way, there are numerous programming patterns that help you with this very work — not to apply.
So, the model in our problem will be the addition of numbers with the return of the result. The model, in principle, may not store any state. Those. it may well be implemented by a static method of a static class. Like that:
The next step - (see the “ModelFirst” methodology) - create a View or, more simply, draw an interface. This is also a part that may contain creativity. But, again, do not be worth it to overdo it. The user should not be shocked by the unexpected interface. The interface should be intuitive. Our View will contain three text fields that can be labeled: number one, number two, sum.
The final step is to connect the View and the model through the VM. VM is a place that should not contain a creative element at all. Those. This part of the pattern is iron driven by the View and should not contain ANY "business logic". What does conditionality from View mean? This means that if we have three text fields in View, or three places that must enter / output data - therefore in the VM (a kind of substrate) there must be at least three properties that these data accept / provide.
Therefore, two properties take from the View number one and two, and the third property calls our model to execute the business logic of our program. In no case does the VM perform the addition of numbers on its own; it only causes the model for this action! This is the function of the VM - to connect View (which is also nothing other than receiving input from the user and providing output to it) and the Model, in which the entire calculation takes place. If you draw a picture of our problem, you get something like this:
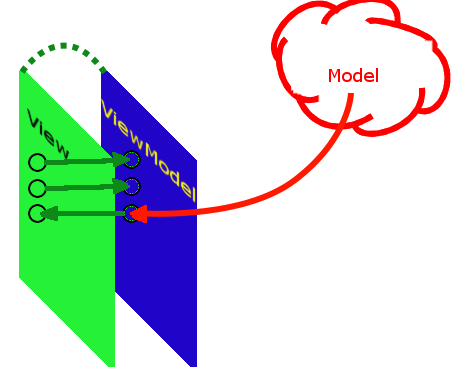
Image 3: Diagram of Example # 1
Green is a View, the three green dots in which are our three text fields. Blue is VM, to which these three green points are nailed (pribindeny), well, a red cloud is a model that is engaged in the calculation.
Specifically, in WPF implemented "hardware support" of the MVVM pattern. View is implemented in XAML. Those. the green layer (View) will be written in XAML. Green dots are text fields. And green lines connecting with blue will be implemented through the Binding mechanism. The green dashed line - the connection of the entire View and VM is performed when we create a VM object and assign it to the DataContext View property.
Draw View:
Now we execute the last item of the methodology - we implement the VM. In order for our VM to "automatically" update the View, you need to implement the INotifyPropertyChange interface. It is through it that View receives notifications that something has changed in the VM and that data needs to be updated.
This is done as follows:
Now we will supply the VM with three necessary properties. (The requirements for establishing a VM and View connection are such that they must be public properties)
The last property is the dashed blue line of the VM and model link:
We implemented a full-fledged application using the MVVM pattern.
Consideration of the pattern on the example number 2:
Now we complicate our task. The program will have a text box for entering the number. There will be a listbox with a collection of values. The “Add” button, by clicking on which a number in the text field will be added to the collection of values. The delete button, by clicking on which the selected number in the ListBox will be removed from the collection. And a text box with the sum of all values in the collection.
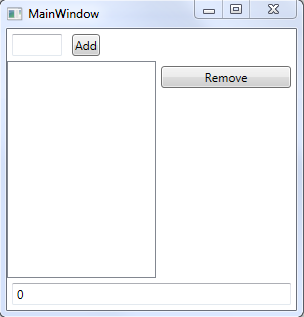
Image 4: Interface for Example 2
According to the method - you must first develop a model. Now the model can not be stateless and must keep state. So the model will be a collection of elements. This time. Then - the operation of adding a certain number to the collection is the responsibility of the model. VM cannot climb into the interior of the model and independently add a number to the model collection, it must ask the model to do it. Otherwise, it will be a violation of the principle of encapsulation. It is as if the driver did not, as it should be, poured fuel into the gas tank, etc. - and would climb under the hood and inject fuel directly into the cylinder. That is, there will be a “add number to collection” method. These are two. And third: the model will provide the sum of the values of the collection and also notify about its changes through the INotifyPropertyChanged interface. We will not raise disputes about the purity of the model, but will simply use the notification.
Let's immediately implement the model:
A collection of items should notify subscribers of their change. And it should be read-only so that no one except the model can change it in any way. Access restriction is the fulfillment of the principle of encapsulation, it must be strictly observed to: a) not accidentally create a situation of an elusive debug, b) instill confidence that the field does not change from the outside - again, in order to facilitate debugging.
In addition, since we continue to connect Prism for DelegateCommand anyway, then let's immediately use BindableBase instead of the self-implementation of INotifyPropertyChange. For this you need to connect via Prism.Wpf NuGet libraries (at the time of writing 6.3.0). Accordingly, OnPropertyChanged () change to RaisePropertyChanged ().
According to the method - draw a View. Before this, a few necessary explanations. In order to create a button and VM connection, you need to use DelegateCommand. The use for this event and the form code, for pure MVVM is not allowed. Used events must be framed into commands. But in the case of a button such a frame is not required, because there is its special property Command.
In addition, the number that we will add using DelegateCommand, we will not bind to the VM, but will be passed as a parameter to this DelegateCommand, in order not to clutter the VM and avoid desynchronization by directly invoking the command and using the parameter. Pay attention to the resulting scheme and, especially, to the place circled in red.
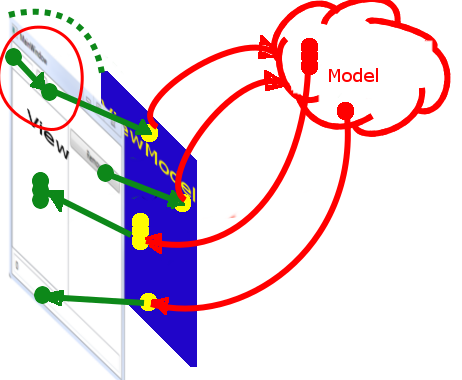
Image 5: Diagram for Example 2
Here, the binding on the View does not occur in the View <=> ViewModel, but in the View <=> View. In order to achieve this, a second type of binding is used, where the name of the element and its properties are indicated, to which the binding is performed - "{Binding ElementName = TheNumber, Path = Text}".
Now we implement the ViewModel:
Attention is important! Concerning forwarding notifications from the model. The VM cannot independently notify about the change in the amount. she should not know what exactly to change in the model, after calling her methods and whether to change at all. The VM model must be a black box. Those. it should transfer user input and actions to the model and if something has changed in the model (what the model itself should notify about it), then only then notify further View.
We implemented the second full-fledged application using the MVVM pattern, got acquainted with the ObservableCollection, DelegateCommand, binding the View <=> View and forwarding notifications to the View.
Why do I need to use the MVVM pattern? This is an extra code! Write the same can be much clearer and more straightforward.
The answer is: in small projects, the rectilinear approach works. But as soon as it becomes a bit more, the program's logic is smeared in the interface so that the whole project turns into a monolithic tangle, which is easier to rewrite again than trying to unravel. For clarity, you can look at two pictures:
Image 1: code without MVVM.
')
Image 2: MVVM code.
In the first case, the programmer, with the words “I just need to connect this port and this one, why do I need all these clamps and labels?” Simply connects a couple of slots with a patchcord. In the second case, it uses some kind of template approach.
Consideration of the pattern on example No. 1: Addition of two numbers with the result output
Method:
The method of writing a program using the approach "ModelFirst".
- 1. Develop a program model.
- 2. Draw the program interface.
- 3. Connect the interface and model with a VM layer.
So, our task is to write a program to add two numbers with the result output. We carry out the first point: we write model. A model is a place in a program that may require some creative effort or the backing of its creative abilities.
However, creativity is a rather resource-consuming thought process, and excessive use of it should be avoided. Firstly - in order not to overstrain. Secondly - so that your programming fellow (and you yourself, in a couple of weeks), looking into your code, would not be forced to, at times too exciting, to follow the creative flight of thought. All the places where you suddenly managed to apply creativity, you need to provide a detailed commentary. By the way, there are numerous programming patterns that help you with this very work — not to apply.
So, the model in our problem will be the addition of numbers with the return of the result. The model, in principle, may not store any state. Those. it may well be implemented by a static method of a static class. Like that:
static class MathFuncs { public static int GetSumOf(int a, int b) => a + b; } The next step - (see the “ModelFirst” methodology) - create a View or, more simply, draw an interface. This is also a part that may contain creativity. But, again, do not be worth it to overdo it. The user should not be shocked by the unexpected interface. The interface should be intuitive. Our View will contain three text fields that can be labeled: number one, number two, sum.
The final step is to connect the View and the model through the VM. VM is a place that should not contain a creative element at all. Those. This part of the pattern is iron driven by the View and should not contain ANY "business logic". What does conditionality from View mean? This means that if we have three text fields in View, or three places that must enter / output data - therefore in the VM (a kind of substrate) there must be at least three properties that these data accept / provide.
Therefore, two properties take from the View number one and two, and the third property calls our model to execute the business logic of our program. In no case does the VM perform the addition of numbers on its own; it only causes the model for this action! This is the function of the VM - to connect View (which is also nothing other than receiving input from the user and providing output to it) and the Model, in which the entire calculation takes place. If you draw a picture of our problem, you get something like this:
Image 3: Diagram of Example # 1
Green is a View, the three green dots in which are our three text fields. Blue is VM, to which these three green points are nailed (pribindeny), well, a red cloud is a model that is engaged in the calculation.
Implementing Example 1 in WPF
Specifically, in WPF implemented "hardware support" of the MVVM pattern. View is implemented in XAML. Those. the green layer (View) will be written in XAML. Green dots are text fields. And green lines connecting with blue will be implemented through the Binding mechanism. The green dashed line - the connection of the entire View and VM is performed when we create a VM object and assign it to the DataContext View property.
Draw View:
<Window .... xmlns:local "clr-namespace: MyNamespace"> <!-- VM --> <Window.DataContext> <local:MainVM/> <!-- VM View --> </Window.DataContext> <StackPanel> <!--Binding, , VM --> <!--UpdateSourceTrigger, , VM --> <TextBox Width="30" Text="{Binding Number1, UpdateSourceTrigger=PropertyChanged}"> <TextBox Width="30" Text="{Binding Number2, UpdateSourceTrigger=PropertyChanged}"> <!--Mode=OneWay --> <TextBox Width="30" Text="{Binding Number3, Mode=OneWay}" IsReadOnly="True"> </StackPanel> Now we execute the last item of the methodology - we implement the VM. In order for our VM to "automatically" update the View, you need to implement the INotifyPropertyChange interface. It is through it that View receives notifications that something has changed in the VM and that data needs to be updated.
This is done as follows:
public class MainVM : INotifyPropertyChange { public event PropertyChangedEventHandler PropertyChanged; protected virtual void OnPropertyChanged(string propertyName) { PropertyChanged?.Invoke(this, new PropertyChangedEventArgs(propertyName)); } } Now we will supply the VM with three necessary properties. (The requirements for establishing a VM and View connection are such that they must be public properties)
private int _number1; public int Number1 { get {return _number1;} set { _number1 = value; OnPropertyChanged("Number3"); // View , } } private int _number2; public int Number2 { get {return _number2;} set { _number1 = value; OnPropertyChanged("Number3"); } } The last property is the dashed blue line of the VM and model link:
// , View , Number1 Number2 public int Number3 { get; } => MathFuncs.GetSumOf(Number1, Number2); We implemented a full-fledged application using the MVVM pattern.
Consideration of the pattern on the example number 2:
Now we complicate our task. The program will have a text box for entering the number. There will be a listbox with a collection of values. The “Add” button, by clicking on which a number in the text field will be added to the collection of values. The delete button, by clicking on which the selected number in the ListBox will be removed from the collection. And a text box with the sum of all values in the collection.
Image 4: Interface for Example 2
According to the method - you must first develop a model. Now the model can not be stateless and must keep state. So the model will be a collection of elements. This time. Then - the operation of adding a certain number to the collection is the responsibility of the model. VM cannot climb into the interior of the model and independently add a number to the model collection, it must ask the model to do it. Otherwise, it will be a violation of the principle of encapsulation. It is as if the driver did not, as it should be, poured fuel into the gas tank, etc. - and would climb under the hood and inject fuel directly into the cylinder. That is, there will be a “add number to collection” method. These are two. And third: the model will provide the sum of the values of the collection and also notify about its changes through the INotifyPropertyChanged interface. We will not raise disputes about the purity of the model, but will simply use the notification.
Let's immediately implement the model:
A collection of items should notify subscribers of their change. And it should be read-only so that no one except the model can change it in any way. Access restriction is the fulfillment of the principle of encapsulation, it must be strictly observed to: a) not accidentally create a situation of an elusive debug, b) instill confidence that the field does not change from the outside - again, in order to facilitate debugging.
In addition, since we continue to connect Prism for DelegateCommand anyway, then let's immediately use BindableBase instead of the self-implementation of INotifyPropertyChange. For this you need to connect via Prism.Wpf NuGet libraries (at the time of writing 6.3.0). Accordingly, OnPropertyChanged () change to RaisePropertyChanged ().
public class MyMathModel : BindableBase { private readonly ObservableCollection<int> _myValues = new ObservableCollection<int>(); public readonly ReadOnlyObservableCollection<int> MyPublicValues; public MyMathModel() { MyPublicValues = new ReadOnlyObservableCollection<int>(_myValues); } // public void AddValue(int value) { _myValues.Add(value); RaisePropertyChanged("Sum"); } // , public void RemoveValue(int index) { // - if (index >= 0 && index < _myValues.Count) _myValues.RemoveAt(index); RaisePropertyChanged("Sum"); } public int Sum => MyPublicValues.Sum(); // } According to the method - draw a View. Before this, a few necessary explanations. In order to create a button and VM connection, you need to use DelegateCommand. The use for this event and the form code, for pure MVVM is not allowed. Used events must be framed into commands. But in the case of a button such a frame is not required, because there is its special property Command.
In addition, the number that we will add using DelegateCommand, we will not bind to the VM, but will be passed as a parameter to this DelegateCommand, in order not to clutter the VM and avoid desynchronization by directly invoking the command and using the parameter. Pay attention to the resulting scheme and, especially, to the place circled in red.
Image 5: Diagram for Example 2
Here, the binding on the View does not occur in the View <=> ViewModel, but in the View <=> View. In order to achieve this, a second type of binding is used, where the name of the element and its properties are indicated, to which the binding is performed - "{Binding ElementName = TheNumber, Path = Text}".
<Window ...> <Window.DataContext> <local:MainVM/> <!-- DataContext --> </Window.DataContext> <DockPanel> <!-- --> <StackPanel DockPanel.Dock="Top" Orientation="Horizontal"> <TextBox x:Name="TheNumber" Width="50" Margin="5"/> <Button Content="Add" Margin="5" Command="{Binding AddCommand}" CommandParameter="{Binding ElementName=TheNumber, Path=Text}"/> </StackPanel> <!-- --> <TextBox DockPanel.Dock="Bottom" Text="{Binding Sum, Mode=OneWay}" Margin="5"/> <!-- --> <Button DockPanel.Dock="Right" VerticalAlignment="Top" Content="Remove" Width="130" Margin="5" Command="{Binding RemoveCommand}" CommandParameter="{Binding ElementName=TheListBox, Path=SelectedIndex}"/> <!-- --> <ListBox x:Name="TheListBox" ItemsSource="{Binding MyValues}"/> </DockPanel> </Window> Now we implement the ViewModel:
public class MainVM : BindableBase { readonly MyMathModel _model = new MyMathModel(); public MainVM() { // View _model.PropertyChanged += (s, e) => { RaisePropertyChanged(e.PropertyName); }; AddCommand = new DelegateCommand<string>(str => { // - VM int ival; if (int.TryParse(str, out ival)) _model.AddValue(ival); }); RemoveCommand = new DelegateCommand<int?>(i => { if(i.HasValue) _model.RemoveValue(i.Value); }); } public DelegateCommand<string> AddCommand { get; } public DelegateCommand<int?> RemoveCommand { get; } public int Sum => _model.Sum; public ReadOnlyObservableCollection<int> MyValues => _model.MyPublicValues; } Attention is important! Concerning forwarding notifications from the model. The VM cannot independently notify about the change in the amount. she should not know what exactly to change in the model, after calling her methods and whether to change at all. The VM model must be a black box. Those. it should transfer user input and actions to the model and if something has changed in the model (what the model itself should notify about it), then only then notify further View.
We implemented the second full-fledged application using the MVVM pattern, got acquainted with the ObservableCollection, DelegateCommand, binding the View <=> View and forwarding notifications to the View.
Source: https://habr.com/ru/post/338518/
All Articles