We write for UEFI BIOS in Visual Studio. Part 1 - Deploying the development environment, compiling and running to debug
Introduction
This article will describe how to quickly start programming for UEFI in the edk2 framework in Visual Studio without spending a lot of time setting up the environment in the usual way, using the original manuals. It is enough to give the git clone command ... in the root directory of the disk, and this is actually all, the environment will be fully installed and ready to go. Requires 64-bit Windows 7 and higher with Visual Studio 2008-2015 . These two conditions are not obligatory, but then you have to work a little to assemble the edk2 system - Visual Studio as a whole, a brief memo will be given.
The purpose of the article is to lead the beginner by the hand on the first UEFI project, remaining in his familiar environment. For more experienced people, I hope it will be interesting to work in VS instead of the usual command line, or to disassemble the approach and transfer it to your favorite Eclipse .
Let's start with simple things, output the string to the console and Russify (a pretty demanded thing, and simple to implement), then there will be work with forms in HII (what was commonly called BIOS Setup pages), then graphics, then Boot Manager , and then It will be seen (s).
')
Those interested - please welcome under cat.
Now you need to decide whether you need it or not. We will spend half a page on this at the start, so as not to waste half a day and at the end understand that you need something completely different. Or, I hope, on the contrary - to catch fire with enthusiasm and find time to read the article.
Good at first
1) Hardware is not needed from the word at all. No Evaluation Boards , no Intel BlueBox JTAG for $ 3000. Everything will be debugged in a 32-bit OVMF virtual machine - Intel 's ported qemu virtual machine for debugging UEFI Firmware . To recompile for a real platform, then after debugging it’s enough to rearrange a pair of keys in the compilation settings, and that’s it.
2) We will work with all the capabilities of Visual Studio , i.e. breakpoints, watch, step execution and the rest are available. Recompiling and running a simple module takes 8-10 seconds.
3) The virtual file system is available on a Windows machine for write-read. It is very useful if you need to edit the UEFI Shel l scripts, after launching to see screenshots and analyze logs using Windows.
4) No assembler , only C / C ++ .
Now that we will not do
1) We will work in DXE (where there is already a UEFI Shell ) and late phases. We won't get into earlier phases, since nobody will let us in there, at least for Intel processors. Later there will be an explanation of why. If you want to make a full cycle, from switching on to OS loading, and quickly and without scoring a bunch of unnecessary and uninteresting information at the moment, you don’t need to manually configure the system at all - don’t read further, and type in "coreboot" in Google.
2) "Graphic" UEFI with a mouse and buttons, like Dell, MSI and others, will not be here. These are paid environments for use in large companies. There are, of course, enthusiasts who create them themselves with their own hands, without first answering the question “Why?”, But usually their enthusiasm ends on the second form with buttons.
3) We will work with the Visual Studio compiler. Those interested can set up gcc in cygwin , or icc , but at the moment it’s not a task to get the optimal fast code, but it’s a task to quickly go to the beginning of full-fledged work.
All, the preliminary dances are over, who is necessary - inspired, who is necessary - scared.
Getting down to business
First of all, download the repository to the root of the disk. It will turn in with: / FW . If the FW directory in the root of the disk already exists, then it would be better to rename it, because all configs are configured exactly in absolute paths. Not according to Feng Shui, but perfectionists can always correct absolute relative paths by writing the corresponding script that does this.
So, whoever has git on the command line on the machine, executes the command in the cmd window (or in Far Commander , not the essence) from the root directory:
git clone https://github.com/ProgrammingInUEFI/FWand those who do not, follow the link to github , download the zip-file and open it in the directory with: / FW .
As previously promised, we give a hint from the Intel training on the use of a different configuration, different from that indicated at the beginning of the article. Look for your combination in the plate, if the proposed for some reason does not fit:

Configuring the environment for a version other than VS2010
Open the file c: \ FW \ edk2 \ Conf \ target.txt and in the line
TOOL_CHAIN_TAG = VS2010x86Replace VS2010x86 with the tag of the version of Visual Studio you have installed. For Visual Studio 2010, the tag will remain as it is, for other versions of VS - see the picture above, or the list at the beginning of the file c: \ FW \ edk2 \ Conf \ tools_def.txt
Actually, the edk2 development environment is fully deployed and you can work from the command line. Some people work all their lives (“to steal from hardcore, maintain the spirit of the old school and all that” - (c) CodeRush in its classic article ). But we still go further, to transfer a person from MSVS back to the command line is inhumane, especially in 2017.
We configure the project in the Visual Studio
Open Visual Studio , open Solution NT32.sln in it from the directory C: \ FW \ VS \ NT32 . In order to reduce the time of entry into the theme, the solution has already created the NT32 project of the same name, in which the settings described below have already been made. This is if you fail to create it yourself - in order to have guaranteed working project settings. This approach will greatly reduce the time to search for the source of problems, if they occur. Nevertheless, it is better to go through the path described below, and to understand the meaning of the settings - this will make it easier to set up the following projects.
A little advice for those who caught fire seriously
It will be useful to set up the working directory on c: \ FW \ VS in Tools-> Options right away, but if another working project is being run in VS, then you don’t need to do so:

So, in steps:
Project creation
Create a new project for Visual C ++ in Solution NT32 (right- click on Solution NT32, Add-> New Project , select the Makefile Project option), and call it MyFirstUEFIProject (or anything else). Click Finish .

Select the NT32 project in the Solution , select Project-> Properties from the context menu and make project settings.
Setting NMake Options
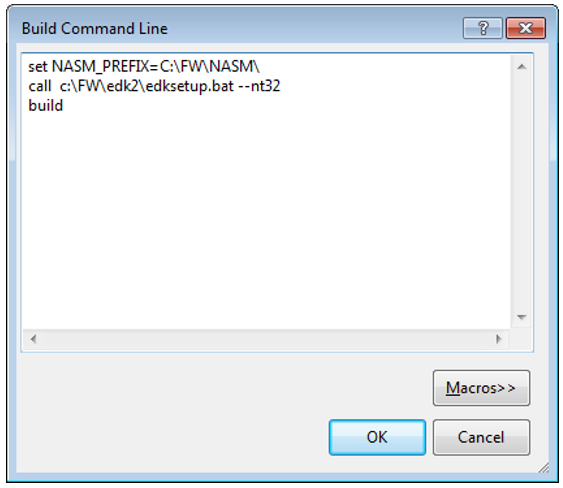
In the window on the left, select the line Configurarion Properties → NMake , in the window on the right - the line Build Command Line

Click Edit ... and in the opened text box we enter:
set NASM_PREFIX=C:\FW\NASM\ call c:\FW\edk2\edksetup.bat --nt32 build Now it is worth explaining a little what we do. In fact, we are writing in this window a regular batch bat file instead of a makefile.
The first line sets the NASM_PREFIX assembler environment variable as understood by edk2 , that is, the path that the nasm.exe file lies on. We will not write on the assembler ourselves, but our assembly system needs an assembler.
The second line calls the edk2 environment settings script and sets up environment variables for this compilation and launch session (these variables are not reflected outside VS). The –nt32 switch tells the build system to compile the sources for the Nt32Pkg package, located in C: \ FW \ edk2 \ Nt32Pkg . There are many packages there, we will consider them, but not now.
In the third line, we give the command to compile in the newly configured environment ( build.exe is in C: \ FW \ edk2 \ BaseTools \ Bin \ Win32 , this path is written in the previous line, in edksetup.bat )
So, this is what we should have in the Build Command Line text box:
Then, in the next line, enter the Rebuild Command Line in the window that opened under Edit ... window
set NASM_PREFIX=C:\FW\NASM\ call c:\FW\edk2\edksetup.bat --nt32 build clean build The build clean command means the very thing that you assume. It makes a complete restructuring of the project with recompilation of all modules.
What we enter in the window from Clean Command Line , probably, everyone already guessed:
set NASM_PREFIX=C:\FW\NASM\ call c:\FW\edk2\edksetup.bat --nt32 build clean Honestly, this option is not needed, in 99% of cases Rebuild will be enough, but let it be - for example, clear the environment to transfer it to another place or upload it to github.
As a result, we should have this window:

All with NMake setup.
Debugging option setting
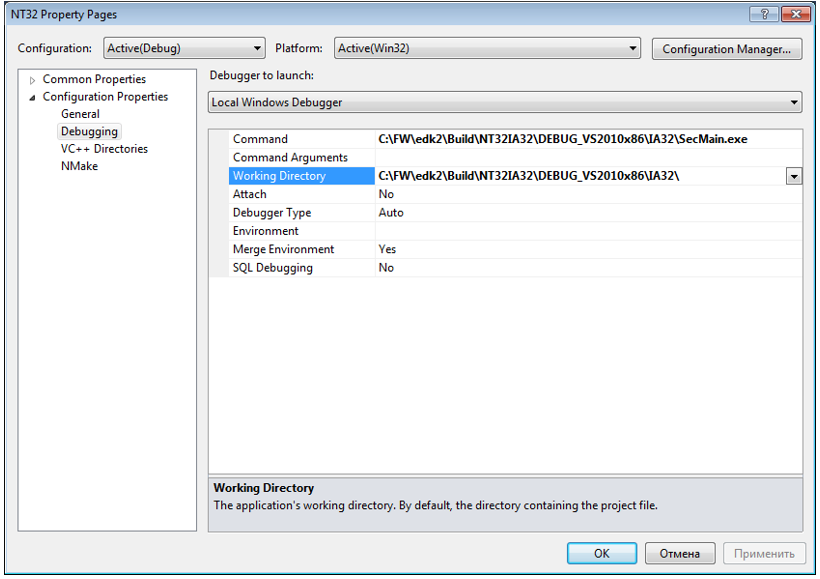
So, open the Debugging line and enter:
In the Command line:
C:\FW\edk2\Build\NT32IA32\DEBUG_VS2010x86\IA32\SecMain.exe In the line “Working Directory” :
C:\FW\edk2\Build\NT32IA32\DEBUG_VS2010x86\IA32\ A couple of comments:
SecMain.exe - to explain now what it is - for a long time, if very briefly and simplified - then this is an analogue of the bootloader, which runs everything else.
Working directory - all successfully created modules will be placed here, and they will be accessible all at once from the command line.
So, this is what we should get after the settings in this window:
That's all with the project settings.
Build the project
Call Build Solution , look at the screen for about a minute, during which there is the greatest risk of being cursed by the compiler, and go to drink coffee - it will all be created 10-15 minutes, depending on the resources of your computer. Nothing boring is forever, and in the end we get the message:
========== Build: 1 succeeded, 0 failed, 0 up-to-date, 0 skipped ==========If instead something else is obtained, see if you have completed all the steps correctly. The worst case is to get:
LINK : fatal error LNK1123: failure during conversion to COFF: file invalid or corruptThis is a VS2010 environment bug and means that VS2010 is installed without SP1. Put SP1, or look for ways to plug this error in the internet.
If you got an error and it is not clear from the compiler messages what it is - rearrange the default project on NT32 and run it for compilation with debugging. If there is an error, check TOOL_CHAIN_TAG for the predefined values described in tools_def.txt . Nothing else can rest there, except that Visual Studio itself is installed, hmm, not quite standard, or it uses a third-party compiler.
Jobs at UEFI Shell
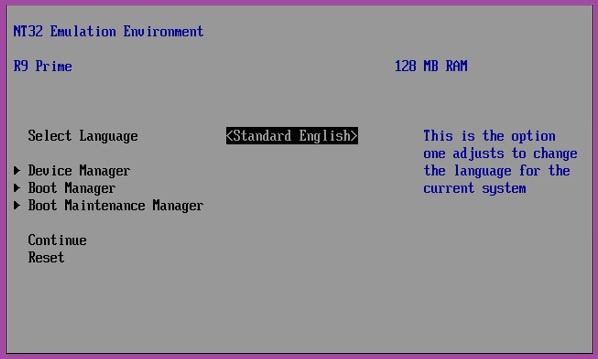
So, everything compiled well, and you read these lines. Now click on your favorite F5 and after about a minute of working with the disk (we will shorten this time later) we get the following picture:

Actually, this is the UEFI Shell . How to work in it - a lot of manuals are written, take a look at Google, but for now we will do a few things in it.
1. We look that we compiled there for these 10 minutes. Enter fs0: ( UEFI Shell is case-insensitive) and then ls –b , where the –b option means waiting for Enter to scroll the page, because the list is large, not on a single screen.
Now it became clear what the “Working Directory” parameter in the Visual Studio project option settings meant - C: \ FW \ edk2 \ Build \ NT32IA32 \ DEBUG_VS2010x86 \ IA32 \ . There is the same list of files, and it is better to watch it (and edit scripts) through the developed Far Commander (or Total Commander ) shell than from the command line in the UEFI Shell .
2. In UEFI Shell and type “hel”, press Tab and see Helloworld.efi on the screen. Not that we had no idea what would happen if you press Enter after that, but you need to check! Click and get three times UEFI Hello World! . The number of repetitions is an external parameter configurable in the environment settings (and not in the source code), and we will analyze this configuration later.
3. Type exit and get into our favorite and familiar window:
Well, you can admire the fruits of their labors. After that, the arrows drive the focus to the Reset and the virtual machine closes, returning us to the familiar MSVC window.
Print our string
Creating your application completely will require quite a lot of settings, which will be better considered in the next article - otherwise you will get a large amount, and no one will read long sheets. However, “Programming” is written in the title of this article, but for the time being we were only engaged in tuning. To keep the promise, let's make a very simple modification of the HelloWorld application in this article using its existing set of files, and in the next article we will create our own, using the Intel UEFI Driver Wizard utility, since we can run beginners through the full cycle of creating a set of files for the UEFI driver ( applications) is nonhuman, wildly routine and bears the risk of losing 90% of the audience. If a person hooks - he will come to this with time, and if you just want to play, it makes no sense to spend a lot of time on it, since much has already been done automatically through the UEFI Driver Wizard , and feng shui, which is naive to expect from a beginner.
So, open the file in Visual Studio
C:\FW\edk2\MdeModulePkg\Application\HelloWorld\HelloWorld.cAnd we will add our simple line immediately after the declaration of variables in a single function:
Print (L"I did it in UEFI!\r\n"); Of course, the text can be replaced by anything, only in English letters - the Russian font edk2 still does not understand, we will add it in the following articles. You can put an ordinary breakpoint on this line and see how Visual Studio behaves.
Click F5 , after compiling and eliminating errors, enter “fs0:” , HelloWorld.efi and get the following output:

That's all. In the next article, we will work a little bit in UEFI Shell to get the hang of it, and analyze a bit of theory.
Source: https://habr.com/ru/post/338264/
All Articles