learnopengl. Lesson 2.6 - Multiple Illumination Sources

Multiple light sources
In previous lessons, we learned quite a bit about lighting in OpenGL. We got acquainted with the Phong lighting model, figured out how to work with materials, texture maps and various types of light source. In this lesson we are going to combine all of our knowledge to create a fully lit stage with 6 active light sources. We are going to simulate the sun as a directional light source, add 4 points of light scattered throughout the scene, and of course we will add a flashlight.
In the previous series
Part 1. Start
')
- Opengl
- Creating a window
- Hello window
- Hello triangle
- Shaders
- Textures
- Transformations
- Coordinate systems
- Camera
Part 2. Basic lighting
To use more than 1 light source in a scene, we need to break the illumination type calculations into functions. If we add the calculations of all the lights in one main function, then our code will quickly deteriorate.
The functions in GLSL are the same as the functions in the C language. We have the name of the function, the return type, and also we can declare its prototype from above, and describe it from below. We will create different functions for each type of lighting: a directional light source , a point source and a spotlight .
When using multiple sources of lighting in the scene, the approach is usually this: we have 1 color vector, which represents the output color of the fragment. The result of calculating each light source is added to this vector. That is, we will calculate each color of the fragment, relative to each light source in the scene, and combine it with the output color. The main function itself may look something like this:
void main() { // vec3 output = vec3(0.0); // , output += someFunctionToCalculateDirectionalLight(); // for(int i = 0; i < nr_of_point_lights; i++) output += someFunctionToCalculatePointLight(); // output += someFunctionToCalculateSpotLight(); FragColor = vec4(output, 1.0); } out vec4 FragColor; The final code will differ depending on the implementation, but the main function will remain the same. We define our functions that calculate their color for a given fragment and add it to our result, which we assign to the output color vector. If for example 2 the light sources are close to the fragment, their combination will result in a brighter illuminated fragment than a fragment illuminated by one light source.
Directional light source
We need to write a function in the fragment shader that calculates the result of the directional light on any fragment: the function takes several parameters and returns the calculated color value of the fragment.
The first thing we need is to decide what minimum set of variables we need to calculate the directional light source. We will store the variables in the DirLight structure and declare its object as uniform. You should be familiar with these variables.
previous lesson:
struct DirLight { vec3 direction; vec3 ambient; vec3 diffuse; vec3 specular; }; uniform DirLight dirLight; We can pass our dirLight object to a function with the following prototype:
vec3 CalcDirLight(DirLight light, vec3 normal, vec3 viewDir); Just like in C and C ++, if we want to call a function (in our case, inside the main function), the function must be declared somewhere until the moment we call it. In our case, we will declare a prototype over the main function, and we will describe it somewhere below.You can see that the function requires a DirLight structure and 2 vectors. If you have successfully completed previous lessons, then the code for this function should not cause you questions:
vec3 CalcDirLight(DirLight light, vec3 normal, vec3 viewDir) { vec3 lightDir = normalize(-light.direction); // float diff = max(dot(normal, lightDir), 0.0); // vec3 reflectDir = reflect(-lightDir, normal); float spec = pow(max(dot(viewDir, reflectDir), 0.0), material.shininess); // vec3 ambient = light.ambient * vec3(texture(material.diffuse, TexCoords)); vec3 diffuse = light.diffuse * diff * vec3(texture(material.diffuse, TexCoords)); vec3 specular = light.specular * spec * vec3(texture(material.specular, TexCoords)); return (ambient + diffuse + specular); } Using the example code from the previous lesson and using the vectors that the function takes as arguments, we calculate the result of each component (ambient, diffuse and specular). Then we sum up our components and get the final color of the fragment.
Spotlights
As well as in a directional light source, we also define a function that calculates the color of a fragment from a point light, including fading. As well as in the directional light source, we will declare the structure with the minimum set
variables for point source:
struct PointLight { vec3 position; float constant; float linear; float quadratic; vec3 ambient; vec3 diffuse; vec3 specular; }; #define NR_POINT_LIGHTS 4 uniform PointLight pointLights[NR_POINT_LIGHTS]; As you can see, we used the GLSL preprocessor to declare the number of point sources NR_POINT_LIGHTS equal to 4. We use this constant NR_POINT_LIGHTS to create an array object of the PointLight structure. The arrays in GLSL are the same as the arrays in C and
can be created using two square brackets. Right now we have 4 pointLights [NR_POINT_LIGHTS] PointLigh structures.
We could also create one large structure that would include all the necessary variables for all different types of lighting, and use it for each function, ignoring variables in which we would not need. Although, I personally find the current approach better, because Not all types of lighting will need all variables.Prototype point source function:
vec3 CalcPointLight(PointLight light, vec3 normal, vec3 fragPos, vec3 viewDir); The function takes all the data it needs and returns vec3 with the calculated fragment color. Again, a few copy-paste manipulations from the previous lesson lead to the following result:
vec3 CalcPointLight(PointLight light, vec3 normal, vec3 fragPos, vec3 viewDir) { vec3 lightDir = normalize(light.position - fragPos); // float diff = max(dot(normal, lightDir), 0.0); // vec3 reflectDir = reflect(-lightDir, normal); float spec = pow(max(dot(viewDir, reflectDir), 0.0), material.shininess); // float distance = length(light.position - fragPos); float attenuation = 1.0 / (light.constant + light.linear * distance + light.quadratic * (distance * distance)); // vec3 ambient = light.ambient * vec3(texture(material.diffuse, TexCoords)); vec3 diffuse = light.diffuse * diff * vec3(texture(material.diffuse, TexCoords)); vec3 specular = light.specular * spec * vec3(texture(material.specular, TexCoords)); ambient *= attenuation; diffuse *= attenuation; specular *= attenuation; return (ambient + diffuse + specular); } The main advantage of the function is that we can calculate the resulting color for different point sources, without duplicating the code. In the main function, we simply create a loop in which we iterate over our array of a point source and call the CalcPointLight function for each point.
Putting it all together
Now that we have written our functions for a directional and point source of illumination, we can call them in the main function.
void main() { // vec3 norm = normalize(Normal); vec3 viewDir = normalize(viewPos - FragPos); // 1: vec3 result = CalcDirLight(dirLight, norm, viewDir); // 2: for(int i = 0; i < NR_POINT_LIGHTS; i++) result += CalcPointLight(pointLights[i], norm, FragPos, viewDir); // 3: //result += CalcSpotLight(spotLight, norm, FragPos, viewDir); FragColor = vec4(result, 1.0); } Each type of lighting adds its contribution to the output color vector, until all light sources are processed. The output color vector contains all calculations of the light sources in the scene. If you want, you can also add the spotlight function yourself, based on the code from the previous lesson. We will leave the CalcSpotLight function as an exercise for readers.
Setting uniform values to variables should not be unfamiliar to you, but you might be surprised how we can set uniform variables for an object of a spotlight structure.
Fortunately for us, it's not too difficult. To set the value to a specific uniform object of an array, you only need to refer to this object as to a regular array (through an index).
lightingShader.setFloat("pointLights[0].constant", 1.0f); Here we refer to 1 element of our pointLights array and set the value 1.0f of the variable constant. Unfortunately, this means that we need to set all the variables in the same way, to all the elements of the array, which ultimately results in line 28 of the code. You can try to write a more convenient code for this task.
Do not forget that we also need a position vector for each point source of illumination. We define the array glm :: vec3, which will store these positions:
glm::vec3 pointLightPositions[] = { glm::vec3( 0.7f, 0.2f, 2.0f), glm::vec3( 2.3f, -3.3f, -4.0f), glm::vec3(-4.0f, 2.0f, -12.0f), glm::vec3( 0.0f, 0.0f, -3.0f) }; Further, we will simply index on this array and set the position values for each object of the pointLight array. Also, we need to draw 4 light cubes, instead of 1. A simple way to do this is to transfer different values of the matrix of the model, using our newly created array pointLightPositions.
If you use a flashlight, our scene will look something like this:
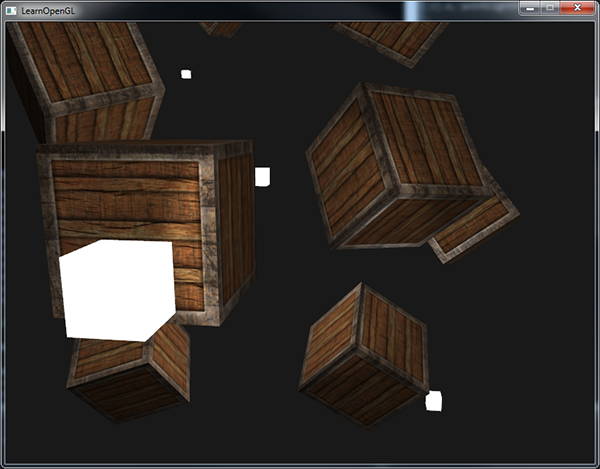
As you can see, this scene includes all our types of lighting: global light (like the sun) somewhere in the sky, there are 4 light boxes scattered all over the stage and a flashlight shining from the observer's camera. Looks pretty neat, isn't it?
You can find the full code here .
The image shows all the types of lighting with the default settings that we used in previous lessons, but if you play with these values, you can get some pretty interesting results. Artists, as a rule, set up these lighting variables in some editor to make sure that the lighting corresponds to the real environment. Using our lighted environment, you can customize different, interesting visual effects by simply setting their art attributes:

We also changed the ClearColor value to better reflect the light. You can see that by simply adjusting some of the lighting parameters you can create a completely different atmosphere.
You should now have a pretty good understanding of the lighting in OpenGL. With this knowledge, you can already create an interesting, visually rich and atmospheric scene. Try playing with different lighting values to create your own atmospheric scene.
Tasks
Recreate different types of atmospheric scenes from the last image, replacing the values of the art light attributes with a link .
→ Original article
Source: https://habr.com/ru/post/338254/
All Articles