3CX technical support responds: how to replace or update the SSL certificate on the server
In this article, we will answer a fairly frequent question from our users: how to replace or renew (renew) an SSL certificate for the NGINX web server used in the 3CX system.
First of all, consider what may require obtaining, replacing or updating a certificate:
In the article we will not consider the situation of replacing the FQDN - it is described earlier here and provides for the reinstallation of 3CX. We will consider the procedure for obtaining a certificate and installing it on an already running server. That is, it is assumed that the FQDN of the server does not change, and all that needs to be done is to renew the certificate.
')
To get a trusted Let's Encrypt certificate in a variety of ways, including automatically . However, we will consider only manual receipt via the https://zerossl.com service. Of course, you can purchase a paid certificate from the selected supplier, but Let's Encrypt certificates are free and are used by many software and hardware manufacturers, including 3CX (they are generated and issued to you automatically with a valid subscription to updates).
Go to https://zerossl.com and go to Online Tools - Zero SSL Certificate Wizard.
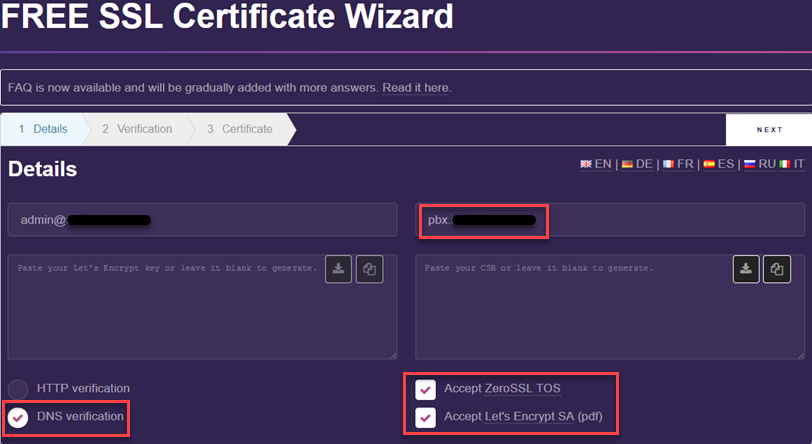
Specify the FQDN of the server for which the certificate will be generated, select DNS verification , accept the terms of service and click Next . Optionally, you can specify your e-mail. A certificate request will be generated. Then click Next again, and the secret key will be generated. Download the CSR and Account Key files (they will be useful in the future).
Next you need to go through DNS verification, i.e. confirm that the selected FQDN of the server belongs to you. To do this, on your DNS server (often this is done at the hosting provider) add the specified TXT record and wait a while before the DNS cache is updated.

Your certificate is ready. Download it and the secret key to the computer and rename them according to this scheme:

Having files of certificates, we will start their installation.
If you are installing a new system, then at the appropriate stage of the Initial Configuration Wizard, simply enter the certificate and key.

If the server is already installed and running, go to it and go to the folder:

Attention: if you see 5 files, then the FQDN and certificate from 3CX are used. In this case, nothing needs to be changed!
Overwrite existing files with your files. After this, restart the NGINX service. On a Windows system, it is called 3CXPhoneSystem Nginx Server.
Now, having come to the 3CX interface, you can see the parameters of the new certificate.

As you can see, the certificate is valid for 3 months. Keep this in mind so as not to forget to extend it in time!
First of all, consider what may require obtaining, replacing or updating a certificate:
- You use your own domain name for 3CX (type pbx.mybusiness.com). 3CX version 15 and higher require the presence of a trusted (signed) SSL certificate.
- You have decided to switch from a FQDN issued by 3CX (of the type mybusiness.3cx.eu) to your own domain name.
- You upgrade your system from previous versions of 3CX and must use a trusted certificate (in 3CX 15 and above, only trusted certificates are allowed).
- You have decided to unsubscribe from 3CX updates (Maintenance). We do not recommend to refuse updates because this can affect the quality of your business (and savings can lead to much greater losses). However, in this case you need to transfer 3CX to your own domain name, since Without a subscription to updates, support for the FQDN and SSL certificate from 3CX is discontinued.
In the article we will not consider the situation of replacing the FQDN - it is described earlier here and provides for the reinstallation of 3CX. We will consider the procedure for obtaining a certificate and installing it on an already running server. That is, it is assumed that the FQDN of the server does not change, and all that needs to be done is to renew the certificate.
')
Getting Let's Encrypt Certificate
To get a trusted Let's Encrypt certificate in a variety of ways, including automatically . However, we will consider only manual receipt via the https://zerossl.com service. Of course, you can purchase a paid certificate from the selected supplier, but Let's Encrypt certificates are free and are used by many software and hardware manufacturers, including 3CX (they are generated and issued to you automatically with a valid subscription to updates).
Go to https://zerossl.com and go to Online Tools - Zero SSL Certificate Wizard.
Specify the FQDN of the server for which the certificate will be generated, select DNS verification , accept the terms of service and click Next . Optionally, you can specify your e-mail. A certificate request will be generated. Then click Next again, and the secret key will be generated. Download the CSR and Account Key files (they will be useful in the future).
Next you need to go through DNS verification, i.e. confirm that the selected FQDN of the server belongs to you. To do this, on your DNS server (often this is done at the hosting provider) add the specified TXT record and wait a while before the DNS cache is updated.
Your certificate is ready. Download it and the secret key to the computer and rename them according to this scheme:
- domain-key.txt> pbx.mybusiness.com-key.pem
- domain-crt.txt> pbx.mybusiness.com-crt.pem, where pbx.mybusiness.com is the FQDN of the 3CX server name specified in the certificate generation wizard.
Having files of certificates, we will start their installation.
Installing the certificate on the 3CX server
If you are installing a new system, then at the appropriate stage of the Initial Configuration Wizard, simply enter the certificate and key.
If the server is already installed and running, go to it and go to the folder:
- Windows: C: \ Program Files \ 3CX Phone System \ Bin \ nginx \ conf \ instance1
Linux: / var / lib / 3cxpbx / Bin / nginx / conf / Instance1
Attention: if you see 5 files, then the FQDN and certificate from 3CX are used. In this case, nothing needs to be changed!
Overwrite existing files with your files. After this, restart the NGINX service. On a Windows system, it is called 3CXPhoneSystem Nginx Server.
Now, having come to the 3CX interface, you can see the parameters of the new certificate.
As you can see, the certificate is valid for 3 months. Keep this in mind so as not to forget to extend it in time!
Source: https://habr.com/ru/post/338160/
All Articles