Development for Sailfish OS: Using Sensors (Part 1)
Hello! This article is a continuation of a series of articles devoted to the development of applications for the Sailfish OS mobile platform. This article will discuss the use of sensor devices running Sailfish OS.
This topic is quite extensive and we got a lot of material, so we decided to divide it into two parts for readability. The second part is available here .
Built-in sensors - this is the filling of the smartphone, which makes it smart. Each smartphone is equipped with any sensors. Moreover, the larger the sensor set of a smartphone, the wider its capabilities. Naturally, smartphones running Sailfish OS are no exception.
For most smartphone users, sensors only add convenience to everyday use, whether it is turning the screen while tilting the device or lowering the brightness while lowering the room illumination. However, the sensors allow you to implement more serious ideas, including the creation of augmented and virtual reality. We will not consider the use of sensors on such scales, of course, but we can give a fairly complete picture of their capabilities.
')
The toolkit for working with sensors on Sailfish OS is presented in the form of the Qt Sensors API, which provides both the native C ++ library and the interface for working directly from QML code.
In order to use QML types from the Qt Sensors API, you need to add a dependency on the qt5-qtdeclarative-import-sensors plugin to the application project under Sailfish OS. This is done by adding the name of the plug-in to the Requires section of the project's YAML file:
After plugging in, you need to import the QtSensors module version 5 and higher into the QML code. At the time of writing, the most current version available on Sailfish OS is version 5.2. It will be used in the examples:
If you plan to use the Sensors API directly in C ++ code, then you do not need to add dependency on the plugin. Instead, you will need to specify the layout in the .pro file of the project using the QtSensors library. This is done by adding a line to it:
After that, all API classes will be available for inclusion in the project, and it will be possible to import or the entire library at once:
Or only the necessary classes, for example, an accelerometer:
The set of available sensors primarily depends on the filling of the device. For example, the INOI R7 smartphone has sensors for orientation, lighting, rotation, tilt, proximity, magnetic field strength, and an accelerometer.
For Sailfish OS, working with sensors helps build the Qt Sensors API. The set of sensors covered by this API is much broader than what is covered in this article.
Each sensor is represented in Qt Sensors by two interfaces: the C ++ class and the QML type wrapping the corresponding C ++ class. Both interfaces provide full access to the sensor functions, so which one will be used depends only on the desires and capabilities of the developer.
First you should get a list of all sensors available on the device. For this there is an element SensorGlobal and its three methods:
sensorTypes returns a list of all sensor types present on the device, while sensorsForType returns the registered identifiers for the specified sensor type. defaultSensorForType , as the name implies, returns the identifier of the standard sensor for the specified type, that is, the one that will be used by the QML component, unless you explicitly specify the identifier.
Analogs of the methods described above are also present in C ++. They are the static functions of the QSensors class:
Their purpose is fully consistent with the purpose of QML-methods with the appropriate names.
Create a small application that displays a list of all the sensors of the device:
On the Jolla C, the QmlSensors.sensorTypes () method returns the following list of sensors:
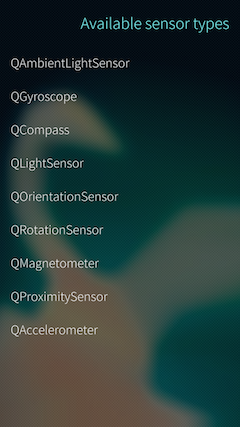
This means that the following set of sensors is available on the device: a light sensor, a proximity sensor, a tilt angle sensor, and an accelerometer.
All classes that work with sensors are inherited from one common parent class Sensor . This class is an abstract sensor, the properties and methods of which are applicable to all of its child classes:
Since Sensor is only an abstract type, it cannot be declared directly. Instead, components inherited from it must be created that correspond to a specific type of sensor.
An object of type SensorReading contained in the reading property deserves special attention, because it serves as the base type for all components that read values from sensors. The value of the reading property changes in accordance with the update frequency specified in the dataRates property, but only during those moments while the sensor is in active state. If the sensor is not active, the reading contains the last measurements received, and on devices without the support of the corresponding sensor - null .
By itself, SensorReading has only the timestamp property, which contains the time of the last receipt of information from the sensor, but its subclasses implement properties that directly provide values from device sensors. SensorReading , as well as its successors, cannot be declared directly. The only way to obtain them is to access the reading property of the object that represents the corresponding sensor.
Sailfish OS sensors can be started using the example of working with probably the most common sensor - an accelerometer. The accelerometer, sometimes called the G-sensor, is found in almost all modern models of mobile devices. A typical application for an accelerometer is to register the change in acceleration when the position of the smartphone changes, which is used to change the orientation of the image on the screen of the smartphone.
So, to get measurements from the accelerometer, the first thing to do is to declare on the desired page and put the Accelerometer component into the active state, the hallmark of which from Sensor is the presence in the type property of the value QAccelerometer .
Everything, the component is created and already makes reading of indications from the device accelerometer. But now how can a developer get these same measurements? Here we need to recall the reading property mentioned above. This time it contains the AcrelerometerReading QML type - the successor to SensorReading , which, among other things, has acquired new properties: x , y and z . They contain the linear acceleration of the device along the X, Y and Z axes, respectively. Since we did not change the value of the axesOrientationMode , the position of the axes will remain standard, namely the one shown in the image below.
We associate the acceleration values along the X and Y axes with the horizontal and vertical position of the image on the screen. To do this, apply a transformation to the image that horizontally shifts it to the acceleration value along the X axis and vertically to the acceleration value along the Y axis. We also add a restriction on the permissible image position so that it does not go beyond the screen.
As a result, the FRUCT logo will move around the screen when the smartphone is tilted:

Another feature of the Accelerometer component that distinguishes it from the Sensor is the presence of the accelerationMode property, which controls how the acceleration sensor calculates its values. In total there are three modes of calculation of acceleration:
It is worth noting that not all devices and sensors support the ability to change the mode of calculation. For devices that do not have this capability, the combined mode will be applied, and changing the value of the accelerationMode property will have no effect on the measurement.
The proximity sensor reacts to objects in close proximity without physical contact with them. For example, the proximity sensor installed on a mobile phone allows you to turn off the touch screen sensor when the phone approaches the user's ear during a call or to put the device into sleep mode when you move it into your pocket. From this it follows that the main task of the sensor is to block the screen of the device, thereby preventing the user from accidentally pressing a button or performing an unplanned action. Typically, such a sensor is located on the front of the device on top. Svid he looks a bit like a hole under the front camera.
The proximity sensor in QML is represented by the ProximitySensor component. There is not much to write about it, because its only difference from the parent component is the presence of the near property of the corresponding ProximityReading QML type. This property is true if any object is located close enough to the sensor.
Having determined the required component, you can add a signal handler to change the value of the near property, and in it you can perform the required actions. For example, when an object approaches a sensor, it is possible to minimize applications or do something really useful - this already depends on the developer’s imagination:
The light sensor is one of the oldest sensors in the world of mobile devices. His task is to measure the level of illumination of the situation in which the smartphone is used. These measurements are used by the smartphone software to adjust the screen brightness: in low light, the brightness decreases, thereby reducing the user's eye load and keeping the battery charge, and on a clear day, it turns out to the maximum so that the text on the screen can be at least somehow to distinguish.
QML-type LightSensor provides an API to get the level of illumination in lux, which can be used to adjust the parameters of the application, including the screen brightness. And although Sailfish OS already has built-in software to automatically adjust the screen backlight level, this does not prevent developers from adjusting it to their applications.
The component for obtaining sensor readings can also be obtained from the reading property. This time it contains a LightReading object, which has the illuminance property — it contains the luminance values. Using the light sensor in conjunction with the nemo-qml-plugin-systemsettings plugin, you can achieve an automatically controlled brightness level that is appropriate for your application. Simply link the LightSensor readings to the brightness property of the DisplaySettings component, set limits on the values taken, and the brightness level will adapt to your desired limits. Also, you should first set the autoBrightnessEnabled property to false to disable the automatic adjustment of the brightness level by the operating system.
In addition, LightSensor provides information about the angle of view of the sensor. You can get it by accessing the fieldOfView property. This functionality is available though not on all devices, and if the fieldOfView contains 0, then, alas, the sensor used does not support this function.
Sailfish OS also has another component for measuring the level of illumination - AmbientLightSensor . Its functionality is almost completely similar to the previous sensor, but instead of the luminance value in lux, it returns the previously designated constants from the following list:
Thus, this component is advisable to use when the exact values of the level of illumination are redundant, and the approximate will be enough. For example, you can create a reader that goes into the “night” mode in low light.
First, as usual, the component of the sensor is determined:
Creates a background and text with the original color settings:
Well, at the end is set a set of states and transitions that will be applied to objects on the screen. The condition for the change of states is just the low value of the light sensor:
In low light, the screen on the left will smoothly switch to the “night” version on the right:
This article is only the first part, in the second part we continue to consider the main sensors available on the Sailfish OS operating system.
Technical issues can also be discussed on the Sailfish OS Russian-speaking community channel in a Telegram or VKontakte group .
Posted by: Maxim Kosterin
This topic is quite extensive and we got a lot of material, so we decided to divide it into two parts for readability. The second part is available here .
Foreword
Built-in sensors - this is the filling of the smartphone, which makes it smart. Each smartphone is equipped with any sensors. Moreover, the larger the sensor set of a smartphone, the wider its capabilities. Naturally, smartphones running Sailfish OS are no exception.
For most smartphone users, sensors only add convenience to everyday use, whether it is turning the screen while tilting the device or lowering the brightness while lowering the room illumination. However, the sensors allow you to implement more serious ideas, including the creation of augmented and virtual reality. We will not consider the use of sensors on such scales, of course, but we can give a fairly complete picture of their capabilities.
')
Qt Sensors API Review
The toolkit for working with sensors on Sailfish OS is presented in the form of the Qt Sensors API, which provides both the native C ++ library and the interface for working directly from QML code.
In order to use QML types from the Qt Sensors API, you need to add a dependency on the qt5-qtdeclarative-import-sensors plugin to the application project under Sailfish OS. This is done by adding the name of the plug-in to the Requires section of the project's YAML file:
... # Runtime dependencies which are not automatically detected Requires: - sailfishsilica-qt5 >= 0.10.9 - qt5-qtdeclarative-import-sensors ... After plugging in, you need to import the QtSensors module version 5 and higher into the QML code. At the time of writing, the most current version available on Sailfish OS is version 5.2. It will be used in the examples:
import QtSensors 5.2 If you plan to use the Sensors API directly in C ++ code, then you do not need to add dependency on the plugin. Instead, you will need to specify the layout in the .pro file of the project using the QtSensors library. This is done by adding a line to it:
QT += sensors After that, all API classes will be available for inclusion in the project, and it will be possible to import or the entire library at once:
#include <QtSensors> Or only the necessary classes, for example, an accelerometer:
#include <QtSensors/QAccelerometer> The set of available sensors primarily depends on the filling of the device. For example, the INOI R7 smartphone has sensors for orientation, lighting, rotation, tilt, proximity, magnetic field strength, and an accelerometer.
For Sailfish OS, working with sensors helps build the Qt Sensors API. The set of sensors covered by this API is much broader than what is covered in this article.
Each sensor is represented in Qt Sensors by two interfaces: the C ++ class and the QML type wrapping the corresponding C ++ class. Both interfaces provide full access to the sensor functions, so which one will be used depends only on the desires and capabilities of the developer.
First you should get a list of all sensors available on the device. For this there is an element SensorGlobal and its three methods:
- string defaultSensorForType (type) ;
- list <string> sensorTypes () ;
- list <string> sensorsForType (type) .
sensorTypes returns a list of all sensor types present on the device, while sensorsForType returns the registered identifiers for the specified sensor type. defaultSensorForType , as the name implies, returns the identifier of the standard sensor for the specified type, that is, the one that will be used by the QML component, unless you explicitly specify the identifier.
Analogs of the methods described above are also present in C ++. They are the static functions of the QSensors class:
- static QByteArray defaultSensorForType (const QByteArray & type) ;
- static QList <QByteArray> sensorTypes () ;
- static QList <QByteArray> sensorsForType (const QByteArray & type) .
Their purpose is fully consistent with the purpose of QML-methods with the appropriate names.
Create a small application that displays a list of all the sensors of the device:
Page { SilicaListView { header: PageHeader { title: "Available sensor types" } anchors.fill: parent delegate: ListItem { Label { text: modelData anchors.verticalCenter: parent.verticalCenter x: Theme.horizontalPageMargin } } // model: QmlSensors.sensorTypes() } } On the Jolla C, the QmlSensors.sensorTypes () method returns the following list of sensors:
This means that the following set of sensors is available on the device: a light sensor, a proximity sensor, a tilt angle sensor, and an accelerometer.
All classes that work with sensors are inherited from one common parent class Sensor . This class is an abstract sensor, the properties and methods of which are applicable to all of its child classes:
- active - a property that determines the activity of the sensor at the moment. Assigning true to it is similar to calling the start () method — it starts reading values from the sensor, if possible. Assigning false, on the contrary, stops reading.
- alwaysOn is a property that determines the sensor activity when the screen is off.
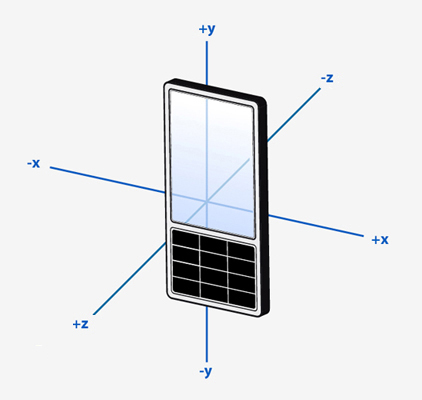
- axesOrientationMode - determines how the position of the device affects the axis of measurement values. By default, the axes are arranged as shown in the image:
Three modes are available:- FixedOrientation - the axes always maintain their position relative to the device. This value is standard and will be used if the device does not support changing the orientation mode of the axes.
- AutomaticOrientation - axes retain their position in space, changing position relative to the device. In other words, the position of the device does not affect the values of the sensors.
- UserOrientation - the position of the axes is set by the user.
- busy is a property containing the busy state of the sensor. If he is busy with another process, then it is impossible to use it.
- dataRate - contains the frequency of data exchange with the sensor, expressed in the number of operations per second.
- error - the code of the last error that occurred. The property value is set automatically when an error occurs and cannot be changed manually.
- reading is a property containing SensorReading is a component that reads values from sensors. It is with its use that information is obtained from the sensors. The value of this property is updated in accordance with the set exchange frequency; it cannot be recorded manually.
- type - string name of the sensor. Set at the time the object is defined, cannot be changed.
- description - contains a string describing the sensor. As type , it is set at the moment of definition of object, cannot be changed.
- start () - starts reading values from the sensor, equivalent to assigning the true value to the active property.
- stop () - stops reading values from the sensor, equivalent to assigning the false value to the active property.
Since Sensor is only an abstract type, it cannot be declared directly. Instead, components inherited from it must be created that correspond to a specific type of sensor.
An object of type SensorReading contained in the reading property deserves special attention, because it serves as the base type for all components that read values from sensors. The value of the reading property changes in accordance with the update frequency specified in the dataRates property, but only during those moments while the sensor is in active state. If the sensor is not active, the reading contains the last measurements received, and on devices without the support of the corresponding sensor - null .
By itself, SensorReading has only the timestamp property, which contains the time of the last receipt of information from the sensor, but its subclasses implement properties that directly provide values from device sensors. SensorReading , as well as its successors, cannot be declared directly. The only way to obtain them is to access the reading property of the object that represents the corresponding sensor.
Accelerometer
Sailfish OS sensors can be started using the example of working with probably the most common sensor - an accelerometer. The accelerometer, sometimes called the G-sensor, is found in almost all modern models of mobile devices. A typical application for an accelerometer is to register the change in acceleration when the position of the smartphone changes, which is used to change the orientation of the image on the screen of the smartphone.
So, to get measurements from the accelerometer, the first thing to do is to declare on the desired page and put the Accelerometer component into the active state, the hallmark of which from Sensor is the presence in the type property of the value QAccelerometer .
Accelerometer { id: accelerometer active: true } Everything, the component is created and already makes reading of indications from the device accelerometer. But now how can a developer get these same measurements? Here we need to recall the reading property mentioned above. This time it contains the AcrelerometerReading QML type - the successor to SensorReading , which, among other things, has acquired new properties: x , y and z . They contain the linear acceleration of the device along the X, Y and Z axes, respectively. Since we did not change the value of the axesOrientationMode , the position of the axes will remain standard, namely the one shown in the image below.
We associate the acceleration values along the X and Y axes with the horizontal and vertical position of the image on the screen. To do this, apply a transformation to the image that horizontally shifts it to the acceleration value along the X axis and vertically to the acceleration value along the Y axis. We also add a restriction on the permissible image position so that it does not go beyond the screen.
Image { id: fruct source: "http://social.fruct.org/content/img/fruct.png" transform: Translate { property double horizontalPosition: x - accelerometer.reading.x property double verticalPosititon: y + accelerometer.reading.y x: if (horizontalPosition < 0) { 0 } else if (horizontalPosition > page.width - fruct.width) { page.width - fruct.width } else { horizontalPosition } y: if (verticalPosititon < 0) { 0 } else if (verticalPosititon > page.height - fruct.height) { page.height - fruct.height } else { verticalPosititon } } } As a result, the FRUCT logo will move around the screen when the smartphone is tilted:
Another feature of the Accelerometer component that distinguishes it from the Sensor is the presence of the accelerationMode property, which controls how the acceleration sensor calculates its values. In total there are three modes of calculation of acceleration:
- Accelerometer.Combined - together taken into account the values of acceleration caused by both gravity and the movement of the device by the user.
- Accelerometer.Gravity - only the acceleration value caused by gravity is taken into account. The movement of the device by the user does not affect the values returned by the sensor, however, the angle of inclination of the device is taken into account.
- Acceleration.User - only the acceleration caused by the movement of the device by the user is taken into account, the acceleration values caused by gravity are not taken into account. In this mode, when the device is stationary, the sensor value will be close to 0.
It is worth noting that not all devices and sensors support the ability to change the mode of calculation. For devices that do not have this capability, the combined mode will be applied, and changing the value of the accelerationMode property will have no effect on the measurement.
Proximity sensor
The proximity sensor reacts to objects in close proximity without physical contact with them. For example, the proximity sensor installed on a mobile phone allows you to turn off the touch screen sensor when the phone approaches the user's ear during a call or to put the device into sleep mode when you move it into your pocket. From this it follows that the main task of the sensor is to block the screen of the device, thereby preventing the user from accidentally pressing a button or performing an unplanned action. Typically, such a sensor is located on the front of the device on top. Svid he looks a bit like a hole under the front camera.
The proximity sensor in QML is represented by the ProximitySensor component. There is not much to write about it, because its only difference from the parent component is the presence of the near property of the corresponding ProximityReading QML type. This property is true if any object is located close enough to the sensor.
Having determined the required component, you can add a signal handler to change the value of the near property, and in it you can perform the required actions. For example, when an object approaches a sensor, it is possible to minimize applications or do something really useful - this already depends on the developer’s imagination:
ProximitySensor { id: proximitySensor active: true } Connections { target: proximitySensor.reading onNearChanged: proximitySensor.reading.near ? appWindow.deactivate() : appWindow.activate() } Light sensor
The light sensor is one of the oldest sensors in the world of mobile devices. His task is to measure the level of illumination of the situation in which the smartphone is used. These measurements are used by the smartphone software to adjust the screen brightness: in low light, the brightness decreases, thereby reducing the user's eye load and keeping the battery charge, and on a clear day, it turns out to the maximum so that the text on the screen can be at least somehow to distinguish.
QML-type LightSensor provides an API to get the level of illumination in lux, which can be used to adjust the parameters of the application, including the screen brightness. And although Sailfish OS already has built-in software to automatically adjust the screen backlight level, this does not prevent developers from adjusting it to their applications.
The component for obtaining sensor readings can also be obtained from the reading property. This time it contains a LightReading object, which has the illuminance property — it contains the luminance values. Using the light sensor in conjunction with the nemo-qml-plugin-systemsettings plugin, you can achieve an automatically controlled brightness level that is appropriate for your application. Simply link the LightSensor readings to the brightness property of the DisplaySettings component, set limits on the values taken, and the brightness level will adapt to your desired limits. Also, you should first set the autoBrightnessEnabled property to false to disable the automatic adjustment of the brightness level by the operating system.
import org.nemomobile.systemsettings 1.0 Page { LightSensor { id: lightSensor active: true } DisplaySettings { id: display autoBrightnessEnabled: false brightness: if (lightSensor.reading.illuminance < 50 ) { 50 } else if (lightSensor.reading.illuminance > 100) { 100 } else { lightSensor.reading.illuminance } } } In addition, LightSensor provides information about the angle of view of the sensor. You can get it by accessing the fieldOfView property. This functionality is available though not on all devices, and if the fieldOfView contains 0, then, alas, the sensor used does not support this function.
Sailfish OS also has another component for measuring the level of illumination - AmbientLightSensor . Its functionality is almost completely similar to the previous sensor, but instead of the luminance value in lux, it returns the previously designated constants from the following list:
- AmbientLightReading.Undefined - the light level cannot be recognized,
- AmbientLightReading.Dark - dark,
- AmbientLightReading.Twilight - moderately dark
- AmbientLightReading.Light - in a lit room,
- AmbientLightReading.Bright - in the shade on a clear day,
- AmbientLightReading.Sunny - under direct sunlight.
Thus, this component is advisable to use when the exact values of the level of illumination are redundant, and the approximate will be enough. For example, you can create a reader that goes into the “night” mode in low light.
First, as usual, the component of the sensor is determined:
AmbientLightSensor { id: ambientLightSensor active: true } Creates a background and text with the original color settings:
Rectangle { id: background anchors.fill: parent color: "white" Label { id: text text: " , " anchors { fill: parent leftMargin: Theme.horizontalPageMargin rightMargin: Theme.horizontalPageMargin } wrapMode: Text.WordWrap color: "black" } } Well, at the end is set a set of states and transitions that will be applied to objects on the screen. The condition for the change of states is just the low value of the light sensor:
states: State { name: "dark" PropertyChanges { target: text color: "white" } PropertyChanges { target: background color: "black" } when: ambientLightSensor.reading.lightLevel === AmbientLightReading.Dark } transitions: Transition { to: "dark" reversible: true ColorAnimation { duration: 200 } } In low light, the screen on the left will smoothly switch to the “night” version on the right:
 |  |
Conclusion
This article is only the first part, in the second part we continue to consider the main sensors available on the Sailfish OS operating system.
Technical issues can also be discussed on the Sailfish OS Russian-speaking community channel in a Telegram or VKontakte group .
Posted by: Maxim Kosterin
Source: https://habr.com/ru/post/338044/
All Articles