Implementing OpenId Connect in ASP.NET Core using IdentityServer4 and oidc-client
Recently, I needed to figure out how authentication is done on OpenId Connect on an ASP.NET Core. I started with examples, it quickly became clear that reading the specification could not be avoided, then I had to move on to reading source codes and articles of developers. As a result, there was a desire to gather in one place everything that is needed in order to understand how to make a working implementation of OpenId Connect Implicit Flow on an ASP.NET Core platform, while understanding what you are doing.
The article is about the specifics of implementation, therefore I recommend to reproduce the decision on the code proposed in the article, otherwise it will be difficult to grasp the context. Most of the relevant comments in the comments and in the text of the article contain links to sources. Some terms have no generally accepted translations into Russian, I left them in English.
A bit about OpenId Connect
If you understand OpenId Connect, you can start reading from the next section.
OpenId Connect (not to be confused with OpenId) is an authentication protocol built on the basis of the OAuth2.0 authorization protocol. The point is that the OAuth2 task involves only user authorization, not authentication. OpenID Connect also sets a standard way to get and present user profiles as a set of values called claims. OpenId Connect describes a UserInfo endpoint that returns this information. It also allows client applications to receive user information in the form of signed JSON Web Token ( JWT ), which allows you to send fewer requests to the server.
It makes sense to begin acquaintance with the protocol from the official site , then it is useful to read the sites of commercial cloud authentication solutions providers like Connect2id , Auth0 and Stormpath . I do not quote a description of all the necessary terms, firstly, it would be a wall of text, and secondly, everything you need is on these links.
If you are not familiar with Identity Server, I recommend starting with reading its excellent documentation , as well as excellent examples like this .
What we want to get in the end
We implement OpenId Connect Implicit Flow, which is recommended for JavaScript applications, in the browser, including for the SPA. In the process, we will go a little deeper than is usually done in walkthroughs; we will discuss different meaningful settings. Then we will look at how our implementation works from the point of view of the OpenId Connect protocol, and also learn how implementation is related to the protocol.
Instruments
- On the server side, we use IdentityServer4
- On the client side, we will use the oidc-client library
The main authors of both libraries are Brock Allen and Dominic Brier .
Interaction scenarios
We will have 3 projects:
- IdentityServer is our OpenId Connect authentication server.
- Api is our test web service.
- Client is our JavaScript client application, based on JavaScriptClient code.
The interaction scenario is as follows: the Client client application is authorized using the IdentityServer authentication server and gets access_token (JWT), which it then uses as a Bearer token to call the web service on the Api server.
The OpenId Connect standard describes various options for authenticating. These options in the standard language are called Flow.
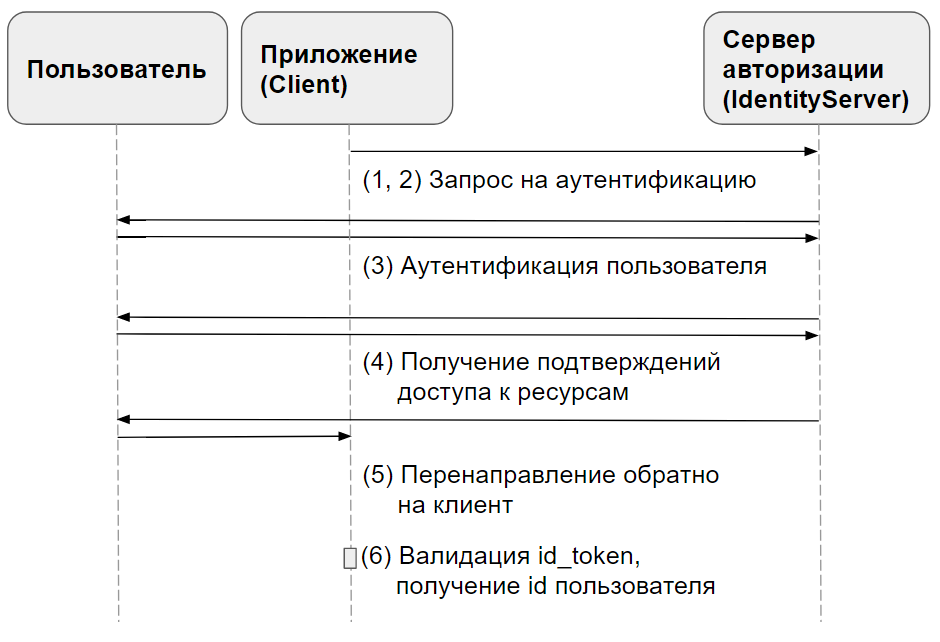
Implicit Flow, which we are considering in this article, includes such steps :
- The client prepares an authentication request containing the desired request parameters.
- The client sends an authentication request to the authorization server .
- The authorization server authenticates the end user .
- The authorization server receives confirmation from the end user .
- The authorization server sends the end user back to the client with id_token and, if required, access_token.
- The client validates the id_token and gets the end-user Subject Identifier .
Implementation
In order to save a lot on writing pages related to login and logout, we will use the official Quickstart code .
I recommend dotnet run Api and IdentityServer during this exercise through the dotnet run - IdentityServer writes a lot of useful diagnostic information in the course of its work, this information will be immediately visible in the console.
For simplicity, it is assumed that all projects are running on the same computer on which the user's browser is running.
Let's get down to implementation. For definiteness, we will assume that you are using Visual Studio 2017 (15.3). You can see the complete solution code here.
Create an empty solution OpenIdConnectSample .
Most of the code is based on examples from the IdentityServer documentation, but the code in this article is supplemented by what, in my opinion, is missing in the official documentation, and annotated.
I recommend to get acquainted with all the official examples, we’ll take a deeper look at Implicit Flow.
1. IdentityServer
Create a solution with an empty project, choose ASP.NET Core 1.1 as the platform.
Install these NuGet packages
Install-Package Microsoft.AspNetCore.Mvc -Version 1.1.3 Install-Package Microsoft.AspNetCore.StaticFiles -Version 1.1.2 Install-Package IdentityServer4 -Version 1.5.2 Package versions are significant here, because Install-Package installs the latest versions by default. Although the authors have already made an IdentityServer port on Asp.NET Core 2.0 in the dev branch, at the time of this writing, they have not yet ported the Quickstart UI. The differences in the code of our example for .NET Core 1.1 and 2.0 are small.
Change the Main Program.cs method to look like this.
public static void Main(string[] args) { Console.Title = "IdentityServer"; // https://docs.microsoft.com/en-us/aspnet/core/fundamentals/servers/kestrel?tabs=aspnetcore2x var host = new WebHostBuilder() .UseKestrel() // , Kestrel .UseUrls("http://localhost:5000") // UI - .UseContentRoot(Directory.GetCurrentDirectory()) .UseIISIntegration() .UseStartup<Startup>() .Build(); host.Run(); } Then in Startup.cs
- Add namespaces
using System.Security.Claims; using IdentityServer4; using IdentityServer4.Configuration; using IdentityServer4.Models; using IdentityServer4.Test; - Add a few helper methods that contain the IdentityServer settings, note the comments. These methods will be further called in
ConfigureServices. I recommend reading the text of the methods before adding them to the project - on the one hand, this will allow you to immediately have a complete picture of what is happening, on the other hand there is not much there.
Information Settings for Client Applications
public static IEnumerable<IdentityResource> GetIdentityResources() { // , scopes IdentityServer return new List<IdentityResource> { // "sub" claim new IdentityResources.OpenId(), // claims profile scope // http://openid.net/specs/openid-connect-core-1_0.html#ScopeClaims new IdentityResources.Profile(), }; } These settings add support for claim sub , which is the minimum requirement for our OpenId Connect token to meet, as well as the claim scope profile including the OpenId Connect profile fields like name, gender, date of birth, and the like.
These are similar to the previous settings, but the information is intended for the API.
public static IEnumerable<ApiResource> GetApiResources() { // claims scopes access_token return new List<ApiResource> { // scope "api1" IdentityServer new ApiResource("api1", "API 1", // claims scope api1 new[] {"name", "role" }) }; } The client applications themselves, you need to let the server know about them.
public static IEnumerable<Client> GetClients() { return new List<Client> { new Client { // , client_id ClientId = "js", ClientName = "JavaScript Client", AllowedGrantTypes = GrantTypes.Implicit, AllowAccessTokensViaBrowser = true, // , // false UserInfo endpoint AlwaysIncludeUserClaimsInIdToken = true, // // User Agent, RedirectUris = { // "http://localhost:5003/callback.html", // access_token iframe "http://localhost:5003/callback-silent.html" }, PostLogoutRedirectUris = { "http://localhost:5003/index.html" }, // , CORS- AllowedCorsOrigins = { "http://localhost:5003" }, // scopes, AllowedScopes = { IdentityServerConstants.StandardScopes.OpenId, IdentityServerConstants.StandardScopes.Profile, "api1" }, AccessTokenLifetime = 300, // , IdentityTokenLifetime = 3600, // , // refresh- scope offline_access AllowOfflineAccess = false, } }; } Test users, note that bob is our admin
public static List<TestUser> GetUsers() { return new List<TestUser> { new TestUser { SubjectId = "1", Username = "alice", Password = "password", Claims = new List<Claim> { new Claim("name", "Alice"), new Claim("website", "https://alice.com"), new Claim("role", "user"), } }, new TestUser { SubjectId = "2", Username = "bob", Password = "password", Claims = new List<Claim> { new Claim("name", "Bob"), new Claim("website", "https://bob.com"), new Claim("role", "admin"), } } }; } - Modify the
ConfigureServicesmethod so
public void ConfigureServices(IServiceCollection services) { services.AddMvc(); services.AddIdentityServer(options => { // http://docs.identityserver.io/en/release/reference/options.html#refoptions options.Endpoints = new EndpointsOptions { // Implicit Flow EnableAuthorizeEndpoint = true, // EnableCheckSessionEndpoint = true, // EnableEndSessionEndpoint = true, // claims // http://openid.net/specs/openid-connect-core-1_0.html#UserInfo EnableUserInfoEndpoint = true, // OpenId Connect EnableDiscoveryEndpoint = true, // , EnableIntrospectionEndpoint = false, // .. Implicit Flow access_token authorization_endpoint EnableTokenEndpoint = false, // refresh reference tokens // http://docs.identityserver.io/en/release/topics/reference_tokens.html EnableTokenRevocationEndpoint = false }; // IdentitySever cookie options.Authentication = new IdentityServer4.Configuration.AuthenticationOptions { CookieLifetime = TimeSpan.FromDays(1) }; }) // x509-, IdentityServer RS256 JWT .AddDeveloperSigningCredential() // id_token .AddInMemoryIdentityResources(GetIdentityResources()) // access_token .AddInMemoryApiResources(GetApiResources()) // .AddInMemoryClients(GetClients()) // .AddTestUsers(GetUsers()); } In this method, we specify the IdentityServer settings, in particular, the certificates used to sign tokens, the scope settings in the sense of OpenId Connect and OAuth2.0, the settings of the client applications, and the user settings.
Now a little more. AddIdentityServer registers the IdentityServer service in the ASP.NET Core dependency resolution mechanism, this needs to be done in order to be able to add it as middleware in Configure .
- IdentityServer signs tokens using RSA SHA 256, so a private-public key pair is required.
AddDeveloperSigningCredentialadds test keys for signing JWT tokens, namely id_token , access_token in our case. In production, you need to replace these keys, you can do this, for example, by generating a self-signed certificate . AddInMemoryIdentityResources. You can read about what is meant by resources here , and why they are needed - here .
The Configure method should look like this.
public void Configure(IApplicationBuilder app, IHostingEnvironment env, ILoggerFactory loggerFactory) { loggerFactory.AddConsole(LogLevel.Debug); app.UseDeveloperExceptionPage(); // middleware IdentityServer app.UseIdentityServer(); // 2 , app.UseStaticFiles(); app.UseMvcWithDefaultRoute(); } Download Starter UI for IdentityServer from the official repository , then copy the files into the project folder so that the folders match the structure, for example wwwroot with wwwroot.
Check that the project is compiled.
2. Api
This project is a toy API server with limited access.
Add another empty Api project to the solution, choose ASP.NET Core 1.1 as the platform. Since we are not going to create a full-fledged web application in this project, but only a lightweight web service that provides JSON, we confine ourselves to the MvcCore middleware instead of the full Mvc.
Add the packages you need by running these commands in the Package Manager Console
Install-Package Microsoft.AspNetCore.Mvc.Core -Version 1.1.3 Install-Package Microsoft.AspNetCore.Mvc.Formatters.Json -Version 1.1.3 Install-Package Microsoft.AspNetCore.Cors -Version 1.1.2 Install-Package IdentityServer4.AccessTokenValidation -Version 1.2.1 Let's start by adding the necessary Kestrel settings to Program.cs
public static void Main(string[] args) { Console.Title = "API"; var host = new WebHostBuilder() .UseKestrel() .UseUrls("http://localhost:5001") .UseContentRoot(Directory.GetCurrentDirectory()) .UseIISIntegration() .UseStartup<Startup>() .Build(); host.Run(); } Startup.cs will require a few less changes.
For ConfigureServices
public void ConfigureServices(IServiceCollection services) { services.AddCors(options=> { // CORS, API options.AddPolicy("default", policy => { policy.WithOrigins("http://localhost:5003") .AllowAnyHeader() .AllowAnyMethod(); }); }); // MVC Core Razor, DataAnnotations , Asp.NET 4.5 WebApi services.AddMvcCore() // , Authorize .AddAuthorization(options => // Roles magic strings, options.AddPolicy("AdminsOnly", policyUser => { policyUser.RequireClaim("role", "admin"); }) ) // AddMVC, AddMvcCore, JSON .AddJsonFormatters(); } This is what Configure should look like.
public void Configure(IApplicationBuilder app, IHostingEnvironment env, ILoggerFactory loggerFactory) { loggerFactory.AddConsole(LogLevel.Debug); // middleware CORS app.UseCors("default"); // middleware OpenId Connect JWT- app.UseIdentityServerAuthentication(new IdentityServerAuthenticationOptions { // IdentityServer Authority = "http://localhost:5000", // , HTTPS IdentityServer, true // https://docs.microsoft.com/en-us/aspnet/core/api/microsoft.aspnetcore.builder.openidconnectoptions RequireHttpsMetadata = false, // aud access_token JWT ApiName = "api1", // , api scopes scope // AllowedScopes = { "api1.read", "api1.write" } // JWT- claims HttpContext.User Authorize , AutomaticAuthenticate = true, // middleware authentication challenge AutomaticChallenge = true, // [Authorize], IdentityServerAuthenticationOptions - RoleClaimType = "role", }); app.UseMvc(); } It remains to add our controller, it returns the current Claims user, which is convenient in order to understand how the IdentityServer middleware authentication decrypted access_token .
Add a single IdentityController controller to the project.
The content of the file should be like this.
using System.Linq; using Microsoft.AspNetCore.Mvc; using Microsoft.AspNetCore.Authorization; namespace Api.Controllers { [Authorize] public class IdentityController : ControllerBase { [HttpGet] [Route("identity")] public IActionResult Get() { return new JsonResult(from c in User.Claims select new { c.Type, c.Value }); } [HttpGet] [Route("superpowers")] [Authorize(Policy = "AdminsOnly")] public IActionResult Superpowers() { return new JsonResult("Superpowers!"); } } } Make sure the project is compiled.
3. Client
This project actually does not contain significant server part. All server code is simply Kestrel's web server settings, so that it gives out static client files.
Just like the last 2 times, add an empty project to the solution, name it Client .
Install the package to work with static files.
Install-Package Microsoft.AspNetCore.StaticFiles -Version 1.1.2 Modify the Program.cs file
public static void Main(string[] args) { var host = new WebHostBuilder() .UseKestrel() .UseUrls("http://localhost:5003") .UseContentRoot(Directory.GetCurrentDirectory()) .UseIISIntegration() .UseStartup<Startup>() .Build(); host.Run(); } The Startup class must contain this code.
public void ConfigureServices(IServiceCollection services) { } public void Configure(IApplicationBuilder app) { app.UseDefaultFiles(); app.UseStaticFiles(); } The client code in JavaScript, on the other hand, contains all the logic of the authentication and Api calls.
We will add the following files to the wwwroot folder of the project one by one.
index.htmlis a simple HTML file with buttons for various actions and a link to the JavaScript application fileapp.jsandoidc-client.js.oidc-client.js- client library that implements OpenId Connectapp.js- oidc-client settings and button event handlerscallback.html- the page to which the authentication server redirects the client application, passing the parameters necessary to complete the login procedure.callback-silent.htmlis a page similar tocallback.html, however, it is for the case when there is a "background" repeated login through the iframe. This is necessary to extend user access to resources without usingrefresh_token.
index.html
Add a new HTML file with this name to the wwwroot folder of the project.
<!DOCTYPE html> <html> <head> <meta charset="utf-8" /> <title></title> </head> <body> <button id="login">Login</button> <button id="getUser">Get User</button> <button id="getSuperpowers">Get Superpowers!</button> <button id="api">Call API</button> <button id="logout">Logout</button> <pre id="results"></pre> <script src="oidc-client.js"></script> <script src="app.js"></script> </body> </html> oidc-client.js
Download this file from here (1.3.0) and add to the project.
app.js
Add a new javascript file with this name to the project's wwwroot folder.
Add a
/// <reference path="oidc-client.js" /> at the beginning of the file to support IntelliSense.
Paste this code to the top of app.js
Oidc.Log.logger = console; Oidc.Log.level = 4; In the first line, using the compatibility of the called methods, we set the standard browser console as the standard logger for oidc-client . The second line, please display all messages. This will allow us to see more details when we move on to the second part of the article, and we will look at how our implementation works.
Now let's in parts add the rest of the code to this file.
This part of the code is the longest, and perhaps the most interesting. It contains the library settings for the main UserManager object of the oidc-client library and its creation. I recommend to get acquainted with the settings themselves and comments to them.
var config = { authority: "http://localhost:5000", // IdentityServer client_id: "js", // IdentityServer // , // - OpenId Connect redirect_uri: "http://localhost:5003/callback.html", // Response Type , Authorization Endpoint // , Implicit Flow // http://openid.net/specs/openid-connect-core-1_0.html#Authentication response_type: "id_token token", // subject id , id_token, access_token api1 (. c IdentityServer) scope: "openid profile api1", // , post_logout_redirect_uri: "http://localhost:5003/index.html", // IdentityServer, true monitorSession: true, // , , 2000 checkSessionInterval: 30000, // access_token https://tools.ietf.org/html/rfc7009 revokeAccessTokenOnSignout: true, // , , 300 // https://github.com/IdentityModel/oidc-client-js/blob/1.3.0/src/JoseUtil.js#L95 clockSkew: 300, // UserInfo endpoint , loadUserInfo: true, }; var mgr = new Oidc.UserManager(config); Let's now add handlers for the buttons and subscribe to them.
function login() { // mgr.signinRedirect(); } function displayUser() { mgr.getUser().then(function (user) { if (user) { log("User logged in", user.profile); } else { log("User not logged in"); } }); } function api() { // claims requestUrl(mgr, "http://localhost:5001/identity"); } function getSuperpowers() { // endpoint requestUrl(mgr, "http://localhost:5001/superpowers"); } function logout() { // mgr.signoutRedirect(); } document.getElementById("login").addEventListener("click", login, false); document.getElementById("api").addEventListener("click", api, false); document.getElementById("getSuperpowers").addEventListener("click", getSuperpowers, false); document.getElementById("logout").addEventListener("click", logout, false); document.getElementById("getUser").addEventListener("click", displayUser, false); // displayUser(); It remains to add a couple of utilities
function requestUrl(mgr, url) { mgr.getUser().then(function (user) { var xhr = new XMLHttpRequest(); xhr.open("GET", url); xhr.onload = function () { log(xhr.status, 200 == xhr.status ? JSON.parse(xhr.responseText) : "An error has occured."); } // Authorization access_token Bearer - . xhr.setRequestHeader("Authorization", "Bearer " + user.access_token); xhr.send(); }); } function log() { document.getElementById('results').innerText = ''; Array.prototype.forEach.call(arguments, function (msg) { if (msg instanceof Error) { msg = "Error: " + msg.message; } else if (typeof msg !== 'string') { msg = JSON.stringify(msg, null, 2); } document.getElementById('results').innerHTML += msg + '\r\n'; }); } In principle, this could be the end, but you need to add two more pages that are needed to complete the login procedure. Add pages with this code in wwwroot .
callback.html
<!DOCTYPE html> <html> <head> <meta charset="utf-8" /> <title></title> </head> <body> <script src="oidc-client.js"></script> <script> new Oidc.UserManager().signinRedirectCallback().then(function () { window.location = "index.html"; }).catch(function (e) { console.error(e); }); </script> </body> </html> callback-silent.html
<!DOCTYPE html> <html> <head> <meta charset="utf-8" /> <title></title> </head> <body> <script src='oidc-client.js'></script> <script> new Oidc.UserManager().signinSilentCallback(); </script> </body> </html> Done!
How it works
I recommend running projects like this: start the console, go to the project folder, execute the dotnet run command. This will allow you to see that IdentityServer and other applications are logging into the console.
First start IdentityServer and Api , and then Client .
Open the http://localhost:5003/index.html Client page.
At this point, you may want to clear the console with clear() .
Now let's configure the console to actually see all the interesting information.
For example, for Chrome 60, the console settings should look like this.

In the Network tab of the developer tools you may want to tick the Preserve log box so that redirects do not interfere with further checking the values of various parameters.
Refresh your page with CTRL + F5 .
Happy path
Let's see which actions correspond to the first two steps of the specification.
1. The client prepares an authentication request containing the necessary request parameters.
2. The client sends an authentication request to the authorization server .
Click the Login button.
Interaction with the authorization server begins with a GET request to the addresshttp://localhost:5000/.well-known/openid-configuration
With this request, oidc-client receives the metadata of our provider OpenId Connect (I recommend opening this address in another tab), including authorization_endpointhttp://localhost:5000/connect/authorize
Please note that WebStorage is used to store user data. oidc-client allows you to specify which object will be used, the default is sessionStorage .
At this point, an authentication request will be sent to authorization_endpoint with such query string parameters
| Name | Value |
|---|---|
| client_id | js |
| redirect_uri | http: // localhost: 5003 / callback.html |
| response_type | id_token token |
| scope | openid profile api1 |
| state | some hard-to-predict value |
| nonce | some hard-to-predict value |
Please note that redirect_uri corresponds to the address that we specified for our client with client_id js in the IdentityServer settings.
Since the user is not authenticated yet , IdentityServer will send a redirect to the login form as an answer.
Then the browser is redirected to http://localhost:5000/account/login .
3. The authorization server authenticates the end user .
4. The authorization server receives confirmation from the end user .
5. The authorization server sends the end user back to the client with an id token and, if required, an access token.
Enter bob as a login and password as a password, send the form.
We are first redirected again to authorization_endpoint , and from there to the confirmation page in accordance with OpenId Connect permission to get the relying party (in this case, our js-client) access to various scopes.
We agree with everything, we send the form. Similar to the authentication form, in response to the form submission, we are redirected to authorization_endpoint , the data to authorization_endpoint transmitted using a cookie.
From there, the browser is redirected to the address that was specified as redirect_uri in the original authentication request.
When using Implicit Flow, # . This is necessary to ensure that these values are available to our application in JavaScript, but are not sent to the web server.
| Name | Value |
|---|---|
| id_token | Client User Token |
| access_token | Token with the necessary data to access the API |
| token_type | Type access_token , in our case Bearer |
| expires_in | access_token |
| scope | scopes |
6. id token Subject Identifier .
oidc-client state, nonce id_token . , (, sub claim id_token ). id_token oidc-client .
id_token ( Network ), , payload -
{ "nbf": 1505143180, "exp": 1505146780, "iss": "http://localhost:5000", "aud": "js", "nonce": "2bd3ed0b260e407e8edd0d03a32f150c", "iat": 1505143180, "at_hash": "UAeZEg7xr23ToH2R2aUGOA", "sid": "053b5d83fd8d3ce3b13d3b175d5317f2", "sub": "2", "auth_time": 1505143180, "idp": "local", "name": "Bob", "website": "https://bob.com", "amr": [ "pwd" ] } access_token payload , , .
{ "nbf": 1505143180, "exp": 1505143480, "iss": "http://localhost:5000", "aud": [ "http://localhost:5000/resources", "api1" ], "client_id": "js", "sub": "2", "auth_time": 1505143180, "idp": "local", "name": "Bob", "role": "admin", "scope": [ "openid", "profile", "api1" ], "amr": [ "pwd" ] } , loadUserInfo , UserInfo Endpoint . UserInfo Endpoint claims Authorization Bearer - access_token , claims JavaScript- .
loadUserInfo access_token , HTTP-, .
API
"Call API".
ajax- http://localhost:5001/identity .
, OPTIONS- CORS .. , "" ( Authorization , ).
, , GET -. , Authorization Bearer < access_token> .
IdentityServer middleware . IdentityServer middleware Asp.Net Core JwtBearerMiddleware .
, 200.
Logout
GET- end_session_endpoint
| Name | Value |
|---|---|
| id_token_hint | id_token |
| post_logout_redirect_uri | URI, , |
, .
, . , - , - .
alice Get Superpowers! , bob .
do not allow
Logout ,
Username: alice
Password: password
http://localhost:5000/consent No, Do Not Allow .
http://localhost:5003/callback.html .
, URL #error=access_denied , signinRedirectCallback , rejected .
callback.html catch-, .
id_token URL , claims, scope profile.
API .
api1
claim api1
"scope": [ "openid", "profile" ], Api 401 (Unathorized).
access_token
access_token , Call API .
API ! , IdentityServer middleware Asp.Net Core, ClockSkew. , , , , . ClockSkew 5 .
5 , API 401 (Unathorized).
401, access_token .
access_token
app.js config ,
var config = { // ... // true, access_token , false automaticSilentRenew: true, // "" iframe silent_redirect_uri: 'http://localhost:5003/callback-silent.html', // oidc-client access_token accessTokenExpiringNotificationTime: 60, // ... } access_token . Call API , .
id_token
access_token API , , , id_token . js-. .
Conclusion
, :
- OpenId Connect Implicit Flow IdentityServer oidc-client ASP.NET Core 1.1.
- , .
- , , , , , .
useful links
- .
- IdentityServer4
- oidc-client .
- ASP.NET Core. .
- Authorize IdentityServer.
- OpenId Connect 2 —
id_tokenaccess_token. - OpenId Connect ASP.NET Core.
')
Source: https://habr.com/ru/post/337784/
All Articles